Repair of the wheel hub of a URAL motorcycle
How I disassembled and reassembled the hubs. Attention!
Below is described what I did, consistent with what I had read earlier and what I had learned in the process. I don’t know how correct it really is. A little bit about the prerequisites. When driving, regardless of speed, the front suspension began to shake randomly (as if the wheel was oval). Even if you stood up and pumped the shock absorbers while simultaneously changing the speed mode, the vibrations were eliminated only when the speed was significantly reduced. EMNIP, at speeds above 80 km/h there was never any shaking. Well, accordingly, suspicion of a malfunction fell on the entire front part. I’ll start with Tutov from the bottom - from the wheel hub.
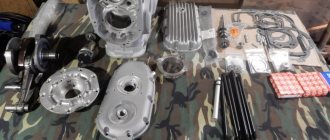
I did not take measurements on a hanging fork. I removed both wheels at once (I’m just going through everything at the same time). The left spacers of both wheels showed good play. The right front hub bearing also showed slight play when rocking with fingers. The wheel, put on an axle secured accordingly, did not cause any major complaints, but did not show any “iron” fastening either. Nearby there were two manuals (both made in the hub plan), a CV joint bank, 4 7204 bearings (KRAFT, I don’t remember about the letter A in the index), and two sets of bushings with “nut assemblies”.
The hub consists of (from left to right as the motorcycle moves): a special nut (a big fool with 4 eyes for a radius wrench) a nut assembly (also a fool, with 4 holes at the end of the wrench, with a gasket and a washer cored at the back. The left spacer is included in the package ) bearing intermediate sleeve with washer (in the middle of the sleeve there is a square plate with corners rounded to fit the radius of the hub. Moves freely) bearing right spacer sleeve thrust washer garage space.
Please note that the bearings are located with their wide parts inward . In other words, the bearing housings are located outside.
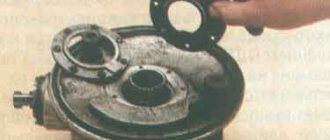
What to do, how to take it apart. Remove both nuts (which are healthy fools). Next, if you only need to change the lubricant, then knock out the filling on the right bushing (the right bearing housing remains in place). The bearing will not be damaged, because its inner wall rests against the intermediate sleeve, and the right bearing doesn’t give a fuck, because... he has no choice. If you need to replace everything, then use a 30mm head to knock out everything else (I knocked everything out at once) through a thrust washer (the washer has a convexity in the middle, which can be damaged by a smaller diameter of the head (punch).
How to assemble it. I lubricated everything with CV joints without skimping. After cleaning and lubricating the walls. First comes the thrust washer with its bulge forward (that is, to the right). Then comes the right bearing housing (which side, see above). I worked through head 32, but it didn’t quite reach the end (it hit the inner wall of the case), but experimenting with a vice, a sledgehammer and the old case gave the go-ahead. But it’s better to find something a little wider in diameter, because... due to the “floating” contact between the head 32 and the body, the impact load was “curved” and distortions occurred. The idea of putting an old thrust washer under the head came to my mind already on the way home. Attention! The housings of both bearings settle easily, but when misaligned they stand up tightly. It is useless to hit the “under-planted” part; you have to knock it out and start again. The hub walls between the bearing seats have a slightly larger diameter. If the body doesn't work, you need to knock it out and start again. According to observations, if the body is 3/4 in the seat, it will no longer warp. I controlled the degree of shrinkage of the right bearing housing with my finger - the gap between the thrust washer and the bearing housing. It shouldn't exist. Next, I lubricated the bushing, inserted it, then lubricated the bearing, inserted it, then lubricated the intermediate bushing along the entire volume between it and the hub body, and inserted it. Then I installed the left bearing and pressed the housing. The shrinkage of the left housing was controlled by the radial movement of the left bearing. Tighten the nuts as written below. Then I coated the right outer part between the hub body and the spacer sleeve with lubricant, stuck on a protective cap and placed it against the wall. That's where I'm done for now. The question remains: did I go too far with the lubricant?
The theoretical part, which I will practice later. The manual instructs to tighten the nut assembly (with the spacer sleeve) until it stops by hand, then unscrew it 1/5-1/6 turn and lock it with a special nut. Then drive 6 km without stopping or braking, touch the hub body. If it is hot, then loosen the nut a little more. Check. If everything is in order, then further monitoring and adjustment of the gap should be carried out 500, 1000 and 2500 km after working with the hub.
Source
Rear axle of a Ural motorcycle. We change the main pair.
Riding with an 8-wheel drive in the rear axle of a motorcycle did not bring satisfaction, especially since the rear wheel had a 16” rim. The engine roars at maximum speed, and the speed barely reaches 90 km/h. It was decided to change the main pair in the rear axle of my Dnepr motorcycle.
I had a stroller pair (8/37 with a ratio of 4.63), and at the market I bought an accelerated pair (10/35 with a ratio of 3.5). I expected the speed increase to be about 32%.
I started by draining the oil from the bridge by unscrewing the bottom plug. I took off the rear wheel, disconnected the brake rod, unscrewed the four nuts securing the bridge to the pendulum, pulled it slightly towards myself, and now I have the bridge in my hands. The brake pads were removed and put aside.
I unscrewed the protective cover (cap) of the hinge; note that it has a left-hand thread. Next, I unscrewed the nut and carefully, so as not to spoil the thread, knocked out the wedge bolt securing the hinge. Lightly tapping the body of the hinge mechanism with a hammer, he removed it from the drive gear shaft.
Unscrewed the six nuts securing the crankcase cover. Some nuts came off along with the studs. By quietly tapping the crankcase cover with a hammer, he disconnected the cover and the crankcase. When I pulled out the cover, needles from the needle bearing fell into the crankcase. I carefully counted them all (45 pieces) and collected them in one place.
To remove the large gear from the crankcase cover, I had to screw in two long bolts in place of the studs securing the crankcase to the pendulum and slowly use them to squeeze out the hub with the driven gear.
I immediately cleaned the threads in the crankcase cover with a sword. Removed the thrust bushing from the driven gear hub.
Next, I unscrewed the aluminum shank nut. It also turned out to have a left-hand thread.
Pulling the shaft, shaking it a little from side to side, he pulled it out of the crankcase. The needle bearing remains in the housing. I removed all the needles from the bearing cage, there were 28 of them.
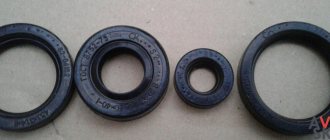
Removed the collar seal from the crankcase cover.
I knocked out the support bearing (207) through the holes in the hub and loosened the 8 bolts securing the driven gear to the hub. The bolts were loosened and unscrewed almost by hand. Removed the driven gear.
I washed the crankcase body and cover in gasoline.
I started installing the new driven gear on the hub. It turned out that the old mounting bolts did not fit on the new gear. Different thread pitch. I had to look for eight suitable bolts.
How to change bearings on a Ural motorcycle
A Ural motorcycle has been in the garage since 1998. The motorcycle is separate, the engine is separate, the gearbox is in a completely different corner. I spent my entire childhood on this motorcycle, after buying a car, they forgot about it. And so I decided to restore it...
First, it was decided to deal with the engine, since, according to the owner, the crankshaft was knocking. Therefore, we immediately began disassembling the engine.
Removing the cylinders
I removed the heads, checked the piston clearances in the cylinders, everything was fine, only the right cylinder had a rusty emulsion - apparently moisture had gotten in. But fortunately the cylinder mirror was not damaged.
I checked the gaps on the fingers - everything is within normal limits. I pressed out the fingers, marked where the right and left parts of the cylinders were and put them aside.
Removing the clutch
Then I started disassembling the clutch to remove the flywheel. A simple screwdriver and hammer blows were not enough to unscrew the screws the first time. There is no point in buying an impact screwdriver just for one use. I turned on my ingenuity. And so he pressed the engine from the frontal side into the opening of the garage door, and pressed the screwdriver to the bolt with the help of a block and a jack, and with a gas wrench tore off the metal beads. And then everything opened without problems. I removed the clutch and started disassembling the frontal part, since I didn’t have a 36mm socket wrench on hand to unscrew the flywheel.
Removing the timing belt
In the frontal part, everything is disassembled simply, the cover is unscrewed, the ignition is removed, the ignition coil is removed, then the windshield is unscrewed. I unscrewed the two bolts that hold the camshaft and placed two mounting brackets under the camshaft gear using rags. And he pulled out the camshaft and gear. Upon inspection, no wear was found in the timing gears. The bearing is also in excellent condition. I secured the pushers with electrical tape to prevent them from falling into the crankcase and getting tangled.
Motorcycle Ural. #8. Replacing the main bearings and installing the crankshaft into the crankcase.
Published May 24, 2018
Gradual assembly of the engine began. The crankshaft is in its place and will now rotate on new Japanese Koyo bearings. I hope they don’t fail, but just in case I won’t throw away the old bearings. All critical fasteners are mounted on a removable threaded fastener. One that will not allow the screws to unscrew on their own, but if necessary, it is still possible to tighten them.
Before installing the crankshaft, the front bearing should have been heated and covered with a stamped cap - this would have simplified the installation. A very important thing was missed: if the rear cover does not have tension in the crankcase, then it is not recommended to install it. Because there won't be enough oil pressure to the rear support. The flywheel should have been ground to the crankshaft cone with valve lapping paste - this gives an almost 100% guarantee that it will not fall off. Before installing the rear crankshaft support housing, it was necessary to heat the crankcase and the inner bearing race in that place. And on such crankshafts you should never knock on the axle in the axial direction to seat another axle into the bearing - you must pull from the arc side. To do this, you could take a plate 4-6 mm thick, make 3 holes, the outer 2 of which are threaded. Take 2 small plates to support the bolts of the outer holes on them (so as not to damage the crankcase) and insert the crankshaft gear fastening bolt into the central hole and tighten it. Look like that's it. Good luck in the future!
High-quality Korean wheel bearings for Ural Dnepr. Replacement and adjustment of wheel bearings.
High-quality spare parts for Soviet boxer cars are a real headache for every owner in modern realities. My solution is to use suitable parts from modern cars as much as possible. They are often cheaper than their motorcycle counterparts due to mass production and are of better quality if you choose the right manufacturer. Everything is on video, and if anyone forgot how to assemble and adjust the wheels, I also filmed that. Regarding the manufacturer - I used Parts-mall PSC-009 bearings and as the owner of a Korean car, I assure you that these are excellent analogues, which are the supplier of the Daewoo-GM conveyor. The same cannot be said about “Korean-type” AMD bearings, which they can offer you as an analogue. they are two or three times cheaper when purchased, and this is weak Chinese, be careful!
Attached videos:
Other entries in this logbook
How to install an oil pressure indicator on a Dnepr motorcycle.
A detailed description of such a simple but very important modification to my Dnepr motorcycle, installation of a mechanical pressure gauge. Usually everything is on the Internet. Read more
About the directory
Anyone who wants to purchase a bearing of one size or another, number or type, for auto-moto and special vehicles can use this site, which provides all the detailed information. Searching for a bearing largely depends on the extent to which the bearing search catalog has certain data. It is extremely important that the description contains information about the size, shape, type of bearing and other parameters. Also to yours and “general information about bearings”. A bearing is a device that is used as a part that provides the necessary sliding, rolling or friction. Undoubtedly, the role of bearings in modern industry is undeniable, so there are currently no analogues to this unique invention. One can talk for a long time about the need and purpose of a bearing in various fields of application, but one thing remains indisputable: the bearing must be reliable, durable, and wear-resistant. These characteristics can only be adequately achieved by a bearing made of high-quality steel and various types of alloys.
Bearings are conventionally designated using markings and symbols in accordance with GOST. In addition, the manufacturer must be indicated on the bearing. The standard bearing designation includes seven numbers and an additional designation, which is placed to the left and right of the main one. An additional designation is highlighted with a dash (—) or begins with a particular letter. The symbols are read from right to left. All bearing sizes are strictly regulated in accordance with standards, both Russian and European. It is extremely important to know the bearing number before purchasing it, as similar-looking bearings may differ when interacting with structures. It is worth noting that bearings play an important role and the main focus should be on safety, as an unsuitable bearing can have serious consequences.
Bearings play a big role that is not taken into account. For example, trains moving along railway tracks are subject to friction every day, but if they were not equipped with durable bearings, the consequences could be much more serious. Unfortunately, nothing lasts forever and bearings are also prone to wear, it’s only a matter of time. That is why it is important that the bearings produce their power without any problems, and only then promptly replace them at the end of their life. Bearings must be properly maintained at all times, using only quality, proven products. Both thousands of tons of cargo and people’s lives depend on bearings, because they ensure the operation of a variety of parts of trains. Regardless of the type of bearing, its functions are always defined, so when purchasing, you need to know exactly which bearing you need and for what purpose. For example, rolling bearings are used not only for the railway industries, but also in various types of industries. They largely replace plain bearings.
Messages [13]
1↑ Topic from Dimka-Oppositchik 02/23/2012 14:21:34
- Dimka-Oppositchik
- Assistant
- Inactive
- Registered: 14-01-2012
- Messages: 155
- Reputation: 1
Topic: Wheel hub disassembly
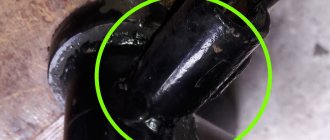
In short, hello everyone) the problem is current! in the middle it became very heavy, but I tightened the wheel more, it seems like the steering wasn’t so bad! AND NOW I HAVE REMOVED THE REAR WHEEL, I LOOK AND THERE THE BUSHING IS BROKEN, where the bushing on which the wheel is centered is inserted))) so it was broken, namely the bearing (I want to remove it, but I only removed one nut from the outside, and then you need a special puller! How to remove it without puller? And is it possible to buy these bearings in a regular store?
2↑ Reply from mexanik62 02/23/2012 19:19:19
- mexanik62
- Mechanic from the 30s.
- Inactive
- Name: Uncle Vitya
- From: Evpatoria
- Registered: 03-08-2011
- Messages: 10 831
- Reputation: 1 138
- Motorcycle: 12-volt K-750, ZAZ Sens Hatchback
Re: Wheel hub disassembly
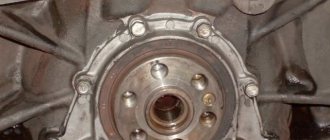
Bearing 7204 In addition to our wheels, the outer bearing of the front wheel is used. Zaparya I don’t quite understand, but you need to unscrew the adjusting nut so that the first bearing is visible, then put the hub on a wooden support and use a pipe of size 1" to knock out the bearings from the side of the ring gear
Added: 02/23/2012 17:13:26
Added: 02/23/2012 17:19:19
Here is a drawing Explain from the drawing what is hurting you 1 left spacer sleeve (short) 2 Lock nut 3 adjusting nut 4 oil seal 5 7 bearing 7204 or 6-7204 6 middle spacer sleeve 8 boot washer 9 right spacer sleeve (long) Here is one of options for knocking out bearings
Edited by mexanik62 (11-04-2019 08:00:28)
3↑ Reply from Dimka-Oppositchik 02/24/2012 12:28:24
- Dimka-Oppositchik
- Assistant
- Inactive
- Registered: 14-01-2012
- Messages: 155
- Reputation: 1
Re: Wheel hub disassembly
I have a broken bearing and I want to replace it, describe the process to me, I unscrewed one nut that was not large, but I can’t do the other! tell me what and how!
4↑ Reply from mexanik62 02/24/2012 19:18:17
- mexanik62
- Mechanic from the 30s.
- Inactive
- Name: Uncle Vitya
- From: Evpatoria
- Registered: 03-08-2011
- Messages: 10 831
- Reputation: 1 138
- Motorcycle: 12-volt K-750, ZAZ Sens Hatchback
Re: Wheel hub disassembly
As I understand it, you unscrewed nut 2 (see picture) Now you need to unscrew nut 3. It requires a “native” key, like for an angle grinder, but first pick out the dirt from the holes for the key. Well, of course, you can use a punch in this hole and a hammer, but it is not advisable Right-hand thread i.e. unscrew counterclockwise Then knock out the bearings with a pipe as shown in the figure. Be careful not to damage the threads! Assemble in the order shown in the picture. Lubricate the bearings thickly.
5↑ Reply from Dimka-Oppositchik 02/25/2012 06:27:48
- Dimka-Oppositchik
- Assistant
- Inactive
- Registered: 14-01-2012
- Messages: 155
- Reputation: 1
Assembly. The first day.
Greetings to all readers of my bortovik and, of course, just random passers-by...
Today I want to share my experience of assembling a Ural , because as I wrote earlier, the parts are painted, dried overnight and in the morning I go to the garage. I immediately took tapered bearings bought on Aliexpress, installed them on the lower crossmember of the front fork, filled them with grease, tightened them with a nut and put on the fork guards as they are installed before installing the crowbars. I also installed the rear swingarm and center stand.
Then the assembly went as if in a dream - before I had time to come to my senses, a fork, a rear fender, a steering wheel, a wiring braid appeared... and when I remembered that I needed to take a photo for MOTO2 , I decided to just put on the tank and seat for verification so that it already looked like something.
Then there was a hitch. All my wheels (and there are about 20 of them) are now in a state of either restoration or new (which are still a pity and will be installed in the process of completion), but the truth was one wheel assembled with a “daisy” hub , which for some reason I don’t like much, and therefore I had to go home for the second and third, because... At home there is a pair of so-called restoration wheels that I purchased from a friend in Irbit when I was passing through there. I didn’t prepare the wheels in advance because... I assembled the motorcycle for one time (just go and register it with the traffic police ) and was sure that a friend would give me a spare wheel from his motorcycle to travel 30 km. But imagine my surprise when he refused me... I honestly didn’t even think about it. It will be a lesson to me. I took two rims from home, put tires on them (it’s good that I have a large selection of them) and put the motorcycle on MY wheels.
Now that the spendthrift has received all the support points, you can roll it out onto the street and continue to work without being constrained in space. Installed the engine. I also have several of them, probably 6 of them, but I have not yet had time to completely disassemble this particular motorcycle for complete repairs and modifications, but only took off the heads, generator and ignition to see at least the approximate condition, because. Let me remind you that the motorcycle was dead and had not started for several years. I didn’t take the gearbox from this motorcycle, but from another one previously purchased for free with only 4400 km .
I installed a rear axle with a cardan, also from a donor, with a mileage of 4400 km , and began to do what I love - wiring
Wiring is a complex, but interesting business. I immediately installed a charging regulator relay from the car, since on standard relays either the generators burn or the batteries boil... I temporarily left the charging control light unused, I’ll fix it later, but on this relay there is no reason to worry and, in extreme cases, there are two on the relay itself control lamps (one shows that the voltage is suitable and the second that there is a charge). Then I started working on turn signals. For right turns you need to throw an additional wire, so I left this work for the next day, and today we connect the left ones, tidy, brake light and headlight. While I was working on the turn signals and tidying up, it was getting dark outside—it was autumn, the days were short (although the weather didn’t tell us that it was the end of October).
After dark it became inconvenient to work on the street and we again moved to the garage where we continued to work on electrical work. I connected the neutral control lamp and connected the headlight.
The last one for today is a brake light with side lights.
October 29, 2019 turned out to be such a productive day . Literally in one day the motorcycle turned from a bunch of parts into one whole, of course there is still a lot of work ahead, but that’s for another post!! All the best!! And finally the result of today...
If anyone needs more information about the relay, for example, or about the wiring, then you can write in the comments what is interesting, I will make a separate post with a more detailed explanation...