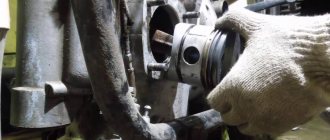
Problems with a scooter most often occur during operation, and one of the breakdowns may be a worn oil seal. Let's look at the process of replacing the oil seal on a scooter and the purpose of the oil seals.
Oil seals on a scooter play a very important role, because they prevent oil or gasoline from leaking into unnecessary places. In the design of any scooter there are many oil seals of different sizes, but they all perform one role - to maintain the tightness of the connections. Also, in addition to the fact that the seals do not allow scooter fluids to pass through, it is impossible for dust and dirt to pass through them, so you should always have the seals in excellent condition. But sometimes the seals can fail, that is, wear out. Replacing seals on a scooter is a fairly simple process; you just need to notice the leak and determine the location of the seal.
Photo report: Replacing scooter front fork bearings
Repairing the front fork of a scooter or motorcycle
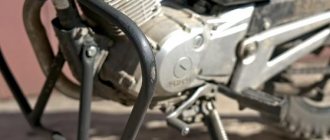
The front fork of both a motorcycle and a scooter consists of literally the same parts, they just differ from each other in size, and, in some cases, in design and principle of operation. If a front fork breakdown occurs, you must not let the situation get worse and fix it as soon as possible.
In order to carry out any work with it, it is necessary to naturally remove and disassemble it.
So, disassembly and assembly are carried out in a certain order in the following way:
- First, remove the wheel and front fender from the motorcycle, then unscrew the nut securing the stay and remove the spring. During this, if the need or any inconvenience arises, the steering wheel can also be removed. Next, you need to unscrew the coupling bolts of the lower bridge and grasp the sliding pipe with your hands, and only then remove the feather with the bridge. If you are unable to remove the feather, then you can wrap the feather bunny back a little and hit it several times with a wooden hammer or a block, then the process will go faster.
- If it is convenient for you, you can remove the headlight along with the cap and the gasket with the cover. If something prevents the cover from being removed, then you can loosen the locknut and coupling bolt, the so-called upper bridge.
- Then you need to unscrew the oil seal housing with a spanner wrench and remove it, unscrew the oil seal housing nut so that it becomes possible to remove the boot and oil seal. After this, you will be able to unscrew the rod axis and drain the oil. And then you need to remove the sliding and supporting pipes.
- Next, you should remove the upper bushing with the sealing ring and, turning the supporting pipe over, remove the piston with the rod and spring. By the way, it is worth remembering that in order to remove the lower piston or lower bushing you need to remove the corresponding retaining rings.
- Well, that's all, the disassembly of the front fork is completed, now you can start servicing or repairing it. After work, it is reassembled in the reverse order, paying attention to the wear of the rubber O-rings. Even with minor damage, they should not be installed on the fork, because they are the ones that hold the oil inside and do not allow it to leak out. And after you have assembled everything, you need to slightly loosen the coupling bolts of the lower bridge and lightly tap it with a hammer, and only then tighten the bolts. In this way, you can avoid distortions that could appear during assembly.
- If you want to simply disconnect the front fork from the frame assembly, then you also need to follow a certain procedure. First, unscrew the fork leg nuts and remove them. Afterwards, you need to unscrew the coupling bolt of the upper bridge together with the steering wheel, and only then unscrew the steering column rod nut. Next, you need to remove the protective cap and the upper cone so that you can carefully remove the balls of the upper bearing. Well, in the end, you need to carefully disconnect your fork from the motorcycle frame, just be careful not to lose the balls of the lower bearing. Naturally, assembly is done in reverse order.
And what is worth paying attention to is the abundant lubrication of the running tracks of the cones with lithol, on which the balls are actually placed, twenty pieces per bearing.
- If you have problems adjusting the column bearings, then there is a certain procedure for this case. It is necessary to unscrew the coupling bolts of the lower and upper bridge and loosen the locknut of the column rod.
- In this case, the rod nut is tightened so that the front fork can rotate quite freely relative to the motorcycle frame, but also so that there is no large play. Only then can the coupling bolts and locknut be tightened.
- If you just want to pour oil into the hydraulic shock absorber, then to do this you just need to unscrew the nut securing the stay, but, on the contrary, to drain it, unscrew the fixing axis of the rod and begin to slowly rock the fork.
- Malfunctions can also include knocking, rough operation and small oil leaks. In general, all faults must be eliminated in a timely manner.
- The repair itself comes in two types: planned and restorative. The first involves replacing oil seals, anthers and the so-called glass. Sometimes it may be necessary to change the oil. During the restoration of a motorcycle or scooter fork, as a rule, straightening or even replacement of the non-moving pipe of the fork itself is required.
- The fork is straightened if there are small bends in the feathers, and if such bends are too large, then you will have to change it completely. Traverses can also be repaired only when using special equipment. If you have difficulty turning the steering column, then most likely the cause will be worn bearings.
- Dismantling the front fork stays, for example, a scooter, is carried out with the front part facing removed. And for the convenience of this dismantling, it is recommended to remove the plug completely.
So, let's take a closer look at dismantling the feathers. First, you should remove the upper boot of the pen by prying it off with a regular screwdriver. Then remove the retaining ring using pliers and a screwdriver. Afterwards, you can loosen the bolt that secures the fork in the yoke, and only then remove the feather from the yoke.
Afterwards, you need to loosen the bolt that secures the shock absorber rod at the bottom of the feather and remove the feather boot along with the retaining ring of the feather plug, which is located under the boot.
Before draining the oil from the fork, you need to press the rod inward and remove the top plug from it, after which you can remove the spring. And by unscrewing the shock absorber rod fixing bolt, you can separate the guide and the lower parts of the scooter fork leg. All that remains is to remove the shock absorber rod and oil seal, which is pryed off with a regular slotted screwdriver.
After the above sequence of actions, you should wash all parts in gasoline or kerosene and inspect them thoroughly. If wear or damage is noticeable anywhere, it has been done and should be repaired or replaced.
Now, after correcting the problem, you can put the plug back together. Such actions are performed in the following sequence. Press in the fork seal using mandrels or a socket of suitable diameter. The remaining steps are performed in the reverse order of those described above, adding the oil recommended by the manufacturer.
By the way, as a tip, an alternative to the recommended oil for fork shock absorbers could be power steering fluid or automatic transmission fluid (ATF).
The video story will tell you how to repair an oil telescopic fork
Replacing crankshaft oil seals on a Honda Dio 27 scooter
Watch the video How to change the oil seal on a Yamaha/Stels 50 scooter on Vmir for free
The new oil seal should ideally match the dimensions of the old one, but in principle, a different size is unlikely to fit.
Answers to the most popular questions about the repair and maintenance of scooters and mopeds, more consultations from professionals. Why do two-stroke bikes even have such rack rings that are narrowed to the piston?
This happens when the socket head falls into the working hole of the oil seal and further deforms the metal frame of the product. If your scooter or moped has crankshaft oil seals leaking, if the carburetor has stopped responding to adjustments. But in order to install a new oil seal, you must first remove the old one, and since it is always tightly secured, removing it can be problematic.
After removing the old oil seal, the seat must be cleaned. Hello everyone, Michael is here from Kyiv, and in this video I will be repairing a scooter for the first time. Honda Tact Changing the bearing On some models, the oil seal is covered with an additional metal cover, which is secured with three bolts.
Another way would be to remove the oil seal using a hook-shaped wire. Link to help page: Personal page on VK: This is why cylinder wear measurements are taken so as not to do a bad job.
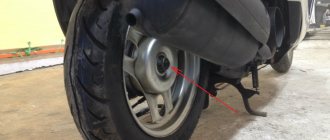
Therefore, as soon as you notice that gasoline is leaking through this hole, even in a small amount, urgently replace the scooter oil seal.
Disassembling the Honda Dio AF fork shock absorber
Understanding is not difficult. First, the fork shock absorbers need to be removed; to do this, you need to unscrew 2 bolts from the yoke, on each stay, and pull the shock absorber out of the yoke.
The shock absorber is made up of a glass (10), two bushings: the top (through (5)) and the bottom (blind (8)) made of fluoroplastic (coprolon), a rubber bumper (9), a retaining ring (4), anther (3) , a plug (1), 2 springs (6), a spring stopper welded onto the feather (7) and the feather itself (2). To disassemble the removed shock absorber, you need to pull out the boot and retaining ring, and if there are no problems with the first, then you may need to rummage around with the other. There are 2 lugs at the ends of the locking ring; you need to insert two awls into them, squeeze and then remove the ring.
After this, the feather should quietly crawl out of the glass, but it happens that the upper sleeve sticks to the glass and does not allow the feather to be pulled out. All methods are good here - WD-40 and a little warming up. You may have to crush it and pull it out in pieces.
We disassemble the gearbox
Please note and remember that two long bolts are located where the gearbox cover guide bushings are located.
The cover cannot be pulled out using a knife or screwdriver, inserting them between the cover and the gearbox housing. Damage the gasket and break the seal. You will have to put the lid on the sealant.
We look at the condition of the bearings. They must be intact and rotate freely, without jamming, without axial and radial play. The shafts should not be loose. If there are defects, then change the bearings along with the seals without hesitation. It's better to use native Japanese ones.
On the output shaft (on which the wheel fits), the bearing is difficult to pull out. You need a special puller or you will have to remove the engine to press out the bearing.
But it can be made simpler. Unhook the rear brake cable. Take a blowtorch or a tourist gas can with a burner and heat the gearbox from the outside.
The housing will expand, and the output shaft bearing along with the oil seal will easily come out using a hammer and an extension from a set of sockets.
The input shaft with bearing will also easily come out of the heated gearbox cover.
Before heating, be sure to disconnect the breather (rubber tube).
Checking work
The most adequate assessment of the work done after reassembly is a ride on the updated motorcycle. It’s not for nothing that they say that after changing the oil, a motorcyclist ends up with a completely different piece of equipment in his hands. The fork should be elastic, stable, not sag or be too stiff.
Changing the oil in the fork of Alpha and Delta mopeds
Repair of fork for moped Alpha, Delta. Change of oil. Replacing oil seals
A vehicle such as a scooter is increasingly gaining popularity. Its suspension includes such a part as the front shock absorbers of the scooter. They are simply irreplaceable on our roads. It is the shock absorbers that soften the ride over all irregularities, potholes and bumps. If they were not there, then other parts that are not designed for such a load would suffer. Thanks to its suspension, the scooter can ride not only on a flat road, but also on moderately broken ones and withstand falling into potholes. Although the scooter is intended for smooth roads and the city. I once fell into a 10 cm deep hole on a Honda Dio scooter. The same thing happened with a passenger. I think if it weren’t for the scooter’s shock absorbers, not only would it have broken, but I and my passenger would have been sent on a short flight with a hard landing.
Over time, the front shock absorbers of the scooter lose their properties and require repair or replacement. How long it will take for this to happen depends on the quality of the roads, your riding style on them and, of course, on the shock absorbers for the scooter themselves. You will feel it yourself when replacement is required, since every hole and unevenness will be more and more noticeable. There will be a characteristic knocking sound in the front fork of the scooter. If you turn a blind eye to this for a long time, the shock absorbers will completely lose their shock-absorbing properties and, over time, more expensive parts may be damaged. Therefore, as soon as you feel that every unevenness in the road is transmitted to you, that is, you feel the road with your body, then the shock-absorbing properties have become unusable.
The rear shock absorber of the scooter suffers the most. Therefore, replacing them in a scooter is often more urgent than replacing the front ones. One of the signs that the front shock absorbers of a scooter have become unusable is the following: if the scooter is rocked in place, the front fork shock absorber may jam or not return to its standard position on its own. If it sags, you will feel it because the scooter has become a little lower. If you lift the scooter's handlebars up a little, you will see that it has risen and returned to its previous position. But this is before the first load. This front shock absorber needs to be urgently replaced or repaired.
The composition of the scooter oil seal and its shelf life
If you have never seen an oil seal, you can look at the photo, where you can see a small rubber ring. There is a steel frame inside the oil seal - it is this frame that is responsible for the proper tightness and strength of the oil seal.
The oil seal, like any part, has a different manufacturer, and therefore there are both cheap Chinese oil seals and expensive original ones. The shelf life of the oil seal and its reliability during operation depend on this. In order to use the new oil seal for as long as possible, you need to pay attention to its installation, so do not rush into it - an incorrectly installed part will wear out faster.
Honda Dio AF fork repair
After disassembly, all that remains is to assess the degree of wear of the elements (replace if necessary), clean the shock absorber from dirt, fill it with grease and reassemble it in return order.
To repair a Honda Dio fork, you may need fresh boots, plugs and bushings, as well as other parts.
The bushings can be turned by a turner. Material: coprolon, as a more wear-resistant material.
After repair, the fork will become simply unrecognizable and is in no way inferior in softness to the Honda Tact. The result of the repair will gradually begin to be lost after 3.5 thousand. km driven on our roads.
Dirt is a terrible enemy of these (and not only) shock absorbers; pay attention to the condition of the dust plugs and boots.
Oil seals in the design of a scooter - purpose and correct replacement
In the design of a scooter you can find a large number of oil seals of various sizes, designs and densities, but they all have the same task - to maintain the tightness of connections, the mating parts of which move in a radial or longitudinal direction relative to each other.
In practice, everything is simple - the oil seal simply prevents oil from leaking out of any mechanism of the scooter, and prevents dust, dirt and water from entering the mechanism. In appearance, it is often a shaped ring made of oil-resistant rubber. Inside the oil seal there is usually a steel frame that determines rigidity, stability, and durability. The oil seal always has a working edge, which is pressed against the rod or shaft by a special bracelet spring.
The quality of oil seals and factors affecting their service life.
Of course, the service life of the oil seal directly depends on the quality of workmanship and the materials used in production. For example, the quality of oil seals on most modern Chinese scooters is much worse than those from European and Japanese manufacturers, which is not surprising, because the pursuit of budget makes its contribution.
Another important factor that directly affects the service life of the oil seal is correct installation . This process must be approached with all responsibility, because if the oil seal is installed incorrectly, you can expect its rapid failure even after short-term use. There have been cases when this happened after 50-100 kilometers.
Replacing the oil seal on a scooter - do it right.
Most seals can be replaced in a home garage with simple tools. It is important to understand that the oil seal is essentially a disposable part and, once removed from its seat, is usually not reused. During extraction, damage occurs to the rubber seal, working edge, and often to the metal base. Its cost is negligible and restoration is generally considered inappropriate and often impossible.
So, let's consider a number of important points and rules, the observance of which is mandatory when replacing oil seals on a scooter:
Dimensions of coprolon (fluoroplastic) bushings for Honda Dio AF-25
| Parameter | Size (mm) |
| Inner diameter of glass | 35,4 |
| Upper bushing outer diameter | 35,3 |
| Upper bushing inner diameter | 27,5 |
| Top bushing height | 30 |
| Bottom bushing outer diameter | 34,8 |
| Bottom Bushing Inner Diameter | 27,2 |
| Bottom bushing height | 30 |
| Thickness of the bottom of the lower bushing | 5 |
| Holes in the lower bushing | 2,5 — 3,2 |
Disassembling the Honda Dio AF fork shock absorber
Understanding is not difficult. First, the fork shock absorbers need to be removed; to do this, you need to unscrew 2 bolts from the yoke, on each stay, and pull the shock absorber out of the yoke.
The shock absorber is made up of a glass (10), two bushings: the top (through (5)) and the bottom (blind (8)) made of fluoroplastic (coprolon), a rubber bumper (9), a retaining ring (4), anther (3) , a plug (1), 2 springs (6), a spring stopper welded onto the feather (7) and the feather itself (2). To disassemble the removed shock absorber, you need to pull out the boot and retaining ring, and if there are no problems with the first, then you may need to rummage around with the other. There are 2 lugs at the ends of the locking ring; you need to insert two awls into them, squeeze and then remove the ring.
After this, the feather should quietly crawl out of the glass, but it happens that the upper sleeve sticks to the glass and does not allow the feather to be pulled out. All methods are good here - WD-40 and a little warming up. You may have to crush it and pull it out in pieces.
Dimensions of oil seals and bearings for Honda dio scooters Honda dio
Many people are confused about which oil seals and bearings to order for their Honda engines. Well, let's figure it out together!
You will find the model and number of your Honda scooter engine on the front of the gearbox cover, right above the filler bolt.
1) AF-18E engine (stamped on the gearbox cover) with a “thin” 12mm crankshaft (Dio 18 and the same with a disc brake Dio 25; Dio 27 and 28 of the first releases, then they made a thick 14mm shaft on them)
You will recognize this motor by its characteristic counter jaw, 14mm variator nut and the thread itself on the shaft is 10mm, pitch 1.25:
The crankshaft bearings are the same on both halves of the crankcase, you need 2 pieces
D=52mm d=20mm h=12mm, you can buy here diomarket.ru
The oil seals are the same on both halves of the crankcase, you need 2 pieces: D=25.5mm d=15.5mm h=7mm you can buy here: diomarket.ru
2) AF-18E engine model with a “thick” crankshaft (wide belt) (almost all 27e, 28e) AF-24E engine model with a “thick” crankshaft
(HONDA TACT AF 24, AF 30/31, Giorno 24)
You will recognize this motor by its characteristic counter jaw, 17mm variator nut and the thread itself on the shaft is 12mm, pitch 1.25:
Cost of scooter repair work (2t)
| 1 | Editing a disc | 500 |
| 2 | Installation and dismantling of 1 piece of plastic | 100 |
| 3 | Fork editing | 700 |
| 4 | Replacing the transmission cable brakes, speedometer cable | 300 |
| 5 | Replacing the throttle cable, rear brake cable | 500 |
| 6 | Replacing front pads | 300 |
| 7 | Replacing rear pads | 400 |
| 8 | Replacing a light bulb, A.K.B. | 100 |
| 9 | Soldering plastic 1cm. | 30 |
| 10 | Replacement of weights, variator belt, clutch | 500 |
| 11 | Carburetor cleaning, adjustment | 500 |
| 12 | Cleaning the fuel system | 500 |
| 13 | Replacing the spark plug | 100 |
| 14 | Cleaning the air filter | 100 |
| 15 | Repair of reed valve with lapping | 500 |
| 16 | Replacing the piston group | 1500 |
| 17 | Replacement of crankshaft oil seals, For 1 piece. | 600 |
| 18 | Replacement of crankshaft and bearings | 4000 |
| 19 | Halve the engine | 1500 |
| 20 | Muffler cleaning | 500 |
| 21 | Partial, full wiring diagnostics | 500 — 1000 |
| 22 | Replacement of feathers, rear. Shock absorbers | 400 |
| 23 | Replacement of tires, tubes (perez, rear) | 200 — 400 |
| 24 | Changing the oil in the gearbox | 200 — 400 |
| 25 | Installation of additional equipment | 300 — 700 |
| 26 | Adjusting the variator, clutch | 500 — 1000 |
| 27 | Seat reupholstery | From 800 |
| 28 | Repairing a dirty moped)) | 500 |
| 29 | Drum brake adjustment | 100 |
| 30 | Disc brake adjustment (with brake fluid bleeding) | 500 |
| 31 | Changing the oil in the barrel (with flushing the oil line) | 300 |
| 32 | Replacing the reed valve, replacing the manifold | 500 |
| 33 | Replacing headlight glass and light bulbs | 100 – 400 |
| 34 | Replacing the electric starter | 500 |
| 35 | Kick starter repair, gear replacement | 500 |
| 36 | Full comprehensive engine overhaul (2t) | 5000 |
| 37 | Repair and replacement of the ignition switch (key making) | 500 |
| 38 | T.O: Maintenance | 1000 |
| 39 | Pre-sale preparation | 1000 |
| 40 | Diagnostics of faults (full) without repair | 600 |
| 41 | Diagnostics of faults with subsequent repairs | For free |
| 42 | Replacing the muffler gasket | 300 |
| 43 | Replacing relays (turn signals, starter, generator, switch, coil) | 400 |
| 44 | Replacement and repair of brake light switch (frog) | 300 |
| 45 | Oil pump replacement and repair | 500 |
| 46 | Generator replacement and repair | 700 |
| 47 | Cleaning the gas tank | 1000 |
| 48 | Replacing and cleaning the vacuum pump | 500 |
Repairing the gearbox on a scooter should not be delayed.
Repairing a scooter gearbox, or main gear, includes replacing bearings and shafts with gears.
On 50 cc 2t scooters (Suzuki Lets 2, Honda Dio, Yamaha, Chinese models), the oil change in the main gear is done after 5-6 thousand km. If such a tech. If the regulations are not followed, sooner or later the main gear will fail - there will be a crackling noise while driving, extraneous noise in the area of the rear wheel, and the scooter will howl at speed. How to carefully repair the final drive?
There are subtleties here that you need to know. That's what we'll talk about next.
Honda Dio AF fork repair
After disassembly, all that remains is to assess the degree of wear of the elements (replace if necessary), clean the shock absorber from dirt, fill it with grease and reassemble it in return order.
To repair a Honda Dio fork, you may need fresh boots, plugs and bushings, as well as other parts.
The bushings can be turned by a turner. Material: coprolon, as a more wear-resistant material.
After repair, the fork will become simply unrecognizable and is in no way inferior in softness to the Honda Tact. The result of the repair will gradually begin to be lost after 3.5 thousand. km driven on our roads.
Dirt is a terrible enemy of these (and not only) shock absorbers; pay attention to the condition of the dust plugs and boots.
Spare parts for Japanese scooters
Spare parts for Japanese scooters: the Japanese rule!
You feel like the king of the roads when you cut through space on a Japanese scooter! Powerful, reliable, maneuverable, they faithfully serve their owners for many years. And if a breakdown suddenly occurs, or you want to improve your iron “horse,” “Scooterm” is ready to provide everything you need!
The site presents all kinds of spare parts for Japanese scooters of various models of the following well-known and respected brands throughout the world:
Not all parts are in stock. But it's not a problem. You can order the necessary spare parts, especially if they are required for a rare model of scooter. It is possible to get parts directly from Japanese auctions.
And we also have a real surprise for our customers - original spare parts catalogs for Japanese scooters! We know that people who understand will appreciate this advantage.
Everything is there. From literature on repair, maintenance and installation of scooters to electrics, optics and tuning.
Today, a country like Japan has long gone ahead in the production of various motor vehicles. It is this country that produces the best spare parts and models of motorcycles and scooters in the world. It’s quite easy to purchase Japanese-made motorcycles and spare parts these days. Many stores and brands offer spare parts for Japanese scooters at competitive prices. Our store has tried to select for you a huge and varied range of products to suit every taste. In our store catalog you can find everything you need to restore the operation of your vehicle. All products have quality certificates and meet modern standards. Each part is designed taking into account the characteristics of a particular motorcycle model.
buy spare parts for a Japanese scooter right now by placing an order on our website. We guarantee that such parts will serve you for many years and will delight you with their quality. You should not skimp on the choice of parts, this is, first of all, your safety, so choose trusted sellers. Our store sells parts only from official factories and manufacturers. By purchasing from us, you will be confident in your safety and you will not have to replace parts with new ones every year.
What does our store offer?
Our Japanese scooter parts store offers a wide variety of parts that will ensure the quality performance of your scooter. We have a large selection of engines, carburetors, transmission parts, shock absorbers and much more. All products are located in the appropriate sections of the site, so you can easily find the product you need. Most of the spare parts are in stock in our warehouse, and we are always happy to order any product just for you. We try to constantly expand our range by adding many new spare parts for different models of scooters. If you have any difficulties choosing parts, our consultants are always happy to help you choose the most convenient option for you. Spare parts for the Japanese Honda scooter can be purchased today. The most reasonable prices on the market, large selection and quality service. We will provide assistance not only with the purchase, but also provide consultation on the replacement of faulty parts and any modernization. We offer a quality guarantee and fast delivery for all products. Ensure maximum safety for your scooter by purchasing only proven parts from original manufacturers.
Buying spare parts for Japanese scooters is easy if you deal with Scooterm! Call
Assembling the gearbox
Wash the inner and outer surfaces of the gearbox thoroughly with a toothbrush and gasoline (until white). We replace worn parts with new ones.
Before installing the bearings, first lubricate the places where the bearings are placed with lithol, and then heat them with a burner to about 100 ° C (if you touch them with a wet finger or splash water, it should hiss). Then the bearings will calmly, without much effort, using a mandrel and tapping with a hammer, fall into place.
We assemble the shafts and all gears in the reverse order.
If the gasket on the gearbox remains intact, then we do not change it, but only lubricate it with lithol.
Carefully place all washers in their proper places. The gears must not touch the walls of the gearbox.
We fasten the cover with five bolts. Checking the rotation of the shafts. They should spin freely. Then pour transmission oil into the gearbox.
Wipe with a rag and make sure that oil does not leak anywhere around the perimeter of the gasket.
Dimensions of coprolon (fluoroplastic) bushings for Honda Dio AF-25
| Parameter | Size (mm) |
| Inner diameter of glass | 35,4 |
| Upper bushing outer diameter | 35,3 |
| Upper bushing inner diameter | 27,5 |
| Top bushing height | 30 |
| Bottom bushing outer diameter | 34,8 |
| Bottom Bushing Inner Diameter | 27,2 |
| Bottom bushing height | 30 |
| Thickness of the bottom of the lower bushing | 5 |
| Holes in the lower bushing | 2,5 — 3,2 |
Cost of repair work for scooters (4t)
| 1 | Change of oil | 300 |
| 2 | Adjustment of valves | 1000 |
| 3 | Complete engine overhaul | 6000 |
| 4 | Replacing the piston group | 2000 |
| 5 | Replacing the timing chain | 600 |
| 6 | Wiring diagnostics (partial, complete) | 600 – 1500 |
| 7 | Cleaning and adjusting the carburetor | From 600 |
| 8 | Replacement of weights, belt, variator, clutch | 600 |
Cost of motorcycle repair work
| Chassis | ||
| 1 | Replacing anther seals (without disassembling the fork) | 1500 |
| 2 | Replacing shock absorbers (mono shock absorbers) | 400 – 1500 |
| 3 | Replacing chain and sprockets | 1400 |
| 4 | Chain lubrication | 200 |
| 5 | Adjusting the steering column bearings | 450 |
| Brake system | ||
| 1 | Bleeding the brakes (front, rear) | 400 |
| 2 | Replacing pads (1 caliper) | 300 – 500 |
| 3 | Installation of reinforced hoses | 3000 |
| 4 | Replacing brake fluid throughout the entire system | 1000 |
| 5 | Caliper repair | From 800 |
| Engine | ||
| 1 | Cleaning and synchronizing carburetors | From 3000 |
| 2 | Changing the oil and oil filter | 450 |
| 3 | Replacing the air filter | 300 |
| 4 | Replacing antifreeze | 450 |
Call or come to us and find out about our capabilities for repairing your scooter: 8(495)229-44-14 15.02.2010
Preparing to disassemble the gearbox
- Remove the exhaust pipe and rear wheel. On a Honda Dio 34, 35, it is better to do this by placing the scooter on its side on a rag so as not to scratch the plastic.
- Remove the air filter and air duct.
- Remove the variator casing.
- Unscrew the clutch drum nut. To do this, you need to fix the drum with some kind of device. Or the nut can be easily unscrewed with a pneumatic gun.
Then we press on the variator belt with the mounting tool and push it deeper between the cheeks of the variator to remove the clutch.
How to set the timing belt on a scooter - DIY car repair
How to set the ignition on a 4t scooter? Problems with ignition of a 4-stroke engine can appear for various reasons, but they all lead to the same result - the engine stops starting. But the lack of a timely spark may not be the only reason that the engine does not start.
To make sure that it is the ignition that is causing the engine failure, it is necessary to check all other possible faults that may interfere with engine operation and eliminate them. Breakdowns may occur in the ignition system, the causes of which can arise from both the mechanical and electrical side.
Using simple techniques, you can determine whether the problem is a mechanical fault or an electrical component. At home, you can fix any breakdown in the ignition system of a 4-stroke scooter engine.
Reasons for failure of a 4-stroke scooter engine
If the scooter engine does not start, there can be a variety of reasons: 1. There is no fuel supply to the combustion chamber.2. The air supply is not adjusted.
3. There is no compression. Burnt and deformed valves do not provide compression. The reason for the lack of compression may be incorrect assembly of the cylinder-piston group, as well as a malfunction of the cylinder itself.
4. The gas distribution mechanism responsible for the operation of the valves is faulty.5. The spark plug is faulty.
6. An ignition spark is not produced during the mechanical operation of the generator.
Ignition on a 4t scooter depends on the synchronous movement of the gas distribution shaft located in the cylinder head and the magneto. There is a protrusion on the outside of the rotor housing that contacts the ignition sensor during rotation. At the moment of contact, a spark appears on the spark plug.
The rotor is connected to the crankshaft. At the moment the spark occurs, the crankshaft and piston are in the extreme dead center position.
How to set the ignition on a 4t scooter? It is necessary that during the passage of the dead center the position of the gas distribution shaft corresponds to the moment of ignition of the fuel in the combustion chamber.
Starting to adjust the ignition
Before you turn on the ignition on a 4T scooter, you need to make sure that there is a spark and the spark plug is working properly. To do this, you need to unscrew the latter, connect it to the ignition cable and press it with the metal case to the frame. When the rotor rotates, a clearly visible spark should appear, the presence of which indicates the proper functioning of the generator, as well as the spark plug itself.
Adjusting the ignition of a 4t scooter
In order for the rotation of the generator rotor and gas distribution shaft to correspond to the desired piston operating cycle, it is necessary to set their position according to the marks. On the magneto body there is a marker for the position of the dead center of the cylinder in the form of the letter “T”.
The rotor can be adjusted manually, or using a kick starter. The position of the camshaft is determined by the marks on the timing sprocket. Three points marked on the star from the outside form an equilateral triangle, the vertex of which should be directed to the extreme position from the piston.
Adjusting the ignition consists of setting the correct position of the timing star.
Ignition advance
How to set the ignition on a 4t scooter with advance? There is an opinion that if you do this, the speed and power of the motor will increase. In theory, this is true. If the spark at the moment of compression occurs slightly before the moment the cylinder passes the dead center, this should give the desired effect. But the technical implementation of such an ignition setting on a scooter is associated with the transfer of its protrusion on the generator rotor housing.
There is a method that is simpler and safer, which gives a certain effect. You can make a step on the ignition ledge. To do this, you need to remove a layer of 0.5 mm from half the surface of the protrusion. The step should start from the side that first contacts the ignition sensor.
The resulting dual spark will provide more predictable engine starting and will also increase the likelihood of ignition when exposed to adverse weather conditions and improper fuel and air settings.
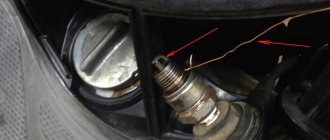
Replacing oil seals on a Honda tact 24 scooter
Let's get him back on his feet, comrades! Old review of this scooter Insert the oil seal tightly and, if necessary, hammer it in, then check its operation in action. If during operation of the scooter you notice that gasoline is leaking from the variator or generator side, even just a few drops a day, then the crankshaft oil seal has worn out and must be replaced.
In this short video I'll show you how to check your crankshaft and bearings the easy way.
Also in the video there will be an old, worn oil seal, you can not take care of it and tear it out by force. Problems with a scooter most often occur during operation, and one of the breakdowns may be a worn oil seal. It's time to change the crankshaft seals!
How do you know that the crankshaft oil seal has come to an end!? Symptom of dead seals Guys, come down from heaven, knee seals have nothing to do with compression either at 2T or 4T. Of course, you can’t start it without seals or with dead ones, but if you measure the compression, it can be ten.
Watch the video How to change the oil seal on a Yamaha/Stels 50 scooter on Vmir for free
Chinese scooter Lifan. Oil leakage on the crankshaft oil seal of the crankshaft bearing of the qmj engine. It is also advisable to buy oil seals as expensive as possible, because Chinese parts, according to statistics, break many times faster.
Let's look at the process of replacing the oil seal on a scooter and the purpose of the oil seals. Petal scooter. I think I replaced the seals, although I understand that compression does not depend on them.
Honda diagnostics
The condition of the chassis, brake and steering systems, electrics and air conditioning, automatic transmission, DSG, variator can be checked during Honda diagnostics in our technical center.
Computer diagnostics for free, full diagnostics of Honda from 1,000 rubles.
Showing concern for all road users, a vigilant driver tries to monitor the general condition of his car, which allows faults to be eliminated in a timely manner and the service life extended. If you experience the following symptoms, come for a diagnosis:
can't start the car
steering wheel deflection during steering
jerking when changing speed
increased consumption of gasoline and transmission fluids
Honda engine repair
During engine overhaul, professional specialists are able to identify problems and fix them. We will solve any problems and malfunctions of the unit in a short time; we also provide diagnostics, engine repair on a Honda, engine oil change, and block boring. If it is impossible to repair the internal combustion engine, we replace the device. Some breakdowns include:
- Ignition system malfunction
- Wear of engine parts
- Oil leak
- Problems with the fuel pump, cooling and lubrication systems
Source