Electrics and electrical equipment of a scooter
Dedicated to all owners of Chinese scooters...
First, I would like to present a wiring diagram for a Chinese scooter.
Since all Chinese scooters are very similar, like Siamese twins, their electrical circuits are practically no different.
The diagram was found on the Internet and is, in my opinion, one of the most successful, since it shows the color of the connecting conductors. This greatly simplifies the diagram and makes it more comfortable to read.
(Click on the image to enlarge. The image will open in a new window).
It is worth noting that in the electrical circuit of a scooter, just like in any electronic circuit, there is a common wire . On a scooter, the common wire is the minus ( - ). In the diagram, the common wire is shown in green . If you look more closely, you will notice that it is connected to all the electrical equipment of the scooter: headlight ( 16 ), turn relay ( 24 ), instrument panel backlight lamp ( 15 ), indicator lamps ( 20 , 36 , 22 , 17 ), tachometer ( 18 ), fuel level sensor ( 14 ), horn ( 31 ), tail light/brake light ( 13 ), start relay ( 10 ) and other devices.
First, let's go over the main elements of the Chinese scooter circuit.
Egnition lock.
Ignition switch ( 12 ) or “Main switch”. The ignition switch is nothing more than a regular multi-position switch. Even though the ignition switch has 3 positions, the electrical circuit uses only 2.
When the key is in the first position, the red and black wires are connected. In this case, the voltage from the battery enters the electric circuit of the scooter, the scooter is ready to start. The fuel level indicator, tachometer, sound signal, turn relay, and ignition circuit are also ready for operation. They are supplied with power from the battery.
If the ignition switch malfunctions, it can be safely replaced with some kind of switch like a toggle switch. The toggle switch must be powerful enough, because the entire electrical circuit of the scooter is, in fact, switched through the ignition switch. Of course, you can do without a toggle switch if you limit yourself to short-circuiting the red and black wires, as the heroes of Hollywood action films once did
.
1 is shorted to the housing (common wire). In this case, engine operation is blocked . Some scooter models have an engine stop button ( 27 ) to block the engine, which, like the ignition switch, connects the white- black and green (common, body) wires.
Generator.
The generator ( 4 ) produces alternating electric current to power all current consumers and charge the battery ( 6 ).
There are 5 wires coming from the generator. One of them is connected to a common wire (frame). The alternating voltage is removed from the white wire and supplied to the relay regulator for subsequent straightening and stabilization. The yellow wire removes voltage, which is used to power the low/high beam lamp, which is installed in the front fairing of the scooter.
Also in the design of the generator there is a so-called hall sensor . It is not electrically connected to the generator and there are 2 wires coming from it: white- green and red - black . The hall sensor is connected to the CDI ignition module ( 1 ).
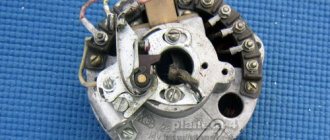
Relay regulator.
Regulator relay ( 5 ). People may call it a “stabilizer”, “transistor”, “regulator”, “voltage regulator” or simply “relay”. All these definitions refer to one piece of hardware. This is what the relay regulator looks like.
The relay regulator on Chinese scooters is installed in the front part under a plastic fairing. The relay-regulator itself is attached to the metal base of the scooter in order to reduce the heating of the relay radiator during operation. This is what the relay regulator looks like on a scooter.
In the operation of a scooter, the relay regulator plays a very important role. The task of the relay regulator is to convert the alternating voltage from the generator into direct voltage and limit it to 13.5 - 14.8 volts. This is the voltage required to charge the battery.
The diagram and photo show that there are 4 wires coming from the relay-regulator. Green is the common wire. We have already talked about it. Red is the output of positive DC voltage 13.5 -14.8 volts.
The regulator receives alternating voltage from the generator through the white wire to the relay. Also connected to the regulator is yellow wire coming from the generator. It supplies the regulator with alternating voltage from the generator. Due to the electronic circuit of the regulator, the voltage on this wire is converted into a pulsating one, and is supplied to powerful current consumers - the low and high beam lamps, as well as the dashboard backlight lamps (there may be several of them).
The supply voltage of the lamps is not stabilized, but is limited by the relay regulator at a certain level (about 12V), since at high speeds the alternating voltage supplied from the generator exceeds the permissible limit. I think those who have had their dimensions burned out due to malfunctions of the relay-regulator know this.
Despite all its importance, the device of the relay regulator is quite primitive. If you pick apart the compound with which the printed circuit board is filled, you will find that the main relay is an electronic circuit consisting of a thyristor BT151-650R , a diode bridge on 1N4007 , a powerful diode 1N5408 , as well as several wiring elements: electrolytic capacitors, low-power SMD transistors, resistors and a zener diode.
Due to its primitive circuitry, the relay-regulator often fails. Read about how to check the voltage regulator here.
to "Wiring diagram of a Chinese scooter - free download"
Good afternoon, sorry if this is off topic, but I couldn’t find anything suitable for what topic to write. The question is today I suddenly braked and found that the speedometer stopped working, what could be the reason? Is it also possible to install xenon on a scooter? Scooter racer taurus
1alexiss1, regarding the speedometer: unscrew the drive cable from the speedometer itself and spin the front wheel, the inner cable should rotate. If there is no rotation, then something is wrong with the drive, you need to remove the front wheel and see what's what. If the cable rotates, then the problem is in the speedometer. Regarding xenon: xenon can be installed on any scooter, even KAMAZ, it doesn’t matter. The main thing is to carefully study the parameters of a particular ignition unit: what current it consumes, whether it has dust and moisture protection, the vibration resistance of a particular unit must also be taken into account, that is, see whether a specific model of the unit will suit your scooter or not. Like this.
Actually, regarding xenon, I’m now waiting for the Chinese to receive xenon at their warehouse, and I want to create an article about installing xenon on a scooter, since the owners of this equipment are so interested. By the way, I will focus on installing xenon without any modifications or alterations to the generator .. Of course, there are articles on this topic on the Internet, but there we are talking about removing and altering the generator, and on top of all this you still need to spend a X amount of money to purchase shunt voltage regulator. A beginner, I think, will not be able to do such meticulous work.
Evgeniy, the article on installing xenon on a scooter will undoubtedly be very useful and interesting for readers. So we'll be looking forward to it. Regarding the alteration of the generator: if possible, please share the links, I would like to get acquainted.
Dobrij denj,nuzen vaw sovet.U menja malaguti ciak 125cc 2006god,kogda zavodil so startera,neskoljko raz sliwal zvuk,kak budto karatilo gdeto,polez razbiratj smotretj nenawel,stal probovatj zavoditj starter krutit no nezavoditsa,vikr util sve4u mokraja, checked iskri netu. Vse predohraniteli celie,provoda nacal prozvanivatj i td vplotj do Zamka zaziganija vse ok.Nacal testerom proverjatj naprjazenie v konce kogda krutiw starterom,v 1sekundu kogda tolko nacinaew krutitj pojavljaetsja i srazu ze propadaet,pitalsa najti sxem u zaziganija.negde i necego!!ewe pocemuto 2provoda idut cerez korobku s ograni4iteljem skorosti,i odin provod cerez pol motorolera k gudku(dlja cego?) signalizacii netu,imobilajzera toze vrode… vse golovu lomajut.Estj podozrenie who generat0r??
Can you suggest a website selling spare parts for the MOTOLIFE CY50T -7 B (SPOTY) 4-stroke scooter? I can’t find anything on the Internet.
And I have this question, I don’t know much about electrical stuff at all, but on the color diagram of the voltage relay there are 4 wires, but I don’t have 5 black wires, I have 150 cc. Chinese pioneer admiral, some kind of ass with the electrics, everything seems to be normal, but there seems to be a short circuit on the yellow wire, there is such a pile of wires, what should I do, remove all the wiring?
Hej. Strona co jakiś czas nie działa, dlaczego ?
Where to download the operating and repair instructions for the Sonik GPX 150 motorcycle
The collars are ON, the engine is not running, turn off the engine. Everything is fine? Are we learning?
Add a comment Cancel reply
This site uses Akismet to reduce spam. Find out how your comment data is processed.
Source
Ignition circuit elements.
One of the most important electrical circuits in a scooter is the ignition circuit. It includes the CDI ignition module ( 1 ), ignition coil ( 2 ), spark plug ( 3 ).
CDI ignition module.
The CDI ignition module ( 1 ) is made in the form of a small box filled with compound. This makes it difficult to disassemble the CDI unit if it malfunctions. Although the modular design of this unit simplifies the process of replacing it.
There are 5 wires connected to the CDI module. The CDI module itself is located in the bottom of the scooter body near the battery compartment and is secured to the frame with a rubber clamp. Access to the CDI block is made difficult by the fact that it is located in the bottom part and is covered with decorative plastic, which has to be completely removed.
Ignition coil.
Ignition coil ( 2 ). The ignition coil itself is located on the right side of the scooter and is mounted on the frame. It is a kind of plastic barrel with two connectors for connection and a high-voltage wire output that goes to the spark plug.
Structurally, the ignition coil is located next to the start relay. To protect against dust, dirt and accidental short circuits, the coil is covered with a rubber cover.
Spark plug.
A7TC spark plug ( 3 ).
The spark plug turned out to be cleverly hidden on the scooter, and it can take quite a long time to find it the first time. But if we “walk” along the high-voltage wire from the ignition coil, the wire will lead us straight to the spark plug cap.
The cap is removed from the candle with a little effort. It is fixed to the spark plug contact with an elastic metal latch.
It is worth noting that the high-voltage wire is connected to the cap without soldering. The insulated stranded wire is simply screwed onto the screw contact built into the cap. Therefore, you should not pull the wire too hard, otherwise you can pull the wire out of the cap. This can be easily fixed, but the wire will have to be shortened by 0.5 - 1 cm.
Electrical circuit diagram of a scooter
Every car, motorcycle, moped, and scooter has electrical wiring - wires connecting electronic components, blocks and modules of equipment.
The correct operation of all systems, and in our case the scooter as a whole, depends on its serviceability. Today we will look at various options for schematic diagrams of the electrical wiring of a scooter. Electrical wiring diagrams for scooters differ depending on their model. Below, the article offers various options for scooter schemes, perhaps one will suit you. If you do not have a diagram specifically for your scooter model, then you can use one of the proposed standard diagrams below:
A simple typical scooter diagram
Electrical diagram of the scooter STILET-150Z, JOKER-150Z
Electrical diagram of the DINK-125 scooter
Electrical diagram of the scooter VITALITY-50 2T
Wiring diagram for LIFAN/ZiD scooters - LIFAN LF50QT-15,
LF50QT-8A/9, Viper Booster, Race 1/2/3, Grand Prix, Phantom, Reggy Bizon
Electrical diagram of REGGY scooter
VIPER ACTIVE scooter wiring diagram
PATRON JOKER 50 scooter wiring diagram
Scooter wiring diagram. Engine 139QMB ("Poltosy")
SHARE WITH YOUR FRIENDS
Download Stels Tactic 50 instruction manual
Contents of the Stealth Tactic 50 maintenance book
- Security measures
- Getting to know the scooter
- Controls and instrument panel (dial indicators)
- Description of indicators
- Controls and instrument panel (LCD)
- Description of indicators (LCD instrument panel)
- Main controls
- Ignition switch/gas tank
- Luggage compartments
- Starting the Stealth Tactic engine
- Scooter control
- Running-in/Identification of the moped
- Check before departure
- Air filter
- Changing transmission oil
- Battery
- Washing and storage
- Technical information
- Specifications
- Lubrication frequency
- Maintenance card
- Recommendations
- Warranty terms
- Warranty card
The manual is usually supplied with the scooter. Usually it is left in the trunk of the scooter. There is a warranty page at the end of the manual. It must be filled out (if the seller has not provided a separate warranty for the moped), otherwise you will not be able to have your Tactic 50 at the service center.
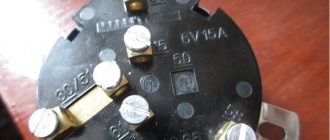
Types of scooter switches
Before connecting the switch, it is important to know what type your scooter requires. If you connect the wrong device or do it incorrectly, the switch will immediately fail. The problem is that the part has the same plugs, but you can tell them apart. It's worth starting with the fact that DC is much larger in size.
AC CDI is much more common. It is installed on most Chinese and some Japanese vehicle models. Most often, such a switch is found on those scooters that have a 139QMB or 157QMJ engine.
A slightly different AC switch is installed on “Alpha”, “Delta” mopeds, and other equipment with a 1P39FMB motor. Such a switch operates from a generator coil and requires alternating voltage
DC has a different type of power supply - from a battery, so it has
12V, and if you connect it to a generator, the switch will break. AC is more durable in this regard; most likely, it simply will not work until you connect it correctly.
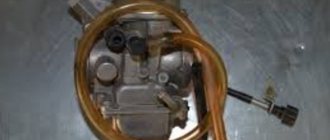
The principle of operation of a carburetor on a scooter
The design of a scooter carburetor is quite complex, but most of them have standard elements. The main task of any carburetor is to create a high-quality fuel mixture. Also, most scooters are equipped with a float chamber on the carburetor, so if you do not know how to adjust the carburetor on a 2t or 4t scooter, first study its structure.
The principle of operation of the carburetor is as follows: after pressing the throttle, the valve on the carburetor is activated, it is called a Venturi tube, the needle rises in the valve and the formation of a fuel mixture begins by mixing gasoline and air. An open throttle increases the supply of mixture to the engine, which is why the scooter starts to move.
When is carburetor adjustment needed?
A faulty carburetor will prevent the engine from starting, so it must be kept in as good condition as possible. Before adjusting the carburetor on a 50cc scooter, identify the main signs of failure. The main consequences may be:
Most often, these situations occur when the carburetor is incorrectly adjusted, causing the mixture to become either lean or rich. Checking the characteristics of your mixture is quite simple; just inspect the spark plug for its condition; if the spark plug is flooded and has carbon deposits or other changes, most likely you have an enriched mixture. A spark plug that is too white indicates that there is too much air in the fuel mixture. Keep in mind that if you don’t know how to adjust the carburetor on a scooter, 2t or 4t, the type of engine will not matter; adjustments should be made according to standard recommendations.
Stealth Tactic 50: cheaper only on foot
Motorcycles in the most budget category will always be popular and in demand. The lightweight Stels Tactic 50 scooter is an excellent example of this; due to its low price, it was produced for many years.
The Stealth Tactic 50 scooter did not shine with impressive technical characteristics, catchy design or other advantages even at the moment when it first went on sale. Why did he become so popular? It's simple - dealers offered it at a very low price , and this attracted a large number of thrifty buyers for whom the cost of purchase and maintenance is of paramount importance. Over the past years, tens of thousands of copies of this model have been sold, and many of them are still in use, because there are no problems with spare parts, and budget motorcycles are always relevant.
Setting the mixture quality
The quality of the mixture plays a key role in the operation of the entire scooter, because incorrectly configured parameters will lead to the scooter choking, consuming a lot of fuel and increasing wear on the piston group. That is why the combustible mixture must be in the optimal quantity; a lean mixture indicates a loss of power and frequent overheating of the engine, a rich mixture is characterized by high fuel consumption and the presence of heavy carbon deposits in the combustion chamber.
There are two ways to adjust the quality of the mixture - with an adjusting screw or the needle level in the damper. In some cases, the carburetor design assumes the absence of an adjusting screw, so adjustment is carried out only with a needle. The standard procedure for adjusting the screw is to rotate counterclockwise and clockwise; in the first case, the mixture becomes lean; tightening the screw indicates that the mixture is richer. In the case of a needle, you can enrich the mixture by raising it up; the lean mixture is set on a lowered needle.
Important: adjusting the quality of the mixture should also be carried out with the engine warmed up for 10-15 minutes.
The instructions for most scooters say that there is a standard setting for the mixture quality, where the screw should be unscrewed only 1.5-2 turns. Therefore, if it is impossible to accurately adjust the mixture, stick to this indicator.
The needle is adjusted by raising or lowering it; it has markings and a special locking ring that sets the current height. Accordingly, if you find a lean mixture, you will have to raise the ring level by 1 notch. Having achieved optimal performance, your scooter will operate smoothly and correctly, it will consume fuel in normal quantities, and the power will correspond to the characteristics.
Scooter owners sooner or later encounter poor performance of their “iron horse”. The reasons can be completely different, one of which is a problem with the scooter’s carburetor. In this case, it is necessary to disassemble the carburetor, clean it and readjust it. Further in the article we will tell you how you can adjust the carburetor of the Stealth Tactic 50 scooter. Looking ahead, it is necessary to say the following: adjusting the carburetor with your own hands is more than possible. To do this, you need to be familiar with the structure of the carburetor and the principle of its operation. If difficulties arise during the disassembly process, you can always turn to specialists for help who will do everything in the best possible way.
So, let's begin. The needle located in the air damper should not move over a wide range. It is best to move such a needle with a corkscrew ring, which must be placed in the grooves. We insert the ring into the middle groove, then fully tighten the bolt responsible for the quality of the mixture and unscrew it a quarter turn. Next, we start the engine. We listen carefully to the operation of the engine. If the idle speed is not stable and is higher or lower than optimal, it is necessary to adjust the screw responsible for idle speed.
After this, you need to bring the idle speed to maximum using the screw responsible for the quality of the mixture. Done? – loosen by ½ turn. If everything is done according to the instructions, everything should be fine. We check the work done: we set off and pick up speed. If there are no failures in engine operation, then everything was done correctly. But, if there are so-called “dips,” it is necessary to tighten the screw another ¼ turn. Be sure to adjust the idle speed screw after fine-tuning the quality screw.
Principle of operation
Inside the body there is a movable cylindrical element called a rotor (in collective farm language - an anchor). An insulated copper wire is wound on the rotor in a strictly defined order, forming several independent coils, circuits, windings, poles, circuits - which, in fact, is the same thing. The ends of each of the coils have their own independent outputs in the form of lamellas (contacts) on the collector.
Inside the main body, two permanent magnets are glued exactly around the rotor. Each of the magnets has a different pole N (north) S (south) in relation to each other. Anyone who went to school will understand...
After you press the start button, the electric current from the battery will begin to pass through the power terminal, the brush and then, passing through the lamellas of one and the rotor windings - it forms a constant magnetic field along the axis of the armature.
I think there is no need to explain that the magnetic field that forms a constant electric current has different polarities? So that's what I'm talking about. Oh yes, the magnetic field of the rotor will begin to interact with the magnetic field of the permanent magnets and the armature will deviate by a certain degree. The commutator will turn, the next pair of lamellas will approach the brushes and the rotor will deviate again. Thus, it will rotate exactly until you lower the start button.
Scooter price
On the secondary market, used copies are sold at prices ranging from 20 thousand rubles and above, on average sellers want about 30 thousand . Most of the mopeds offered are already equipped with tuning, and have a 70 or 100 cc piston on board instead of 50. This is convenient, considering that according to the documents, the bike is still considered a moped, for which a category M license is enough to drive. The new Stealth Tactic 50, alas, are no longer produced, but there is a 150 cc modification on sale.
Repair and tuning
Maintainability and low cost of spare parts are characteristic of almost all Chinese motorcycles. In addition, it is a good place to practice your first repair skills, which may come in handy sooner or later. It’s better to practice on something budget-friendly, and the hero of our review is perfect for this role.
Repair
Anyone can repair the Tactic 50 themselves. If you've seen the inside of at least one budget scooter, then you've seen them all, because they have minimal differences. Forget about special tools and so on, for any service and repair operations, a standard set of tools will be enough for you, the most complex of which will be a regular torque wrench with adjustable torque. And then only if you get into the depths of the engine.
Spare parts
This model, like many others, was assembled from components used by various Chinese motorcycle manufacturers. Therefore, there are no problems with spare parts, and there is no need to contact dealer stores - everything you need can be picked up from other scooters. Spare parts are cheap, and you can buy everything you need, even a new engine or a complete set of plastic. The prices will definitely please budget-conscious bikers.
Tuning
Usually, all tuning of cheap Chinese bikes comes down to minor decoration, but the popularity of the model has made its own adjustments here. Since all the components from which the Stels Tactic 50 is assembled are used on other models, they are widely used. Therefore, a lot of things are suitable for this scooter, and many owners change the piston by installing a larger-volume CPG. You can even buy such tuning on Aliexpress, and many dealers at one time sold bikes with a new piston, although according to the documents they remained 50 cc.
How to properly repair scooter wiring?
All troubles come from ignorance. Or rather, from the reluctance of some people to receive this knowledge and apply it in practice. Sometimes a motorcycle comes in for repairs, and from the original wiring there are only three wires left in it, worn out by more than one roll of electrical tape... The illiteracy of scooter owners only benefits those who repair them; as long as there are such owners, there is enough work for everyone...
To successfully repair the wiring we will need:
- Terminals
- Heat shrink sleeve
- Soldering iron
- Terminal crimp
- Insulating tape
The most common faults in electrical wiring include the following:
- Burnout, violation of insulation integrity, breakage, oxidation of contact terminals
- Breakage, violation of insulation integrity, oxidation, combustion of wires
- Unqualified repairs, as well as installation of terminals, connectors, wires that do not meet the parameters of consumers
Malfunctions in wiring are easy to identify: just do a visual inspection of the wiring and a broken or broken wire will immediately reveal itself, as well as a terminal or connector. In particularly difficult cases, you can ring a suspicious wire for a break, but this rarely happens.
Let’s take an ordinary “Chinese” as an example. After an accident with plastic falling and breaking, all electrical appliances stopped working, including the starter.
After a quick inspection, four broken wires were discovered.
The wires were broken for a reason: someone was repairing the wiring and laid the wires incorrectly: the harness was laid in the place where the front fork crossbar rests on the frame stop. While the scooter was driving normally, everything was fine. And as soon as the steering wheel turned sharply during the fall, the traverse broke four wires at once.
This malfunction is not serious and can be easily treated: cut the damaged wires with side cutters
Using the same side cutters, we cut small pieces of thin heat-shrinkable cambric
We put cambric on the wire
We strip 4-5 cm of insulation and do a classic twist. Classic twisting is done not in the collective farm way, but strictly according to those regulations:
Bend the wires at a distance of 1-2 cm from the insulation
We wind one core around another
We wind the second core and cut off the protruding ends
Collective farm twisting is done a little differently. In terms of the level of skill and culture of repair, such twisting is unacceptable.
According to all those regulations, the twists must be soldered with tin, crimped with sleeves, or the ends welded with a special welding machine. To deviate from those regulations is evil, so we take it and solder it.
We stretch the cambric over the twist and shrink it with a hairdryer. You can also seat it with a match, but you must follow fire safety measures. The scooter is made of plastic and also contains gasoline - it is better to use a hairdryer.
Electrical diagram of a Chinese scooter - free download
I am sharing with you my personal collection of electrical circuits for Chinese scooters that I found on the Internet. Unfortunately, the technical capabilities of the site do not allow displaying the diagrams in the original size, so I advise you to download the diagrams to your computer where you can view them in more detail. Just in case, do not forget to check them for viruses.
Schematic diagram of switch connection.
Admin
You may also like
Electrical diagram of motor scooters “Tourist”, “Tulitsa”, “Ant”
Connection diagram (pinout) of the scooter switch
Electrical diagram of motorcycles “Voskhod-3m”, “Voskhod-3m-01”, “Owl”, “Farmer”
Advantages and disadvantages
Comparing the Stels Tactic 50 with other similar scooters, it is difficult to identify any distinct strengths or weaknesses. But we’ll still try, although this is just another extremely budget moped, the whole purpose of which is to carry its owner and, if possible, not cause him problems.
Advantages
- A small mass , not reaching even a hundred kilograms.
- Very low price of both the scooter itself and all spare parts for it.
- Abundance of available tuning.
- Economical and low maintenance costs.
- Simplicity and maintainability.
Flaws
- Low service life of a two-stroke engine.
- Small gas tank volume .
- Low quality plastic , which can crack not only from a fall, but also from vibrations or driving on uneven roads.
General structure of the scooter
Any scooter owner should know how his vehicle works, because without such knowledge it is not only impossible to find out the cause of the malfunction, but also to eliminate it. Almost all equipment, no matter in which country or in which factory it was produced, has the same design for a scooter, so after examining and repairing one moped, you can easily troubleshoot any other.
Scooters are rightfully considered one of the most economical and unpretentious means of transportation. Ease of operation, low engine power and amazing maneuverability have made scooters one of the most popular types of equipment.
How to remove the starter on a scooter?
After we have found the starter and provided free access to it, we look on its body for the terminal to which the power wire fits and unscrew the wire from it. Then, we determine where the starter is attached to the engine body, unscrew the mounting bolts and remove it from its seat.
Mounting bolts, in this case they are located at the end of the housing
In this case, the starter is flanged and its mounting bolts are located at the base of the housing.
To facilitate dismantling, on some engine models, there is a special technological gap between the starter housing and the engine housing (depending on the engine model). We insert a flat screwdriver into it and loosen the starter with it.
The structure of the scooter and its main components.
The structure of the scooter from the point of view of the organization of its main components can be viewed using the figures below.
The scooter is controlled, as a rule, by three elements: acceleration - 1) throttle; brake - 2) rear and 3) front. Of the two steering handles of the scooter, the gas handle is on the right. Brakes on both sides; rear and front - on the right or on the left, each manufacturer decides for himself how to arrange it.
In addition, the steering panel (so to speak) contains sensors, control buttons and switches (see picture). Usually like this: on the left - horn (1), turn signals (2), low/high beam switch (3); on the right is an electric starter (4), lights on/dimensions/off (5), and sometimes a stop button-switch (you can use it to turn off the engine without turning off the ignition, but you won’t start it until you turn it back on) (6). The number 7 indicates the throttle cable tension regulator. My scooter also has buttons to control the electronic clock. Sensors include a speedometer, sometimes a tachometer, a fuel level sensor; on two-stroke engines there is almost always an oil level sensor in the oil tank, light indicators, and turn signals. Also, scooters with hydraulic brakes usually have a “brake reservoir” (8) on the handlebars, which is used to determine the brake fluid level. I don’t think there’s any need to explain why there’s an engine in a scooter. The scooter can be equipped with a two-stroke or four-stroke engine - depending on this, the scooter device can be supplemented with additional components, for example, an oil pump for a two-stroke engine. (Well, diesel, rotary and jet engines are not yet installed on scooters. At least not commercially
Source
Owner reviews
Actually a normal moped, considering the price, but there are a lot of minor problems with quality. Plastic can be broken with your hands, iron is also not a fountain, all the brackets clearly use some kind of incomprehensible silumin alloy, clearly not designed for heavy loads. The frame itself is also fragile, I know a man whose frame simply cracked when he was driving along a dirt road in the village with a heavy passenger. I didn’t have this, but the front wing mounts fell off twice over the summer until they were welded tightly. The CVT is still a bit dull, but you get used to it quickly. Andrey, Mednogorsk.
I bought the scooter new in 2014, already with a 70 cc piston engine, like a little more vigorous. The guys never found fault, the piston itself is not visible, it is hidden under the plastic, although there are different stamps with the engine number on it. The maximum speed at 70cc is about 85 mph without a headwind, this is according to the speedometer, but it’s probably lying on the higher side. My consumption is about 2.5 liters per hundred, sometimes it was 3 liters. The scooter has not yet been sold, it sits in the village, and is used for its intended purpose from time to time. I don’t see any point in selling it for pennies, that’s why I left it. It always starts up after winter without any problems if the battery is charged and fresh gasoline is poured into the tank. Nikolay, Moscow.
I owned this model for two years and had mixed impressions. On the one hand, this is a really normal scooter for the price of a bicycle, what else do you need? On the other hand, constant minor breakdowns simply freeze out, then the candles die one after another for an unknown reason, then the mirror mount falls off for no reason, or something else. And I recommend pouring only synthetics into the engine, then the engine will live longer than 3-5 thousand km. It will bend quickly on mineral water, it has already been tested. Ivan, Vologda.
FAQ
- Everyone says that two-stroke engines have low engine life. Approximately what? On average, according to owner reviews, for this model it exceeds 10,000 km. Replacing the piston with a new one is inexpensive.
- Do you need to fill it with gasoline already mixed with oil, like in a Soviet motorcycle? No, the oil is poured into a separate tank, from where it gradually enters the combustible mixture in the required quantities.
- I'm going to change the CPG to a new one, I want to plug it into 100 cc, will I need to run it in again? Yes, but not as hard as at first, since the engine has been broken in for a long time. But for the first 500-700 km it is better to drive at a moderate speed, without high revs, and after the break-in is completed, you need to change the oil again.
Conclusion
Not all bikes are destined to be a source of pride for the owner. Some of them just need to quietly and unassumingly do their job without attracting the attention of passersby, and Stealth Tactic 50 falls into this category. Cheap, tenacious and unremarkable, it once became very popular precisely because of its low price. In addition, the 50 cc workhorse can be easily tuned , becoming noticeably more energetic, and all these joys cost very modest money. Compared to numerous competitors, this model does not stand out as anything special, but it is worth the money. If you need an extremely budget option for everyday needs, pay attention to it. Where is it cheaper?
Source