Step-by-step instructions on how to clean the inside of a gas tank from rust
For a vehicle to function properly, it must be fueled with high-quality fuel. But even the most highly purified gasoline will not save you from rust in the gas tank if it has already appeared.
To prevent its smallest particles from leaking through the filter and damaging the engine, you need to regularly clean the fuel storage from corrosion.
Read the article on how to clean the inside of a gas tank from rust.
Flushing the gas tank with your own hands: means, techniques, recommendations
A fuel tank is a container in which fuel is stored. To ensure that gasoline storage is as safe as possible, modern tanks are made of durable metal alloys and treated with anti-corrosion substances. However, during operation, the cavity and surfaces of the gas tank are inevitably susceptible to rust - in this case, the car owner must take the necessary measures to extend the life of the tank.
Preparing for cleaning
To prevent rust from accumulating in the gas tank, it must be cleaned regularly. Professionals advise doing this at least 3 times a year.
Before you begin the main procedure for removing corrosion,
you need to carry out several preparatory measures:
- Empty the tank. It should not contain gasoline. It must either be developed or drained.
- Remove the tank, open the cap and turn it over to remove any remaining gasoline from the lines and from the bottom.
- Place the container in such a way that it is convenient to pour the cleaning composition into it.
Even preparatory activities should take place in a well-ventilated area. Gasoline tends to evaporate, and its vapors are toxic to humans.
Prevention
The simplest thing you can do is try to always keep your tank full and refuel at proven gas stations. One of the radical methods is to treat the inner surface of the tank with epoxy resin. It does not react with fuel and does not dissolve in water. Another method is to replace the metal tank with a plastic one. However, there is a risk of cracking and deformation. A simpler and more effective way is to use store-bought chemicals added directly to the tank.
LIQUI MOLY Fuel Protect
Protects against corrosion, contains dehydrators and other combinations of additives. Adsorbs water from the tank and lines, protects the fuel rail or carburetor from icing. The product is environmentally safe and meets the requirements of European standards. Compatible with catalytic converters and turbos. The bottle is enough for 60 liters of fuel.
Corrosion protector LIQUI MOLY Fuel Protect with a capacity of 0.3 liters in action. Average price: 739 rub. Photo: Youtube. com
Regular tank cleaning is a must. It happens that the car owner has already gone through half the car, replaced many parts, but the engine still does not work stably. And the whole problem was a dirty gas tank, a clogged mesh or filter inside. So timely cleaning of this container, even with the simplest methods, will extend the life of the engine and save your money.
Methods of cleansing
You can deal with rust in a gas tank using available tools. To combat corrosion, acids and solvents are used , but when using them, you must strictly follow the instructions.
Hydrochloric or phosphoric acid
Both phosphoric acid and hydrochloric acid do an excellent job of removing oxides formed on the metal surface. However, they must be handled with extreme caution, as they can cause severe chemical burns if they come into contact with the skin.
Procedure:
Fill the tank with hot water. You need to fill it halfway.- Pour 2 liters of acid into it.
- Fill the tank to the brim with water.
- Close it with a lid, preferably an iron one.
- Leave for 2 hours. Periodically you need to approach the container and shake it slightly.
- After the specified time, the acid is drained.
- A solution based on soda and water is poured into the tank to neutralize any remaining acid.
The concentration of acid used to clean the tank should not exceed 10-14%. More information about the method of getting rid of rust using phosphoric acid can be found here.
How to rinse with acetone?
You can deal with metal oxides using acetone. This universal solvent is effective not only on paint and varnish coatings, but also perfectly removes rust.
Procedure:
- pour 2 liters of technical acetone into an empty tank;
- close the container with a lid and shake several times;
- After 5 minutes, the product is drained.
Detergents
If the rust layer is small, then you can deal with it using household chemicals, which are found in every home.
You can get rid of corrosion using such means as:
- shampoo;
- dishwashing liquid;
- liquid soap;
- washing powder.
The selected composition must be diluted with enough water to fill the tank to the top. They don’t skimp on the product; the more concentrated the solution, the better.
Instructions for treating rust tanks with detergents:
- The finished solution is poured into the fuel storage, filling it to the brim.
- Close the container with a lid and shake vigorously several times.
- Leave the tank alone for 3-5 hours.
- Drain the solution and rinse it with warm water several times.
ClassicAutoClub.ru
06/15/2015 Topics: Cleaning the gas tank
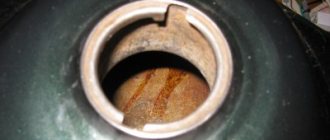
One of the most common examples is the appearance of rust inside the gas tank. If the car is not used daily, but is stored in a garage or in a parking lot with an incomplete tank, then when the temperature changes, water vapor condenses on the walls of the tank, which causes corrosion.
On the Internet you can find a large number of different cleaning methods, from treatment with soda to evaporation with exhaust gases and the method with a handful of metal nuts. All of them are good in their own way and, one way or another, contribute to solving the problem, but today I want to share one of the methods for cleaning a tank from rust, tested from my own experience - using a rust converter containing phosphoric acid.
Recommendation: If you do not use your vehicle regularly, store it with a fully filled tank.
Rust close up
Preparation
You will be using a strong chemical during the cleaning process, so prepare your work area and protect yourself from possible burns. You need to have: a container of clean water that can be used to wash off the substance if it gets on your skin, rubber gloves and safety glasses. You need to work in a dry, bright and well-ventilated area.
So, let's begin. We go to the auto store and buy a rust converter containing phosphoric acid. I do not recommend using acid in its pure form, since if you overdo it with the amount or keep the proportion incorrectly, it can cause irreparable harm to the gas tank of your classic car. I used Phosphomet, but there are other analogues, for example, Melon ZhS No. 15 or Hotex. It’s more convenient to immediately purchase a large canister; it’s better to keep it in reserve.
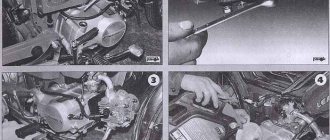
Removing the tank
Before starting dismantling, it is necessary to remove the terminals from the battery and drain the remaining fuel from the tank. A special drain hole is provided for this; if it is not there, the fuel can be removed using a hose and a pumping bulb. Prepare a container into which you will pour gasoline, then carefully examine the design of the tank and its mounting points, as well as the location of the fuel system pipes.
Each car may have its own characteristics of mounting the gas tank, so I advise you to study the operating manual and the fuel system diagram in detail. After you have drained the remaining gasoline, you will need to disconnect the fuel level sensor (if equipped) and disconnect the ventilation and fuel hoses. Now all you have to do is unscrew the nuts that secure the gas tank clamps to the car body and remove the negative wire.
Carefully remove the tank and place it on a flat surface.
Removed gas tank
Primary flushing
First you need to get rid of large pieces of rust, for this I used ordinary hot water, but depending on the degree of neglect of the corrosion areas, you can add the previously mentioned nuts, and use gasoline instead of water. You shouldn’t add a lot of liquid, 2-3 liters is enough. Place the lid on the tank and shake it thoroughly. Drain the water and repeat the procedure 2-3 more times. If you used nuts, you can remove them using a magnetic screwdriver. After large pieces of rust have been removed from the tank, it needs to be dried. Leave the tank for 2-3 hours in a well-ventilated area. You can also speed up the drying process using a hair dryer.
IMPORTANT: If, after removal and initial washing, your tank looks too rusty, and there is a danger of through corrosion (down to holes), I advise you to use more gentle means, for example, oxalic acid, which I will briefly discuss at the end of the instructions.
Cleaning
Now let's proceed directly to cleaning. Pour approximately 0.5 liters into the tank. rust converter, close the cap and slowly turn the tank in all directions so that the liquid spreads along the walls. We wait for the time specified in the instructions for the converter (usually 30-60 minutes), and then drain the liquid. If the tank was very susceptible to rust, then I advise you to repeat the procedure again.
Final rinsing
Once your classic car's gas tank is cleaned, you need to get rid of any remaining substance. To do this, thoroughly rinse the tank with plain water with the addition of baking soda - 100 g per 10 liters of water. Baking soda neutralizes acid residues and softens water. Next, drain the remaining soda solution and rinse with running water.
Now you need to remove all the water from the tank, which cannot be done by simply draining it. For this purpose, I used medical alcohol, which, as we know, mixes well with water and is also flammable. Pour about 0.5 liters of alcohol into the tank, shake it so that the alcohol spreads into all corners where water could accumulate, and pour it out. Now you need to leave the tank to dry for 3-4 hours. The remaining alcohol mixed with water will not harm the engine - it will burn along with the gasoline.
Gas tank installation
The cleaned tank can be installed on the car. This needs to be done in the reverse order to how we filmed it. That is, we first connect the negative wire, fix the gas tank clamps, then the fuel and ventilation hoses and, finally, connect the fuel level sensor. In any case, I recommend always acting strictly according to the scheme. When performing the tank cleaning procedure, it is recommended to immediately replace the fuel filter, and, if necessary, the fuel pump, fuel system pipes and their clamps. After the tank is placed in its rightful place, carry out a test refueling - fill in a few liters of fuel and start the engine. Carefully check the fuel system for leaks. If everything is in order, go out on the road and enjoy driving your classic car.
Example of an owner's manual page with a fuel system diagram
Other cleaning methods
In addition to the method described above, there are several other popular methods for cleaning a gas tank from rust. For example, oxalic acid and electrolysis. Both of them are more time-consuming, but, unlike the converter, they are gentler and will suit you if your classic car's gas tank is in very poor condition. In short, the essence of the electrolysis method is that electrolyte is poured into the tank and the electrode is immersed - the anode (“plus” from a 12 V battery), and the cathode (“minus”) is connected to the housing. With the help of direct current, gas formation begins - hydrogen is released at the cathode, and oxygen at the anode. Hydrogen purifies and restores the metal from its oxide. This method will take you a couple of days. In the case of oxalic acid, the procedure is a little similar to the converter method I described, but there are a few significant differences. Firstly, it is more convenient to purchase the acid itself in dry form, then create a solution at the rate of 200 grams per 10 liters of water. You will also need a container that you can completely submerge the tank in and leave it for a few days. The process itself is simple - prepare the solution and pour it inside the tank to the very edges, then immerse the tank in the solution and leave it there, periodically (once a day) changing the liquid. After 2-3 days, the tank can be removed, and then, after washing it with a soda solution, it can be installed back on the car. Oxalic acid is especially popular among restorers specializing in World War II equipment, as it allows for the gentlest removal of rust from metal without destroying it.
I will definitely tell you about these and other methods in more detail. Expect publication soon.
New gas tank with no signs of corrosion
Take care of your classic car and it will bring you joy every day. Before you do anything with your own hands, study the subject and use only proven methods, and most importantly, never forget about safety precautions.
Text: Stepan Gordienko
Which methods are not suitable?
It is not recommended to use mechanical cleaning
to remove corrosion .
The use of abrasives or hard metal objects may simply cause a hole to appear in the tank. For the same reason, high concentration acids should not be used to remove metal oxide.
Do not throw nuts, washers or bolts into the container . When shaking, the intact metal will be knocked off along with the rust, causing the tank to quickly become unusable.
Is it possible to flush the tank with gasoline?
Washing with gasoline (diesel fuel) is a mandatory step in all cleaning procedures. The fact is that after any, even the most thorough washing, a small amount of acid, acetone or washing powder inevitably remains in the gas tank. You cannot install such a tank on a car, because all this sediment will get into the fuel system, and from it into the engine.
Before pouring gasoline, it is recommended to dry the tank with a hairdryer - warm air will quickly dry all corners of the gas tank cavity. It will take a day or more for the container to dry on its own.
Therefore, after completing all cleaning procedures, it is necessary to carry out the last one - rinse the tank with fuel:
Connect all necessary lines.
Fill the gas tank to the brim with gasoline.
Start the engine and allow the fuel to circulate through the system.
Add gasoline as it leaves the highways.
Video: an alternative method of flushing gas tanks
It is very important to fill the tank full immediately, and it is not recommended to use fresh gasoline for this purpose. It is better to prepare cans of fuel in advance so that any sediment remains at the bottom.
How to clean and rinse a gas tank from rust
The gas tank is an important element of the fuel system, whose main purpose is to safely store liquid fuel, preventing fuel leakage and limiting evaporative emissions. To maintain maximum safety when storing gasoline, car tanks are made from hard alloys, pre-treated with anti-corrosion protection.
However, non-compliance with the recommendations for operating the car and the use of low-quality gasoline lead to the formation of rust in the fuel tank and subsequent problems in the operation of the car. Along with low-quality gasoline, water, dirt and other impurities enter the gas tank, so from time to time the gas tank needs to be washed and cleaned of rust and accumulated dirt.
There are many ways to clean a car's gas tank with your own hands. And the first of them is cleaning the fuel tank without removing it from the car.
Preventing gas tank contamination
It is important not to let the situation get worse and periodically clean the fuel tank. In this case, it will be possible to eliminate the formation of problems with the system and the car as a whole. Preventive measures will not require much time and the costs will be minimal.
- Epoxy does a good job of preventing the development of corrosion processes. This substance does not dissolve in fuel and water and serves as reliable protection for the internal walls. Epoxy is poured through the neck and spreads along the inner walls through rotational movements. Drying follows.
- Anti-corrosion additives are offered in large quantities by automobile stores. Not all of them are highly effective. To choose a worthy product, you need to read the reviews on the forums.
- Proper operation of the vehicle is the most effective method of preventing the formation of contamination and the development of corrosion. The rules that must be followed are simple and accessible to every driver:
- The quality of fuel should always be at its best; for refueling you need to choose proven gas stations;
- the amount of fuel should always be high, the more empty space there is, the more water will flow as a result of condensation;
- during fog and high air humidity, you should try not to refuel the car, and if you do, always have a full tank;
- During frosts, you need to add a small amount of alcohol or a dehumidifier along with the fuel.
Everything in a car is interconnected, each process depends on many factors. So the condition of the tank affects the operation of the fuel system, the ability of the car to start up smoothly and move smoothly.
How to clean the gas tank without removing it
To put it bluntly, flushing the gas tank without removing it is an ineffective procedure. For example, removing rust with the fuel tank removed will be much better. But when there is very little time, and you need to remove rust as quickly as possible, this method should not be neglected.
To clean the gas tank without removing it, you need to:
- unscrew the gas tank drain bolt;
- drain the remaining fuel into a clean container;
- tighten the bolt and pour a couple of liters of fresh gasoline into the gas tank;
- further, in order for the fuel to evenly clean the walls of the gas tank from unnecessary dirt, you need to rock the car to the sides;
- then drain the used gasoline and pour in a couple of liters of new gasoline again. It is advisable to repeat this procedure several more times;
- The procedure is completed by closing the drain plug and cleaning the gas tank with compressed air. At this point, washing the rust without removing it is considered complete.
It is not recommended to do this kind of washing frequently; it is better not to be lazy, but to remove and clean the gas tank thoroughly. How to get rid of rust from a fuel tank is described below.
How to flush a gasoline tank with sparkling water
It has been said for a long time that soda is used not only for its intended purpose, but also removes rust from metal. And the fuel tank is also no exception, although this method of cleaning rust in a gas tank is considered quite expensive. And so, to remove rust in a car tank you need:
- Stock up on sparkling water in the amount that will fit in your gas tank. Moreover, you don’t have to buy only Coca-Cola, you can take any soda. Flushing the gas tank, in this case, occurs due to the presence of orthophosphoric acid in drinks, which is found even in cheap waters with gas.
- Heat the water to a temperature of 40°C and fill the fuel tank to the top with the heated liquid. Note! While the water is heating up, it is advisable to take the gas tank out into the sun - in this case, it will be better to clean the car tank of rust.
- Leave the filled tank for 2–4 hours. If you clean the fuel tank once a year or less often, you can do it all night.
- After the specified time has passed, the drink must be drained and the gas tank must be rinsed thoroughly. Remains of the sweet drink must be completely removed.
We use acetone
To flush a standard 43–50 liter tank, you will need to prepare 2–3 liters of acetone. The procedure is performed as follows:
- Pour 1 liter of acetone into the dismantled gas tank.
- Close all drain holes and filler cap tightly.
- Shake the container well several times.
- Drain the liquid into a bucket.
- If a large amount of rust and dirt comes out along with acetone, then it is necessary to carry out the procedure one or two more times.
The properties of acetone allow you to efficiently remove rust from any metal surface.
How to remove rust from a gas tank using electrolysis
Cleaning the fuel tank by electrolysis is considered an effective method that can not only remove old rust, but also restore the metal coating of the gas tank. This occurs due to the chemical reaction of electrolysis, during which hydrogen and gases are formed.
Note! Electrolysis cleaning is done in an open area, as the gases generated are hazardous to health and highly flammable.
How to clean rust inside a gas tank:
- The gas tank is filled to the brim with electrolyte (sodium carbonate).
- Next, the electrode is immersed there (black metal of any shape, stainless steel cannot be used). The electrode must not touch the sides of the gas tank, otherwise a short circuit will occur.
- Then the negative wire is connected to the gas tank body, and the positive wire to the electrode. Then it is connected to a 12-24 V power supply - the catalysis process begins, accompanied by the active formation of hydrogen. You can clean the gas tank with electrolyte faster if you fill it with a warm solution.
- After 20 minutes, drain the electrolysis, rinse the fuel tank with warm water, dry it and enjoy the result.
The gas tank rust will completely disappear and the original metal layer will be restored.
Cleaning the fuel tank with phosphoric acid
Another effective method for getting rid of rust inside a gas tank is cleaning with phosphoric acid. To do this, you need to buy a couple of liters of acid (or rust converter), pour it in and shake it up. The entire gas tank should be covered with the product.
The converter is left for 25 minutes, during which time the fuel tank should be completely free of rust. Next, the liquid is drained and the result is checked. If the walls are clean, the acid is removed; if not, the procedure is repeated. You can clean the gas tank from traces of phosphoric acid with a solution of soda and water. Then rinse again with clean water and dry. At this point, cleaning the fuel tank with phosphoric acid is considered complete.
All of the above methods allow you to clean the gas tank at home. Each of them is costly and requires skills and abilities. And incorrect actions when removing rust from inside the tank can harm your health or damage the elements of the car. Flushing the fuel tank in a car service center is carried out only by qualified specialists and in compliance with all safety rules. You definitely won’t be able to achieve the same results as at a service station on your own.
Source
Methods for removing water, dirt and rust from a gas tank
During the cold season, experts periodically recommend removing moisture from the tank that could get there as condensation. Since water in fuel can damage both the fuel system itself and the engine as a whole, it is also a source of corrosion of the tank itself.
It is possible to remove water from the gas tank without dismantling work. To do this, you need to use acetone or alcohol. You need to pour 10 ml of one of the substances. per liter of fuel.
To remove rust from a gas tank, the first step is to completely drain the fuel. Under no circumstances should you allow the engine to run until it runs out of fuel! To pump it out, you can use a hose and do it the old fashioned way, or use an old VAZ electric fuel pump, a pump that runs from a drill (available on Aliexpress), or make a pump for pumping out the liquid yourself.
Pump for pumping liquids (purchased at home or driven by a drill)