What bearings are in the Izh Planet 5 engine?
Reader A. Ustinov from Kemerovo asks what bearings and seals are used on the IZH-Planet and IZH-Jupiter motorcycles, and asks for their numbers.
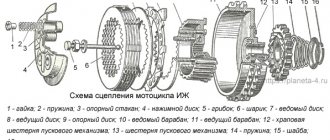
The crankshaft of the Planet motorcycle (all models) rests on two 2505K roller bearings and one 304 ball bearing (on the left). Its trunnions are sealed with an oil seal designated IZH-49 sb. 1-30-1 with cover (right) and seal IZH-49 sb. 1-40-3 (left).
The Jupiter crankshaft (also of all models) is mounted on three 205 ball bearings and on 304 ball bearings (on the left). The oil seals are as follows: right - IZH-49 sb 1-30-3 with a cover, left - IZH-Yu sb. 1-50 and one oil seal IZH-Yu sb. 1-14-1 in each of the two crank chamber covers.
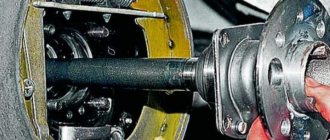
The secondary shaft of the gearbox for both Planeta and Jupiter is supported by roller bearing 192906 K1M and sealed with an IZH-49 sb oil seal. 1-28-1.
The primary shaft of all motorcycles on the left rests on a 204 ball bearing, and on the right - on a bronze bushing inside the secondary shaft
The outer clutch drum of the IZH Jupiter and Planet-3 motorcycles rotates in bearing 104, and the shaft of the starting mechanism (kick starter) is sealed in the left crankcase cover with an IZH-Yu2 sb oil seal. 1-52 (only for “Jupiters”).
For all these motorcycles, the front fork in the steering column of the frame is supported by two thrust ball bearings 778706.
The wheel bearings of all these same motorcycles (two per wheel) are ball bearings 203 (or 60203), and the rear wheel sprocket bearing is ball bearings - 205. To protect wheel bearings from dust, simple felt seals were used until 1965, and then special rubber seals were used - IZH-56 Sat 4-27.
The axis of the pendulum fork is sealed with two felt seals IZH-56. 2-90 and two rubber ones with a spring - IZH-56 sb. 2-99.
The front fork stays also have two oil seals each: felt - IZH-49. 3-23 and rubber - IZH-P sb. 3-7
Provide a list of bearings and oil seals for Izh motorcycles, indicate their installation locations and dimensions
To begin with, let's agree that all bearings and seals will have the same size designations: the first number is the outer diameter, the second is the inner diameter, and the third is the height (or width).
And now - the list itself: bearing 104 - outer clutch drum and input shaft: 42X20X12; bearing 203 - engine crankcase and intermediate shaft, wheel bearings: 40X17X12; bearing 204 - engine crankcase and input shaft: 47X20X14; bearing 205 - crank chamber covers, engine crankcase and crankshaft axle shafts, rear wheel sprocket: 52X25X15; bearing 2505KM - engine crankcase and crankshaft axle shaft of the Izh-P4 engine: 52X25X18; bearing 192906K1 - engine crankcase and secondary shaft: 46.4X30X13; bearing 778706 - steering column: 48X30X12; right crankshaft oil seal “Izh-49” 1—48—3: 30Х16.5Х10.5; secondary shaft oil seal “Izh-49” 1—47—2: 52 X 34.5 X 9; left crankshaft oil seal "Izh-Yu" Sat. 1—49: 52.2X24.4X10; crankshaft oil seal (for “Izh-Yu4”) “Izh-Yu” coll. 1—15—1: 52.2×24.4X6; wheel seal "Izh-56" coll. 4—29: 36.5X21.5X6.5; front fork oil seal "Izh-P" sb. 3—10—1: 43X32X8.5; left oil seal (for “Izh-P4”) “Izh-49” coll. 1—49: 52X24.4X20; cuff Izh-P2-222: 84X58.5X8; rear shock absorber oil seal “Izh-56” 2—99—1: 24Х9.2Х X12.7; sealing ring for gear shift shaft “Izh-P2” 1—421: 17.7X13.7X2; secondary shaft nut cap “Izh-P2” 1—416: 43.5X4.5X14.5; trigger shaft oil seal (for Izh-Yu4) “Izh-Yu2” 1—132—1: 32X23X14; sealing ring for the trigger shaft “Izh-P2” 1—423—1: 28.4X22X6. 58. List the bearings used on the Voskhod-3 motorcycle and indicate their number and sizes.
Crankshaft bearings 205, 3 pcs., 47X20X14; input shaft bearing 203, 1 piece, 40 X 17 X 12; steering column bearing 746905, 2 pcs., 44X26X21; needle bearing of the lower head of the connecting rod 464805D, 1 pc., 31X25X18.5; gearbox intermediate shaft bearings 202, 2 pcs., 35 X 15 X 11; wheel bearings 60204, 4 pcs., 47X20X14; secondary shaft bearing roller, 42 pcs., 4X6; clutch release rod and central switch ball, 3 pcs., 4.763; kickstarter pedal ball, 1 pc., 6.35; rear wheel sprocket bearing 60304, 1 pc., 52X20X15.
Source
Five random motorcycles:
Five random articles about motorcycles:
Using a chain cover from a motorcycle Voskhod on Java 634
Covers for Java On some Java-634 motorcycles (from the first batches of delivery), chain covers fail quite quickly, and it is still difficult to purchase new ones. Instead, you can use covers from the Voskhod motorcycle to protect the chain. Alteration of the casing: 1— frame; 2—plate; 3— spacer sleeve; 4 - old part of the casing; 5 - extension To secure them. it is necessary to make two extensions 5 (see figure) and two spacer bushings 3, through which we connect the halves of the casing. We make extensions using a mandrel. We weld (or solder) frames 1 to them, which we first cut off from the old casings using a thin chisel. It is advisable to seal all connections on the casing by soldering or another method. For more reliable fastening of the covers, you should make new clamps or strengthen the old ones by welding metal plates to them. On my motorcycle, after a run of 5,000 kilometers, the covers have their original appearance.A. KORNILOV 606230, Gorky region.
Installation of bearings and seals
We install a retaining ring in the left half of the crankcase.
Depending on the model of the main oil seal, we install a spacer sleeve in the mounting hole of the main bearing, or, if the oil seal was initially wide (there are some), we heat the crankcase and, on the inside of the crankcase, place the oil seal until it stops against the retaining ring.
My engine had a regular narrow oil seal, so I put in a bushing.
Using a mandrel, install the main oil seal into the preheated crankcase.
Quickly, before the crankcase cools down, place the oil guide washer on the oil seal. The oil guide washer has a saucer-shaped profile. We place it on the oil seal so that the concave side faces us, and the curved side faces the clutch basket.
While the crankcase has not cooled down, we press the outer race of the main bearing into it using a mandrel.
If you are going to replace the main bearings with new ones, don’t be lazy: find a sheet of iron 7-8 mm thick, cut a wedge in it for the connecting rod, pass the sheet of iron between the cheeks of the crankshaft and use a mandrel to drive the main bearing onto the axle.
This way you will protect yourself from damage to the crankshaft. The main bearing has a very high interference and fits into the axle with a very large force. It is not uncommon for people to simply knock out the axle (the axle on the planetary crankshaft is pressed into the cheek) inside the crankshaft, but they were never able to put the bearing on.
Bearings IZH-7.107 “Planet-5”. Catalog 2002
Attention: The electronic auto parts catalog is intended for reference purposes! Our company only sells those products that have prices listed.
| Number | 203 |
| Name | Bearing GOST8338-75 |
| Quantity per "for IZH 7.107 (Planet 5); for IZH 7.107-01 (Planet 5-0" | 2 |
| OKPO class | 46 Rolling bearings |
| Number | 203 |
| Name | Bearing GOST8338-75 |
| Quantity per "for IZH 7.107 (Planet 5); for IZH 7.107-01 (Planet 5-0" | 2 |
| OKPO class | 46 Rolling bearings |
Part number on drawing: 1
Bearing GOST8338-75
Serial number: 203 Quantity per model: 2
| Number | 304 |
| Name | Radial ball bearing (d=20, D=52, B=15) |
| Quantity per "for IZH 7.107 (Planet 5); for IZH 7.107-01 (Planet 5-0" | 1 |
| OKPO class | 46 Rolling bearings |
Motorcycle repair IZH JUPITER 5
Izh Jupiter 5 repair
Cylinder-piston group. Cylinder head
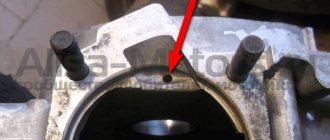
The group number is indicated on the plane of the horizontal edge of the head from below.
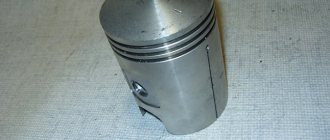
Pistons and cylinders. The amount of wear is determined by measuring the diameters of the pistons and cylinders. If the gap between the piston and cylinder is greater than 0.3. 0.4 mm, they need to be repaired. Repair is also necessary if the cylinders have deep marks and burrs on the working surface. Engine repair Izh Jupiter 5,
as a rule, it is produced:
* selection and installation of new sets (of normal size) of cylinders, pistons and piston rings to replace worn ones or * boring and honing of old cylinders and installation of rings and pistons of repair sizes. When replacing pistons and cylinders, select the same group according to the table
Piston pins and connecting rod upper head bushing. When installing a new piston (nominal or repair sizes), select the piston pin using the holes in the bosses. The pins and holes of the bosses are marked in different colors depending on the repair groups according to the table
The color of the piston pin markings must match the color of the piston markings. The pin group is marked in enamel on its inner diameter near the end, and the piston is marked on the boss inside the piston.
In case of wear of the holes in the bosses and the bushing of the upper head of the connecting rod, you can install a repair-size pin by reaming the holes for it, according to the table below.
Spare parts include pins from two repair groups. If the connecting rod upper head bushing is worn, replace it with a repair size bushing or a bushing made of bronze according to the figure.
Press out and press in the bushing according to the figure.
Piston rings. Install new piston rings when replacing (repairing) pistons and cylinders or in cases where the piston and cylinder have acceptable wear, and the gap measured with a feeler gauge at the joint of the ring installed in the cylinder at a distance of 10.30 mm from the top end is more than 2.5 mm . Before installing a new ring you must:
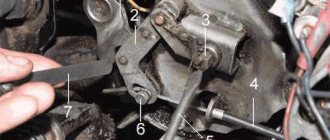
Right crankshaft oil seal, clutch control mechanism. For ease of disassembly, repair and assembly of these assembly units without removing the engine from the frame, it is recommended to disconnect the right and left mufflers and rod from the foot brake lever.
When disassembling the clutch control mechanism, it is necessary to keep in mind that the axis of the clutch automatic lever and the screws securing the automatic clutch bracket are anchored, and the clutch cable lever and the lever axis are removed after removing the automatic machine bracket. When assembling, check that the ball is in the hole in the input shaft; Lubricate the pusher, lever and cam of the clutch control mechanism with grease. In general, the design of the Izh Jupiter 5 engine is not too different from its predecessor.
Clutch Izh Jupiter 5, starting mechanism, transmission from engine to clutch
Disassemble, identify possible faults and assemble these assembly units in the same way as on the Planet engine. Check the alignment of the planes of the crankshaft sprocket teeth and the outer clutch drum. The permissible non-flatness of 0.4 mm is achieved by installing adjusting washers with a thickness of 0.2. 0.5 mm on the input shaft between the inner bearing race and the outer drum spacer. The sag of the motor chain should be within 2.9 mm. If the chain sag is greater, it is necessary to use sprockets with an increased diameter of the circle of the depressions between the teeth.
When assembling the Izh Jupiter 5 clutch, it is necessary to ensure that the spring nuts protrude by 3.5. 4 mm above the ends of the caps and movement of the pressure plate without distortion (allowable distortion up to 0.4 mm). To adjust the clutch control mechanism, after installing the right cover with the automatic clutch, screw the adjusting screw in the pressure plate until it stops, a. Then unscrew 1/4. 1/2 turn and lock the screw with the nut. Next, use the adjusting screw on the steering wheel to set the free play of the clutch lever to 5.10 mm.
Gearbox Izh Jupiter 5
Motorcycle engine Izh Jupiter 5
, when disassembling and assembling the gearbox, it must be removed from the frame. In this case, you do not have to disassemble the cylinder-piston group, but be sure to disconnect the inlet pipe from the cylinders. Drain the oil from the crankcase before disassembling.
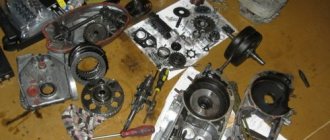
Disassembly. Remove the trigger and shift levers, left crankcase cover and gasket. Disassemble the clutch, transmission from the engine to the clutch and the trigger mechanism. Disconnect the lower pipe of the motorcycle wheel drive chain cover from the engine crankcase. Knock out the mounting sleeve at the front of the engine to half its length.
Unscrew the seven screws securing the crankcase halves and, having unscrewed the nuts, remove the engine mounting bolt at the rear. Remove the remote flywheel cavity hatch cover with the gasket and drain the oil. Use the special wrench from the tool kit to loosen the bolt holding the flywheel together. Separate the crankcase halves using screwdrivers, installing them in the grooves of the rear and front parts of the crankcase, or using a hammer and drift. Remove the remote flywheel and keys.
Remove the input and intermediate shafts with gears and washers, the worm shaft with gear shift forks from their seats, and mark the installation locations and the number of adjusting washers. Disassemble the gear shift mechanism in the following order: * straighten the ends of the cotter pin and remove it from the hole in the gear shift mechanism shaft; * unscrew the coupling bolt on the cam, remove the adjusting washers and the clutch cam, remove the key from the groove; * remove the gear shift shaft, anchor stopper and sector, taking precautions, since the mechanism spring with its ends is wound behind the anchor stop; * straighten the lock washer and unscrew the nut securing the anchor stop to the crankcase; Disconnect the spring from engagement with the bolt stop and remove the stopper.
Crankshaft bearings Izh Planet (2505KM 2 pieces metal cage)
Characteristics of bearing 2505 / N2205
| Parameter | Designation | Meaning | Units |
| Bearing inner diameter | d | 25 | mm |
| Bearing outer diameter | D | 52 | mm |
| Bearing width | IN | 18 | mm |
Please note, these are new bearings. They are declared to be manufactured in Russia, although in fact it is impossible to verify the manufacturer of the components, since often modern Russian factories are only assembly sites.