Izh Planeta-5 is one of the popular brands of motorcycles. But over time, the vehicle breaks down. Often the piston fails. You can buy this part in Russia for an amount from 800 to 7000 rubles .
The piston on Izh Planet-5 is an element of a motorcycle engine that perceives the pressure of gases formed during the combustion of fuel and transmits force to the connecting rod mechanism . In two-stroke engines, this part also serves as a gas distribution mechanism.
Failure of the piston on Izh Planeta-5 may be due to natural wear, improper operation, or violation of the installation rules for this part. The piston must be positioned strictly in the engine cylinder. The joints of the piston rings must not fall into the openings. Otherwise, breakdown cannot be avoided.
Factors influencing the price level
The cost of a motorcycle piston varies from place to place. This is due to the consideration of certain factors in the price. When developing a price list, implementers take into account the following:
- State.
- Manufacturing company.
- Originality.
- Quality.
- The fame of the implementer.
- Place of purchase.
- Delivery required.
The better the condition of the part, the higher its price will be . The more famous the manufacturing company, the more expensive its products will be. You will have to pay separately for delivery of goods. Some companies deliver products for free within a city or region. In other cases, the delivery price depends on the distance between the buyer and the seller. The higher the quality of the part, the more it will cost. Original spare parts are valued higher than non-original ones.
Assembly
In a carefully washed and prepared for assembly crankcase we place the input shaft, the first gear gear and the follower shaft with pre-selected shims.
We put a fork on the gear-carriage for engaging the second-fourth gear (it is smaller than the gear-carriage for engaging the third-first gear, you can’t go wrong) as shown in the picture. We put the gear on the input shaft and insert the fork pin into the upper groove of the follower shaft.
We put a fork on the gear-carriage for engaging the first-third gear, as shown in the picture, place it on the first gear gear and insert the fork pin into the lower groove of the copy shaft.
We install the fork guides in their places (with grooves towards the clutch basket). By the way, if necessary, the “Planetovskaya” gearbox can be assembled and disassembled without disassembling the clutch basket and without removing the guides. But to do this, during installation you will have to pull the tracing shaft towards you a little, insert the pins of the forks into the grooves and after that, remove the locking bar and push the tracing shaft all the way.
Install the intermediate shaft.
On older engines, the end gear is installed separately. On later ones, it is made integral with the intermediate shaft.
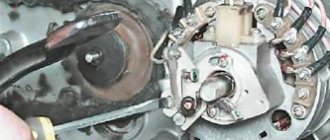
We fill the return spring of the gear shift shaft as shown in the picture.
We check the functionality of the gearshift shaft pawls: compress and unclench them several times. We pay special attention to their working edges: they should be sharp and not licked. And don’t forget to check the spring that compresses the pawls: it must be of the correct shape and ensure the elasticity of the pawls’ movement.
We squeeze the pawls and install the gear shift shaft in its place.
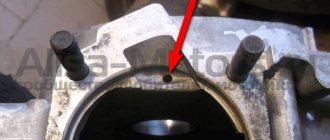
We rotate the tracking shaft with the mark on the body towards the gear shift shaft and so as not to miss the mark during installation, we cover the gap between the teeth opposite the mark of the tracking shaft with lithol or paint it. It will be more noticeable this way.
We look for a mark on the sector and when putting the sector on the gear shift shaft, we combine the mark on the sector with the mark on the tracking shaft body: the tooth opposite the sector marks should strictly fit between the teeth opposite the mark of the tracking shaft.
To ensure that our marks do not get lost during installation, we tie together the sector and the copy shaft with ordinary sewing thread.
We put standard thrust washers on the input and follower shafts and insert the guide bushings of the gearbox cover into place.
We degrease the surfaces, apply sealant, lay the gasket, install the cover and tighten the mounting bolts with the maximum possible force. We adjust special washers under the bolts marked with yellow arrows.
After tightening the gearbox cover, we check the axial play of the primary and secondary shafts. Normal: 0.2-0.4mm.
If the play is greater than normal, remove the plate, seat the bearing and adjust the required number of shims under it.
Varieties
Motorcycle pistons come in different types. They are sorted after production into certain groups. The difference between categories can be about 0.01 mm . The pistons have their own markings. There are the following types of pistons for Izh Planet-5:
- "1". The cylinder diameter is 71.99 mm and the piston diameter is 71.94 mm .
- "0". The cylinder has a diameter of 72 mm , and the piston has a diameter of 71.95 mm .
- "00". Piston diameter - 71.96 , cylinder - 72.01 mm .
- "000". The piston has a diameter of 71.97 mm , the cylinder - 72.02 mm .
The condition of the item may be:
- New, in excellent condition.
- New, with a manufacturing defect.
- Used, in good or fair condition.
- Used, in poor condition, with defects.
Local purchases can be made:
- In a specialized market.
- In a specialty store.
- By private advertisement.
- At the vehicle dismantling point.
- In the online store.
Spare parts for Izh Planet-5 are available according to the manufacturer:
- Original.
- Unoriginal.
Preparing for assembly
Preparation for assembly can be divided into two main stages: measuring and, if necessary, eliminating the axial play of the tracer shaft and checking the suitability of the secondary shaft bearing for further operation.
The first stage is measuring and eliminating the axial play of the copy shaft
We put adjusting washers on the tracking shaft from the locking side. In my case, there were four adjusting washers, but you may have more or less, or maybe not... We move the locking bar to the side and install the copy shaft in its place. We put a standard thrust washer on the second end of the tracing shaft.
We place a new gasket (required) on the plane of the gearbox cover connector, on which you will later finally assemble the gearbox, and tighten the gearbox cover fastening screws with the required force.
We turn the engine over and measure the axial play of the copy shaft, the norm is 0.2-0.4 mm, but it will be better if you can ensure the axial play at a level of no more than 0.2 mm. Adjustment of axial play is accomplished by simply adding or removing shims.
I measure the play with an indicator. If you don’t have one, try measuring the backlash with a caliper; if you don’t have a caliper, so be it - measure by eye...
Second stage: checking the suitability of the secondary shaft for further use
Under normal operating conditions, the secondary shaft bearing runs for quite a long time. But no matter how much we want and try, it wears out. It would be nothing if it weren’t for safety: if your secondary shaft bearing falls apart while driving, and it will certainly fly apart if you don’t change it in time, the gearbox sticks together with the rear wheel, and it’s tight and you’re grinding the asphalt with your butt...
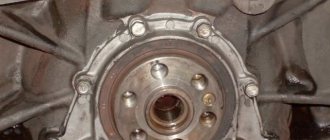
Carefully, take out the secondary shaft over some tray and carefully inspect the shaft bearing raceway, the races and the rollers themselves. The working surfaces of the bearing and rollers should be free of holes, edges, signs of wear or overheating. The path must have a perfectly flat working surface.
Example of a secondary shaft race and race in perfect condition.
To facilitate reassembly, apply some kind of lubricant, such as lithol, to the treadmill and carefully place the rollers on the track and, turning it a little, insert the shaft into the cage. As soon as the sprocket splines rest against the edge of the oil seal, use a thin screwdriver in a circle to straighten the edge of the oil seal and push the shaft until it stops. And immediately, so that the shaft does not fall out, put the sprocket on it and secure it with a nut.
Common faults
The simplest method that will help in some cases. Place the motorcycle on its right side, then remove the kick starter and gear shift lever along with the shaft. Then remove the left crankcase cover, and then remove the clutch basket along with the discs. During operation, the gearbox gears wear out, which causes the meshing of the teeth to deteriorate. This leads to slipping and jerking of the transmission until the second gear fails. Sometimes, when replacing a gear, the problem is not always solved, and lies in the wear of the bearings of the input shaft, which moves to the left over time due to vibrations. To fix the problem, you need to remove the stopper of the input shaft bearing, then move this bearing with light blows of a mallet or with a hammer through the “spacer”, so as to move the shaft to the right. To fix it in this position, you should place washers of appropriate diameter under the bearing. Using the number and thickness of washers, ensure that there is no play in the input shaft, then return the bearing stopper to its place, reassemble the clutch basket and other parts in the reverse order.
We would like to warn you right away: you should mark and write down the previous location of the adjusting washers when dismantling the switching mechanism.
The faceplate is self-sealing.
If you want to learn more about domestic motorcycles, we recommend watching videos about the IZH motorcycle and its model range.
We advise you to watch our video section, and you will immediately find the information you are interested in about the unique IZH motorcycle.
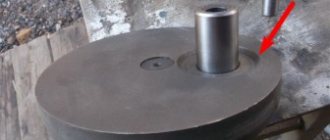
In general, the turner turned the washer and asked to mark exactly how to cut and drill =).
I decided that I would give him half of the crankcase and it would be better to measure everything myself =)
- I like I like 6
Other entries in this logbook
Motor from Jupiter 4
I bought a seat, a carrot and a chrome wing assembly for RUR 500. A spacer is already welded into the seat. But I will still do my best to protect her! I'll paint it black. Read more
The final
Motorcycle assembly Part 4 ALMOST FINAL
The project is moving towards its logical conclusion. I decided to abandon the backlight in the speedometer. I'll install turn signals for beauty's sake. Left. Read more
Comments
Only authorized users can leave comments
dr.cbr
Russia, Moscow Region, Pushkino
I made the holes myself. And yes, there is no step on this faceplate - it rests on the crankcase, if you give it away with the crankcase, the turner will modify it. These holes are a pain in the ass.
- Answer
- March 1, 2016 at 2:23 pm
Skamp
Russia
Why are there no steps? Yes =) There is still that headache on Jupiter. (on the planet there is somehow more space in the generator section) Fortunately, I will install the BSZ and will be able to turn the generator.
- Answer
- March 1, 2016 at 6:44 pm
Common faults
The simplest method that will help in some cases. Place the motorcycle on its right side, then remove the kick starter and gear shift lever along with the shaft. Then remove the left crankcase cover, and then remove the clutch basket along with the discs. During operation, the gearbox gears wear out, which causes the meshing of the teeth to deteriorate. This leads to slipping and jerking of the transmission until the second gear fails. Sometimes, when replacing a gear, the problem is not always solved, and lies in the wear of the bearings of the input shaft, which moves to the left over time due to vibrations. To fix the problem, you need to remove the stopper of the input shaft bearing, then move this bearing with light blows of a mallet or with a hammer through the “spacer”, so as to move the shaft to the right. To fix it in this position, you should place washers of appropriate diameter under the bearing. Using the number and thickness of washers, ensure that there is no play in the input shaft, then return the bearing stopper to its place, reassemble the clutch basket and other parts in the reverse order.
Repair
Once the unit has been gutted, you can begin to determine the parts that need to be replaced. As a rule, you have to buy a set of shims, a set of gaskets and sealant. This is the case if there are no more serious damage. Once you have decided on the elements to be replaced, you will need to adjust the worm shaft axis, and after final assembly, the clearance along the axis of the primary, intermediate and secondary shafts.
Adjusting washers are placed on the far ledge of the copy roller; they should be lubricated with a special compound. A support washer is mounted on the near edge, and the shaft is put in place. It should be turned so that the neutral sensor with its protrusion fits into the deepest groove. Then, using a ruler (without the gearbox cover yet) on the plane of the crankcase, measure the gap between the washer and the dipstick. It should be no more than 0.2 mm. Depending on the indicator, regulators are added or removed. If it is impossible to accurately set the gap, it is better to make it smaller.