Alternator breakdown is not uncommon even for a modern foreign-made motorcycle, not to mention a domestic vehicle. The reason for this is the presence of aggressive components in synthetic oils, as well as the high loads that fall on this unit when connecting additional equipment. The symptoms of a failed generator are familiar to almost every motorcyclist - they include a shutdown of electrical equipment, unstable engine operation at high speeds, and starter failure. To deal with them, you don’t have to go to a service station and spend a lot of money. It is enough to know how to check the alternator on a motorcycle and perform basic repairs.
Mechanical damage
The easiest way to detect a broken alternator cover or a cracked housing is that you don't even need to disassemble the motorcycle. Such malfunctions can cause oil leakage, as well as foreign objects getting inside and complete failure of the vehicle's electrical system. Fixing this problem is quite simple - you need to replace the damaged parts or weld them. In most cases, you will need argon welding to restore the integrity of the generator housing - the equipment is quite expensive, so it is better to contact a service station or a specialist who has posted an ad on the Internet.
In addition, when diagnosing a generator, the bearings must be checked. With large backlashes, they can move from the axis of rotation, break the rotor and stator, and even destroy the housing. It is also not necessary to disassemble the motorcycle to assess the condition of the bearings. To do this, you will need a stethoscope - place it on the generator housing while the engine is running and listen carefully to the sounds coming from inside. A uniform hum and light tapping of the generator is considered normal, but strong impacts, squealing and grinding are symptoms of a unit malfunction. Bearings can only be replaced when disassembling the generator - since it will also be required for diagnosing the electrical part, let’s consider this stage in more detail.
Common causes of problems with scooter generators
In conclusion, it is worth noting that the failure of a scooter generator is one of the most common problems faced by owners of two-wheeled vehicles. If a malfunction occurs, you may encounter external signs such as a poor battery charge, a weak spark, or some problems with the electrical system. Typically, the reason for the incorrect operation of the generator is:
- Short circuit;
- Wire wear;
- A sharp decrease in the magnetization of the generator rotor, etc.
Before repairing the generator, you must carry out diagnostics and find out the cause of the malfunction, and only then begin repairs or take the device to a workshop.
Source
How to disassemble the generator?
Since the design of generators is approximately the same for all motorcycles and scooters, let’s consider the disassembly process using the example of the domestic Ural. The procedure should begin by removing the back cover of the rectifier, and it must be removed very carefully, since this part is very easily damaged, which makes reassembly impossible. Next, you need to turn off and remove the generator voltage rectifier, again taking utmost care. Assess the condition of the diode bridge - if there is no mechanical damage, traces of melting or black spots, it can not be removed, since it will not interfere with further disassembly.
The next step is to remove the studs that hold the generator housing cover in place - first unscrew the nuts, and only then remove the rods themselves. The most difficult part is removing the front bearing, which is covered with a cover. The best option would be to use a special puller with thin legs and a ball, which will help apply force to the desired point. When removing the bearing, hold the stator with your hand, as it may fall out, which will lead to broken wires.
If you need to know how to remove the alternator from the motorcycle, you will also need to figure out how to remove the rear bearing. It is usually removed by hitting the back of the rotor with a mallet, but this will not help if it is jammed or severely worn. The broken bearing is removed using the claw device described above. After removing the rear bearing, all that remains is to disconnect all terminals and then remove the generator rotor and stator. Evaluate the appearance of the parts - they should also not have stains, traces of melting or other serious damage.
Design and principle of operation of a scooter generator
To the average person who is not experienced in electrical matters, a scooter generator may seem like a very complicated device. This is partly true: electric current is an invisible thing to the eye, and if we can see or touch mechanical faults, then we can only guess about faults in the electrics of a scooter or identify them using special measuring devices.
However, “it’s not the Gods who burn the pots” and if a person has a desire for something, then this article will be a good help, but for those who don’t want anything, there’s no point in continuing.
The scooter generator is a flywheel type generator with permanent magnet excitation. This type of generator is used on the vast majority of scooters, as well as mopeds and small motorcycles.
Designation of the main elements of the generator
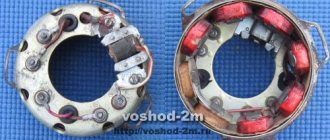
The scooter generator consists of a rotor (in collective farm language - “anchor”) and a stator. The rotor is mounted directly on the crankshaft and while the engine is running, the rotor rotates around the stator coils
The stator is attached directly to the engine crankcase. And while the engine is running it remains motionless. The stator is a metal base made of several plates of special transformer iron. On the base of the stator there are special projections (coils) on top of which a copper wire is wound in a strictly defined order - forming the generator windings.
Depending on the generator model, there may be two or three windings. The generator shown below has three windings: supply, control and high-voltage
Permanent magnets are installed on the inner surface of the rotor. Magnets have different polarities. The magnets in the drain are covered with a lid; if you remove it, you can see them
Each magnet forms a static (constant) magnetic field around itself. In turn, the field of each magnet will be different: blue is negative (“north”), red is positive (“south”)
If we insert the stator into the rotor in the same way as is done on the engine, then we will see that the stator coils will be in the magnetic field of the magnets located next to them
After we start the engine, the rotor magnets will begin to rotate around the stator coils. During the rotation of the rotor, magnets of different polarities will approach the coils, which always stand still, and the field in which the coils are located will change at a very high speed. Due to the rapid change of magnetic fields, magnetic induction will occur in the generator coils and the generator will begin to generate electric current.
Current is good. But the current of a generator with excitation from permanent magnets is not a constant value and directly depends on the engine speed: the higher the engine speed, the more often the field of the coils changes - the induction increases and, as a result, the voltage in the coils increases. So it turns out that at idle engine speed the generator voltage will be 8-10V, and at maximum 60-70V.
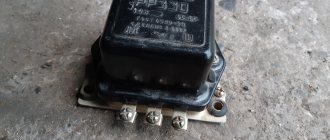
In order to stabilize the generator voltage to specified limits, a special generator voltage regulating module was introduced into the scooter’s power supply system. That’s what it’s called: generator relay regulator
The principle of operation of the relay regulator is very simple: there are three windings on the generator stator: supply, high-voltage and control. The power winding is the main one and is designed to power the lights, sound signal and charge the battery.
The control winding is auxiliary and if the voltage in the supply winding increases, the relay-regulator supplies voltage to the control winding - the induction is disrupted and, as a result, the voltage in the supply winding of the generator drops.
When the voltage decreases, the opposite happens: the relay-regulator stops supplying current to the control winding, induction is restored, and the voltage in the supply winding increases.
The control and auxiliary windings of the generator are wound on the same coils
The high voltage winding is wound on individual coils or coil. The high-voltage coil is needed to form a spark on the spark plug and is only partially related to the generator. Rather, it relates to the ignition system, and this is a separate module and has little to do with the operation of the generator
Another auxiliary module of the generator is a load resistor. It is needed to ensure that the generator does not operate without load. For devices that generate current, working without a load is like death. The designers foresaw this possibility in advance and, in order to prevent the generator from running idle, they slightly loaded the supply winding onto the resistor
In addition to the elements described above, the scooter’s energy supply system includes an ignition sensor, which, at the right moment, ensures the formation of a spark at the spark plug.
This module is the same generator only in miniature and it works exactly on the same principle
On the outside of the rotor there is a small magnet in the form of a rectangular protrusion. This magnet, just like its larger brothers, forms a constant magnetic field around itself, and what happens next, you probably already guessed: while the engine is running, the field passes through the sensor coil and a small current is generated in it, which goes directly to the switch, controlling the torque in it sparking
Electrical damage
Quite often the cause of generator malfunction is the breakdown of the diode bridge. To detect it, you should check each diode by sequentially passing the current received from the multimeter battery in both directions. If the diodes do not allow current to pass through at all, or if it passes freely in the opposite direction, the bridge should be replaced completely. Of course, you can try to perform a budget repair of the generator by soldering in individual diodes, but this will be very difficult to do, and you will face the risk of damaging the part.
Problems associated with the insulation of individual stator windings also often arise. This can be detected by seeing traces of current breakdowns on the coils, represented by dark spots. In addition, you can check whether the generator on the motorcycle is working by measuring the voltage while the engine is running - if the windings are damaged, it will be much lower than normal. If traces of breakdown are insignificant, you can simply dip the stator in hot varnish and then let it dry for 24 hours. However, usually the motorcyclist has to rewind the generator with a new copper wire - to successfully complete the repair, the following recommendations should be followed:
- Record the number of turns and sketch a diagram of pulling the wire between the coils during disassembly;
- Wind the generator while wearing gloves that will protect your hands from cuts;
- Press the wire with a metal or thin plastic ruler;
- Break up the winding over several days so as not to lose attention;
- Cover the windings with varnish or diluted epoxy resin using an artist's brush.
Often you have to deal with a break in the insulation of the rotor housing - to detect it, you should attach one contact of the multimeter to its core, and the other to the winding, having first turned on the circuit search mode. Rewinding the rotor is more difficult to perform, but even this operation can be performed at home with the proper skill. It is very important not to forget to insulate the windings to eliminate the possibility of repeated breakdown. In addition, connect a multimeter, turned on in ohmmeter mode, to the slip rings of the generator rotor. If the result obtained is more than 2.3–2.6 Ohms, you will need to remove the oxide film with fine sandpaper, and then degrease the treated area with gasoline.
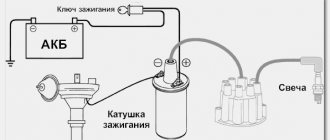
Checking the ignition coil
Disconnect the battery and remove the beak on the scooter. We disconnect the connector on the switch and measure the resistance on the coil with a meter. We put one probe in the connector on the black wire, and the second on the negative (green wire). There should be 4 ohms - this means that the wiring and the primary winding of the coil are working properly.
We check the second winding of the coil. We take out the probe from the contact of the green wire and insert it into the candlestick instead of the candle. And we leave the other probe on the contact of the h/w wire. The resistance should be about 7.85 kOhm. This indicates that the second winding, the armored wire and the candlestick itself are in good working order.
Let me remind you that the armor wire and the candlestick separately from the coil have a resistance of 5 - 8 kOhm. Such resistance is needed to suppress radio interference from the spark discharge, so as not to interfere with others listening to the radio in the car or at home. If you make an armored wire and a candlestick without resistance and drive next to someone who is listening to the radio. Then the radio stops working normally and begins to crackle in time with the spark discharge on the scooter (moped).
And if the device shows a break (i.e. does not react at all), then remove and check the candlestick and armored wire separately. If they ring, it means a break has occurred in the ignition coil. It cannot be repaired, it is solid, you will have to replace it with a new one. It's inexpensive and you can always buy it without any problems.
Complex breakdowns
To make sure that the generator is able to produce normal voltage, you should also check the operation of the regulator. To do this, we connect this part to a circuit of a light bulb and a fully charged battery, and look at the result. If the light is dim, goes out periodically, or does not light at all, the generator cannot produce the voltage specified by the standards. The voltage regulator is completely replaced - unfortunately, it cannot be repaired. Along with the regulator, it is advisable to change the terminals that connect it to the rest of the generator components - if this is not possible, it is advisable to simply clean them.
Also, the cause of a generator malfunction may be a short circuit between the stator turns or a breakdown from them to the device body. The main symptom of such a breakdown is the rapid discharge of the battery during a long trip at low speeds - most often motorcyclists become aware of this problem when the engine stalls after 2-3 hours of riding in the city. In addition, a sign of such problems may be a fairly strong howl of the generator, which becomes louder when the headlight or additional electrical equipment is turned on. To make sure there is a breakdown, you should remove the positive terminal from the engine and start the motorcycle - the absence of a howl will mean a problem with the windings, and its continuation will tell you about a malfunction of the rotor slip rings. The malfunction is eliminated by completely rewinding the generator, as well as restoring the insulating layer.
If the unit is equipped with brushes, the problem may be their severe wear - and it is enough to simply replace such a part with a new one. In addition, installing brushes that are too hard can cause indentations in the slip rings. To repair such damage, the rings will need to be turned on a lathe, and then polished to a mirror finish and degreased before installation. Do not forget to change the brushes to those suitable for your generator model, since this will determine the need for further repairs.
In addition, there are also cases of wire breakage due to poor quality fastening at the factory or during the last disassembly. The repair can be done quite simply - you need to change the wire, having previously polished the terminals to which it should be connected. The only exceptions are brushes, in which you will need to drill a small hole to pass the wire through.
Preparatory procedures
Where should you start first? Check all electrical connections on your scooter. Most of them can be found in the battery compartment. Make sure they are all tightly connected to each other. At this time, your scooter's battery pack will automatically check the main and individual battery connections. Bundles of wires should not hang freely.
Usually the battery compartment on a scooter is located at the bottom of the floor
Scooter engine initial test
Test the generator by making a direct connection to the battery. You will need to find an insulated wire to perform this procedure and cut 2 pieces approximately 20cm long.
- Raise the scooter so that the rear wheel does not touch the ground.
- Remove the battery cover and locate the 2 wires that come from the engine. Disconnect the motor wires from the controller - this is easy to do by unfastening the clamps.
- Using 2 wires, attach the first jumper wire to the red positive wire inside the motor wire clamp. Do the same with the black negative wire coming from the engine. Then take the red wire and make contact with the positive terminal of the battery and do the same with the black wire at the negative terminal.
Connected battery on a scooter
Do you need to do your own repairs?
You can repair a generator only if you know its structure, operating principle, as well as the design features used on your motorcycle. If the restoration is performed poorly, you can not only waste time, but also cause even greater damage to the vehicle's electrical circuit. Therefore, if you are unsure, you should entrust the work to a professional who will guarantee the functionality of the restored unit. In addition, you can consider purchasing a used generator if there is a lot of damage. But if you have the appropriate financial opportunity, it is better to buy a new part that will last long enough and allow you not to worry about the reliability of the motorcycle.
Before checking the alternator on a motorcycle, check the battery first!
Of course, the battery is not necessarily involved. But before you conduct a thorough examination, it is better to make sure that there is no problem.
Start with an external check: first make sure the cables are still in good condition. If they are coated with sulfate, this may be the source of your concern. Therefore, they should be cleaned by wiping with a damp sponge or cloth. After this, check the tightness of the lugs. Sometimes they can become loose. Therefore, you will solve the problem by tightening them securely.
If, despite all this, problems still occur, check the voltage at the battery terminals using a multimeter. To do this, turn off the motorcycle engine and turn on the device. Normally it should be 12 volts. But if the displayed voltage is lower at startup, it means the battery has failed. Therefore, you need to think about recharging or replacing it.