In 1983, the Kavrovsky plant launched the modernized Voskhod 3M motorcycle. The purpose of the modernization was to improve the operational and technical characteristics of the Voskhod motorcycle. The platform for creating the motorcycle was the Voskhod 2M model. Since the early 90s, serial production of the Voskhod 3M 01 modification began. But still, many owners of this device are not satisfied with the appearance. Therefore, in this article we will talk about tuning sunrise 3m.
Technical characteristics sunrise 3m.
| Name | Index |
| General indicators | |
| Load limit, kg | 165 |
| Dry weight, kg | 125 |
| Number of gears | 4 |
| Dimensions | |
| Distance between wheels/width/height from ground to seat, mm | 2000/ 761/ 1090 |
| Ground clearance, m | 1,25 |
| Turning radius, m | 2,5 |
| Performance indicators | |
| Maximum acceleration, km/year | 105 |
| Gasoline consumption per 100 km | 4.4 l |
| Engine | |
| Type | Two-stroke, single-cylinder, carburetor |
| Volume | 173,7 |
| Power at 5500 - 5800 rpm | 4 l. s./ 10 kW |
| Clutch | Multi-disc in oil bath |
| Cooling system | Air |
| Electronics | |
| Voltage | 12 V |
| Ignition system | Electronic, contactless |
| Alternator | 65 W |
| Chassis | |
| Frame | Tubular, welded, single |
| Wheels | Spoked, tube tires, 3.25 - 16 inches |
| Brake mechanism | Drum with mechanical drive |
| Suspension | |
| Front | Telescopic, wheel travel 160 mm |
| Rear | Pendulum, wheel travel 80 mm |
to "Photo report: Repair (repressing) of the crankshaft of the Izh-Planet motorcycle"
The connecting rods on these and earlier crankshafts had two slots, and this connecting rod is from the later planets.
What is the name of the device?
Dial type indicator, you can look at it here.
It was very interesting. Thanks for your efforts. While reading, I remembered my tinkering with the crankshaft on the chezette. I installed the connecting rod from Java. Maintaining the size of the axles with the connecting rod intact. Centered with a plastic sledgehammer for straightening cars. So as not to crush the axles. At the same time, pressing the hacksaw against the untouched pins and comparing on the collapsible one where the protrusion is relatively untouched and where the dip is, tracing the blade from the hacksaw in a circle. Served for a long time.
The man talks about a “gross design flaw” and explains how to properly handle the crankshaft with a sledgehammer! It would be better if I went to “sort out” the sleepers! Be smart!
I came across this “comrade” named Alexander from the city of Engels, I’ll tell you, he’s a dark horse. I sent him an Izh Planet Sport crankshaft for repair. The phone is immediately switched off, they are already calling me from PEC, they say we can’t reach him, I write to him by email, send SMS, etc. Okay, with grief he took the apartment, and all was silence, a week, two, three, four... (although the repairs, according to him, took 5 days). Somehow I found him, I say just don’t deceive me, do everything humanely. I’ll tell you his excuses, like those of 3-year-old children, but the most infuriating thing is that his phone is permanently switched off, I noticed he turns it on to view messages from clients on Avito, then immediately turns it off, that is, the client You can communicate with him via SMS. Okay, having pretty much shaken my nerves, we came to the moment of sending the CV, so he sends a video that no video player reads, there’s nowhere to go, I paid him. The crankshaft arrives, I immediately see that something is wrong, the connecting rod is different, incomprehensible, although the mark is 1-49, but the font is not the same as on the factory Soviet connecting rods. I call him and ask why the connecting rod is not mine, his answer is simple, what difference does it make to you what kind of connecting rod, for me it makes a difference that it’s my own from the factory, that I don’t know which one and where it came from, especially since he originally wrote to me that your connecting rod will be retuned, etc. d. In short, I wore out my nerves with him - the sea. It is not yet known how this apartment will behave, time will tell. By the way, you installed the spacer washers of the separator in such a way that they had to be knocked out with considerable effort with a hammer (it’s unclear)...(((. So guys, I categorically DO NOT ADVISE you to this miracle master - an invisible man, so as not to fray your nerves and that’s all from here following. Good luck. His ads are posted on Avito. , his phone number is 89172160879.
Vladimir from Ivanovo, before you crap on a person, learn to use a PC and learn to listen to people. I also had the Izh PS crankshaft repaired by Alexander and during the initial communication I watched several video reports, including your crankshaft and in the process of balancing, etc. Well, brother, give it to me. The crankshaft you have is simply excellent. The piece of hardware is 40 years old and it’s like new. The connecting rod was installed just by Izhmash of the USSR and not any other! I personally asked Alexander what happened and why there was such a review on all sites - the person didn’t even say a bad word towards you (unlike YOU). Well, he did it longer than usual - so there were reasons for this. Why pester the person with calls, etc. d. The main thing is the final result and the engine performance. and as the Internet and motorcycle communities know, it works like a clock for you. And the crankshafts are made from Engels and this has been tested by many over time. Personally, I also made the washers on the piston pin tight, and for a friend on Planet 5 I actually made a bearing instead of a bushing, and there the washers are also tight and nothing rings during operation. You need to be technically literate and not make sudden conclusions.
They pressed the finger into the cheeks of the PS K 16 shaft, after starting the cheeks moved apart... the “specialists” welded it at three points on each side. They sharpened it, and as a result, after the first run, the pancakes spread out again and began to rub the wall on the side of the generator... Is it possible to somehow secure it (finger)?
Add a comment Cancel reply
This site uses Akismet to reduce spam. Find out how your comment data is processed.
Motorcycle improvement
Boosting the engine The Voskhod motorcycle has not been produced for a long time, but it does not lose popularity in our time. This is due to the low cost of Soviet equipment. But the old technology has several disadvantages: low power indicators, outdated design. Therefore, in order to get a high-speed and modern means of transportation from an old motorcycle, drivers carry out tuning of the sunrise 3m with their own hands.
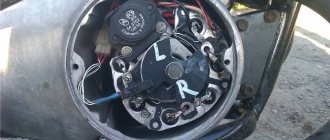
Removing the generator
We slightly unscrew the generator rotor mounting bolt, attach the rotor with a puller, rest the puller bolt against the rotor mounting bolt and pull the rotor off the crankshaft axle
We pick out the key and put it somewhere away. Help: painted oil seals are a sure sign of collective farm repairs (experience)! If you decide to buy a Voskhod and see that the seals are painted, check the engine a hundred times and only then agree to purchase.
Parts of the cylinder-piston group
Tuning sunrise 3m begins with improving performance characteristics. The maximum speed of the Voskhod 3M motorcycle can be increased by lightening the CPG parts. To do this, we use a milling machine to bore those places that do not affect the strength.
We lighten the connecting rod in the same way. To play it safe, you can find foreign analogues. Next, you need to bore the purge, inlet and outlet channels. This is done in order to better mix and ignite the air-fuel mixture.
Engine disassembly
We unscrew the bolts holding the crankcase together. There should be 14 bolts
We heat the crankcase connector with a hairdryer, apply gentle blows to the protruding shafts through a wooden spacer until the engine is halved
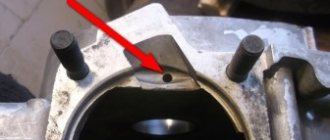
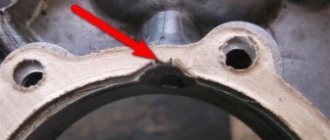
The third jamb
The crankcase gasket was installed crookedly, so much so that it did not even cover the crank chamber connector
Jamb four
The main bearing was closed. He died quickly
Fifth jamb
The gearbox secondary shaft bearing was not assembled correctly: the rollers should be separated by a ring, but on this engine a ring was not installed between the rollers
So much for a major “repair”, the painted oil seals are proof of this. Now think: is it worth buying a motorcycle after a major overhaul or is it better to buy one that has been worn out, but has never been chipped.
Source
Overhaul of the engine, during which it is necessary to completely disassemble the power unit. Inspect the crankshaft, key seat, check the quality of the connecting rod bearings. Pay attention to the rubber seals, especially the quality of the working surface. The integrity of the central gasket is mandatory. Access to gearbox parts for inspection and repair.
All this work is only possible with the engine removed. Dismantling from the motorcycle frame has a certain sequence that it is advisable to perform. For example, people often forget to drain the oil, and when removing the left engine cover, the oil suddenly flows out right out of nowhere.
Be sure to thoroughly wash the motorcycle before disassembling it in a car wash. This directly affects the quality of service. In which every motorcyclist is interested.
Be sure to thoroughly wash the motorcycle before disassembling it in a car wash. This directly affects the quality of service. In which every motorcyclist is interested.
Supply system
To make the bike go faster, you need to adjust the original carburetor for a higher fuel supply or replace it with a more efficient one. To install a new carburetor, you need to perform the following steps:
- we grind aluminum bushings under the flange of the pipe attaching the carburetor to the cylinders;
- cut off the edge of the inlet channel;
- take a flange from an old carburetor;
- We fasten all the elements using cold welding.
The assembled carburetor must line up exactly with the intake port.
Disassembling the clutch
Removing the clutch cover
Checking the motor circuit
We put pressure on the motor chain and see how much it has sagged: if the chain sag by more than 15 mm, we immediately throw it in the trash.
In our case, the motor chain is ideal: there is practically no sagging
Removing the clutch basket springs
Remove all discs from the basket. After removal, check the discs for wear and warping.
We take out the clutch rod
We weld a rod or piece of tire to the old unnecessary clutch disc, unbend the lock washer under the nut of the inner drum of the clutch basket, fix the inner drum with a puller and unscrew the nut (left-hand thread)
First joint
Someone put a washer under the inner drum
Place a tin block or stick under the chain and unscrew the nut (right-hand thread)
The sprocket sits on a cone and can only be removed with a puller
Remove the adjusting washers from the shaft and pick out the second key
Reed valve
A design feature of a two-stroke engine is that during the working stroke of the piston, part of the working mixture exits through the outlet window. In order for the air-fuel mixture to be completely burned, a reed valve must be installed. Along with fuel economy, it increases traction characteristics at low speeds, which improves acceleration dynamics.
How to use?
Using a carriage puller to remove it is quite simple:
- remove the connecting rods using a connecting rod puller;
- if the carriage is square, then it is better to start on the left side;
- match the splines of the puller with the splines on your carriage;
- if the puller has a centering axis, screw it into the carriage shaft;
- Unscrew the carriage cup, then repeat the same steps on the other side.
Remember that most carriages have right-hand threads on the right and left-hand threads on the left. With the exception of Italians, where both cups have right-hand threads. Different companies have different tools. You may need an additional wrench to turn the carriage puller itself, or your puller may already have a handle. However, there are no very difficult or incomprehensible moments in using the puller, and anyone can figure it out.
Modern look
Along with the increase in power characteristics, there is a need to improve the appearance of the unit: installing a new panel, nickel-plated arches, fairings. One of the popular options for tuning a 3m sunrise among drivers is to convert the sunrise to a cross.
The advantages of this option are that the cross bike moves well off-road, is easy to control and does not require fundamental design changes.
Cross version of the motorcycle.
A few simple instructions on how to convey sunrise, tuning for cross.
- When creating a cross bike, wheels play a very important role, since they take the main load. The wheels should be able to absorb strong impacts well. Spoke-based wheels can handle this task. You should select a tire based on the following dimensions: 120/70-17 at the front and 160/60-17 at the rear.
- The front suspension meets more stringent requirements. Unfortunately, a compromise solution is not possible here, since the original fork may not withstand the load. You will have to buy a fork from a motocross bike as a kit.
- The rear suspension is being converted to a single shock absorber. For this purpose, the fork needs to be welded or selected to the required size at a motor disassembly shop. The spring for the shock absorber is selected based on the weight of the bike and the driver. Next, the suspension is adjusted so that the rear wheel travel does not exceed 250 mm.
Previous entry Tuning IZH Jupiter-5 - do it yourself
Next entry Ural motorcycle - valve adjustment
Replacing the connecting rod
Usually the problem of replacing a connecting rod in the crankshaft is faced by owners of two-stroke equipment, these are motorcycles Minsk, Voskhod, IZH, Krosoviki, Snowmobiles, scooters and mopeds. The crankshaft is screwed up, the question arises of how to repair the crankshaft of a motorcycle, the answer is, first, buy a new crankshaft, second, replace the connecting rod, pin and needle bearing (separator) on the broken crankshaft.
Buying a new crankshaft is of course easier, but the price of a crankshaft is five times more than the price of a connecting rod with a pin and a needle bearing. Here the problem immediately arises of how to press the crankshaft yourself at home, and then compress it and eliminate the runout. Of course, to eliminate runout, any master will look for a lathe, but this is an extra problem. There is a way to eliminate crankshaft runout at home without a lathe, which I came up with.
If you decide to replace the connecting rod in the crankshaft of a motorcycle yourself, then this article is for you. Why pay extra money for a new crankshaft when changing the connecting rod will transform a broken crankshaft into a new one.
Just don’t try to heat the crankshaft, everything is done cold.
Raspresovka kovala
You can press the crankshaft in different ways at home. I prefer to crush the crankshaft cheeks using a chisel or any conical iron bar. The photo below shows crushing the crankshaft cheeks using a chisel and hammer. The principle is this: cones are inserted on both sides of the connecting rod, then blows are applied to them alternately, the cones push the crankshaft cheeks apart. If the width of the cone does not allow the crankshaft cheeks to be moved apart until it separates, you can additionally place a piece of metal under the cheek.
Photo. Motorcycle crankshaft before pressing.
After disconnecting the crankshaft cheeks, you can remove the old connecting rod and bearing. Usually the crankshaft pin comes out from one cheek of the crankshaft, but remains in the other; it can be knocked out using a strong mandrel slightly thinner than the crankshaft pin. Knock out the finger with a heavy hammer; if you try to knock it out with a light hammer, the process may take longer. The old finger is knocked out from the outside of the crankshaft cheek.
I almost forgot, in order to properly compress the crankshaft and not spoil the required gaps between the connecting rod and the cheeks, measure the internal size between the crankshaft cheeks with a caliper before pressing, remember it or write it down.
Pressing the crankshaft
It’s not difficult to press the crankshaft, I didn’t bother pressing the good crankshaft, I’ll explain everything in words. It is advisable to press the crankshaft on an anvil or an old cast-iron car block. Hammer the new finger into the crankshaft cheek in which the finger remained when pressed, this will make it easier to press in the second cheek. The new pin is driven from the inside of the crankshaft to the end. Place the new needle bearing and connecting rod on the pin. Place the crankshaft cheek with the hammered pin on the anvil so that the pin rests on the anvil. Place the other cheek on your finger and hammer in with a heavy hammer as shown in the photo below.
When you put the second cheek on the crankshaft, be careful not to hit the threads or the cone of the crankshaft axis. At this point, there is no need to worry too much about the alignment of the crankshaft shafts; it is enough to roughly position it correctly.
The koleval has been pressed, now check the size between the cheeks with a caliper, if possible, spread the cheeks less, if more, beat the cheeks to the desired size.
Also, be careful that the crankshaft pin does not come out from one of the cheeks; if it comes out, drive it in with a mandrel.
Photo. Pressing a motorcycle crankshaft
Crankshaft alignment
The crankshaft has been assembled, all that remains is to eliminate the runout of the shafts (balance), many people think that you can’t do this without a lathe, but everything ingenious is simple.
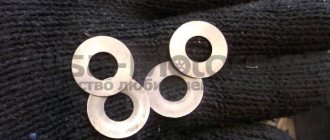
Measure each neck with a caliper as shown in the photo below, usually they are the same size, but sometimes they are slightly different in size. This dimension must be taken into account when aligning the crankshaft.
Photo. We measure the crankshaft cheeks.
All that remains is to attach the rod to the crankshaft cheek as shown in the photo below. It will be like this, first place the barbell on one cheek and press it with your finger, the barbell will lie perfectly flat on the cheek, if this cheek is shifted upward, a gap will appear between the barbell and the second cheek. If the cheek is lower, the bar will lie slightly obliquely.
Photo. A motorcycle crankshaft with a rod is shown; the arrow shows the gap between the rod and the cheek.
Your task is to achieve alignment of the crankshaft cheeks without gaps by applying the bar alternately to each cheek. The photo below shows how you can move the crankshaft cheek with a hammer blow. Just be sure to take into account the strength of the crankshaft cheeks, the crankshaft on which I am showing from a cross-country ChZet, it is hardened and is not afraid of impacts. But most of the crankshafts from road motorcycles have soft metal, so you can only hit the place where the bar is not applied.
Photo. This way you can move the crankshaft cheek.
If one cheek of the crankshaft turns out to be larger in diameter than the other, then when centering the crankshaft, take into account the gap between the cheek and the rod; this gap should be visually the same when applying the rod to the larger cheek on both sides.
Photo. The crankshaft of the motorcycle is centered, the rod lies without gaps on the crankshaft cheeks.
If you do everything right, everything will be correct, you will save money on a new crankshaft by replacing only the connecting rod on the old one, for this you only need your hands and a smart head.
Is it possible to replace the crankshaft cheek by taking it from another?
I did it in different ways, but it is advisable not to change the crankshaft cheek, since it happens that there is a slight displacement from the center of the hole and the center of the crankshaft, so by assembling the cheeks from different crankshafts it is not possible to remove the axial displacement of the shafts. But it happens that even different cheeks sit like native ones. Crankshafts are drilled on one machine with one setting, if the crankshaft is from a different batch, then it was drilled on another machine, and here there may be a slight displacement of hundredths and tenths of millimeters, this little thing does not affect the engine, but when assembling the crankshaft from different cheeks, there may be a displacement.
Pressing out the crankshaft
For repressing the Minsk crankshaft, there are a large number of devices, both specialized and homemade, invented by those who had to carry out repairs at home. The most reliable and easiest, especially for those who are performing depressing for the first time, is a method based on crushing the crankshaft cheeks using a chisel or any other tool approximately suitable in shape.
Before pressing, it is important to record the values of the gaps between the surface of the connecting rod and the surface of the crankshaft cheeks. To do this, use a rod to measure the gaps and write down the data obtained.
Preparation
Russian is Russian, so until we process all the parts properly with a file before installation, nothing will work out...
Insert the cylinder rings and use a feeler gauge to measure the gap in the lock.
- If the gap is less than normal, file the ends of the rings with a file
To reduce engine noise and speed up the ring grinding process, remove small chamfers on their working edges (preferably)
To improve lubrication of the piston pin, use a 5-6 mm drill to drill through holes in the piston bosses (optional)
We remove flashes and deposits of metal in the cylinder windows and round the edges along which the rings go
After finishing work, we thoroughly wash all the parts, prepare a clean work area and begin assembly.
Causes of bearing wear
Otherwise, a complete replacement of the shaft or repair along the path of metal spraying is required. Do not forget also about emergency situations, such as jamming of the piston in the cylinder. This will inevitably lead to bending of the crankshaft, which, by the way, can occur during unprofessional disassembly of the motorcycle, when the shaft is knocked out with a hammer or sledgehammer.
If the bend can be eliminated, then physical damage cannot. Don’t also forget about replacing worn out oil seals in a timely manner. Replacing crankshaft oil seals on a Minsk motorcycle will allow you to avoid such troubles as the release of a gasoline-oil mixture into the generator. Many owners also experience difficulty starting the engine and a sharp drop in power.