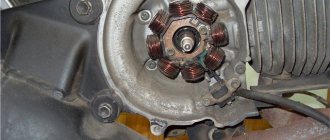
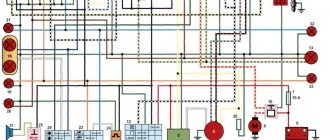
Full generator for 125 motors
YX 125 is definitely a cool engine!
One of the most reliable, torquey at the bottom, and overall a good engine, what can I say. The problem arises only in one thing - in the generator. This is not even a problem, but a solvable nuisance.
The torque of this engine is provided by a huge and heavy generator, which has a large centrifugal and inertial force, due to which the engine can effortlessly drive up a steep hill almost at idle speed.
But the whole problem with this generator is that the current that goes to the power wires, which mostly go to the headlight, is very small. Installing a headlight also, of course, requires installing a battery, otherwise it will work like a kerosene lamp, and the illumination from it will be the same. Someone will say, “Why do you need a headlight at all?”, but many spend their time not on cross-country trails, but simply ride through forests and fields enjoying a quiet ride, and it is these people who need a good headlight.
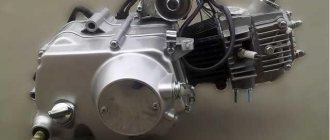
Let's assume that you installed the battery, but left the original generator.
Yes, it really does have power wires for the light, but they are powered by one single low-power coil, it’s funny! The headlight will drain the battery almost completely within 20 minutes, and the generator, which in theory should charge the battery, with its only dead coil cannot even cope with a AA battery, let alone a headlight, and even provide a stable charge to the battery.
You can, of course, install a full-fledged generator from the YX 140.
It will produce much better current, but it is light and will completely kill all the advantages and high-torque power of the 125, because there will be neither inertia nor the fact that it is the 125 motors that carry out this way. So this option is no longer available, unfortunately.
But the LIFAN engine manufacturers have solved the problem and are installing a full-fledged six-coil generator on their 125 engines, which is perfect for the YX. What is noteworthy is that this generator is heavy! This is exactly what you need and is ideal for 125 engines.
But the coolest thing is that there are six coils, and not one, as on YX engines. Such a generator will more than provide you with full-fledged operation of the headlight and a good, stable battery charge, so nothing cooler has yet been invented.
Bottom line: if you are a fan of the 125 engine and you want to have full lighting with a good battery charge, then you will not find a better generator for your tasks, unless of course you are an electronics genius and you make it yourself.
Source
Combination of timing marks for YX 140 and YX 125 engines
This article is devoted to combining timing marks for the YX140 and YX125 engines.
In terms of mark alignment, these engines are identical, and structurally they are not very different, with the exception of reliability and volume. You will definitely need to combine marks in two cases:
1. when you perform a banal valve clearance adjustment;
2. when, after complete or partial disassembly of the engine, you need to correctly install the timing chain with all the necessary marks aligned. There are only two of them.
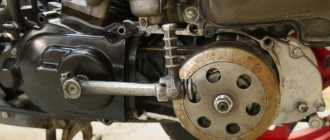
So, first we unscrew the generator cover on the left side, which is held on by three screws under the M 8 head!
Behind it we find a generator. Light, heavy, with or without coils for light - it doesn’t matter. In terms of mark alignment, I don't care.
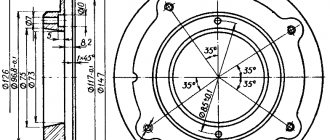
On the generator we find the T mark. Only T and nothing else! This mark corresponds to the mark on the generator, located to the right of the letter T.
EXACTLY THIS RISK should coincide with the slot that is located on the crankcase!
Now about the mark on the timing star. With the generator perfectly aligned with the T mark with the slot on the crankcase, the timing sprocket should exactly coincide with its POINT mark with the slot on the cylinder head housing (approximately the same slot as on the crankcase for the T mark).
Only the blind or lazy can fail to see two marks, one dot and a mark!
So, correction! With a perfectly aligned generator, the mark on the timing sprocket may deviate from the mark by one to one and a half millimeters. This is due to the presence of free movement of the timing chain and camshaft, which is in a neutral position, when there is no force exerted by the rockers on the valves.
That's all you need to know to correctly align the timing marks and not bend the valves!
Source
To watch online, click on the video ⤵
Rotor Kit, Pitbike Tuning, ROTOR KIT, YX 140More details
sports ignition for alpha Inner Rotor Kit Flywheel IgnitionRead more
Rotor kit, yx140, lightweight generator, tuning, rotor kitRead more
Malossi selettra on a pit bike, top ignitionRead more
PROJECT “ROCKET” THE MOST POWERFUL PIT BIKE 140/SERIES 2/INSTALLATION OF SPORTS IGNITION ON YX140.PAINTING.Read more
Rotor Kit Kayo-140 (In action)More details
Rotor ignition for a pitbike - test / Rotor Kit Engine Kayo 125 Pitbike HDMore
PROJECT “ROCKET” THE MOST POWERFUL PIT BIKE 140/SERIES 1/I am doing porting to the cylinder head yx140.sports camshaft z40More
HOW TO UPGRADE A PIT BIKE FOR 900 RUBLES. More details
The whale rotor burned out, Daytona is over, life is painRead more
Pit bike exhaust tuning. Megabomb installation from PonurovichRead more
Installing a 3 valve cylinder head on a 125YX engineRead more
WHAT happens if you install the wrong generator on a pit bike (motorcycle)Read more
Pitbike wheelie JMC 140 and rotor kitRead more
Source
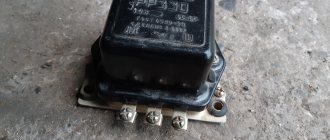
Ignition coil transfer to JMC 160MXR and ignition sensor transfer to YX160
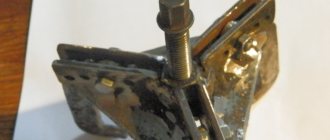
As usual, I moved the ignition coil and shortened the explosive wire by half.
I made an L-shaped adapter from a corner.
I cut the explosive wire in place.
This is what happened.
Thanks to this, there is less chance that it will break into the wire and, in general, there is less snot of any kind.
I finally made myself a basic strobe light and checked all the switches that I had, 8 pieces, of which only one was “smart” from JMC (rejected the ignition from 35 degrees to 45 degrees) and two crazy ones (rejected the ignition from 35 degrees to 40 degrees), the rest were stupid ( constantly kept an angle of 40 degrees, regardless of the speed) among them was the so-called racing one, beautiful and with ribbing BUT at the same time, stupid as a felt boot!
And then I was horrified because at idle we have a 35 degree lead, the engine is constantly detonating and you can hear it very well! I decided to somehow fix this and made a spacer plate for the sensor. (light stock, dark new)
As a result, this plate shifted the ignition by 10 degrees and I got 25 degrees at idle and 35 degrees at rpm, which in general is quite enough for the top, but at XX, the damn engine is detonating???? The next step will be microprocessor ignition programmable on the fly, thanks to which it will be possible to achieve maximum performance from the engine at all speeds!
Source
To watch online, click on the video ⤵
We remove the generator rotor without a pullerRead more
How to remove the generator rotor on Irbis TTR 125More details
How to remove the rotor without a puller on an Irbis TTR 125 pit bike. Read more
how to remove an alternator without a puller on a scooter (yamaha 3kj) suzuki hondaRead more
How to remove a generator rotor in 2 minutesRead more
Analysis of Patron Sport 250. how to remove a magnet (Generator Rotor) from an engine with a starter overrunning clutchRead more
How to remove a generator rotorRead more
Remove the rotor without a puller on TTR 125More details
How to remove an alternator bell on a motorcycle without a special pullerRead more
How to remove a generator rotor (Experiment)More details
Homemade generator rotor puller from a Kayo125 pit bikeRead more
HOW TO REMOVE THE GENERATOR ON THE BSE PH10-150e PIT BIKE. FATAL MISTAKES! Read more
About how to easily and simply remove the generator rotor without a puller. Read more
How to remove the generator rotor on an alpha moped (without a puller)Read more
Replacing the generator oil seal on a pit bikeRead more
How to remove a generator rotor on a Chinese motorcycle. (without a PULLER)!! Read more
How to remove the generator magnet from Alfa, DeltaRead more
How to remove a magnet (generator rotor) from an alpha without a pullerRead more
Setting up a pit bike carburetor
The easiest way to check whether a pit bike's carburetor is set correctly is by the color of the spark plug.
We unscrew the candle and look at the color:
- Brick color - the mixture is correct
- Whitish - poor mixture
- Black smoked - rich mixture
In addition, you can determine the quality of the mixture by the sound and reaction to opening the trigger.
When you let off the gas, you hear shooting noises - the mixture is lean. When the gas is sharply opened, the engine seems to choke and there is no proper pickup - the mixture is too rich. In addition, when the mixture is lean, the engine overheats and the exhaust pipe becomes red-hot.
Having determined the quality of our mixture, we begin to turn the carburetor. In reality, it looks something like this: first we try to achieve the desired mixture by raising or lowering the needle one or two notches, we try to ride it, if the difference is felt immediately, we continue to conjure until the desired result is achieved. Don't forget about the suction. The carburetor must be adjusted with the engine warm and the choke closed. If the difference is not immediately visible, we ride longer, then evaluate the results of the adjustment by the color of the spark plug. If you can’t adjust the needle, then return the locking ring on the needle to the middle position (default) and select the jets. The carburetor must be supplied with a set of jets of different sizes. The nozzle has two sizes: the first is the thread diameter (m5, m6, etc.), the second is the throughput of the nozzle in cm3/min (the numbers are stamped on the nozzle itself). You can change the jet or check its size by removing the carburetor from the pit bike, draining all the gasoline from it and opening the float chamber by unscrewing two bolts. The jet looks like a flathead screwdriver bolt with a through hole in the middle.
Accordingly, if the mixture is lean (the spark plug is white, the pipe is red, the motor is overheating), we raise the needle; if that doesn’t help, we increase the jet (the numbers are larger). If the mixture is rich (the spark plug is black, when the gas is opened sharply), we lower the needle; if that doesn’t help, we reduce the jet (the numbers are smaller).
After you have adjusted the mixture, there will also be a bolt with a spring on the carber that is responsible for idle speed. If the pit bike stalls when the gas is released, the engine speed is too low - turn the screw clockwise (tighten it). If, on the contrary, the pit roars while standing on a stand, unscrew the screw counterclockwise. Ideally, do everything with the engine warm and running, so that you can immediately determine whether we have cranked up enough or whether we need more.
It happens that no adjustment helps, or this may be due to dirt and sand getting into the carburetor. Flushing and blowing all the channels in the carburetor will help here.
In general, this is how everything is set up, the main thing here is to stock up on time and patience, in this matter, of course, some professionalism is required, which will allow you to quickly identify the problem of a bad mixture and adjust the carburetor on a pit bike, but even without experience you can cope with this task. Although in particularly advanced cases it is better to call a professional.
Mikuni carburetor rebuild for pit bikes
SUPER ESSENTIAL UP
An ultra-intensive course on setting up carbers on a pit bike.
- Removing the carburetor and filter
- We disassemble the carburetor down to the screws, wash everything in gasoline, and blow out all the holes with a compressor.
- Reassemble the carburetor in reverse order, keeping it surgically clean. We unscrew the quality screw two turns, and tighten the idle screw almost all the way. The needle is in the middle position.
- We wash the filter either with a special product, or with Fairy, or, if it’s just a foam cartridge (from a filter box), we soak it in gasoline.
- We dry the filter and thoroughly saturate it with special oil, let it soak, and squeeze out the remainder without enthusiasm.
- We put everything back on the pit bike.
- We put a new clean candle.
- Next, we look at the gas hose and gas filter (if installed). Kinks and pinching of the hose are not allowed. The filter should be blown freely without creating resistance.
- We check the presence of gasoline in the tank.
- After all the manipulations, we are looking for a deserted, flat, straight road. Let's start a pit bike. Warming up. Using the XX screw, we lower the idle to stable. Then we go all the way in a straight line and ride at an active pace for about 5-10 minutes. Turn off the engine with full throttle.
- We unscrew the spark plug and look at the insulator
- If it is ashen white, the mixture is too lean.
- If it is pale with a brownish tint, the mixture is too poor.
- If it is the color of coffee with milk, or a brick tint, the mixture is what you need!
- If it is darker (coffee with a small amount of milk ????) - the mixture is slightly richer.
- If it is dark brown or black, the mixture is too rich. If nothing is clear from the candle, we ride at full speed for another 5-10 minutes.
Jet
Next, based on the color of the candle, we change the jet.
- If it gets rich, we reduce the jet by two orders of magnitude.
- If it becomes lean, we increase the jet by two orders of magnitude.
- If we are close to the target, we change the jet in the range ± 1.
After each replacement, we roll back and forth at full throttle, then look at the spark plug. We turn off without releasing the gas. The process is quite long and tedious. Having received the desired color (coffee with milk), we proceed to adjusting the quality of the mixture at idle speed.
A correctly selected jet can also be determined by the following symptoms.
- If, when you sharply apply the gas and release the throttle, the speed seems to hover at the top point for a few seconds, and then reluctantly drops, this indicates a lean mixture.
- If, when you sharply apply the gas and release the throttle, the speed drops and sags almost until the engine stalls, and then rises and levels out to idle, this indicates a rich mixture.
With a normally adjusted mixture, after releasing the throttle, the engine speed should drop to the idle level within a second and operate stably at it.
Installing lights on a pit bike
Many riders who ride a pit bike not only during daylight hours, but also in the dark, are very concerned about the lack of standard light on the pit bike. This question affected me too. In this article, let's look at possible ways to install lighting equipment on a pit bike .
There are generally two options for installing lights on a pit bike. It all depends on what kind of engine your motorcycle is equipped with. Does the generator have windings for powering the light or not?
There are three wires coming out of the generator, one of which is plugged.
For example, we took the engine installed on PitsterPro - Zongshen 160cc . There are no windings for light devices on the generator. Possible options: either install a generator with a winding for light, or buy a powerful LED bicycle light with a battery compartment and attach it to the motorcycle. There are interesting offers, for example here. Some specimens will shine even better than the option described below.
There are six wires coming out of the generator, three of which are plugged.
For example, we took the engine installed on the BSE - Lifan 140cc . The generator has windings for light. Installing a headlight on a pit bike with such an engine according to the instructions will take no more than 2-3 hours.
Choosing a light for a pit bike
Having decided on the possibility of connecting the light, we proceed directly to the choice of headlights. But we don’t have much choice, I would say its complete absence. I’ll say right away that I’m not a fan of “collective farm” tuning and prefer ready-made kits for installation on a motorcycle.
A similar kit was discovered on ebay and it is called ACERBIC CYCLOPS STYLE HEADLIGHT KIT PITBIKE DIRT BIKE . There are several colors to choose from:
- Black
- White
- Red
- Green
- Blue
I chose black because... The plastic of the motorcycle was also black. There are two asymmetrical eyes on the muzzle, one lensed for low beam, the other regular with a reflector for high beam.
The advantage of this option is that it is a completely self-sufficient product that does not require any additional purchases , such as wires, regulator relays, remote control, etc. The package includes:
Wire harness, already soldered to contacts and laid in corrugation
Remote control with steering wheel switches (engine start/stop, off/low/high, electric start button)
Two regulator relays (why there are two is not clear, maybe the second one was installed by mistake)
- Meager instructions on one A4 sheet
Installing light on a pit bike
All we have to do is connect it all. To do this, remove the plastic with the seat, remove the gas tank , remove the switch , remove the number plate from the plug (a headlight will be installed in its place), remove start/stop button and disconnect all wiring .
Next, we attach four rubber clamps to the traverse stays, attach the muzzle to them, and bring the wires inside. We install the remote control on the steering wheel by unscrewing two bolts, lay the wire along the steering wheel to the traverse, and secure it with clamps where necessary.
The most popular engine for a 125cc pit bike, pros and cons, tuning
Pitbikeclub welcomes you! My name is Alexey and I am the CEO of PITBIKECLUB.
Below I will share my PERSONAL experience of owning and using this engine, as well as its possible tuning.
Who is this 125cc engine suitable for? Anyone who wants to drive through forests, fields, quarries and holiday villages. Due to the design features, this type of engine has maximum traction from the bottom, so it’s easier and much more comfortable to storm slides, hills, etc. on it than on 150/160cc. This feature of the engine is achieved due to the presence of a large mass on the crankshaft axis, when a heavy clutch basket hangs on one side, and a heavy generator flywheel on the other, and when this structure spins up, the engine “rushes like a tank.” In addition, it starts easily, practically does not “kick in the leg” and has the longest service life of all engines for pit bikes and similar motorcycles.
The performance characteristics are as follows: 4 strokes, air cooling, 9-11 hp, 4 gears manual transmission / automatic (variator) / semi-automatic, kickstarter / electric starter.
Due to a design feature, you can start the engine only in neutral gear! — so if you stall on a climb, look for N ????
There are a lot of options and manufacturers of 125cc engines in China due to the great popularity of such models:
— 125cc with electric starter and manual transmission
— 125cc with electric starter and automatic transmission
— 125cc without starter and manual transmission
— 125cc with electric starter and semi-automatic transmission
As I said above, there are many types of 125cc engines, which are marked 153FMI, 154FMI,1P52FMI, etc. They also pull differently: some are weaker, others are stronger, which is why they indicate 9-11 hp.
Personally, I have used all these types throughout my time. Visually, you won’t immediately notice the difference in them, it’s “inside”: in the size of the piston, the material of the cylinder, the diameter of the pin, the size of the valves, and the type of generator. The most budget 125cc have a 52.4mm piston with 13 pins and valve sizes of 23/20mm (inlet/outlet) + 2x coil generator. Top versions of 125cc engines already have a 54mm piston, 14mm pin and 27/23mm valves + a 6-coil generator with a cast iron cylinder for better cooling - this motor is the most powerful and optimal in my experience of use. It is this motor that is “square”, i.e. the piston stroke is equal to its diameter 54mm x 54mm - and this is the best ratio for even and smooth traction. The French also install it on their top YCF pit bikes.
CARBURETOR. The best carburetor for any 125cc is the Mikuni VM22 - this has already been proven by many years of practice. You won't find anything better. Problem-free start-up, normal choke operation, optimal engine operation without obvious failures.
TUNING. At one time I was very interested in tuning, so I have a lot of experience. You always want to get the most out of the engine, so I tried different methods.
You can't really do anything with this engine except enjoy the stock thrust from the lowest revs. I tried installing sports carbs, polishing the channels, changing the ignition (the entire generator) - to little avail. I recently saw a report on installing a 3-valve cylinder head - in the end, it's a complete "hat" - don't waste your money and time. But in the stock configuration, the engine runs the longest and has the least trouble with its operation.
I hope this article helped you to solve your problems and choices.
Please rate my work with a like or comment.
Thank you for your attention! Joy, goodness and happiness to everyone!
Source