The generator is removed from the scooter in the same way, regardless of the model, manufacturer and year of manufacture. The only thing you will need is a special tool called a generator rotor puller.
Preparation
You can purchase a generator rotor puller at any specialized store. The main thing is to check whether the tool is suitable for your scooter model. If you can’t find a puller in stores in your city, it’s better to order it online, since you won’t be able to remove the generator on a scooter without this tool - damage to the winding is guaranteed and, as a result, the purchase of a new generator.
In addition to the puller, you may need a lock that can be used to lock the rotor or clutch bell in one position.
It should be noted that the generator needs to be dismantled only if such faults are detected as:
- generator breakdown and winding damage;
- if the crankshaft oil seal on the generator side begins to leak;
- if necessary, overhaul the entire scooter engine.
Puller for anything (moped generator)
Good afternoon to all DIYers, in this article I will tell you how to make a useful household device - a puller for bearings, pulleys and other parts. This is a puller with sliding jaws. These paws can be rearranged to suit different diameters. It is also possible to make the legs of different lengths.
Here's what you needed to make your homemade product: 1. Welding 2. Grinder 3. Hammer 4. Sheet of metal 4 mm thick 5. Sheet of metal 5 mm thick 6. 6 bolts with a diameter of 6 mm 7. 6 nuts by 6 mm 8. 2 nuts by 12 mm 9. Central screw 12 mm 10. Caliper 11. Angle 12. Marker 13. Drilling machine 14. Drills 6 mm and 12 mm 15. Tap 16 mm
Step 1
marking the workpiece on a sheet of iron 5mm thick, using a caliper we mark an equilateral triangle with a side of 110 mm.
Step 2
On a sheet of metal 4 mm thick, using a caliper, mark 6 plates 60 mm by 25 mm for attaching the legs. We cut them out using a grinder. Then, on one plate, departing 5 mm from one edge, we mark four holes for adjusting the legs with a step between the holes of 7 mm, punch these holes, collect the plates in a bag using a hand vice and drill the holes with a 6 mm drill using a drilling machine, not forgetting to add water for cooling .
Step 4
We make marks on the triangle with a core and drill holes with a 16 mm drill. Drill holes in the legs with a 6mm drill
Step 5
screw 12mm nuts onto the bolt and weld them together, weld them to the triangular plate and unscrew the bolt. Then we tighten the plates in pairs with 6 mm nuts, putting a gasket between them and weld them so that there is a slot between the plates. Now we clean them with a grinder. We drive the thread with a tap.
Step 6
We assemble our structure, lubricate the nuts, put the tabs in place and screw in the bolt. That's all, our homemade product is ready; you can remove bearings of various sizes; by replacing the tabs, you can remove the bearing race if it remains inside. Personally, we removed the moped generator with this puller; we couldn’t remove it with anything, but with the help of this puller we removed it with great effort. By the way, we made it for him because we couldn’t find anything like it for sale in stores.
Source
Simple generator rotor puller
Simple generator rotor puller
For those who are not interested in the wall of text, scroll down immediately to the description of the design.
In general, I searched the entire forum through a search engine, and through “Google->site:moto-arena.ru puller,” but in the end I didn’t find anything more specific than “buy a puller”/”mount and such and such mother.”
I went, looked at the prices, and bought a rotor puller. About the wrench for unscrewing the nut holding the clutch, I was told that this is a “super special tool” that is not on sale anywhere (it was interesting to hear this from people who do not know what 139fmb is
) and what should be ordered from a turner for one and a half thousand wooden ones and blah blah. In general, I left dissatisfied and with the thought that I would order parts for a major overhaul of the engine on the Internet, after the guys could not find anything that they had there. But they are not small children; the boss is clearly over forty.
I returned home and started trying the puller. It was screwed onto three turns of thread and jammed tightly. Thread M28, step 1, but, as it turned out, the threads in the puller were not cut in depth (i.e., the recesses between the threads on the inside of the puller were not deep enough, although all the turns were identical and neat. Apparently, at the “factory” manufacturer “ machine" for applying threads is already quite old).
Next, a puller for the clutch basket was machined from a 22mm head, and there were also a lot of bad emotions and broken keys in attempts to do something with the rotor.
Finally, I sat down and started digging through the Internet for the third time and accidentally came across this video, where at 15:20 it is shown how bro removed the rotor:
However, I didn’t like the idea of focusing on the gear at all, since I cannot be responsible for my 100% straight-handedness.
Then I thought that it makes no difference whether the emphasis is on the base of the rotor, with which it is mounted on the crankshaft, or on three points around it. The idea was born.
It would be possible not to tell further, since everything is already clear, but I will write it down anyway.
1) A sheet of metal of suitable size, mine was 4.7 mm thick, made of an incomprehensible, very difficult to drill and non-magnetic metal, I suspect that by some miracle I came across a piece of duralumin, although the devil only knows. I drilled it longer than it took me to assemble and remove the rotor. I think that steel from 2 mm thick will work; thinner ones will most likely bend.
Note: due to the tightness of metal (hello, foreign drills), I have four of these bolts, but it is advisable to use the central one with a larger diameter so that it does not accidentally jump off the stop point and become warped. Don’t pay attention to the stud, there was simply no way to replace one bolt, everything was done in a hurry, so that’s it).
5) Drill, respectively.
We drill a hole in a piece of metal for a larger thrust bolt. We insert this bolt with one nut already screwed on, screw the second nut onto it and tighten it with two wrenches onto the sheet.
Note: it would be nice to drill all four holes at once, but I measured the distances on the rotor that had not yet been removed with a caliper, but since you can’t put them closely, it still turned out almost by eye.
Next, I drilled one hole and inserted a fastening bolt with one screwed-on nut into it, placed the structure against the rotor and looked to see if it matched the stop and the slot for the fastening bolt. Then I repeated it for the other two.
Next you need to unscrew the bolts with hexagonal grooves that are in the rotor. I think that they often get stuck, so I recommend using this key:
I had a set with an adapter head into which I inserted a hexagon. There are hexagons that have sharp edges, similar to an asterisk; I do not recommend using them, as it is easy to tear off the seat for the hexagon.
In the end it turned out what is in the photo.
Next, when everything is level, and this is important, you can start tightening the nuts
It is convenient to use a spanner wrench to rotate the nut, and a wrench with a head or a tube wrench to prevent the fastening bolt from turning (do not touch the thrust bolt, it is tightened tightly!).
We make two or three turns with the wrench, turning the nut, then switch to the adjacent mounting bolt, holding it, turn the nut the same number of turns, then to the next one, and so on in a circle.
Do not allow the puller to warp; tighten the nuts evenly. In total, about fifteen turns on each bolt and clack! The rotor jumps off its seat, everyone is happy, you can go and wash your hands.
Source
how to remove the generator without a puller on Alpha/Delta mopeds, etc.
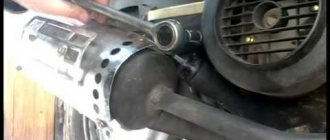
[sc:ads1] Despite the fact that the variator is one of the most durable and wear-resistant components of two-wheeled vehicles, sooner or later the motorist faces the problem of replacing it. A beginner inexperienced in the intricacies of motor mechanics, in view of the widespread opinion about the ease of operation and maintenance of minibikes, will most likely consider this a piece of cake, but everything is far from so simple .
Replacing a CVT in a home garage is quite difficult. The reason is that to dismantle this unit you must have dexterity (that is, straight hands), an understanding of the structure of the vehicle being repaired and, most importantly, specified tools.
If the first and second are purely a matter of profit, then the availability of the necessary repair kit will not be solved by itself. At specialized service stations, the variator is replaced using special pullers, which are provided by official representative offices of brands or are made independently by Kulibin motorcycle mechanics.
The main difficulty in removing the variator from a scooter is fixing the pulley and moving parts. To do this, it is necessary to have pullers suitable for the specific design of the vehicle assembly. This holder is available in several versions.
It can consist of two plates connected in the middle with a bolt (like scissors), with pins welded to the edges. The principle of operation of the tool is to fix the impeller. To do this, puller pins are inserted into the holes on it. Then, using a wrench of a suitable size, the nut on the axle is unscrewed and the variator is dismantled.
There is another design for a homemade puller. It consists of a ring slightly larger than the outer pulley with the teeth of a used variator plate welded along the inner circumference. For convenience, the tool is equipped with a handle holder. Despite the fundamentally different design, the principle of operation of such a puller is similar - fixation.
Procedure
To properly remove the generator from the scooter, use the instructions below:
It should be noted that the hall sensor and the generator itself are connected to each other by a single wiring harness coming out of the casing, which is why you will have to disconnect the wires to dismantle the generator. To do this, you will need to crawl under the plastic and carefully disconnect all the connectors.
During such work, you must carefully ensure that the bolts and nuts that secure the scooter parts are not lost, since you are unlikely to be able to find suitable components if they are lost.
When the generator is properly removed, you can proceed to repair it or install a new device. By acting carefully, you can not only preserve the generator, but also save on the services of specialists.
Difficulties
Our people don’t want to buy pullers and they put everything under the rotor and even try to knock it down with a hammer, and once I came across a scooter with a piece of some kind of metal welded to the rotor. They probably welded a hook and wanted to pull it off with a KAMAZ.
On the one hand, people can understand: why buy an expensive tool for a one-time job. On the other hand, I don’t understand people: why buy and personally damage a scooter with a hammer, if you can give it to a mechanic for repairs? A dilemma, whatever one may say.
Photo report: How to remove a scooter generator?
The generator is not such a simple thing and you will have to work a little to remove it. Well, in addition to everything, if you don’t have at least the minimum material and technical base nearby, then buy pullers for one thing. Unfortunately, there is nowhere without them. Of course, you can do without pullers, and such precedents have already been encountered in my practice, but they are not what we will be talking about today.
On the one hand, people can understand: why buy an expensive tool for a one-time job. On the other hand, I don’t understand people: why buy and personally damage a scooter with a hammer, if you can give it to a mechanic for repairs? A dilemma, whatever one may say.
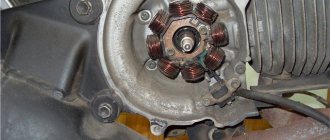
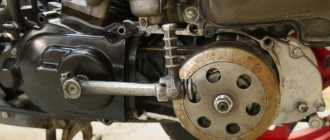
The generator consists of two main parts: the rotor and the stator. The stator is attached to the engine crankcase and can be removed very easily, literally “by hand”. But the situation with the rotor is different. The rotor is mounted on a cone and clamped with a nut, and it is clamped tightly, and in order to remove it from there, you must first secure it from turning, then unscrew the nut and only then use a puller to pull it off the cone.
How to unscrew the nut?
To fix the rotor, I sometimes use a homemade puller similar to the factory one. I made it from old unnecessary pieces of hardware, and it works no worse than the factory one.
If you don't mind the money, you can buy yourself a factory one. It is inexpensive and easier to operate than a steamed turnip: insert the pins into special holes in the rotor, rest the lever on something and calmly unscrew the nut. By the way, such clamps are sold not only in spare parts stores, but also in power tool stores.
In power tool stores, traders position this device as a universal wrench for loosening nuts on angle grinders (angle grinders). It’s called: “universal wrench for angle grinders.” It costs only 160 rubles, and the original, supposedly “correct” one costs 350 rubles.
If you buy the same one for yourself, immediately cut its pins, otherwise they are very long in stock and can damage the generator windings during operation.
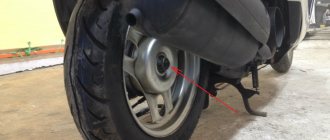
We examine the scooter from all sides to see if there is a generator on it, remove the casing and cooling impeller from it.
Unscrew the bolts and remove the impeller from the rotor.
Let me digress a little: do not lose the bolts that secure the impeller to the rotor, but it is best to immediately remove them. I had the opportunity to repair a scooter, the owner of which lost the original bolt and tightened another one in its place, but it turned out to be a little longer and broke the windings when starting the engine.
The bolt was only a few millimeters longer than the original one.
We fix the rotor and unscrew the nut. As I already said: in my work I sometimes use homemade tools, in this case a puller.
We unscrew the nut and remove it together with the washer from the rotor. If the puck is not there, then someone has already managed to dig around there before you...
Crankshaft restoration
Due to the fact that recently the vast majority of people have begun to look towards Chinese scooters, their number has increased. As you know, the quality is not at the highest level, but it is quite acceptable for trouble-free operation for 2-3 years or even more. I don’t want to write about factory scooters, because their quality is high (they keep the brand), but not all of them.
In general, this article is intended for all scooter riders without exception and does not have clear boundaries in the brand and year of manufacture of the scooter. We will consider the KShM - the crank mechanism of a 2-stroke engine.
Brief information: The crankshaft is designed to convert reciprocating energy into rotational energy. In other words, the crankshaft. This unit is not very complicated in design, but requires very precise weight distribution and proper installation. Also, certain conditions are required for normal operation.
Related Products
KAYO generator rotor engine. YX 140cc (for models with lighting equipment) “Motoopt TW”
KAYO generator rotor engine. YX 140cc (for models with lighting equipment) “Motoopt TW” Product code: 2552
Monday – Saturday 09:00 – 18:00
Current information on prices, as well as Online ordering, can be found on the official ScooterLom website
More than 10 tons of spare parts in our store.
DISASSEMBLY OF JAPANESE SCOOTERS Honda Suzuki Yamaha
Delivery methods:
2. Pickup - Dinskaya str. Krasnaya 1A
3. Russian Post – Cash on delivery
4. SDEK Transport Company
Electric starter KAYO engine. ZS CB250D-G (air) (P061031) TTR 250cc 10 teeth
Electric starter KAYO engine. ZS CB250D-G (air) (P061031) TTR 250cc 10 teeth Product code: 4971
Monday – Saturday 09:00 – 18:00
Current information on prices, as well as Online ordering, can be found on the official ScooterLom website
More than 10 tons of spare parts in our store.
DISASSEMBLY OF JAPANESE SCOOTERS Honda Suzuki Yamaha
Delivery methods:
2. Pickup - Dinskaya str. Krasnaya 1A
3. Russian Post – Cash on delivery
4. SDEK Transport Company
Scooter rear variator: disassembly and malfunctions
A CVT for a scooter is like a gearbox for a car. In principle, this is the gearbox. The rear variator is a manual continuously variable transmission. As a rule, all modern scooters are equipped with a V-belt variator. The peculiarity of its operation is that it works depending on the engine speed and despite the number of loads. If the scooter's rear variator is worn out, it can be easily felt while driving. The scooter loses its smooth ride, acceleration speed and maximum speed drop. It is not comfortable to ride a scooter for the reasons mentioned above.
The rear variator of a scooter is also called a centrifugal clutch. The operating principle of a centrifugal clutch is quite simple. At certain engine speeds, the clutch automatically connects the secondary shaft of the variator with the gearbox, this ensures a smooth start of the scooter from a standstill. To ensure comfortable travel, the rear variator must always be in good working order.
A scooter's variator (centrifugal clutch) usually lasts for more than one season. In Japanese scooters this can be 5 years or more. But even despite such excellent service, sooner or later he becomes unfit for service. To make it last longer, you need to disassemble the scooter’s variator before each season and evaluate its condition. Even for minor tuning of the variator, it needs to be completely disassembled.
Dismantling the rear variator of a scooter
To disassemble the variator you need to remove the variator cover; it is secured with several bolts. For example, in a Honda dio scooter, the variator cover is screwed on with 6 bolts, which require a 13 socket head.
Now that you have removed the variator cover, let's begin disassembly. It is not necessary to remove the variator belt.
This is precisely why we disassembled the variator of the moped (scooter). Now you need to check the variator rollers for wear.
Replacing variator rollers on a scooter
Replacing the variator rollers on a scooter is necessary if:
The rear variator rollers are one of the main parts of the scooter transmission. The whole dynamics of the scooter is just the rollers of the variator and the spring of the driven pulley. The main thing that characterizes the quality of rollers is roundness and weight.
Sometimes people are looking for an answer to the question “what is the weight of the variator rollers.” But you need to understand that the weight of the variator rollers can vary significantly. You must select variator rollers that are exactly the same as those already installed on your scooter. If you cannot find the same rollers, then you need to replace the entire scooter variator kit, because:
Reviews
Be the first to review “Generator rotor TTR 250cc 166FMM 200W 18k, internal puller, with overrunning clutch” Cancel reply
Monday - Saturday 09:00 - 18:00
Current information on prices, as well as Online ordering, can be found on the official ScooterLom website
More than 10 tons of spare parts in our store.
DISASSEMBLY OF JAPANESE SCOOTERS Honda Suzuki Yamaha
2. Pickup - Dinskaya str. Krasnaya 1A
3. Russian Post - Cash on delivery
4. SDEK Transport Company
Factory puller
The rotor can be removed using either a factory puller or a homemade one. The option with a factory and homemade puller has its pros and cons. I'll start with the disadvantages of the factory puller.
The main disadvantage of a factory puller is its price. A factory puller is very, very expensive. About 500-600 rubles. But price is essentially not a very important criterion for me. Versatility, reliability, ease of use and durability are much more important to me. Unfortunately, the factory puller does not have all these advantages, except perhaps ease of use.
The versatility of the factory puller is zero and, unfortunately, it is only suitable for a certain series of engines. And if you need to repair a scooter that is not widely used in our country, then you will also have to buy a new puller for it. And this will be very, very difficult to do, since tools for rare models of scooters are as rare on sale as spare parts.
The reliability of the factory puller is extremely low. I won’t say that the problem is in the design itself, rather the opposite: the design is more than perfect. And it’s much more perfect. Nut + bolt - that’s all its design.
But the quality... There is something to discuss here. The quality of factory pullers leaves much to be desired. They are enough for literally several times, and I’m talking about expensive pullers for 500-600 rubles.
Cheap ones at 220-250 rubles in terms of quality are completely out of the question. Not only are they made of some kind of plasticine, but even this seems not enough for the manufacturer of this shit. He still manages to make them thinner or even thicker than necessary.
This is what the cheapest puller looks like, or rather, what’s left of it: a bolt from it is lost somewhere. It was used only once - the thread was immediately torn off, both on the puller itself and on the rotor, although before using this guan it was good there.
And even if you imagine the situation. that I will be able to buy a good branded puller, even if it costs 1,500 rubles, but it costs about that much. Where do I put the tusks (or rather, where do I get away from them?), who kill the threads under the puller and then, with an innocent look, roll their garbage dumps to me for repairs. There is no way to correct the thread on the rotor; it is not through.
This is what a high-quality factory puller looks like. Their prices are real - from 500 rubles and above.
Cons are minuses, but the factory puller also has its advantages. One of which is ease of use. And it is really convenient and easy to use. What's inconvenient about that? Screw it into the rotor, tighten the bolt and the rotor itself jumps into your hand.
Homemade puller
Unfortunately, homemade, just like factory-made, is not without its drawbacks. It is moderately reliable, versatile, and cheap, but it is not so convenient to use, and if you do not know how to use it, you can easily break the threads under the bolts of the cooling impeller.
Which puller you will use is up to you to decide. I have described all the pros and cons of both options for you.
For myself, I chose the option with a homemade puller. And the price has nothing to do with it. It's all about experience. Over the years of work, I tried a lot of things and eventually came to the conclusion that there is nothing better than a homemade tool puller.
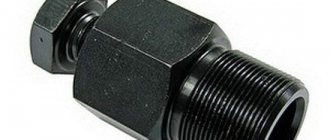
I made my puller in literally an hour, if not less. I bought the largest washer that was available in the store, welded a smaller washer into its center, and welded a regular nut into the center of the small washer.
I screwed a bolt from a regular car puller into the nut, attached the washer to the cooling impeller, marked points with a pencil through the holes for the bolts, marked and drilled the holes.
If you don’t want to make a puller, buy a factory one at the store or ask your friends. Just before purchasing, just in case, remove the cooling impeller and look at the condition of the thread.
Removing the rotor
Insert the bolts into the required holes. We take the bolts from the cooling impeller - they fit there perfectly. In order not to touch the windings, we screw restrictive nuts onto the bolts - they will not allow the bolts to go deep inside the generator.
We apply the puller to the rotor and screw the bolts into the holes. In order not to break the thread, slightly tighten the central bolt and see if all the bolts are tight. If any bolt is loose, tighten it.
This way we will evenly distribute the load between the bolts. If you neglect this moment, the entire load, unnoticed by you, can rest on only one bolt or two, and then they will break out of the rotor along with the thread. We don't need this, of course.
Now the main thing: what is there, you cannot tighten the central bolt by force. In this case, excessive force will not achieve anything. Everything must be done slowly and competently. Otherwise, you will tear the puller out of the rotor along with the roots, and then your budget will become completely financially insolvent.
You only need to remove the rotor this way: Lightly tighten the central bolt of the puller with a wrench, lightly hit the end of the central bolt with a small hammer - the rotor, usually, after the first blow, flies off the cone without talking, if it doesn’t fly off, pull the bolt again and hit again.
I learned this technique back in 1996, when I had the opportunity to remove the reel drive pulley of the Kolos combine harvester from the shaft. If it weren’t for one smart person who promptly told me how to work with a puller correctly, then I would have smashed both the pulley and the puller and the sledgehammer along with the combine...
The rotor sits on a key. If you do not plan to further disassemble the engine, leave it as is. And if you plan, you better get it, otherwise you’ll lose it.
A broken key can be easily removed with small pliers; if the key fits very tightly, leave it, it won’t get away from you.
So that you don’t have to guess later how your stator was positioned, we put marks with a core or take a photo, remember it, or do something else. This is necessary in order to protect yourself from problems with a lost outline.
It happens that when installing it back, the stator is installed in reverse, and then depending on your luck: everything may go without consequences, or the spark may disappear or interruptions may appear. To avoid this, any, not just CDI-type scooter generators must be installed exactly as they were originally installed. If you follow this golden rule, you will be happy.
We remove the stator. Installation of the generator is carried out in reverse order.
Source
Outline
It happens that when installing it back, the stator is installed in reverse, and then depending on your luck: everything may go without consequences, or the spark may disappear or interruptions may appear. To avoid this, any, not just CDI-type scooter generators must be installed exactly as they were originally installed. If you follow this golden rule, you will be happy.
We remove the stator. Installation of the generator is carried out in reverse order.
Source