How to remove a generator on a scooter
The generator is removed from the scooter in the same way, regardless of the model, manufacturer and year of manufacture.
The only thing you will need is a special tool called a generator rotor puller. You can purchase a generator rotor puller at any specialized store. The main thing is to check whether the tool is suitable for your scooter model. If you can’t find a puller in stores in your city, it’s better to order it online, since you won’t be able to remove the generator on a scooter without this tool - damage to the winding is guaranteed and, as a result, the purchase of a new generator.
In addition to the puller, you may need a lock that can be used to lock the rotor or clutch bell in one position.
It should be noted that the generator needs to be dismantled only if such faults are detected as:
- generator breakdown and winding damage;
- if the crankshaft oil seal on the generator side begins to leak;
- if necessary, overhaul the entire scooter engine.
Procedure
To properly remove the generator from the scooter, use the instructions below:
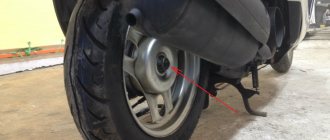
- Place your vehicle on the step and unscrew the side casing held on by 4-5 bolts;
- After removing the casing, you will need to remove the impeller that allows you to cool the engine;
- Then unscrew the nut on the shaft, which will become visible after unscrewing the impeller, using a wrench or a clamp;
- Remove the hall sensor by first removing the plate on which it is attached.
It should be noted that the hall sensor and the generator itself are connected to each other by a single wiring harness coming out of the casing, which is why you will have to disconnect the wires to dismantle the generator. To do this, you will need to crawl under the plastic and carefully disconnect all the connectors.
After this, you will need to unscrew the two bolts that secure the generator and easily disconnect the last one.
During such work, you must carefully ensure that the bolts and nuts that secure the scooter parts are not lost, since you are unlikely to be able to find suitable components if they are lost.
When the generator is properly removed, you can proceed to repair it or install a new device. By acting carefully, you can not only preserve the generator, but also save on the services of specialists.
Photo report: How to remove a scooter generator?
The generator is not such a simple thing and you will have to work a little to remove it. Well, in addition to everything, if you don’t have at least the minimum material and technical base nearby, then buy pullers for one thing. Unfortunately, there is nowhere without them. Of course, you can do without pullers, and such precedents have already been encountered in my practice, but they are not what we will be talking about today.
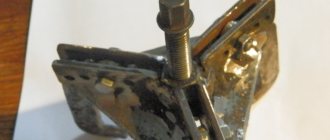
Our people don’t want to buy pullers and they put everything under the rotor and even try to knock it down with a hammer, and once I came across a scooter with a piece of some kind of metal welded to the rotor. They probably welded a hook and wanted to pull it off with a KAMAZ.
On the one hand, people can understand: why buy an expensive tool for a one-time job. On the other hand, I don’t understand people: why buy and personally damage a scooter with a hammer, if you can give it to a mechanic for repairs? A dilemma, whatever one may say.
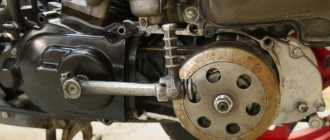
The generator consists of two main parts: the rotor and the stator. The stator is attached to the engine crankcase and can be removed very easily, literally “by hand”. But the situation with the rotor is different. The rotor is mounted on a cone and clamped with a nut, and it is clamped tightly, and in order to remove it from there, you must first secure it from turning, then unscrew the nut and only then use a puller to pull it off the cone.
How to make a scooter generator puller yourself?
At first there was a desire to order some kind of factory puller for a turner, but all the pros and cons - this idea was abandoned: you can’t find a good turner during the day today, and those who sharpen rawhide in garages charge such prices for their handicraft that it’s cheaper to buy in a store branded than to order them.
For those who don't know, the factory puller looks something like this. Pay attention to how well it is made and even with this quality it is only enough for a few times. And this is provided that the threads in the generator rotor are intact and not damaged.
After some thought, this type of puller, due to the unavailability of a good turner, was immediately discarded and it was decided to start from a slightly different scheme - the flange one.
We weld a smaller washer into the center of the washer and weld a regular M12 nut to it, the main step. The choice of the M12 nut was not accidental: I had a factory puller lying around, the bolt of which was just for this thread
At the end of the bolts from the factory pullers there is a ball or a simple cone. A bolt with a ball is the best option: the ball does not put so much pressure on the shaft and it is easier to tighten the bolt with it. If you don’t have such a bolt, sand any one you can get your hands on to a cone. For example, this puller is made from the first washer from a speaker that came to hand and a rusty bolt with a nut. For one or two times such a puller is quite enough
All that's left to do is mark and drill holes for the bolts. Place the cooling impeller against the washer and slightly unscrew the bolt from the puller: it will fit into the recess on the impeller and center it. Fix the washer and mark the holes for the bolts with a pencil
We punch the marks, go through the holes: first with a thin drill, then with an 8 mm drill
Problem: the holes are slightly overlapping the welding seams, and this is not good
So that the welding seams do not interfere with work, we grind them with a grinder and the puller is ready
Working with this puller is not as convenient as the factory one, but it is possible: install the puller on the rotor, slightly tighten the bolt, hit the end of the bolt with a small hammer and the rotor immediately flies off the crankshaft axle
And most importantly, this puller is universal. If necessary, you can drill more holes and remove the generator rotor from any scooter model
Source
How to unscrew the nut?
To fix the rotor, I sometimes use a homemade puller similar to the factory one. I made it from old unnecessary pieces of hardware, and it works no worse than the factory one.
If you don't mind the money, you can buy yourself a factory one. It is inexpensive and easier to operate than a steamed turnip: insert the pins into special holes in the rotor, rest the lever on something and calmly unscrew the nut. By the way, such clamps are sold not only in spare parts stores, but also in power tool stores.
In power tool stores, traders position this device as a universal wrench for loosening nuts on angle grinders (angle grinders). It’s called: “universal wrench for angle grinders.” It costs only 160 rubles, and the original, supposedly “correct” one costs 350 rubles.
If you buy the same one for yourself, immediately cut its pins, otherwise they are very long in stock and can damage the generator windings during operation.
Unscrew the bolts and remove the impeller from the rotor.
Let me digress a little: do not lose the bolts that secure the impeller to the rotor, but it is best to immediately remove them. I had the opportunity to repair a scooter, the owner of which lost the original bolt and tightened another one in its place, but it turned out to be a little longer and broke the windings when starting the engine.
The bolt was only a few millimeters longer than the original one.
We fix the rotor and unscrew the nut. As I already said: in my work I sometimes use homemade tools, in this case a puller.
We unscrew the nut and remove it together with the washer from the rotor. If the puck is not there, then someone has already managed to dig around there before you...
Related Products
Generator puller 4t GY6-125 150cc + 4t GY6 50cc Honda Yamaha Suzuki Double-sided TW
Generator puller 4t GY6-125 150cc + 4t GY6 50cc Honda Yamaha Suzuki Double-sided TW Product code: 8807
Monday – Saturday 09:00 – 18:00
Current information on prices, as well as Online ordering, can be found on the official ScooterLom website
More than 10 tons of spare parts in our store.
DISASSEMBLY OF JAPANESE SCOOTERS Honda Suzuki Yamaha
Delivery methods:
2. Pickup - Dinskaya str. Krasnaya 1A
Factory puller
The rotor can be removed using either a factory puller or a homemade one. The option with a factory and homemade puller has its pros and cons. I'll start with the disadvantages of the factory puller.
The main disadvantage of a factory puller is its price. A factory puller is very, very expensive. About 500-600 rubles. But price is essentially not a very important criterion for me. Versatility, reliability, ease of use and durability are much more important to me. Unfortunately, the factory puller does not have all these advantages, except perhaps ease of use.
The versatility of the factory puller is zero and, unfortunately, it is only suitable for a certain series of engines. And if you need to repair a scooter that is not widely used in our country, then you will also have to buy a new puller for it. And this will be very, very difficult to do, since tools for rare models of scooters are as rare on sale as spare parts.
The reliability of the factory puller is extremely low. I won’t say that the problem is in the design itself, rather the opposite: the design is more than perfect. And it’s much more perfect. Nut + bolt - that’s all its design.
But the quality... There is something to discuss here. The quality of factory pullers leaves much to be desired. They are enough for literally several times, and I’m talking about expensive pullers for 500-600 rubles.
Cheap ones at 220-250 rubles in terms of quality are completely out of the question. Not only are they made of some kind of plasticine, but even this seems not enough for the manufacturer of this shit. He still manages to make them thinner or even thicker than necessary.
This is what the cheapest puller looks like, or rather, what’s left of it: a bolt from it is lost somewhere. It was used only once - the thread was immediately torn off, both on the puller itself and on the rotor, although before using this guan it was good there.
And even if you imagine the situation. that I will be able to buy a good branded puller, even if it costs 1,500 rubles, but it costs about that much. Where do I put the tusks (or rather, where do I get away from them?), who kill the threads under the puller and then, with an innocent look, roll their garbage dumps to me for repairs. There is no way to correct the thread on the rotor; it is not through.
This is what a high-quality factory puller looks like. Their prices are real - from 500 rubles and above.
Cons are minuses, but the factory puller also has its advantages. One of which is ease of use. And it is really convenient and easy to use. What's inconvenient about that? Screw it into the rotor, tighten the bolt and the rotor itself jumps into your hand.
Puller for anything (moped generator)
Good afternoon to all DIYers, in this article I will tell you how to make a useful household device - a puller for bearings, pulleys and other parts. This is a puller with sliding jaws. These paws can be rearranged to suit different diameters. It is also possible to make the legs of different lengths.
Here's what you needed to make your homemade product: 1. Welding 2. Grinder 3. Hammer 4. Sheet of metal 4 mm thick 5. Sheet of metal 5 mm thick 6. 6 bolts with a diameter of 6 mm 7. 6 nuts by 6 mm 8. 2 nuts by 12 mm 9. Central screw 12 mm 10. Caliper 11. Angle 12. Marker 13. Drilling machine 14. Drills 6 mm and 12 mm 15. Tap 16 mm
Step 1
marking the workpiece on a sheet of iron 5mm thick, using a caliper we mark an equilateral triangle with a side of 110 mm.
Step 2
On a sheet of metal 4 mm thick, using a caliper, mark 6 plates 60 mm by 25 mm for attaching the legs. We cut them out using a grinder. Then, on one plate, departing 5 mm from one edge, we mark four holes for adjusting the legs with a step between the holes of 7 mm, punch these holes, collect the plates in a bag using a hand vice and drill the holes with a 6 mm drill using a drilling machine, not forgetting to add water for cooling .
Step 4
We make marks on the triangle with a core and drill holes with a 16 mm drill. Drill holes in the legs with a 6mm drill
Step 5
screw 12mm nuts onto the bolt and weld them together, weld them to the triangular plate and unscrew the bolt. Then we tighten the plates in pairs with 6 mm nuts, putting a gasket between them and weld them so that there is a slot between the plates. Now we clean them with a grinder. We drive the thread with a tap.
Step 6
We assemble our structure, lubricate the nuts, put the tabs in place and screw in the bolt. That's all, our homemade product is ready; you can remove bearings of various sizes; by replacing the tabs, you can remove the bearing race if it remains inside. Personally, we removed the moped generator with this puller; we couldn’t remove it with anything, but with the help of this puller we removed it with great effort. By the way, we made it for him because we couldn’t find anything like it for sale in stores.
Source
Homemade puller
Unfortunately, homemade, just like factory-made, is not without its drawbacks. It is moderately reliable, versatile, and cheap, but it is not so convenient to use, and if you do not know how to use it, you can easily break the threads under the bolts of the cooling impeller.
Which puller you will use is up to you to decide. I have described all the pros and cons of both options for you.
For myself, I chose the option with a homemade puller. And the price has nothing to do with it. It's all about experience. Over the years of work, I tried a lot of things and eventually came to the conclusion that there is nothing better than a homemade tool puller.
I screwed a bolt from a regular car puller into the nut, attached the washer to the cooling impeller, marked points with a pencil through the holes for the bolts, marked and drilled the holes.
If you don’t want to make a puller, buy a factory one at the store or ask your friends. Just before purchasing, just in case, remove the cooling impeller and look at the condition of the thread.
Removing the rotor
Insert the bolts into the required holes. We take the bolts from the cooling impeller - they fit there perfectly. In order not to touch the windings, we screw restrictive nuts onto the bolts - they will not allow the bolts to go deep inside the generator.
We apply the puller to the rotor and screw the bolts into the holes. In order not to break the thread, slightly tighten the central bolt and see if all the bolts are tight. If any bolt is loose, tighten it.
This way we will evenly distribute the load between the bolts. If you neglect this moment, the entire load, unnoticed by you, can rest on only one bolt or two, and then they will break out of the rotor along with the thread. We don't need this, of course.
Now the main thing: what is there, you cannot tighten the central bolt by force. In this case, excessive force will not achieve anything. Everything must be done slowly and competently. Otherwise, you will tear the puller out of the rotor along with the roots, and then your budget will become completely financially insolvent.
You only need to remove the rotor this way: Lightly tighten the central bolt of the puller with a wrench, lightly hit the end of the central bolt with a small hammer - the rotor, usually, after the first blow, flies off the cone without talking, if it doesn’t fly off, pull the bolt again and hit again.
I learned this technique back in 1996, when I had the opportunity to remove the reel drive pulley of the Kolos combine harvester from the shaft. If it weren’t for one smart person who promptly told me how to work with a puller correctly, then I would have smashed both the pulley and the puller and the sledgehammer along with the combine...
The rotor sits on a key. If you do not plan to further disassemble the engine, leave it as is. And if you plan, you better get it, otherwise you’ll lose it.
A broken key can be easily removed with small pliers; if the key fits very tightly, leave it, it won’t get away from you.
So that you don’t have to guess later how your stator was positioned, we put marks with a core or take a photo, remember it, or do something else. This is necessary in order to protect yourself from problems with a lost outline.
It happens that when installing it back, the stator is installed in reverse, and then depending on your luck: everything may go without consequences, or the spark may disappear or interruptions may appear. To avoid this, any, not just CDI-type scooter generators must be installed exactly as they were originally installed. If you follow this golden rule, you will be happy.
We remove the stator. Installation of the generator is carried out in reverse order.
How to remove a generator on a scooter, detailed tutorial with photos
In this article I will tell you and show you in detail how to remove the generator on a scooter. There is no particular difference, what kind of scooter you have, Japanese, Chinese, capacity or others, the principle of removing the generator on a scooter is the same. In either case, you will need a tool called a generator rotor puller.
The same alternator rotor puller does not fit all scooters, therefore, check the brand for the extractor. All this is indicated in online stores, so there shouldn’t be any problems. Now there are an abundance of similar pullers, and if you decide to get to the generator, don’t try to do it without it. In any case, damage the winding and you will need to change the generator, which costs even more than the tool.
And here, in fact, he is. This puller is designed for Honda scooters and Chinese scooters with a 139qmb engine:
But this puller will be useful for you to remove the generator rotor on Chinese 150cc scooters:
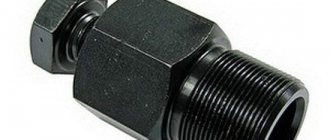
There are also universal 2-in-1 models on the market, where the shaft can be rearranged and screwed in from the reverse side. You can purchase such pullers in motorcycle parts stores or in online stores, for example, here: generator rotor puller. As you can see in the photo, here it is universal, both-sided.
On one side of the puller, an M24 thread is used with a pitch of 1 mm on subsequent scooters:
- Honda Tact;
- Honda Dio;
- Peugeot;
- Kymco;
- Chinese scooters with 139QMB engine;
- Other models with a similar rotor.
On the other hand, M27 threads are used with a pitch of 1 mm on Yamaha scooters, 4-stroke Chinese scooters with an engine capacity of 125-150 cc. and other models with a similar rotor.
Also, to fix the rotor, we will need a special clamp, which can also be used to fix the clutch bell. This is what it looks like, I think we’ve already seen it:
Reviews
Be the first to review “Universal round generator puller” Cancel reply
Monday - Saturday 09:00 - 18:00
Current information on prices, as well as Online ordering, can be found on the official ScooterLom website
More than 10 tons of spare parts in our store.
DISASSEMBLY OF JAPANESE SCOOTERS Honda Suzuki Yamaha
2. Pickup - Dinskaya str. Krasnaya 1A
3. Russian Post - Cash on delivery
4. SDEK Transport Company