Preparation
So that you don’t have green snot later about the fact that the tuning piston does not fit into the crankcase and you were allegedly deceived here - remove the old piston from the engine and measure the hole for the liner with a caliper. If the hole is smaller than the tuning piston sleeve, the “meat” of the crankcase allows it, hands grow from where it is needed - a round file will help you (only before boring - disassemble the engine, assemble the empty crankcase with bolts, bore the hole, make sure that the piston enters the crankcase without problems - wash the parts from shavings and reassemble the engine. Or, as a last resort, coat the crankcase and file with grease to at least somehow protect yourself from sawdust getting into the inside of the engine.)
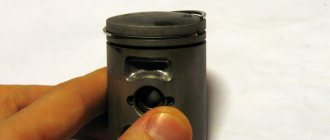
The hole for the 162QMK engine sleeve (such engines are installed on Chinese scabs, more popularly known as “Leika”) in stock is 65 mm. Without boring, a piston of 57mm (150CC), 61mm (1700CC) and 62mm (180CC) easily fits into this crankcase. You won’t find a 62mm piston on sale during the day, so it was decided to install a regular 61mm piston on this engine.
By the way, for those who do not know, a piston with a diameter of 61 mm can be easily installed not only on the Leica engine, but also on any other Chinese 150 equipped with a 157QMJ series engine. There, if you put your hands to it, you can stick a piston at 62mm, but only if the “meat” of the crankcase allows it. Everything is individual, you need to look at the place. In any case, the distance along the studs is the same for both the 61mm piston and the 62mm piston.
From left to right: 61mm, 57mm
On the 139QMB series engine from a regular Chinese 80-six, you can easily install a piston 39mm (45CC), 47mm (72CC), 50mm (84CC)
From left to right: 39mm (45CC), 47mm (72CC), 50mm (84CC)
Setting the valve timing ch2 (in collective farm style - ignition)
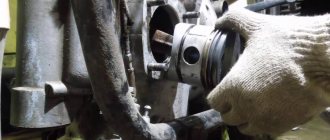
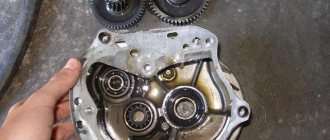
Without knocking the piston off from TDC, we orient the camshaft so that the large hole and marks on its sprocket become as shown in the photo and, while putting on the chain, install the camshaft in bed.
Ideally, the marks on the sprocket should be strictly parallel to the plane of the valve cover connector. In practice, unfortunately, such accuracy is difficult to achieve. And this is mainly due to the stretching of the timing chain. And there’s nothing you can do about it - either change the timing chain to a new one or catch the phase by switching the teeth, but this method of setting the valve timing is not acceptable to me personally.
Replacing a piston (CPG) on a 4t scooter
Need help finding spare parts?
We will help and advise!
+7-927-653-31-57
Gradually the time comes and your two-wheeled four-stroke friend needs to change the piston. There may be 2 reasons for this: wear or installation of a more powerful piston. In this article we will tell you how to replace the piston (CPG) on a 4-stroke scooter with a 139QMB engine.
If you have a different engine model, for example 152QMI or 157QMJ (150 cc scooter), then this article will also suit you to replace the CPG, since there are no fundamental differences. For 2-stroke scooters, we recommend reading the article “Replacing the piston on a 2-stroke scooter”
Installing the timing chain tensioner
If you have a 157QMJ series engine, do the following: unscrew the plug on the tensioner body; We insert a thin flat screwdriver into it and begin to tighten the bolt until the tensioner rod goes inside the body.
Without releasing the screwdriver while simultaneously holding the tensioner body, with your free fingers, insert the tensioner into the cylinder, screw it in with bolts, and only then release the screwdriver and screw the plug into place.
If you have a 139QMB series engine, then do this: unscrew the plug from the tensioner housing and remove the spring; push the rod inside the body; install the tensioner in the cylinder; insert the spring into the housing and screw in the plug.
After installing the piston, do not forget to adjust the thermal clearances of the valves and break in the engine.
How to install a piston on a scooter?
One of the most serious breakdowns of a scooter is the failure of the cylinder-piston group, which immediately makes the scooter inoperative. It is the scooter’s CPG that is responsible for its movement; the slightest breakdown will lead to the impossibility of further movement. That is why if you are faced with a non-working piston, immediately start repairing it.
In general, any CPG has a certain lifespan; with a certain mileage, its wear increases and the buyer will have to replace the part. Often replacing the piston is enough, but sometimes more serious problems occur. Where you have to change the piston, rings and cylinder. Depending on the scooter model and manufacturer, the installation may vary slightly, but we will cover the basic steps. Also, piston scooters may differ in power, but this does not affect the replacement process in any way.
Removing the CPG
If you don't know how to properly install a piston on a 2t or 4t scooter, the first step is to remove the old part. Getting to the piston group is not easy; you will have to disassemble the scooter and sometimes remove the plastic. In general, the steps to replace the CPG are as follows:
- Removing the engine, disconnecting the wires;
- Removing the old piston;
- Installation of a new part according to requirements;
- Similar engine assembly and electrical and hose connections.
After you have disconnected all wiring and made sure that the -oil and -gasoline hose are closed, remove the engine. Removing the engine may be different in different scooter models, so act according to the situation. Having received the finished engine, begin to remove the plastic cylinder casing; it protects the CPG from external dirt, dust, etc. The next step is removing the cylinder head. Depending on the type of scooter (2t or 4t) the head may be more complex, 4t scooters also have valves that will then have to be adjusted. But the procedure for removing the head is to unscrew 4 nuts.
Important: the nuts must be unscrewed gradually, using the criss-cross method. That is, as shown in the picture below
Otherwise, you will break the thread and damage the piston. This also applies to the installation of the piston; the nuts are also tightened.
Next you will have to remove the cylinder, in some cases this is problematic due to large carbon deposits or a defect in the piston. If the cylinder is intact, but the piston is faulty, proceed to replacing the piston. How to properly install a piston on a scooter
Replacing a piston involves a number of difficulties, because the piston will come with several other basic parts. In the kit you will find locking rings, a pin and several rings (depending on the scooter - 2t or 4t). In 2-stroke scooters, only two rings are usually installed; they are compression rings; the third thin ring is practically not needed, but we recommend placing it under the lower ring for springing. In the case of 4-stroke mopeds, there are three main rings, two of them are compression rings, the third is an oil scraper ring.
The ring assembly is based on a 2t scooter; it has a simpler design. So, put two rings on the piston, then take your finger and insert it into the crankshaft hole so that the piston is held securely. Be sure to secure the finger with locking rings on both sides, this is necessary so that the finger does not come out during operation. Also, the retaining rings should not stick out, they should fit snugly into the special hole
Important: the piston must be installed with the arrow (or the inscription EX) facing the exhaust pipe, otherwise the whole procedure will be useless. The next step is installing the cylinder on the piston
Cylinder installation
This procedure is quite complicated, because you need to fit the cylinder onto the piston perfectly. First of all, don’t forget to put gaskets on both sides; they are included with the CPG or can be purchased separately. There are usually two gaskets, one is placed down between the cylinder and the engine, the second is installed between the cylinder and the head. After installing the bottom gasket, try to put the cylinder on so that the rings meet in the groove. To do this, when installing the cylinder, it is enough to press the rings, having previously lubricated the cylinder and piston with oil.
Next, put on the gasket and secure the head with nuts. The nuts must be tightened in a cross pattern. Then check the operation of the piston with a kickstarter; if the installation was successful, the piston should move evenly along the cylinder and have noticeable compression.
That's all, reassemble the scooter in reverse order, connect all the wires and hoses.
Preparation for the procedure
You need to start by cleaning the exterior of the scooter from dirt, sand, and dust. The work itself must be carried out indoors, where there is no risk of debris getting inside the mechanisms from the outside. Operations may be carried out outdoors, but subject to the following conditions:
- the air temperature should be 18-25 degrees;
- little or no wind;
- the presence of a flat, hard surface for repairs - concrete or asphalt are best suited;
- It is not recommended to open the inside of the scooter for at least two hours after turning off the engine for safety reasons.
For fastening, you will need to prepare a box with cells for each type, so as not to lose or mix up the varieties. The work may take about an hour depending on your skill level. If you lack experience, it is better to call another person for help and carefully record what was removed (and in what sequence) in order to reassemble the vehicle correctly after everything.
How to properly install rings on a two-stroke scooter piston
There is nothing complicated about installing rings on the piston of a two-stroke scooter, as well as a four-stroke scooter, and many people know this. But most scooter riders who have only recently acquired such equipment have no idea how to replace the piston on a scooter, how to correctly install the rings on the piston, where the arrow on the piston should point, and much more.
In this lesson, I will tell you how to properly put the rings on the piston and assemble the piston in place. Since we have already talked about four-stroke engines before, here we will talk only about two-stroke engines. So, our piston is worn out and requires replacement.
The rings and piston wear out first, and usually only those need to be replaced. If the piston is severely worn, it is necessary to bore the cylinder. It is also bored when the piston jams in the cylinder, forming deep scratches on the walls of the latter. There's nothing wrong with that, and if your new cylinder has been properly bored (for which you'll only need to shell out about $10), it will need a ring repair kit with a new piston. Such rings are marked 0.25. The second boring is 0.5, respectively, etc. to one.
After purchasing a piston, it needs to be assembled. In the kit, as a rule, you will find the piston itself, two compression rings, a third thin corrugated ring (more on its purpose later), a piston pin and two piston pin retaining rings.
Now about the third ring in the set. Its purpose is to spring the lower compression ring. It installs it directly under it, and usually does not provide any benefit during operation. You can throw this ring away or you can put it in, it makes no difference. Many piston manufacturers do not include it at all.
It's time to put everything back in place. Depending on the scooter model, compression rings may be the same or vary in thickness and cross-section. Most pistons for Honda scooters, for example, have different rings, where the upper one is thinner than the lower one and has a different cross-section.
You should definitely pay attention to this when installing; the top one is thinner and ground at an angle. Also pay attention to the inscription on the ring (usually the letter T or repair size), the inscription should always be on top, that is, opposite to the finger
First you need to put on the bottom, then the top. There is no need to stretch or bend them. These manipulations must be carried out carefully
Also pay attention to the inscription on the ring (usually the letter T or repair size); the inscription should always be on top, that is, opposite to the finger. First you need to put on the bottom, then the top
There is no need to stretch or bend them. These manipulations must be carried out carefully.
There are locks in the grooves for the rings that prevent the rings from turning during operation, so the ring gap must be in these locks, otherwise you will not stick the piston into the cylinder.
And the last important point is the arrow (1) on the bottom of the piston or the inscription EX. Both the arrow and the inscription must be directed towards the exhaust (2). In this case, the ring locks will be located on the side of the reed valve. If the locks are placed towards the exhaust, the piston will not last long, the rings will be pulled into the exhaust port and gradually grind it down.
During all manipulations with the piston, it is imperative to put a rag in the crankcase window so that nothing inadvertently gets in there; we still need a crankshaft with bearings.
When installing the piston pin, pay attention to the condition of the separator (bearing); it may need to be replaced. Before installing the piston pin, install the snap ring on one side before installing the piston (usually on the side where you will not be able to fit the pin and the second snap ring in)
Then place the pin with the bearing and the second retaining ring; when fixed in the groove, it will make a certain click.
That's all, now put on the cylinder, not the piston (remembering to check the condition of the gaskets and lubricate the piston and cylinder walls with engine oil), the cylinder head and tighten the bolts one by one in a cross pattern.
You can also read other articles on the topic:
How to replace rings on a scooter cylinder
Sooner or later, the owner of a scooter is faced with wear on the piston rings. You can change them yourself. There is nothing complicated about installing rings on a piston; you just need to know how to do it correctly. Despite the fact that there are quite a lot of installation recommendations on the Internet, I decided to join them and tell you how I do it.
First of all, you need to determine where the ring is down and where the top is. By top we mean the part facing the piston head. The first way to determine: you need to inspect the ring and find some kind of letter or number engraving on it, for example, UP or N. The engraving is always applied to the upper side of the ring.
If there is no engraving (this can also happen), you need to follow the second method. The cross-section of the ring is not flat, but slightly curved. If you place the ring so that its outer rim is slightly higher and the inner rim is slightly lower (as in the picture), then this is the correct position of the ring. That is, the imaginary continuation of the cone should be directed upside down.
Rings can be of different thicknesses, for example, 1.3 mm and 1.5 mm. Before you put the rings on the cylinder, measure which ring fits which groove. It may also happen that you bought 1.3 mm and 1.5 mm rings, but on the cylinder both grooves have a size of 1.3 mm. In this case, the thick ring is unsuitable for installation. You can buy another set of the same and use a thin ring from it. It doesn’t matter which ring goes up and which goes down – there is no difference between the rings.
If you are installing rings on an old piston, I recommend that you clean the piston of carbon deposits before installation.
Now we put on the ring. First, we insert the ring's tendril into the groove near the lock:
Then we set it down:
We continue to plant further:
Until the ring is completely seated in the groove:
This was the top ring example. With the lower one, everything is done in exactly the same way, only the upper groove will be an intermediate point. That is, it is better to first put the ring on the upper groove and then move it down, so there is less risk of breaking the ring due to inexperience. Sometimes a special spacer ring-spring is placed under the lower ring (if it is included in the kit). Because it is springy, this ring is a breeze to put on.
Please note: This article and the images in it are subject to copyright. Partial or complete reproduction on other resources without permission is prohibited.
scooter777.ru
Installing piston rings
Remove the set of piston rings from the box. A piston ring set for a Chinese four-stroke scooter usually consists of five items. Three of which are a single assembled oil scraper ring, the other two: upper and lower compression.
A typical set of piston rings looks something like this
Or so
Carefully unpack the kit with perfectly clean hands.
In the kit you will find two of the thinnest rings and one thick corrugated ring (expander) - this will be an assembled oil scraper ring that needs to be installed on the piston first.
We place an expander in the lowest groove of the piston
We place thin oil scraper rings in the same groove - one under the expander, the second on top of the expander
We find the lower and upper compression rings in the kit and install them, respectively, in the middle and upper grooves of the piston - with marks on the side surface to the cylinder head (cylinder head). The lower compression ring differs from the upper one in color (not always) and the shape of the working edge (always). In most kits, the lower compression ring is painted black, and its working edge has a slight bevel.
Tags
The top compression ring in the vast majority of piston ring sets is a uniform light color. But this is in most cases, but in practice it happens that the kit comes with upper compression rings that are black or even red
By and large, the color is not particularly important to us, something else is important to us: the working edge of the upper compression ring has small roundings (chamfers) on the sides, and the working surface of the edge of the upper compression ring is covered with a shiny protective coating
For example, in this kit both compression rings are black. But the working surface of the upper compression ring is covered with a layer of protective coating, and small chamfers are removed on the edges of the working surface.
The lower compression ring has a matte working surface, and the working edge is beveled at a slight angle. All these moments are clearly visible in the photo.
The compression rings in this kit are red and black. As in the first case, the upper compression ring has chamfers on the working edge and a protective coating, and the lower one has a matte working edge beveled at an angle.
On classic piston ring sets, the upper compression ring has a light color and a rounded working edge. The bottom is dark in color and the working edge is beveled at a slight angle.
When installing the piston rings, do not forget about the marks. The marks on the rings after installation on the piston should be oriented towards the cylinder head (cylinder head).
Photo report: Installing a tuning piston on a Chinese 4T scooter
Installing a piston with a larger volume than stock is perhaps the simplest, most affordable, affordable and effective way to significantly increase the maximum speed and power of a scooter. There are, of course, even more effective ways to increase maximum speed and power, but these methods, or rather the hardware, cost simply unrealistic money...
If you charge the engine of the same 139QMB to the maximum, then such tuning before the “increase” cost the client about 35,000 rubles and this does not include work.
It is clear that not everyone can afford such amounts. Yes, even if it’s affordable, what’s the point? It’s easier to buy an old branded scooter and ride it than to charge the “Chinese” and then throw it in the trash after a season. But that's what I think.
Preparation
So that you don’t have green snot later about the fact that the tuning piston does not fit into the crankcase and you were allegedly deceived here - remove the old piston from the engine and measure the hole for the liner with a caliper. If the hole is smaller than the tuning piston sleeve, the “meat” of the crankcase allows it, hands grow from where it is needed - a round file will help you (only before boring - disassemble the engine, assemble the empty crankcase with bolts, bore the hole, make sure that the piston enters the crankcase without problems - wash the parts from shavings and reassemble the engine. Or, as a last resort, coat the crankcase and file with grease to at least somehow protect yourself from sawdust getting into the inside of the engine.)
The hole for the 162QMK engine sleeve (such engines are installed on Chinese scabs, more popularly known as “Leika”) in stock is 65 mm. Without boring, a piston of 57mm (150CC), 61mm (1700CC) and 62mm (180CC) easily fits into this crankcase. You won’t find a 62mm piston on sale during the day, so it was decided to install a regular 61mm piston on this engine.
By the way, for those who do not know, a piston with a diameter of 61 mm can be easily installed not only on the Leica engine, but also on any other Chinese 150 equipped with a 157QMJ series engine. There, if you put your hands to it, you can stick a piston at 62mm, but only if the “meat” of the crankcase allows it. Everything is individual, you need to look at the place. In any case, the distance along the studs is the same for both the 61mm piston and the 62mm piston.
From left to right: 61mm, 57mm
On the 139QMB series engine from a regular Chinese 80-six, you can easily install a piston 39mm (45CC), 47mm (72CC), 50mm (84CC)
From left to right: 39mm (45CC), 47mm (72CC), 50mm (84CC)
Installing piston rings
Remove the set of piston rings from the box. A piston ring set for a Chinese four-stroke scooter usually consists of five items. Three of which are a single assembled oil scraper ring, the other two: upper and lower compression.
A typical set of piston rings looks something like this
Or so
Carefully unpack the kit with perfectly clean hands.
In the kit you will find two of the thinnest rings and one thick corrugated ring (expander) - this will be an assembled oil scraper ring that needs to be installed on the piston first.
We place an expander in the lowest groove of the piston
We place thin oil scraper rings in the same groove - one under the expander, the second on top of the expander
We find the lower and upper compression rings in the kit and install them, respectively, in the middle and upper grooves of the piston - with marks on the side surface to the cylinder head (cylinder head). The lower compression ring differs from the upper one in color (not always) and the shape of the working edge (always). In most kits, the lower compression ring is painted black, and its working edge has a slight bevel.
Tags
The top compression ring in the vast majority of piston ring sets is a uniform light color. But this is in most cases, and in practice it happens that the kit comes with upper compression rings that are black or even red. By and large, the color is not particularly important to us, something else is important to us: the working edge of the upper compression ring has small roundings (chamfers) on the sides, and the working surface of the edge of the upper compression ring is covered with a shiny protective coating.
For example, in this kit both compression rings are black. But the working surface of the upper compression ring is covered with a layer of protective coating, and small chamfers are removed on the edges of the working surface.
The lower compression ring has a matte working surface, and the working edge is beveled at a slight angle. All these moments are clearly visible in the photo.
The compression rings in this kit are red and black. As in the first case, the upper compression ring has chamfers on the working edge and a protective coating, and the lower one has a matte working edge beveled at an angle.
On classic piston ring sets, the upper compression ring has a light color and a rounded working edge. The bottom is dark in color and the working edge is beveled at a slight angle.
When installing the piston rings, do not forget about the marks. The marks on the rings after installation on the piston should be oriented towards the cylinder head (cylinder head).
Piston installation
Insert a retaining ring into any boss of the piston pin. It is most convenient to insert the ring with small round nose pliers. After installation, check how well and tightly the retaining ring fits.
- If the retaining ring does not cover the entire surface, but only a small part of it, replace it with a new one.
- If the retaining ring does not lie tightly in the groove and dangles, straighten it a little
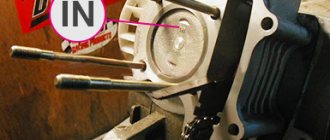
Lubricate the bearings of the lower and upper connecting rod heads and the piston pin bosses with clean engine oil. We put the piston on the connecting rod, orienting it with the “IN” mark to the inlet port; if there is an “arrow” on the piston instead of the “IN” mark, orient the arrow to the exhaust port. We insert the piston pin into the boss - orient the piston on the connecting rod so that the pin hits the connecting rod - install the pin all the way into the locking ring and secure it from falling out with the second locking ring.
We install the cylinder guide bushings on the studs and put on the gasket. It is advisable to place the gasket on the sealant, but without fanaticism.
Piston ring lock alignment
- Place the lower oil scraper ring lock opposite the red arrow
- Place the upper oil scraper lock opposite the blue arrow
- We place the lock of the lower compression ring opposite the yellow arrow
- We place the lock of the upper compression ring opposite the green arrow
Cylinder installation
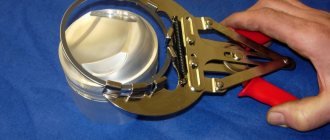
Fill the rings and piston with clean engine oil. We tighten the piston rings with a clamp. We cut the clamp from a piece of any sheet metal - cut out a strip of the required length, give it a profile along the piston and make a retainer from the same piece of sheet metal.
Lubricate the cylinder mirror with clean engine oil
We hook the timing chain with a piece of wire, pull the chain through the cylinder and put the cylinder on the studs.
Very carefully and slowly insert the piston into the cylinder. After the rings are completely inserted into the cylinder, unfasten the clamp and install the cylinder into the crankcase.
Setting the valve timing ch1 (in collective farm style - ignition)
We push the cylinder all the way into the crankcase and set the piston to top dead center (TDC). It is best to set the piston at TDC using an indicator or, at worst, visually/touch. You can also align the piston according to a special mark on the generator rotor, but I have more than once encountered the fact that the marks on some engines are stamped incorrectly and, in order to avoid troubles, I advise you to use them only as a last resort, for example, when the cylinder head is not removed and you need to adjust valve
We insert the cylinder head guide bushings and the lower timing chain guide into the cylinder, degrease the surface and install the gasket.
We install the cylinder head, insert the valve bed guide bushings.
Setting the valve timing ch2 (in collective farm style - ignition)
Without knocking the piston off from TDC, we orient the camshaft so that the large hole and marks on its sprocket become as shown in the photo and, while putting on the chain, install the camshaft in bed.
Ideally, the marks on the sprocket should be strictly parallel to the plane of the valve cover connector. In practice, unfortunately, such accuracy is difficult to achieve. And this is mainly due to the stretching of the timing chain. And there’s nothing you can do about it - either change the timing chain to a new one or catch the phase by switching the teeth, but this method of setting the valve timing is not acceptable to me personally.
We orient the camshaft bed with a mark in the form of the letters “E” and “X” towards the exhaust channel and install the bed.
Tighten the bed nuts crosswise and then tighten the two bolts on the side boss of the cylinder head.
Installing the timing chain tensioner
If you have a 157QMJ series engine, do the following: unscrew the plug on the tensioner body; We insert a thin flat screwdriver into it and begin to tighten the bolt until the tensioner rod goes inside the body.
Without releasing the screwdriver while simultaneously holding the tensioner body, with your free fingers, insert the tensioner into the cylinder, screw it in with bolts, and only then release the screwdriver and screw the plug into place.
If you have a 139QMB series engine, then do this: unscrew the plug from the tensioner housing and remove the spring; push the rod inside the body; install the tensioner in the cylinder; insert the spring into the housing and screw in the plug.
After installing the piston, do not forget to adjust the thermal clearances of the valves and break in the engine.
alisa-motors.ru
Installing a piston engine (CPG) on a 4t scooter
We take a new piston kit for 72 or 80 cubic meters (piston diameter 47mm or 50mm, respectively). You can, of course, use a standard new 50 cc CPG. The kit includes: cylinder, piston, piston rings, pin, retaining rings, as well as head and cylinder gaskets. You can buy a 72 cc cpg at a low price in our online store.
Installation is carried out in the reverse order, having previously lubricated the cylinder, piston and rings with a small amount of oil. We first install a thin ring on the piston in the lower groove, then an oil scraper ring and again a thin ring (the wavy ring - the oil scraper ring will thus be between the two thin ones in the lower groove). Next, install 2 compression rings (which are thicker). The cuts of all rings should not be located on top of each other. After installing the rings, place the piston on the crankshaft connecting rod, fix its position with a finger and locking rings. We take the connecting sleeves from the old cylinder and insert them into the new one.
We put a gasket under the cylinder on the studs
Carefully place the cylinder on the piston with rings so as not to damage the cylinder. We push the chain into the groove for the chain
Then install the chain bar on the cylinder head. Now we can put the chain on the camshaft sprocket (the position of the sprocket should be as follows: a large hole at the top, and two small ones on the sides, parallel to the edge of the cylinder head). We fix the position of the cylinder head with the gasket by screwing it on. Then we install the plastic cylinder head cover, chain tensioner, carburetor and muffler. The installation is now complete!
If you haven’t changed the oil for a long time, you need to change it before starting with a new piston. Before putting a full load on the scooter engine, it is necessary to run-in, i.e. drive 300-500 kilometers at a speed of no more than 40-45 km per hour.
Along with an increase in the power of the scooter with the installation of a tuning cpg, the load on the variator with the gears of the gearbox also increases. Remember this and if possible, replace the variator with gears with tuned ones (more reinforced.)
Photo report: Installing a piston 170CC instead of the standard 150CC on a scooter
This article will talk about how to moderately tune the 157 QMJ engine of the Racer Taurus scooter or any other scooter equipped with this engine for little money.
The tuning itself will consist of increasing the engine displacement to 170CC by installing a piston of larger diameter, and therefore volume. To the great joy of many of you, to install a 170CC piston on a 157QMJ engine you will not have to saw or bore the crankcase, change the cylinder head for another, or carry out other work on fine-tuning, adjustment, etc.
So, let's go to the store and buy a piston with a piston diameter of 61MM (170CC), the choice of piston is now very extensive, so try to give preference to Taiwanese manufacturers, their products are affordable, and the quality is much higher than Chinese ones.
This piston is made in Taiwan and costs only 1,600 rubles. The quality of this piston is quite consistent with its price; if you really want, you can find a higher quality piston, which will cost more. So, as they say: if there is an opportunity, then why not...
For comparison: on the left is a piston with a volume of 150CC 57MM, on the right 170CC 61MM.
We will begin work on the implementation of our piston with the installation of piston rings; the basic rules for installing piston rings are described in detail in the article: Correct installation of rings on a scooter piston
We take the retaining ring from the kit and insert it into any “groove” on the piston; the retaining ring should sit very tightly in the groove, evenly adhering to the entire surface and at the same time rotate freely in it.
Using a medical syringe, apply motor oil to the surface of the piston pin mounting holes, then use a needle to rub the oil evenly over the surface. In the same way, lubricate the upper head of the connecting rod.
We insert the piston pin into the mounting hole so that it protrudes slightly into the piston.
We carefully inspect the seating surface on the crankcase, remove the remnants of old gaskets and sealant from the surface, degrease the surface with gasoline or alcohol and install guide bushings (marked with arrows), put on a new gasket.
We orient the piston with the arrow towards the exhaust valve (exhaust), put the piston on the connecting rod, insert the extended edge of the piston pin into the upper head of the connecting rod and push the piston pin all the way.
This is how your arrow should end up on the piston.
We insert the second retaining ring into place.
Using a syringe, apply oil to the rings, being careful not to drip onto the gasket.
In order not to damage or deform the piston rings when installing the cylinder, we make a clamp from a strip of tin and compress the piston rings with it.
It is convenient to fix the clamp using a bracket bent from the same strip of tin.
Before installing the cylinder, carefully inspect the seating surface and degrease it with gasoline or alcohol.
Apply engine oil to the inner surface of the cylinder with a syringe and rub it evenly over the surface with a needle.
We take a piece of wire and hook it onto the timing chain.
Be careful that the timing chain does not come off its sprocket!
We pass the wire and chain through the cylinder and put it on the studs.
We begin to slowly put the cylinder on the piston, this work should be done very carefully, without applying excessive force, while at the same time making sure that the piston enters the cylinder without distortion.
Push the piston in so that the rings fit completely into the cylinder.
Remove the clamp
We finally “drive” the cylinder into its place.
The cylinder should sit in place with the force of your hands; if the cylinder does not “want” to go into place, it means you did something wrong, perhaps dirt got under the rings, remove the cylinder and do it all over again.
After you have installed the cylinder in place, check how the piston moves in the cylinder. To do this: holding the cylinder with one hand, rotate the crankshaft several times with the other hand, the piston should move in the cylinder freely from hand effort.
We insert guide bushings into the cylinder (marked with arrows).
We install the lower guide for the timing chain in its place.
We look for the T mark on the generator rotor and align it with the protrusion on the crankcase.
Be careful not to confuse the T mark with the F mark, otherwise there will be trouble!
Again, carefully inspect the planes of the head and cylinder, if necessary, clean them and degrease them with gasoline or alcohol. We install the gasket on the cylinder, use a wire to pull the chain through the head and put the head on the studs.
Before installing the head, it is advisable to remove deformations from its plane; read about this in detail in the article: Modifying the cylinder head of a scooter
Install the guide bushings (marked with arrows) into the corresponding holes in the cylinder head.
We put the chain on the camshaft sprocket and install the camshaft in its place, making sure that the upper large hole (marked with an arrow) on the sprocket is at the top and the two notches (marked with arrows) are parallel to the plane of the cylinder head connector.
Before you finally install the camshaft in place, make sure once again that the T mark on the generator rotor is exactly opposite the protrusion on the crankcase.
We install the valve bed cover, orienting it with the EX mark (highlighted in red) to the exhaust valve (exhaust).
We screw the nuts onto the studs, not forgetting to put washers under them, and screw the bolts into place.
The nuts should be tightened crosswise in several steps, first tighten nuts 1 and 4 a little, then nuts 2 and 3, then lightly tighten the bolts. Then tighten nuts 2 and 3 with a little force, then nuts 1 and 4, after tightening the nuts, tighten the bolts a little. So, in several steps, gradually increasing the force, tighten the nuts and bolts completely.
After all nuts and bolts are fully tightened, use a syringe to apply engine oil to the bearings, camshaft lobes, rocker shaft and flail.
The final step in all this work will be the installation of the timing chain tensioner.
We unscrew the bolt on the tensioner, insert a screwdriver into the hole, tighten the bolt until it stops (right-hand thread) so that the tensioner rod goes completely inside.
Holding the screwdriver from unwinding, insert the tensioner into place, tighten the bolts and release the screwdriver; the spring located in the tensioner will be released and automatically extend the rod to the required distance.
After installing the new piston, do not forget to adjust the valve clearances; this work is described in detail in the article: Adjustment, setting valves on a scooter
Also, do not forget to break in the new piston engine; the basic rules for running in a scooter engine are described in detail in the article: Proper break-in of a scooter engine
scooter-mania.ru
What will be needed for replacement?
For such a procedure, it is worth preparing a set of wrenches, a ratchet with socket heads, a torque wrench, a piston ring puller and the set of rings itself.
You may be interested in: Mishlene tires: brand history, popular models
The tool for mounting/dismounting piston rings has a simple design and affordable price. Without this device, the replacement process can turn into an almost impossible task. Of course, in the past, car enthusiasts made do with a couple of screwdrivers. But it is better to have such a tool, otherwise without it you can damage the rings or the piston surface. Moreover, it is always available in auto stores.
Our production
It is worth noting that durable and trouble-free operation of the piston largely depends on the correct installation of the rings. There is absolutely no need for haste and dirt in this matter. Do everything carefully (for yourself, after all), slowly and most importantly: keep it clean!
First, let's take a little look at what a standard set of piston rings for a four-stroke scooter engine is. The standard kit consists of: two compression rings (upper and lower) and one oil scraper ring, which in our case has a collapsible design.
A set of piston rings for a two-stroke scooter engine differs from the previous one in the absence of an oil scraper ring; also, a set of rings for a two-stroke engine may include an expander (marked with an arrow).
So, we have more or less figured out the kits - it’s time to get down to business. We prepare in advance small strips of tin or thin plastic, with their help we will put the rings on the piston.
We thoroughly wash the rings and piston; when installing new rings on a used piston, do not forget to clean its grooves from carbon deposits, otherwise the new rings will not fit into the cylinder. We prepare a clean workplace and perform the installation.
We take the oil scraper ring expander from the kit and place it in the lowest groove of the piston.
In the same way, we install the expander from the kit for a two-stroke engine (if any), with the only difference being that the expander lock should be located in the area of the locking pin (marked with an arrow) of the piston groove.
We look for marks on the rings, apply pre-prepared strips to the piston, very carefully and slowly pull the rings along our strips onto the piston, in this order: first we put on the oil scraper ring, then we put on the second oil scraper ring, then we put on the lower compression ring (dark) and only then put on the upper compression ring (light). The marks on the rings after installation should be located upward towards the cylinder head.
We straighten the rings so that they stand exactly opposite their grooves and slowly pull out our strips from under them. Now the main thing: after you have pulled out the strips and the rings are in their grooves without fail, check each ring for mobility. The rings in the piston grooves should rotate freely in different directions.
The oil scraper ring should look something like this after installation:
After installation, the marks must be directed strictly towards the cylinder head.
Immediately before installing the piston into the cylinder, the piston ring locks must be moved apart in the correct order. This is done like this:
We unfold the upper compression ring so that its lock moves relative to the piston pin axis by approximately 45 degrees, and unfold the lower compression ring so that its lock moves approximately 180 degrees relative to the lock of the upper compression ring.
We rotate the upper oil scraper ring lock 90 degrees relative to the lower compression ring lock, and rotate the lower oil scraper ring lock 180 degrees relative to the upper oil scraper ring.
The photo shows approximately how the piston ring locks of a four-stroke engine should be positioned:
Red marks indicate compression ring locks. Blue marks indicate oil scraper ring locks.
Before final installation of the piston, the piston ring locks of a two-stroke engine must be positioned strictly in the center of the locking pins.
If you charge the engine of the same 139QMB to the maximum, then such tuning before the “increase” cost the client about 35,000 rubles and this does not include work.
It is clear that not everyone can afford such amounts. Yes, even if it’s affordable, what’s the point? It’s easier to buy an old branded scooter and ride it than to charge the “Chinese” and then throw it in the trash after a season. But that's what I think.
How to correctly insert a piston into a cylinder. How to insert correctly. KakPravilno-Sdelat.ru
» How to insert correctly
DIY caliper repair
Anyway, yesterday I tried to tighten the cylinder onto the piston with new rings. I couldn’t find the sheet metal for the clamp recommended in the book - I tried to fit it in like that. Got laid and went home. Does everyone use tightening clamps made of tin, or has anyone else found a way out of the situation? And also, there is a large gap in the valve guides. If you change it, you have to hot press it in and then, due to misalignment, rip the seats, etc. Then the repairs threaten to drag on until the end of the season. Is it possible to give up and ride for a year or does this threaten something terrible?
You can install it without a clamp - the piston is slightly askew, use a screwdriver to press the ring into the groove from one edge of the ring to the other gradually, and so that there is constant pressure between the piston and the cylinder. We have to struggle.
To follow up: you must immediately put the rings (one at a time) into the cylinder without a piston, use the piston to align them in the cylinder and check the gap in the lock. If there is no gap in the lock, then you can’t even use a hammer.
And carbon deposits from the piston grooves must be removed. There's a lot of it there. New rings may not sink completely because of this. It is convenient to remove it with a piece of the old ring. You can't say anything about the guides; you need to know the gap. If it is less than 0.3 mm, it will knock a little and burn up the oil, but this is not critical, you can roll off the season. If more, then everything is possible, from killing the valve seat and guide to pressing the guide out of the head. Well, it will eat oil, the candles can give off oak. Anything can happen.
Thanks. Perhaps the carbon deposits remained - I just tried to dissolve it with some kind of cleaning agent. I did not measure the gap in the guides, but it feels like the valve in them can be shaken and this will be felt. In principle, I traveled last year - I’ll try again.
I would recommend installing the piston rings without anything at all. With just your fingers, yes + a hammer handle. And this is how it is done. A hammer handle is placed under the piston skirt to prevent the piston from running away, which means inside the crankcase when pushing the cylinder onto the piston. Then the lowest oil scraper ring is put on the piston. Using your thumbs, you need to push the ends of the rings slightly apart so that the side of the rings is located. Place the opposite ends obliquely onto the piston. THEN pushing the ring apart to the size of the piston beyond the ends, but certainly obliquely. forward with the whole side to catch up to the desired groove. Do the same with everyone else. Of course, the rings must be pre-selected, for a normal piston - normal, and for a repair piston - appropriate. The ring grooves must be free of carbon deposits. When installing the piston into the cylinder, the rings, as they are put on, must be pressed one by one as much as possible with your fingers and put on the cylinder on them in a circular rotation. This procedure took me 1-2 minutes for each cylinder. Having put on the piston, remove the hammer handle and place the cylinder on the mounts.
Piston rings are a child's task - there are no problems with that. But the problem with circular rotations is that I immediately place the cylinder on the studs. I'll try to clean the grooves again, and if that doesn't help, I'll have to turn out the studs to get circular rotations. Phoenix everyone.
You need to be careful with the broken ring when cleaning the grooves. If the ring is worn, then the edges are VERY sharp. The ring somehow went almost to the bone in my finger. And so, I always installed the cylinders alone, without any mandrels, screwdrivers, or hammers. I set the pistons to TDC, engaged the gear, pressed the ring into the groove with my fingers, and tightened the cylinder. I drowned the next ring and pressed it with a cylinder. And so that’s it. For convenience, the piston is slightly warped. There is a wonderful cone on the cylinder, it helps a lot in the process. On the M-72 and K-750 the process is more complicated, where the cylinders weigh awesome.