How to properly install a piston on a scooter?
During the operation of the scooter, various breakdowns occur.
It does not matter who the manufacturer is (Japan or China). The difference is that one vehicle breaks down earlier, while the other breaks down over time.
Problems can occur with the wiring, engine, or chassis. But, as a rule, almost everyone is faced with replacing the CPG. This abbreviation implies the term “cylinder-piston group” or, as people say, “piston group”. Looking ahead, it must be said that replacing the piston, piston and rings separately is not as difficult a task as it might seem at first glance. It is also worth knowing that the process of removing and replacing the CPG is almost the same on all scooters. Therefore, the article will discuss the main points. Looking ahead, let us remind you that the power of the CPG can vary. It is recommended to install a piston engine with the same power as a standard CPG.
Stupidity
One day a good friend of mine called me and complained that the engine of his Leica, after warming up and driving for a short time, began to knock and jam. I immediately sketched out options for him: definitely - the piston is stuck, not the variator (clients tend to think so), the oil pump has failed, the piston is installed incorrectly, or, as often happens, the running-in is incorrect.
The client completely denies everything: the oil is good, the engine was only recently overhauled and a new piston was installed, and most importantly, all the collective farm gurus have already looked at its garbage dump and voiced different versions (all of them mainly boiled down to the machinations of UFOs and violation of the canons of Feng Shui during assembly ), but none of them came to a common denominator...
In general, the client and I agreed that he would bring me only one engine and I would see what I could do with all this junk.
I removed the piston. The piston skirt, as expected, was a complete scuff.
A tasty scratch on the cylinder mirror.
So it wasn’t my fault - I call the client and inform him that the piston is dead and it needs to be changed in any case. Along the way, I ask him how he installed the piston and whether he lubricated the piston and cylinder with oil. The client admitted that he assembled everything dry - I immediately voiced the version that the reason for the constant wedge of the engine was precisely the dry assembly. The client agrees with me and buys a new piston without further discussion.
A piston with a diameter of 61 mm has a volume of 170 CC and costs about 1800 rubles (it cost, I don’t know now). As it turned out later, the piston from this manufacturer turned out to be defective and of poor quality, in my opinion. The cylinder mirror was all broken, the piston in the cylinder was dangling, but the quality of the sound on the mirror was beyond praise. I have never seen such a high-quality hone on Chinese piston engines.
Be that as it may, we exchanged the piston for another from the same manufacturer, but it turned out to be not much better, but there were no other manufacturers with a capacity of 170 SS on sale, and there were only 57 mm 150 SS, so we took what was in the store...
By the way, for those who don’t know: you can install a piston 57mm 150SS, 61mm 170SS and 62mm 180SS on a Leika without any difficulty or modifications. 62 mm was stock on it, but it had worn out a long time ago, and it was never possible to find such a piston on sale. I had to compromise and set it to 61mm.
Installing the timing chain tensioner
If you have a 157QMJ series engine, do the following: unscrew the plug on the tensioner body; We insert a thin flat screwdriver into it and begin to tighten the bolt until the tensioner rod goes inside the body.
Without releasing the screwdriver while simultaneously holding the tensioner body, with your free fingers, insert the tensioner into the cylinder, screw it in with bolts, and only then release the screwdriver and screw the plug into place.
If you have a 139QMB series engine, then do this: unscrew the plug from the tensioner housing and remove the spring; push the rod inside the body; install the tensioner in the cylinder; insert the spring into the housing and screw in the plug.
After installing the piston, do not forget to adjust the thermal clearances of the valves and break in the engine.
Downloading a book
After successfully completing the payment (by any method) and returning to the KrutilVertel store from the payment system website, you will be taken to the successful payment page:
The book you purchased will be in your personal account, from where you can always download it.
Please note that after making the payment, you need to return back from the payment system website to the KrutilVertel website. If for some reason you did not return back to the site and closed the payment system tab with a message about the successful completion of the payment, please let us know - we will send you a letter indicating access to download the book
If for some reason you did not return back to the site and closed the payment system tab with a message about the successful completion of the payment, please let us know - we will send you a letter indicating access to download the book.
How to install a piston on a scooter: remove the old one, install a new one
Getting to the piston cylinder will be easy if you follow the instructions. You need to start by removing the plastic lining of the scooter, and then disconnect the wires. The oil hose is disconnected, and the motor itself is removed by unscrewing the fasteners
The plastic cover should be set aside so as not to crush it due to careless movement.
To get to the piston, you ultimately need to remove the cylinder head, and then the cylinder itself.
Dismantling the piston itself is carried out in the following sequence:
- remove the CPG mounting bolts along with the head and gasket. Each bolt must be unscrewed in a criss-cross manner (diagonally) to avoid damaging the threads - installing the piston back requires using the same method. This will also prevent unwinding without the participation of the owner;
- directly dismantling the cylinder using upward movements - if you can’t pull it out, it is recommended to knock with a light wooden object. The product may become stuck due to the deposits listed above;
- turning the crankshaft for maximum piston lift. Be sure to cover the crankcase hole with a rag to prevent dirt from getting inside;
- you need to remove the retaining ring in order to remove the piston pin;
- In case of jamming, you need to use liquid to remove carbon deposits. An alternative is carburetor cleaner. As a result, after soaking, all plaque is easily removed, similarly with rings;
- cleaning ring grooves.
Step-by-step video on how to remove the piston from a scooter:
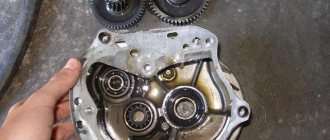
You will need to inspect the needle bearing for signs of burning, indicating wear of the part. If they are, a change is required immediately. Installation of a new CPG will not be effective for long in the absence of proper care.
Needle bearing
You should also pay attention to the following factors:
- if there is displacement of the needles inside the cage, the product as a whole is unusable;
- violation of geometry also indicates the need for replacement;
- There should not be much play when moving in the upper head of the connecting rod. In normal condition, the bearing simply moves freely.
As a result of changing the needle bearing, you can install a new piston for the scooter. Installation is carried out in reverse order. Several features of the procedure must be taken into account:
- Each new piston is supplemented with two rings (retaining rings), which allow the structure to be securely fixed. For four-stroke engines, the number of rings is already three due to the presence of an oil scraper ring;
- everything must be placed so that the rings and cylinder converge in the groove for reliable operation under any load;
- You should not put the plastic back before checking the functionality of the scooter;
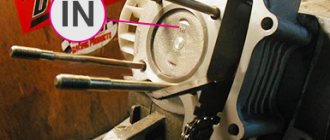
- the upper part of the cylinder is indicated by the word “IN” on the cover - this way you won’t be able to confuse the direction;
- The inscription “EX” (exhaust) on the cover should be directed towards the exhaust port. Another option is to draw an arrow (it means the same thing). This factor depends on the specific scooter manufacturer.
Repairs can be carried out using a special kit containing all the necessary tools:
- piston ring remover (pliers);
- piston groove cleaning device;
- L-shaped screwdriver.
All this can be found separately. The main thing is to follow the dimensions that will suit a specific scooter model.
Step by step video on how to install a new piston on a scooter:
Inserting a piston into the inner diameter of a cylinder
If the sealing surface of the cylinder block was not subjected to finishing during repair, then thoroughly clean it of gasket residues. Thoroughly clean all threaded holes of any dirt, oil or coolant that may still be there. Do all the cleaning work before inserting the pistons into the cylinder bores. Wet all surfaces in the piston with fresh engine oil.
Don't forget the piston pin and connecting rod bearing! When installing, pay attention to the direction of the piston (markings for installation on the piston bottom, valve pockets). Clean the inner bore of the cylinder again with a rag and also moisten it with engine oil.
Check your piston ring tension band for damage or dents, repair them and replace the tool if necessary. When installing the piston, make sure that the tension band or tapered mounting sleeve lies flat on the sealing surface of the cylinder head,
When installing the piston there should not be strong pressure. If the piston does not want to slide inside the cylinder, be sure to check the piston ring tension band. Do not twist the opening of the tape so that it is in the same place as the butt ends of the rings.
Do not install pistons into the engine without the installation tool (risk of injury, risk of ring damage). If a hammer handle is used for installation, only the weight of the hammer itself can act on the piston bottom. Never use a hammer to force the piston into the cylinder diameter! If the piston rings do not break during installation, they can still bend, and because of this they will not perform their task well enough.
Forced installation not only damages the rings, but can also damage the piston.
This is especially important for gasoline engine pistons. Their fire or working belts are very thin, and when hit, the rings easily break or break completely.
The result: loss of power and quick (and expensive) repairs.
Avoid allowing dirt and sand to enter the cylinder bore after the pistons have been installed. Place a clean cloth over/in the openings if necessary to prevent contamination. Especially when work takes place in a dusty environment and/or outdoors.
Installing piston rings
Remove the set of piston rings from the box. A piston ring set for a Chinese four-stroke scooter usually consists of five items. Three of which are a single assembled oil scraper ring, the other two: upper and lower compression.
A typical set of piston rings looks something like this
Or so
Carefully unpack the kit with perfectly clean hands.
In the kit you will find two of the thinnest rings and one thick corrugated ring (expander) - this will be an assembled oil scraper ring that needs to be installed on the piston first.
We place an expander in the lowest groove of the piston
We place thin oil scraper rings in the same groove - one under the expander, the second on top of the expander
We find the lower and upper compression rings in the kit and install them, respectively, in the middle and upper grooves of the piston - with marks on the side surface to the cylinder head (cylinder head). The lower compression ring differs from the upper one in color (not always) and the shape of the working edge (always). In most kits, the lower compression ring is painted black, and its working edge has a slight bevel.
Tags
The top compression ring in the vast majority of piston ring sets is a uniform light color. But this is in most cases, but in practice it happens that the kit comes with upper compression rings that are black or even red
By and large, the color is not particularly important to us, something else is important to us: the working edge of the upper compression ring has small roundings (chamfers) on the sides, and the working surface of the edge of the upper compression ring is covered with a shiny protective coating
For example, in this kit both compression rings are black. But the working surface of the upper compression ring is covered with a layer of protective coating, and small chamfers are removed on the edges of the working surface.
The lower compression ring has a matte working surface, and the working edge is beveled at a slight angle. All these moments are clearly visible in the photo.
The compression rings in this kit are red and black. As in the first case, the upper compression ring has chamfers on the working edge and a protective coating, and the lower one has a matte working edge beveled at an angle.
On classic piston ring sets, the upper compression ring has a light color and a rounded working edge. The bottom is dark in color and the working edge is beveled at a slight angle.
When installing the piston rings, do not forget about the marks. The marks on the rings after installation on the piston should be oriented towards the cylinder head (cylinder head).
How to extend the life cycle of CPG
It is not recommended to drive the scooter at maximum speed for long periods of time (especially in hot weather). This can lead to thermal seizure, which leads to deformation of individual parts of the CPG. As a result, the highest speed of the vehicle will be unattainable due to the loss of pressure inside. When disassembling the structure, the sticking is easily determined by the presence of burnt parts in the form of tongues. Carburetor adjustments will be required to prevent deposits from forming in the muffler and combustion chamber and overall loss of power.
It is necessary to fill in high-quality motor oil that gives a positive effect:
- no noise from the engine;
- no overheating of the motor during prolonged operation;
- relatively clean exhaust and a pipe for the exit of gases.
The best option is synthetic oil, which has the advantage of efficiency, the absence of carbon deposits in bearings, deposits on the piston crown and other unpleasant consequences. Similarly, it is necessary to take a responsible approach to choosing fuel for a scooter. It is worth buying gasoline of the 95 type, which does not lead to detonation inside the combustion chamber, increasing the engine temperature.
After replacing the piston on the scooter, you can begin other types of work such as painting or changing other internals. Be sure to drive several hundred meters to ensure the reliability of the work done.
Signs of a CPG malfunction
To determine the breakdown of the piston group, you do not need to have complex measuring instruments. It is enough to pay attention to the following symptoms:
- the ringing of piston rings is heard;
- The scooter does not start on the first try. You have to perform the operation several times to achieve the result;
- rapid emptying of the gas tank due to excessive fuel consumption;
- noises are heard in the cylinder/motor that were not there;
- the vehicle operates unstably at idle speed;
- general reduction in power;
- sudden shutdown.
Additional signs include too much smoke and lack of resistance when trying to start the scooter's engine. After disassembling (detailed list of actions below) the motor can be seen on the piston cylinder with black traces - this is carbon deposits. This indicates a loose fit of the pistons to the cylinder walls, as a result of which gases constantly escaped from the inside, which reduced the overall pressure.
Old piston with signs of carbon deposits
In the case of a four-stroke engine, the signs of a CPG failure are slightly different:
- presence of thick black/blue smoke;
- increased oil consumption;
- change in power (this indicator can only be determined during diagnostics, since on a 4-stroke engine the change in parameter may not be immediately noticeable);
- inability to start the scooter the first time even with a cold engine.
If these problems are observed, it makes sense to disassemble the vehicle in order to reduce repair costs in the future due to malfunctions of other parts caused by the lack of replacement of the CPG.
What will be needed for replacement?
For such a procedure, it is worth preparing a set of wrenches, a ratchet with socket heads, a torque wrench, a piston ring puller and the set of rings itself.
You may be interested in: Mishlene tires: brand history, popular models
The tool for mounting/dismounting piston rings has a simple design and affordable price. Without this device, the replacement process can turn into an almost impossible task. Of course, in the past, car enthusiasts made do with a couple of screwdrivers. But it is better to have such a tool, otherwise without it you can damage the rings or the piston surface. Moreover, it is always available in auto stores.
Replacing the piston
Note
:
The need to replace the CPG, as a rule, arises after it wears out due to long-term use or the use of low-quality fuels and lubricants, as well as due to the operation of a moped with an air filter that is not impregnated with special oil, or without it at all. Therefore, when replacing the CPG, it is imperative to diagnose the condition of the crankshaft and main bearings, since they may also need to be replaced. It is recommended to change the CPG as a whole, i.e. Along with the piston group, change the cylinder as well. During operation, the rings and cylinder wear out not evenly in a circle, but in an ellipse, due to the fact that the rings are pressed against the walls of the cylinder with unequal force. Therefore, it is not recommended to replace only the piston and rings if the need to replace them is due to wear, since an elliptical cylinder will not allow for normal compression with new (round) rings.
1. Remove the motor. Disconnect the battery ground wire. Remove the necessary body parts. Disconnect the power cable connecting the motor to the scooter's electrical system. Disconnect the high voltage wire and high voltage coil. Disconnect the automatic enrichment connector. Disconnect the generator wiring connector. Disconnect the fuel hose and vacuum hoses. Disconnect the accelerator cable. Remove the air filter housing. Remove the rear brake cable. Remove the rear shock absorber. After unscrewing the bolt securing the engine, remove it, see Figure 10. Carefully lift the scooter by the frame, see Figure 11.
Attention:
Check the condition of the silent blocks on the engine mounting brackets.
Rice. 10 Fig 11
2. Remove the air filter, muffler, generator and cylinder casings. Using a brush and a compressor, remove all dust from the cylinder; if necessary, wash the cylinder. Everything must be perfectly clean.
3. Unscrew the spark plug and unscrew the nuts (bolts) securing the cylinder head, see photo 12.
Photo 12
4. Remove the head and cylinder (if it doesn’t fit, you can carefully pick it up with a pry bar), see photo 13.
Photo 13
5. Be sure to place a clean cloth between the connecting rod and the crankcase walls to prevent foreign objects from getting into the crankcase, which can lead to damage to the crankshaft and piston group, see photo 14.
Photo 14
6.Remove the piston pin stopper and squeeze out the pin. It is not pressed in, it is simply installed a little “pull”, see photo 15
What to do if wear occurs?
Having discovered that the problem lies in the failure of the cylinder-piston group (CPG), you can use two methods. The first is to purchase the entire CPG, but this option requires large financial investments. However, the owner will not have to waste time searching for a turner on his own and will be able to complete the replacement procedure without outside help.
On the other hand, if you have an original cylinder, it becomes possible to bore the worn-out one using turning equipment. The procedure is as follows: the owner takes the old cylinder with him to the turner. The specialist visually assesses the condition, after which he indicates the repair size. There are four in total:
- 0.25
- 0.5
- 0.75
- 1.0
These numbers indicate an increase in millimeters to the existing diameter. This amount of metal is ground down during processing of the internal walls of the cylinder
When boring, the coefficient of thermal expansion of the metal that occurs during engine operation must be taken into account. Therefore, another fifth hundredth of a millimeter (0.05) is added to the indicated number
This will not affect the compression level in any way, and the power unit will not receive a temperature wedge. After assessing the bore diameter, you will have to buy a repair piston. Having purchased it, they pass it along with the cylinder to the master for boring.
Replacing a piston (CPG) on a 4t scooter
Need help finding spare parts?
We will help and advise!
+7-927-653-31-57
Gradually the time comes and your two-wheeled four-stroke friend needs to change the piston. There may be 2 reasons for this: wear or installation of a more powerful piston. In this article we will tell you how to replace the piston (CPG) on a 4-stroke scooter with a 139QMB engine.
If you have a different engine model, for example 152QMI or 157QMJ (150 cc scooter), then this article will also suit you to replace the CPG, since there are no fundamental differences. For 2-stroke scooters, we recommend reading the article “Replacing the piston on a 2-stroke scooter”
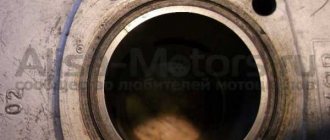
Preparation
So that you don’t have green snot later about the fact that the tuning piston does not fit into the crankcase and you were allegedly deceived here - remove the old piston from the engine and measure the hole for the liner with a caliper. If the hole is smaller than the tuning piston sleeve, the “meat” of the crankcase allows it, hands grow from where it is needed - a round file will help you (only before boring - disassemble the engine, assemble the empty crankcase with bolts, bore the hole, make sure that the piston enters the crankcase without problems - wash the parts from shavings and reassemble the engine. Or, as a last resort, coat the crankcase and file with grease to at least somehow protect yourself from sawdust getting into the inside of the engine.)
The hole for the 162QMK engine sleeve (such engines are installed on Chinese scabs, more popularly known as “Leika”) in stock is 65 mm. Without boring, a piston of 57mm (150CC), 61mm (1700CC) and 62mm (180CC) easily fits into this crankcase. You won’t find a 62mm piston on sale during the day, so it was decided to install a regular 61mm piston on this engine.
By the way, for those who do not know, a piston with a diameter of 61 mm can be easily installed not only on the Leica engine, but also on any other Chinese 150 equipped with a 157QMJ series engine. There, if you put your hands to it, you can stick a piston at 62mm, but only if the “meat” of the crankcase allows it. Everything is individual, you need to look at the place. In any case, the distance along the studs is the same for both the 61mm piston and the 62mm piston.
From left to right: 61mm, 57mm
On the 139QMB series engine from a regular Chinese 80-six, you can easily install a piston 39mm (45CC), 47mm (72CC), 50mm (84CC)
From left to right: 39mm (45CC), 47mm (72CC), 50mm (84CC)
Setting the valve timing ch2 (in collective farm style - ignition)
Without knocking the piston off from TDC, we orient the camshaft so that the large hole and marks on its sprocket become as shown in the photo and, while putting on the chain, install the camshaft in bed.
Ideally, the marks on the sprocket should be strictly parallel to the plane of the valve cover connector. In practice, unfortunately, such accuracy is difficult to achieve. And this is mainly due to the stretching of the timing chain. And there’s nothing you can do about it - either change the timing chain to a new one or catch the phase by switching the teeth, but this method of setting the valve timing is not acceptable to me personally.
Problems when paying with bank cards
Sometimes difficulties may arise when paying with Visa/MasterCard bank cards. The most common of them:
- There is a restriction on the card for paying for online purchases
- A plastic card is not intended for making payments online.
- The plastic card is not activated for making payments online.
- There are not enough funds on the plastic card.
In order to solve these problems, you need to call or write to the technical support of the bank where you are served. Bank specialists will help you resolve them and make payments.
That's basically it. The entire process of paying for a book in PDF format on car repair on our website takes 1-2 minutes.
If you still have any questions, you can ask them using the feedback form, or write us an email at [email protected]
Installing a piston engine (CPG) on a 4t scooter
We take a new piston kit for 72 or 80 cubic meters (piston diameter 47mm or 50mm, respectively). You can, of course, use a standard new 50 cc CPG. The kit includes: cylinder, piston, piston rings, pin, retaining rings, as well as head and cylinder gaskets. You can buy a 72 cc cpg at a low price in our online store.
Installation is carried out in the reverse order, having previously lubricated the cylinder, piston and rings with a small amount of oil. We first install a thin ring on the piston in the lower groove, then an oil scraper ring and again a thin ring (the wavy ring - the oil scraper ring will thus be between the two thin ones in the lower groove). Next, install 2 compression rings (which are thicker). The cuts of all rings should not be located on top of each other. After installing the rings, place the piston on the crankshaft connecting rod, fix its position with a finger and locking rings. We take the connecting sleeves from the old cylinder and insert them into the new one.
We put a gasket under the cylinder on the studs
Carefully place the cylinder on the piston with rings so as not to damage the cylinder. We push the chain into the groove for the chain
Then install the chain bar on the cylinder head. Now we can put the chain on the camshaft sprocket (the position of the sprocket should be as follows: a large hole at the top, and two small ones on the sides, parallel to the edge of the cylinder head). We fix the position of the cylinder head with the gasket by screwing it on. Then we install the plastic cylinder head cover, chain tensioner, carburetor and muffler. The installation is now complete!
If you haven’t changed the oil for a long time, you need to change it before starting with a new piston. Before putting a full load on the scooter engine, it is necessary to run-in, i.e. drive 300-500 kilometers at a speed of no more than 40-45 km per hour.
Along with an increase in the power of the scooter with the installation of a tuning cpg, the load on the variator with the gears of the gearbox also increases. Remember this and if possible, replace the variator with gears with tuned ones (more reinforced.)
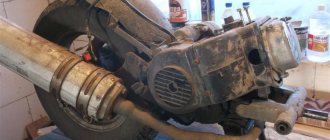
How I restored a Honda DIO AF28 moped Part 2
Last weekend I settled on painted wheels. Today I want to offer you a continuation of my story on the resuscitation of a purebred Japanese!
Now the most interesting thing for me is replacing the cylinder-piston group (CPG or simply a piston with a cylinder). The photo shows the condition of my piston and cylinder, which I removed from the moped. There was a decent amount of scuffing and wear in the cylinder, there was no gasket. Big snot from sealant. There are such notches on the cylinder that mother don’t worry.
I installed a new CPG, saved money and now I understand that it was in vain. The new piston installed without problems, but the compression was 6.5. This means I need to break it in properly and it will last for two seasons, at best.
After that, I replaced all the seals, fortunately they are sold as a set and only 6 or 7 pieces, I don’t remember. And the cost is 130 rubles. And, of course, after replacing the oil seals and cleaning out all the space under the variator and clutch covers, I replaced the rollers in the variator (mine were 8 grams, but they were not perfectly round in shape). I set it to 9 grams - this is the standard, but it turned out that this was too much and it would be better to set it to 7 grams on the contrary. I'll keep this in mind for the future.
Of course, I had to change the variator belt, as well as buy a full set of gaskets for this model. Some of them remained untouched, since I did not change the crankshaft bearings, but they will not be superfluous...
Time to paint the plastic. I painted the plastic with the same Montana that was left over from painting the wheels. Degrease well, then lightly coat paint. After drying, the layer is thicker, and the third is the final one.
But it looks a little strange, you must admit. A grown man can paint his moped in these bed colors. BUT the whole point is that further it will look quite aggressive, but for this it needs to be assembled and add zest to the appearance.
Namely, let's add BLOOD. More BLOOD. Zombies attacked our area and one got wrapped up in a wheel. To achieve this effect, you need to take a can of red paint and apply blots all over the body. I’m not very happy with the fat splashes, but with the blots it turned out great
As a result, the moped attracts attention and looks interesting, and anyone can do something like this