General principle of troubleshooting a scooter Checking the condition of the scooter's piston group Finding a fault in the scooter's power system Finding a fault in the scooter's ignition system Diagnostics of the condition of the scooter's CPG elements Diagnostics of the condition of the scooter's crankshaft Checking the condition of the scooter's clutch Checking the condition of the scooter's spark plug Repairing the scooter's gas tank
When servicing a scooter, it is necessary to unscrew the scooter's spark plug to determine whether the carburetor is set correctly.
It is important to pay attention to the brand and heat rating of the spark plug - if you install a spark plug with a different heat rating from the recommended one, it will not self-clean. If the candle is whitish, you need to enrich the mixture; if it is black, lean it. The adjustment is made on the scooter's carburetor with a special screw located under the cover covering the accelerator drive rocker arm. It is important to remember that a scooter air filter clogged with dirt, without passing the required amount of air, will cause the mixture to become richer, and before drawing conclusions about the need to adjust the scooter carburetor, it is necessary to check the condition of the air filter. A correctly selected scooter spark plug has a decisive influence on the performance of the scooter, as well as on its temperature regime. A spark plug with the heat rating recommended by the manufacturer should be installed on the engine only; only in this case will the process of self-cleaning from carbon deposits occur. The spark plug is a comprehensive source of information for deciding on the necessary repair procedures. This method is used to repair both scooters and cars, such as Ford repairs.
It must be remembered that the reason for the enrichment of the scooter mixture can be not only incorrect carburetor settings, but also a dirty scooter air filter; and the cause of a lean mixture may be the scooter’s fuel system clogged with dirt.
"Chinese"
We inspect the right side of the engine and if you find there a thick black wire at the end of which there will be an incomprehensible L-shaped piece of garbage inserted into the engine. Decide whether it will be convenient for you or not, if it is convenient, remove this garbage from the spark plug and, as necessary, put a special key on the spark plug and unscrew it
If inspection of the engine yields nothing, inspect the engine hood and if you see a hatch in its front part, remove it
If there is no hatch on the hood, remove either the hood or the seat tank
Spark plugs and heat rating
Before I got acquainted with the scooter, I had little idea about spark plugs. But nevertheless, I bought a candle as one of the first parts for a scooter. At that time I didn’t yet understand the markings, and I bought it simply by the name “Candle for Honda Tact.” And then on the Internet I found a convenient table for NGK spark plugs, and after looking at it, I wanted to understand the topic in a little more detail, and especially to understand what the heat rating of a spark plug is. After all, it was this term that interested me most.
To choose the right spark plug, you just need to look at the scooter manual. Most common candles have analogues produced by several companies. Although NGK candles are the most popular due to their quality and reasonable price.
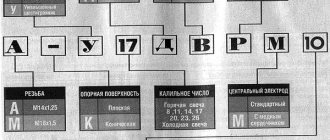
NGK spark plug marking table
Let's take the standard Honda Dio spark plug as an example - this is an NGK spark plug marked BPR6HS .
The first one or two characters indicate the thread diameter and key size.
- A
– 18 mm (hex key 25.4 mm) - B
– 14 mm (hex key 20.8 mm) - C
– 10 mm (hex key 16.0 mm) - D
– 12 mm (hex key 18.0 mm) - E
– 8 mm (hex key 13.0 mm) - G
– PF 1/2 (hex key 23.8 mm) - J
– 12 mm (hex key 18.0 mm) - AB
– 18 mm (hex key 20.8 mm) - BC
– 14 mm (hex key 16.0 mm) - BK
– 14 mm (hex key 16.0 mm) - DC
– 12 mm (hex key 16.0 mm)
The next two symbols indicate the features of the candle.
- K
– protruding end for 3/8″ wrench - L
– compact type (Shorty) - M
– compact type (Bantam) - P
– protruding insulator - R
– resistor - U
– surface or semi-surface discharge - Z
– induction resistor
Then comes a number indicating the heat value. Can take a value from 2 to 12. The higher the number, the colder the candle.
- 6
– heat number
The next symbol indicates the thread length.
- E
– 19 mm - H
– 12.7 mm –
standard for Honda Dio - EH
– half thread: total length 19.0 mm and thread length 12.7 mm - FS
– with 10.9 mm conical seat - L
– 11.2 mm - S
– 9.5 mm - Z
– 21.0 mm
The following symbol indicates the shape and characteristics of the electrodes.
- A
– with special design - B
– for CVCC engine - C
– low angle side electrode - CM
– compact type with oblique ground electrodes - E
– V-shaped corrugated electrode (14.0 mm only) 1.5 mm insulator - ES
- standard spark plug with a long threaded part of 2.5 mm with a central electrode location - F
– with conical seat - G
– central electrode made of thin nickel alloy - GG
– copper electrode with grounding - GV
– gold-palladium central electrode - J
– two extended side electrodes - K
– two side electrodes - M
– two side electrodes, insulator length 18.5 mm - T
– three side electrodes - Q
– four side electrodes - R
– special electrode with grounding - S
– standard central electrode made of copper 2.5 mm - P
– central electrode made of platinum - U
– semi-surface discharge - V
– central electrode made of gold-palladium - VX
– special side electrode, center. platinum electrode - W
– tungsten central electrode - X
– clearance for increased productivity - Y
– V-shaped central electrode - -L
– intermediate thermal rating - -LM
– compact type (insulator length 14.5 mm) - -N
– grounding electrode with special dimensions - IX
– central electrode made of iridium - Z
– central electrode thickness 2.9 mm
The spark plug marking may end with a number indicating the spark plug gap in tenths of a millimeter. For example, - 11 indicates a gap of 1.1 mm.
So, our BPR6HS has the following features:
- B – 14 mm thread for a standard 21 mm wrench
- P – with protruding insulator
- R – with resistor
- 6 – with heat number 6
- H – with thread length 12.7 mm
- S – with standard central electrode
The main thing when selecting an analogue is the correspondence between the physical characteristics of the candle and the heat rating. And the shape and type of electrodes are secondary.
Spark plug heat number
The heat number is a conditional value. Previously, it indicated the time (in seconds) after which the spark plug warmed up to the state at which glow ignition began (when the fuel ignites not from a spark, but from the hot working parts of the spark plug). Now the heat number is the average indicator pressure at which heat ignition begins. The higher the heat rating, the longer the candle prevents overheating. Therefore, the colder it is. A candle with a lower heat rating is hot.
The normal temperature of the working part of the candle is 500-600 °C. In this case, the spark plug cleans itself and works correctly. If the temperature is lower, carbon deposits accumulate on the working parts of the spark plug, causing current leakage, causing the engine to start unstably and run intermittently. If the temperature rises to 800 °C, then there is a danger of glow ignition, and the mixture ignites before the required moment, which leads to loss of power and high gasoline consumption.
If you use your scooter for short trips, it is better to use a hotter spark plug (for example, number 5 or 6), it will be most effective. And if you drive long distances, or with a heavy load, a cold spark plug (with a heat rating of 7 or to avoid hot ignition - after all, during intensive work, the spark plug is prone to overheating) is suitable.
Exactly the same rule can be followed for seasonal use of a scooter. Not all scooter riders park their horse in the garage in winter. If you continue to ride your scooter in the cold, it makes sense to use a hotter spark plug. And in the hot summer it will be correct to drive with a cold spark plug.
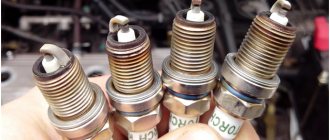
By the type of candle you can conditionally determine whether the heat number is selected correctly. The normal color of the insulator should be light brown. If the insulator is very light or even white, the plug is too hot for the engine. If, on the contrary, the insulator is covered with black soot, you need to put a hotter candle. Of course, this conventional method only works with a correctly configured carburetor.
Please note: This article and the images in it are subject to copyright. Partial or complete reproduction on other resources without permission is prohibited.
How to change?
We take it, buy it, ask someone for a special spark plug wrench. We put the key on the spark plug, insert a screwdriver into the key and turn the spark plug out. After unscrewing the spark plug - carefully so as not to accidentally drop it into the cooling casing - remove it along with the key
As necessary, we insert a new spark plug into the key and very carefully and slowly screw it into place. When you wrap the candle, do not apply much force to it, and if you feel that at the very beginning the candle is wrapped tightly, then you have not hit the thread: unscrew it and try to screw it again.
If the candle went easily, wrap it all the way and pull it slightly. It is not advisable to tighten the candles too much; it will be enough to tighten them a little and this will be quite enough.
How to set the ignition on a scooter
With minimal experience, but good theoretical knowledge, you can set the ignition yourself. To do this, you just need to strictly follow the instructions below.
The most important part of tuning is to find the correct position for the timing sprocket to sit. In order to find it, they use special marks that are applied at the factory during engine assembly. The desired mark looks like the letter "T". In this position, the piston is at dead center. This is the extreme position after which the piston will return back. You need to rotate the rotor until the protrusion on the crankcase and the letter “T” coincide. This can be done using your hands or a kick starter. An electric starter does not need to be used.
To adjust, you need to align the “T” mark and the protrusion on the engine crankcase
Labels may look different on different scooters
If the piston has only moved down minimally, turn it further until the marks line up. It's not always possible to get the right position the first time. After they match, you need to study the other marks: they are located on the timing star. Usually these are three points or holes that are located on the outside of the star. They form a triangular shape if you connect them visually. Notice that one point is larger than the others. After adjusting the ignition, it should be on top, and the other two marks should remain opposite each other. They must stand horizontally.
Markings on the timing star
If the ignition is contactless, it is adjusted as follows. In order for the engine to run smoothly and correctly, you need to adjust the ignition of the mixture at the right moment. To do this, after all the tags are installed in the right places, you need to understand how the contactless principle works in general.
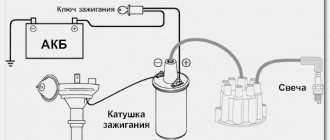
A special feature of the BZS is the presence of special sensors, a switch, and two types of ignition coil winding. When the sensor is closed using a rotor equipped with a magnet, a pulse is generated that enters the commutator, it pumps up the current coming from the generator and directs it to the primary winding of the coil. After this, the charge enters the secondary winding, where a high voltage is generated, with the help of which a spark appears, used to detonate the gasoline mixture. Adjusting the ignition is the alignment of the marks on the crankcase and the star. Usually you have to remove the valve cover.
After this you need to do the following:
- Labels are set in the manner described above.
- In order to set the ignition angle, you can release the stator mount and adjust it in accordance with the technical requirements of your vehicle.
- Make sure that the marks or holes are in the correct position.
How to check the spark?
We insert the spark plug into the spark plug cap and place the spark plug on the engine so that its metal base touches any metal part of the engine. Turn on the ignition, press the start button or kickstarter foot and look at the spark plug electrodes.
- If there is a spark between the electrodes, the spark plug is working
- If there is no spark between the electrodes, the spark plug is broken; to be sure of this, try a known good spark plug or a new spark plug.
- If there is no spark and there is a working spark plug, the spark plug has nothing to do with it and the problem is not in it, but for example in the coil, switch or generator
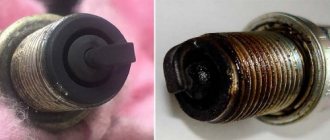
Soot contamination
Type of spark plug: dry soft soot of intense black color on the insulator, electrodes and spark plug body.
Consequences: poor start of the scooter engine; poor operation of a cold scooter engine; interruptions in ignition of the air-fuel mixture; bad reaction to gas.
Probable causes: excessively rich air-fuel mixture; The scooter's air filter is very clogged; The thermal range is incorrectly selected - the candle is too “cold”.
Remedy: adjust the working mixture; adjust the cold start system of the scooter engine; change the scooter air filter; clean the spark plugs or replace them with new ones - with the correct heat rating.
What is advance ignition
The quality of the mixture supplied to the engine cylinder determines the behavior of the scooter in cold weather, as well as how high the wear of the cylinder itself will be. For example, with a rich mixture, the engine starts better, but carbon deposits form; with a lean mixture, the cylinder quickly wears out and traction is lost.
In order to facilitate the process of starting the engine, you can set the ignition to advance, this will make it easier to start the engine regardless of the weather outside, slightly increase engine power, and significantly increase traction. The peculiarities of such settings are that a charge is formed in the spark plug before the piston reaches the dead center. This makes it easier to start the engine and increases engine power. However, it is worth remembering that cylinder wear may increase.
The procedure is carried out in approximately the same way as a regular ignition adjustment, but has its own nuances. To do this, all the same actions are carried out, only the tags are not completely connected. The discrepancy should be approximately half a centimeter. This is enough to get the desired effect.
How to set the lead angle (video)
About adjusting the ignition of a 4t scooter
Knowing how to set up the ignition of a 4T scooter on your own, you can save time and money, since you will not need to contact a motorcycle repair shop. The procedure is simple, even if you have no experience it takes a little time, but you will need to be patient. Regardless of the type of ignition, an important role is played by how the marks are set.
Correct adjustment is a guarantee of stable and smooth engine operation even in cold weather conditions. Often, in used vehicles, the ignition is broken: this can happen for various reasons, ranging from elementary shaking when driving to improper handling of the equipment. In order for the scooter not to let you down and for you to be able to start it whenever you want, you will need to learn how to carry out this procedure yourself. To do this, you will need to have several keys that allow you to remove the valve cover if the engine is four-stroke.
Setting up the Vision scooter ignition system
If the ignition is knocked out, this may be the reason the scooter does not work. Restoring it is not difficult if you understand how it is done.
Advice: before starting work, carefully check and clean the carburetor: this may be the reason. Adjust the quality of the mixture. In addition, it doesn't hurt to check the spark plugs.
Make sure the spark plug is working properly
You need to start adjusting by setting the timing belt in the desired position. As a rule, there are marks on it for this purpose; they are set at the factory. The cylinder must be installed at dead center. The mark may be indicated by the letter T or another symbol. Now make sure that the mark installed on the rotor matches the mark found on the magneto. To do this, you need to gently press the kickstarter. The rotor can also be turned using your hands, but this is more difficult.
There are also marks on the timing star in the form of holes or dots; they must be set so that the largest hole is on top and located exactly in the center. The remaining points should be below and located horizontally opposite each other. Setting the ignition advance makes sense if you want to increase the engine's power a little and make it start easily. The adjustment will help make the spark plug produce a spark earlier than the standard time. That is, a spark will appear even before the piston reaches the dead center. In cold weather, a moped configured in this way will start better.
In order to configure the scooter in this way, you will need to repeat the procedure described above. However, there is a difference: the marks should not coincide clearly, and not reach each other by about 0.5 cm. The main difficulty lies in connecting the marks.
