Installing a piston with a larger volume than stock is perhaps the simplest, most affordable, affordable and effective way to significantly increase the maximum speed and power of a scooter. There are, of course, even more effective ways to increase maximum speed and power, but these methods, or rather the hardware, cost simply unrealistic money...
If you charge the engine of the same 139QMB to the maximum, then such tuning before the “increase” cost the client about 35,000 rubles and this does not include work.
It is clear that not everyone can afford such amounts. Yes, even if it’s affordable, what’s the point? It’s easier to buy an old branded scooter and ride it than to charge the “Chinese” and then throw it in the trash after a season. But that's what I think.
Preparation
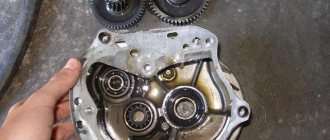
So that you don’t have green snot later about the fact that the tuning piston does not fit into the crankcase and you were allegedly deceived here - remove the old piston from the engine and measure the hole for the liner with a caliper. If the hole is smaller than the tuning piston sleeve, the “meat” of the crankcase allows it, hands grow from where it is needed - a round file will help you (only before boring - disassemble the engine, assemble the empty crankcase with bolts, bore the hole, make sure that the piston enters the crankcase without problems - wash the parts from shavings and reassemble the engine. Or, as a last resort, coat the crankcase and file with grease to at least somehow protect yourself from sawdust getting into the inside of the engine.)
The hole for the 162QMK engine sleeve (such engines are installed on Chinese scabs, more popularly known as “Leika”) in stock is 65 mm. Without boring, a piston of 57mm (150CC), 61mm (1700CC) and 62mm (180CC) easily fits into this crankcase. You won’t find a 62mm piston on sale during the day, so it was decided to install a regular 61mm piston on this engine.
By the way, for those who do not know, a piston with a diameter of 61 mm can be easily installed not only on the Leica engine, but also on any other Chinese 150 equipped with a 157QMJ series engine. There, if you put your hands to it, you can stick a piston at 62mm, but only if the “meat” of the crankcase allows it. Everything is individual, you need to look at the place. In any case, the distance along the studs is the same for both the 61mm piston and the 62mm piston.
From left to right: 61mm, 57mm
On the 139QMB series engine from a regular Chinese 80-six, you can easily install a piston 39mm (45CC), 47mm (72CC), 50mm (84CC)
From left to right: 39mm (45CC), 47mm (72CC), 50mm (84CC)
Modified K60V carburetor
Most mopeds have a very simple carburetor design; it is also located in a convenient location, which makes it possible to quickly adjust. And if you are the owner of an Alfa moped and the like, this guide is about how to set up a carburetor on an Alfa moped for you. The small air jet has been calibrated and the quality screw is now working. The fuel jet has been calibrated, now...
Carburetor adjustment k-60v
Read more carefully the principle of operation of the carburetor and its settings, as well as the selection and operation of the spark plug and its modes. And I made my conclusions based on 40 years of experience in operating motorcycle engines. The mixture quality screw, which is at the bottom left, must be tightened until it stops and then unscrewed one and a half turns and away from...
moped "" Karpaty 2
Any motorcycle wears out over time and requires replacement of some parts and components. In our store you will find any necessary spare part for mopeds of these brands at the best prices. You can purchase a new carburetor, piston or gas tank cap from us.
Refilling “typical malfunctions of the K60 carburetor”
The combination of both methods allows us to achieve the most acceptable results when tuning, however, in the absence of the first, as for example on Suzuki Sepia and Suzuki Assress carburetors, we will be content with only moving the needle.
We configure and modify the Chinese K60V carburetor
Also, before adjusting, check, or better yet, replace with a new spark plug. Check the air filter for contamination (read here), clean it or replace it with a new one. Make sure the exhaust system is clean, which you can read about here. It is also advisable to rinse in gasoline and blow out all channels and jets in the carburetor with compressed air. For more than five years, there has been a Chinese counterfeit of the K60B carburetor on the market. This video talks about…
Adjusting the moped carburetor
If you solder the small air jet completely, then a failure appears at the start, but you can regulate the quality of the mixture, the speed increases. On other carburetors the jet is 1.2 mm or 0.8 mm. I decided to make the hole diameter 0.5 mm and see what happens. Moped carburetor. Adjustment. Music used: Licensed under Creative Commons CC-BY 3.0 Unported License …
Speed limiter in carburetor
Hello everyone, I have a Carpathian moped with a V50m engine, when I switch to first, my speed goes out of whack, I pulled the cable, it still goes out of gear, what should I do? video about speed limiters: scooter repair. creation of motorcycle projects. inventions. test…
Review of carburetor K-60 (Carpathians, Verkhovyna, Delta, Riga)
Answers to the most popular questions about the repair and maintenance of scooters and mopeds, more than 400 consultations from professionals. In this video we will talk about the design and factory defects of the K-60 moped carburetor. Have a nice promo…
about fuel level
It happens that the needle becomes a little askew, this happened to me too, and the gas flows in a stream, but as soon as you start the moped and let it run a little. Personal page in VK of Sergei Tsurko: Group in VK of Sergei Tsurko: .
#49 Installing the throttle valve on the throttle cable
During operation of a road motorcycle there is usually no need to replace the main jet. But in some cases, for example, when preparing a forced engine, when installing a different type of carburetor or air cleaner, a different performance of the main jet is required. TCG channel Subscribe to the channel and like) *Link to...
Carpathian moped working with a lighter rubber band on the carburetor needle valve
It gained such popularity thanks to many factors, including good quality (at the time of the start of production, compared to other two-wheeled vehicles, the Karpaty moped was famous for its fairly high quality of workmanship compared to its competitors), original design, which resembled a small motorcycle, double seat (optional , the second one was not comfortable to sit, but the competitors didn’t have that either). In this video I will show you how my Karpaty moped starts and works with a lighter rubber band on a needle...
Installing piston rings
Remove the set of piston rings from the box. A piston ring set for a Chinese four-stroke scooter usually consists of five items. Three of which are a single assembled oil scraper ring, the other two: upper and lower compression.
A typical set of piston rings looks something like this
Or so
Carefully unpack the kit with perfectly clean hands.
In the kit you will find two of the thinnest rings and one thick corrugated ring (expander) - this will be an assembled oil scraper ring that needs to be installed on the piston first.
We place an expander in the lowest groove of the piston
We place thin oil scraper rings in the same groove - one under the expander, the second on top of the expander
We find the lower and upper compression rings in the kit and install them, respectively, in the middle and upper grooves of the piston - with marks on the side surface to the cylinder head (cylinder head). The lower compression ring differs from the upper one in color (not always) and the shape of the working edge (always). In most kits, the lower compression ring is painted black, and its working edge has a slight bevel.
Tags
The top compression ring in the vast majority of piston ring sets is a uniform light color. But this is in most cases, and in practice it happens that the kit comes with upper compression rings that are black or even red. By and large, the color is not particularly important to us, something else is important to us: the working edge of the upper compression ring has small roundings (chamfers) on the sides, and the working surface of the edge of the upper compression ring is covered with a shiny protective coating.
For example, in this kit both compression rings are black. But the working surface of the upper compression ring is covered with a layer of protective coating, and small chamfers are removed on the edges of the working surface.
The lower compression ring has a matte working surface, and the working edge is beveled at a slight angle. All these moments are clearly visible in the photo.
The compression rings in this kit are red and black. As in the first case, the upper compression ring has chamfers on the working edge and a protective coating, and the lower one has a matte working edge beveled at an angle.
On classic piston ring sets, the upper compression ring has a light color and a rounded working edge. The bottom is dark in color and the working edge is beveled at a slight angle.
When installing the piston rings, do not forget about the marks. The marks on the rings after installation on the piston should be oriented towards the cylinder head (cylinder head).
How to put rings on a scooter
It is worth noting that durable and trouble-free operation of the piston largely depends on the correct installation of the rings. There is absolutely no need for haste and dirt in this matter. Do everything carefully (for yourself, after all), slowly and most importantly: keep it clean!
First, let's take a little look at what a standard set of piston rings for a four-stroke scooter engine is. The standard kit consists of: two compression rings (upper and lower) and one oil scraper ring, which in our case has a collapsible design.
A set of piston rings for a two-stroke scooter engine differs from the previous one in the absence of an oil scraper ring; also, a set of rings for a two-stroke engine may include an expander (marked with an arrow).
So, we have more or less figured out the kits - it’s time to get down to business. We prepare in advance small strips of tin or thin plastic, with their help we will put the rings on the piston.
We thoroughly wash the rings and piston; when installing new rings on a used piston, do not forget to clean its grooves from carbon deposits, otherwise the new rings will not fit into the cylinder. We prepare a clean workplace and perform the installation.
We take the oil scraper ring expander from the kit and place it in the lowest groove of the piston.
In the same way, we install the expander from the kit for a two-stroke engine (if any), with the only difference being that the expander lock should be located in the area of the locking pin (marked with an arrow) of the piston groove.
We look for marks on the rings, apply pre-prepared strips to the piston, very carefully and slowly pull the rings along our strips onto the piston, in this order: first we put on the oil scraper ring, then we put on the second oil scraper ring, then we put on the lower compression ring (dark) and only then put on the upper compression ring (light). The marks on the rings after installation should be located upward towards the cylinder head.
We straighten the rings so that they stand exactly opposite their grooves and slowly pull out our strips from under them. Now the main thing: after you have pulled out the strips and the rings are in their grooves without fail, check each ring for mobility. The rings in the piston grooves should rotate freely in different directions.
Tags
The oil scraper ring should look something like this after installation:
After installation, the marks must be directed strictly towards the cylinder head.
Immediately before installing the piston into the cylinder, the piston ring locks must be moved apart in the correct order. This is done like this:
We unfold the upper compression ring so that its lock moves relative to the piston pin axis by approximately 45 degrees, and unfold the lower compression ring so that its lock moves approximately 180 degrees relative to the lock of the upper compression ring.
We rotate the upper oil scraper ring lock 90 degrees relative to the lower compression ring lock, and rotate the lower oil scraper ring lock 180 degrees relative to the upper oil scraper ring.
The photo shows approximately how the piston ring locks of a four-stroke engine should be positioned:
Red marks indicate compression ring locks. Blue marks indicate oil scraper ring locks.
Before final installation of the piston, the piston ring locks of a two-stroke engine must be positioned strictly in the center of the locking pins.
scooter-mania.ru
Piston installation
Insert a retaining ring into any boss of the piston pin. It is most convenient to insert the ring with small round nose pliers. After installation, check how well and tightly the retaining ring fits.
- If the retaining ring does not cover the entire surface, but only a small part of it, replace it with a new one.
- If the retaining ring does not lie tightly in the groove and dangles, straighten it a little
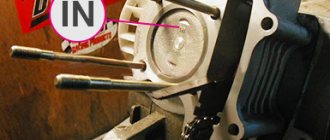
Lubricate the bearings of the lower and upper connecting rod heads and the piston pin bosses with clean engine oil. We put the piston on the connecting rod, orienting it with the “IN” mark to the inlet port; if there is an “arrow” on the piston instead of the “IN” mark, orient the arrow to the exhaust port. We insert the piston pin into the boss - orient the piston on the connecting rod so that the pin hits the connecting rod - install the pin all the way into the locking ring and secure it from falling out with the second locking ring.
We install the cylinder guide bushings on the studs and put on the gasket. It is advisable to place the gasket on the sealant, but without fanaticism.
Theory
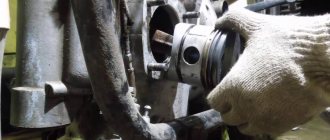
The generator consists of two main parts: the rotor and the stator. The stator is attached to the engine crankcase and can be removed very easily, literally “by hand”. But the situation with the rotor is different. The rotor is mounted on a cone and clamped with a nut, and it is clamped tightly, and in order to remove it from there, you must first secure it from turning, then unscrew the nut and only then use a puller to pull it off the cone.
Cylinder installation
Fill the rings and piston with clean engine oil. We tighten the piston rings with a clamp. We cut the clamp from a piece of any sheet metal - cut out a strip of the required length, give it a profile along the piston and make a retainer from the same piece of sheet metal.
Lubricate the cylinder mirror with clean engine oil
We hook the timing chain with a piece of wire, pull the chain through the cylinder and put the cylinder on the studs.
Very carefully and slowly insert the piston into the cylinder. After the rings are completely inserted into the cylinder, unfasten the clamp and install the cylinder into the crankcase.
Difficulties
Our people don’t want to buy pullers and they put everything under the rotor and even try to knock it down with a hammer, and once I came across a scooter with a piece of some kind of metal welded to the rotor. They probably welded a hook and wanted to pull it off with a KAMAZ.
On the one hand, you can understand people: why buy an expensive tool for a one-time job?.. On the other hand, I don’t understand people: why buy and personally damage a scooter with a hammer, if you can give it to a mechanic for repairs? A dilemma, whatever one may say.
Setting the valve timing ch1 (in collective farm style - ignition)
We push the cylinder all the way into the crankcase and set the piston to top dead center (TDC). It is best to set the piston at TDC using an indicator or, at worst, visually/touch. You can also align the piston according to a special mark on the generator rotor, but I have more than once encountered the fact that the marks on some engines are stamped incorrectly and, in order to avoid troubles, I advise you to use them only as a last resort, for example, when the cylinder head is not removed and you need to adjust valve
We insert the cylinder head guide bushings and the lower timing chain guide into the cylinder, degrease the surface and install the gasket.
We install the cylinder head, insert the valve bed guide bushings.
What will be needed for replacement?
For such a procedure, it is worth preparing a set of wrenches, a ratchet with socket heads, a torque wrench, a piston ring puller and the set of rings itself.
You may be interested in: Mishlene tires: brand history, popular models
The tool for mounting/dismounting piston rings has a simple design and affordable price. Without this device, the replacement process can turn into an almost impossible task. Of course, in the past, car enthusiasts made do with a couple of screwdrivers. But it is better to have such a tool, otherwise without it you can damage the rings or the piston surface. Moreover, it is always available in auto stores.
Setting the valve timing ch2 (in collective farm style - ignition)
Without knocking the piston off from TDC, we orient the camshaft so that the large hole and marks on its sprocket become as shown in the photo and, while putting on the chain, install the camshaft in bed.
Ideally, the marks on the sprocket should be strictly parallel to the plane of the valve cover connector. In practice, unfortunately, such accuracy is difficult to achieve. And this is mainly due to the stretching of the timing chain. And there’s nothing you can do about it - either change the timing chain to a new one or catch the phase by switching the teeth, but this method of setting the valve timing is not acceptable to me personally.
We orient the camshaft bed with a mark in the form of the letters “E” and “X” towards the exhaust channel and install the bed.
Tighten the bed nuts crosswise and then tighten the two bolts on the side boss of the cylinder head.
Outline
It happens that when installing it back, the stator is installed in reverse, and then depending on your luck: everything may go without consequences, or the spark may disappear or interruptions may appear. To avoid this, any, not just CDI-type scooter generators must be installed exactly as they were originally installed. If you follow this golden rule, you will be happy.
We unscrew the bolts.
We remove the stator. Installation of the generator is carried out in reverse order.
Installing the timing chain tensioner
If you have a 157QMJ series engine, do the following: unscrew the plug on the tensioner body; We insert a thin flat screwdriver into it and begin to tighten the bolt until the tensioner rod goes inside the body.
Without releasing the screwdriver while simultaneously holding the tensioner body, with your free fingers, insert the tensioner into the cylinder, screw it in with bolts, and only then release the screwdriver and screw the plug into place.
If you have a 139QMB series engine, then do this: unscrew the plug from the tensioner housing and remove the spring; push the rod inside the body; install the tensioner in the cylinder; insert the spring into the housing and screw in the plug.
After installing the piston, do not forget to adjust the thermal clearances of the valves and break in the engine.
Our production
In our online store you can find and purchase new piston groups at low prices. A complete list of piston engines can be found at
Installing a piston with a larger volume than stock is perhaps the simplest, most affordable, affordable and effective way to significantly increase the maximum speed and power of a scooter. There are, of course, even more effective ways to increase maximum speed and power, but these methods, or rather the hardware, cost simply unrealistic money...
If you charge the engine of the same 139QMB to the maximum, then such tuning before the “increase” cost the client about 35,000 rubles and this does not include work.
It is clear that not everyone can afford such amounts. Yes, even if it’s affordable, what’s the point? It’s easier to buy an old branded scooter and ride it than to charge the “Chinese” and then throw it in the trash after a season. But that's what I think.