CVT rollers on a scooter - purpose and installation
In any case, there are many details that you have not yet examined, because they can be hidden and will only remind you of themselves during a breakdown.
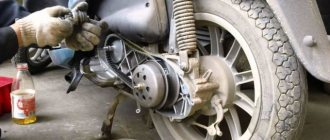
We will talk about the so-called rollers on a scooter, their purpose and proper installation. The rollers of the variator on a scooter are located in the variator itself, and it is they who play a very important role in the entire process of movement. Your maximum speed and jerk at start depends on the correct choice of rollers. If you notice that your scooter does not pick up enough speed or accelerates very slowly from a standstill, check the condition of the rollers. They are located on the front of the variator, to do this, remove the cover and unscrew the front variator (circlip, nut) and take out the rollers, which are located in a certain closed container. After removal, check them for integrity and see if they are worn off. Typically, worn-out rollers wear away the top layer or the entire part, making them almost square. And if your rollers are like this, remove them and be sure to replace them.
Weight of rollers on a scooter
But before replacing the rollers, you should ask yourself: which rollers should you buy? In general, all rollers (also called weights) are divided into different weights, and accordingly their purpose.
Lightweight rollers. Lighter weights allow you to have faster acceleration from a standstill. For this purpose, it would be optimal to buy scooter rollers weighing about 6 grams. But it is not recommended to set the weight below six grams, because then you may lose maximum speed. Already after 30 km per hour you will feel that your scooter is very difficult to pick up speed. So think about these videos because you will have to sacrifice speed.
Medium rollers. The most standard option would be to set the average weight of the rollers. Then your speed will be standard, and acceleration from a standstill will not be very sharp. The optimal weight of rollers for such rollers is 7 - 7.5 grams. These are the standard sizes.
Heavy rollers. Even though rollers will be heavy, the result will not give you much traction or stress. On the contrary, installing heavier weights is necessary for those who want to achieve maximum speed for their scooter. Typically, rollers weighing about 9 grams are used for this purpose. It is not recommended to add even more weight to the rollers, because some scooters are simply not adapted to such changes.
In this article we looked at the purpose of rollers and their weight. You decide for yourself which weights to put, because each owner needs certain indicators. For example, I had poor acceleration from a standstill on my scooter, and installing a different weight of the rollers helped solve the problem a little.
And by the way, after purchasing new rollers, carefully wipe the area where they will be installed. If the old weights were very worn, then most likely they left marks, and this threatens to slip the new weights. So experiment and “tune” your scooter to suit your needs.
How to properly set up a scooter's chain drive?
Setting up a chain drive involves correctly adjusting the chain, as well as selecting the gear ratio. The size of the drive sprocket (on the engine) and the size of the driven sprocket (on the wheel) are different. The difference is in the number of teeth and diameter, which is the gear ratio of the chain drive. Changing it will result in either an increase in speed or an increase in thrust.
Each owner himself determines what is more important:
- if you increase the diameter of the drive sprocket, the speed will increase, but the thrust will decrease;
- If you increase the driven diameter, the thrust will increase, but you will have to sacrifice speed.
Tuning sprockets can be easily purchased in online stores. Most often, replacing sprockets also requires replacing the chain. The chain is selected for specific sizes. The main requirement is that the chain length matches the installed tuning sprockets. The best option is to purchase ready-made tuning kits for a specific scooter model.
The chain drive requires maintenance. It must be cleaned of dirt and dust and lubricated periodically.
Important: the chain tends to stretch during use. Therefore, you need to control its length and periodically tighten it.
Proper chain adjustment involves setting up the chain drive
The need for a tightening is determined by the sagging. The amount of sag in the lower chain branch is set by the manufacturer. On average, it should not exceed 1-2 cm. A sagging chain easily flies off the sprockets when moving.
A tightened chain (without any slack at all) experiences large overloads during suspension operation.
Problems when paying with bank cards
Sometimes difficulties may arise when paying with Visa/MasterCard bank cards. The most common of them:
- There is a restriction on the card for paying for online purchases
- A plastic card is not intended for making payments online.
- The plastic card is not activated for making payments online.
- There are not enough funds on the plastic card.
In order to solve these problems, you need to call or write to the technical support of the bank where you are served. Bank specialists will help you resolve them and make payments.
That's basically it. The entire process of paying for a book in PDF format on car repair on our website takes 1-2 minutes.
source
Payment via PayPal
After selecting payment via PayPal, the PayPal payment system will launch, where you need to select the payment method: bank card or PayPal account.
If you already have a PayPal account, then you need to log into it and make a payment.
If you do not have a PayPal account, and you want to pay using a bank card via PayPal, you need to click on the “Create an Account” button - shown with an arrow in the picture.
PayPal will then prompt you to select your country and provide your credit card information.
After specifying the information required to make the payment, you must click on the “Pay Now” button.
Dismantling the rear variator of a scooter
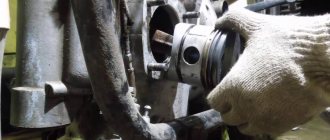
To disassemble the variator you need to remove the variator cover; it is secured with several bolts. For example, in a Honda dio scooter, the variator cover is screwed on with 6 bolts, which require a 13 socket head.
Now that you have removed the variator cover, let's begin disassembly. It is not necessary to remove the variator belt.
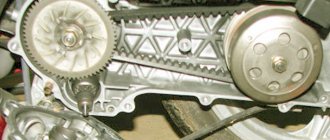
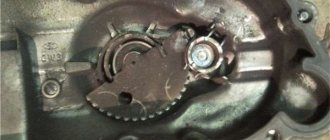
- It is necessary to unscrew the nut of the variator drive pulley. To do this, we fix the drive pulley, select a screwdriver that fits in size and insert it into the place where the starter gear of the drive pulley and the overrunning clutch engage as shown in the figure.
- Now you need to remove the support washer from the shaft.
- And then we remove the kickstarter ratchet bushing.
- After this, you need to remove the drive pulley locking washer.
- Now take the outer half of the drive pulley and remove it.
- Remove the spacer washer from the shaft. The washer is shown in the figure.
- Next, in front of you is the centering sleeve of the drive pulley, remove it too.
- After this, you can remove the scooter's variator pulley assembly.
- Next, remove the splined washer one by one.
- Now the starter drive gear, as in the photo, remove it.
- We also remove the spline washer. Even if you do not understand what a rear variator of a scooter or a centrifugal clutch is, you can navigate all the terms listed in the article from the photo. And you will need the terminology and name to order parts that have failed. By the way, at the end of the article there will be a video that will help you clearly see how the rear variator on a scooter or moped is disassembled.
- We continue, next we need to remove the spacer sleeve from the shaft.
- Now you can and should remove the rear cover of the variator assembly with rubber dampers.
- That's all, we take out 6 rollers from the scooter's variator.
This is precisely why we disassembled the variator of the moped (scooter). Now you need to check the variator rollers for wear.
Replacing variator rollers on a scooter
Replacing the variator rollers on a scooter is necessary if:
- Replacing the workings
- If the plastic shirt has any defects, such as chips or scratches.
- If the connection between the plastic jacket and the metal sleeve is bad
- If the shape of the variator roller is not round, for example as in the photo above.
The rear variator rollers are one of the main parts of the scooter transmission. The whole dynamics of the scooter is just the rollers of the variator and the spring of the driven pulley. The main thing that characterizes the quality of rollers is roundness and weight. Sometimes people are looking for an answer to the question “what is the weight of the variator rollers.” But you need to understand that the weight of the variator rollers can vary significantly. You must select variator rollers that are exactly the same as those already installed on your scooter. If you cannot find the same rollers, then you need to replace the entire scooter variator kit, because:
- It is unacceptable to use rollers of different weights.
- Do not use old rollers with new ones at the same time. If you change the variator rollers, then only as a set.
- Also, you cannot use variator rollers from different sets, even if they are all completely new.
15. Now that we have dealt with the rollers, we need to inspect the drive pulley and its surface. We check the surface for damage and wear. The surface must be flat and the wear from the variator belt should not be more than 0.5 mm. If the output is less, then it can be polished.
Next, we check the surface for other mechanical damage.
Assembling a scooter variator
Reassembling the variator occurs in the reverse order, but before doing this, you need to check that the oil seal has no damage or leaks. If there is dirt or a swamp, we remove it all. We check the variator chamber for oil ingress; this is strictly prohibited by the tolerances. If the oil seal leaks in a two-stroke engine, this will lead to loss of power and interruptions in operation.
Before putting the rollers in place, it is necessary to lubricate them with a thin layer of grease or other variator roller lubricant. It is also necessary to lubricate all parts that rub. After this, we proceed to assembling the scooter’s variator.
Variations on the handle
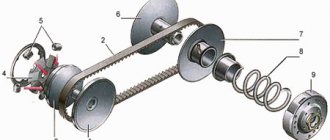
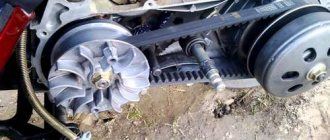
So, with the general principles of changing the gear ratio everything should be clear, now it’s time to proceed to the mechanism of this change, that is, how to make the scooter’s variator pulleys move and move apart exactly when required. To do this, let’s immediately make a reservation that in a scooter variator it is customary to distinguish the driving pulley (located on the crankshaft) and the driven pulley (located on the clutch shaft). In the bowels of the drive pulley there are special cylindrical weights (sometimes also called rollers). These plastic-coated metal bushings are placed in special grooves in which they can move radially. If you move the weights in the drive pulley from the center outward, they will inevitably move the pulley cheeks together. In fact, of course, only one cheek of the variator pulley moves, but this is not important. When the pulley rotates, the weights, under the influence of centrifugal force, tend outward and, shifting the pulley cheeks, push the belt outward. The faster the pulley rotates, the stronger the centrifugal force acting on the weights, and the further outward the compressing pulley cheeks will push the belt. The driven pulley has no weights, but has a large spring that constantly tries to squeeze its jaws together and push the belt out. Like the driving pulley, the driven one has only one moving part - the external one (referred to in foreign literature as the torque driver). It is the torque driver that moves either outward, overcoming the resistance of the spring and allowing the belt to “fall” inside the pulley, or, conversely, inward, closer to the fixed part of the pulley. Thus, the change in the working radii of the scooter's variator pulleys always occurs synchronously. When the belt goes out in the driving pulley, then in the driven pulley, overcoming the resistance of the spring, the belt, on the contrary, moves inward, closer to the axis of the variator pulley.
For a more complete understanding of the process, let's see how the scooter's variator behaves under different engine operating modes . At idle, the rotation speed of the variator drive pulley is minimal. Although a certain centrifugal force acts on the weights, it is not enough to pull the belt out. After all, this requires overcoming the resistance of the large spring of the driven pulley! But now the gas is open, the crankshaft speed jumps, and now the centrifugal force acting on the weights is already enough to push the variator belt in the drive pulley a little outward.
Drive pulley coupling: cover; guide plate; coupling body; rollers.
The gear ratio changes. The rotation speed of the driven pulley of the variator increases significantly, which forces the centrifugal clutch to operate. The scooter starts moving. The engine speed reaches its operating level, meanwhile the belt continues to move further and further outward in the drive pulley of the variator, and deeper in the driven pulley. That is, the speed remains unchanged, but the gear ratio gradually changes, making the scooter go faster and faster. This, by the way, hides one of the great advantages of the variator - acceleration occurs at constant speeds, so you can configure the entire system so that during acceleration the engine will operate at its maximum power (for example, this is impossible to achieve with a manual transmission). Finally, the belt reaches its maximum design radius in the drive pulley of the variator, and its minimum in the driven pulley. However, as a rule, it is possible to accelerate a little faster, but by increasing the speed of the scooter's engine, and not by increasing the transmission.
When the throttle is closed while driving, the engine brakes the scooter for some time until the centrifugal clutch disengages. As soon as it is turned off, under the action of the large spring of the driven pulley, the belt returns to its original position, as when idling a scooter. But as a rule, the scooter’s clutch disengages only when it comes to an almost complete stop (10 - 25 km/h).
By the way, about the scooter’s clutch. This device, although it performs independent functions, is very closely connected with the scooter’s variator itself: if the clutch does not work correctly, the variator will not work correctly, and vice versa. A scooter's centrifugal clutch is almost always three drum-type brake pads that are pushed outward by centrifugal force and engage the clutch drum. The clutch assembly itself is mounted on the driven pulley of the variator and rotates, but the clutch drum is on a shaft, which transmits torque to the rear wheel through a simple gearbox. Thus, in order to make the scooter move, you need to make the clutch drum rotate. This happens as soon as the driven pulley of the scooter's variator gains sufficient rotation speed so that the centrifugal force becomes large enough for the pads to overcome the elastic force of the clutch springs, which prevents their free movement outward. These same springs will “disengage” the clutch, squeezing the pads together when the rotation speed of the driven pulley drops below the critical level for the clutch to operate. As you can see, the system is simple. And it works almost flawlessly, reducing control of the power unit to twisting the throttle (hence, by the way, the name of one popular scooter magazine: Twist'n'go - “Twist and Ride!”). Which not least determined the current wave of popularity of scooters.
This video shows the CVT in action. Shown in the best possible way.
There are several parameters that determine the correct operation of the variator and indicate its good tuning. Firstly, the belt should not slip in the pulleys. Minimal slippage there, of course, is inevitable, but it should be such that the scooter owner does not notice it. Slipping of the variator belt is doubly harmful to the scooter transmission. This includes a decrease in efficiency and increased wear of parts (belt slippage in the drive pulley can also lead to the plastic shell of the variator weights melting due to overheating). A characteristic symptom of slippage is a rise in engine speed when starting from a standstill, which is not accompanied by the expected acceleration (“roars, but does not go”). What determines the slippage of the variator belt? First of all, from the stiffness of the large spring of the driven pulley. The stiffer the spring, the more tension the belt will have before it moves outward in the drive pulley of the variator, and therefore the less it will slip. However, the spring stiffness should not be excessive, otherwise the maximum speed will drop. There are other factors that also affect belt slippage. This is, for example, its wear and tear. Here, of course, there is only one method of struggle - timely replacement.
ProVariator.RU
Polygonal variator rollers. How to put it correctly? Video
Video review of polygonal variator rollers from the online store Scooter.rv.ua
Polygonal variator rollers appeared relatively recently in Ukraine, although they have been used abroad for a very long time and in full swing. The main task of polygonal rollers is to operate the transmission of your scooter. This is to add a little dynamics, a little speed (if your variator and the condition of the belt allow this), and also increase the mileage from replacement to replacement of rollers. There are two cones on the polygonal rollers: one large and the second small, so, correctly, the rollers are installed like this: with a large cone towards the variator hub, but so that the cone is at the top and not at the bottom, and with a small cone, respectively, towards the outer part. Watch the video for more details.
How does a variator work and how to repair it?
A variator is one of the main components of a scooter's transmission. The main task facing the variator is to provide the required speed mode. As a rule, one of the most popular variators is considered to be V-belt. The quality of the CVT directly depends on the number of engine revolutions. The operating principle of CVTs is very simple, especially in comparison with a manual transmission. In addition, in the event of a breakdown, repair work is several times cheaper compared to a manual gearbox.
Downloading a book
After successfully completing the payment (by any method) and returning to the KrutilVertel store from the payment system website, you will be taken to the successful payment page:
The book you purchased will be in your personal account, from where you can always download it.
Please note that after making the payment, you need to return back from the payment system website to the KrutilVertel website. If for some reason you did not return back to the site and closed the payment system tab with a message about the successful completion of the payment, please let us know - we will send you a letter indicating access to download the book
If for some reason you did not return back to the site and closed the payment system tab with a message about the successful completion of the payment, please let us know - we will send you a letter indicating access to download the book.
What is the optimal weight for rollers?
And so, let’s repeat the principle of operation of rollers for a scooter’s variator. When the crankshaft rotates, the rollers diverge by a certain amount. The higher the speed of the power unit and the rotation of the crankshaft, the greater this value. This means the belt extends more and the scooter starts faster. The two-stroke power unit on a scooter is characterized by operating at maximum speed. For the most part, scooter rollers cope with this task.
Quite heavy rollers accompany belt extension at low speeds. At the same time, a drop in dynamics is observed. But, at the same time, the maximum speed is achieved. The operating principle of light rollers is the opposite. That is, the productive element works to its maximum in order to gain maximum speed. Dynamic qualities are reduced back. At the start, the speed will increase quite quickly, but up to 30 km/h. After that, it will be more and more difficult to gain speed.
Based on this, we can draw the following conclusion. The weight of the rollers should be average, optimal. It should be borne in mind that the speed of a moped does not always depend on the weight of the rollers. A significant influence is exerted by the current drive spring - a large spring that is located behind the clutch. What is it for? – responsible for belt fatigue and tension. When it is weakened, the belt is ejected to a larger radius. Thus, with normal weight of the rollers, it is difficult to reach the maximum speed. Often, in such situations, the spring is replaced.
First you need to try rollers half a gram lighter than indicated in the instructions. Experienced scooter riders always have rollers of various weights in “steps” of 0.5-1 grams. The optimal rollers are determined by trial and error. It is difficult and practically impossible to indicate which rollers to install on a scooter without “experiments”. After all, each scooter may have a different condition of the CPG, belt and spring, and variator. One thing can be said for sure, without any doubt: it is impossible to install rollers of different weights in one set. This leads to an imbalance in the operation of the crankshaft and the rapid replacement of its bearings.
Design and principle of operation
The fundamental elements are two pulleys and, accordingly, a belt. The cut belt has a trapezoidal shape. The name of the belt (V-belt) comes from the principle of its operation. The transition of the belt to the maximum radius is similar to a wedge. As the pulleys wear out, the radius becomes smaller and the scooter loses speed.
The main condition for stable operation of the variator is its tightness on the pulleys and the absence of slippage. Experienced users of this type of technology claim that 100% absence of slippage cannot be avoided. But it is necessary to minimize it as much as possible. In case of severe slippage, the operation of the entire transmission is at risk. Breakdowns and replacement of parts cannot be avoided. In addition, efficiency is significantly reduced. A striking example of slippage is the drop in engine speed at the very start (the engine seems to be running, but the movement of the equipment is not significant).
Also, straight belt slippage depends on the pulley spring. If it has lost its rigidity, it must be replaced. In addition, unstable, deteriorated performance may be due to wear of the belt itself.
High-quality famous belts from 6000 km.
How else can you determine the correct operation of the variator? – when starting to move, the engine speed is the same until the start of acceleration. At maximum throttle, the engine speed should approximately correspond to the engine power. “People’s” craftsmen sometimes do some “alterations” so that the dynamic qualities of the scooter increase. Also, to speed up the scooter, there is an option to completely replace the variator. For example, you can buy a sports variator for a 50 or 150 cc scooter.
CVT device on a scooter
A variator is a modern gearbox device, and its use in various vehicles is gaining popularity every day. The mechanism of the CVT gearbox on scooters is very simple: its developers were based on the action of centrifugal force, which made the design lightweight.
CVT components
The scooter has a small weight and dimensions (compared to motorcycles and cars), respectively, and the gearbox should be small.
From the automobile, the scooter's variator inherited:
- two pulleys - driving and driven (though here they are wedge-shaped, and each consists of two halves);
- belt (its shape is trapezoidal, unlike a car belt).
That's all the legacy.
The position of the wedge-shaped halves (cheeks) of the drive pulley is regulated by rollers. The opening and closing of the driven pulley cheeks is carried out by a central spring connected to the clutch.
More about the operating principle
So... The scooter is started and idling. What happens in the variator? The drive pulley rotates at minimum speed. The strap is located just above the center of the cheeks. The slave's cheeks are compressed by a central spring. The belt on them moves along the maximum radius.
The scooter started moving. It's worth mentioning the videos here. They are located behind the inner cheek of the drive pulley. When the speed of rotation of this pulley increases, centrifugal force pushes the rollers towards the outer radius, thereby pressing the halves of the drive pulley together. The belt between these halves moves outward - the radius of its rotation on the leading cheeks increases.
The driven pulley acts exactly the opposite. During acceleration, a centrifugal force acts on it, just like on the rollers, with the help of which the cheeks move apart, compressing the central spring and passing the belt between them. This is how acceleration happens.
Due to this synchronous operation of the pulleys, speed increases at constant speed and maximum engine power.
Setting up a variator on a scooter
By adjusting the variator, the desired dynamics of the scooter are achieved. It can be improved by replacing both the factory rollers and the spring.
The operation of the rollers on a scooter's variator depends on their weight. The manufacturer selects the optimal one when assembling the box. But those who like to drive fast change them to heavier ones. With weighted rollers, a scooter with a variator accelerates more slowly at the start, but after reaching maximum speed, the engine produces a speed 10-15 km/h higher than with factory rollers.
Using rollers of less weight leads to the opposite principle: the scooter starts sharply, but it is difficult for it to reach maximum speed.
Changing spring stiffness also affects speed. Stretched and weak, it will not be able to tightly press the cheeks of the driven pulley. This will cause the belt to constantly operate at a smaller radius than necessary. A spring that is too stiff, on the contrary, will not allow you to reduce this radius (correspondingly increase the speed of the driven pulley) and develop the maximum speed of the scooter.
Repair of a variator on a scooter. Replacing elements
A change in acceleration speed and the appearance of extraneous noise in the variator indicate that some part (or parts) are worn out and require replacement.
To find out the cause of the malfunction, you should disassemble the variator:
- Remove the cover. We do this carefully so as not to damage it. As a rule, the variator cover on scooters has a sealing gasket. It is necessary to evaluate its condition and, if necessary, change it.
- To remove the belt from the variator, you need to remove the drive pulley. And you can get to it only by removing the retaining ring, clutch and gear.
- When the belt and pulley halves are ready, remove the rollers.
- All items must be carefully inspected and tested. Serviceable cheeks have a smooth surface without chips or burrs. The presence of any lubricants on the belt is excluded. If it looks shabby, then it's time to change it.
- After identifying faults, we assemble the variator in the reverse order.
There are two main signs by which the quality of the variator is determined: belt movement and engine speed. In a working variator, the belt does not slip in the pulleys. But, if the engine roars and the scooter does not move, this is the first signal that it is time to look inside the device and examine the condition of the belt and spring.
The operating speed of the engine must correspond to the speed of its maximum power. If this does not happen, it’s time to start adjusting the operation of the variator.
Radius run
A more correct formulation for the technical characteristics of the scooter transmission would be the following: “automatic continuously variable.” In fact, we are talking about such a type of transmission as a V-belt variator , which appeared quite a long time ago, but due to its characteristics, it received the greatest development on scooters, as well as on snowmobiles.
The design of such a transmission is much simpler than a classic manual gearbox, and even more so than the notorious “automatic machines” that cars are equipped with (by the way, some representatives of the four-wheeled world also have a CVT, but a different one than on scooters). It is very simple to understand how a variator works if you remember the system for changing gear ratios on bicycles: several sprockets in front, several in the back, and they are connected by a chain.
True, the V-belt variator does not have any sprockets, but there are two pulleys of V-shaped cross-section, consisting of two cone-shaped halves . These halves, called cheeks, can move closer to or further away from each other. The pulleys are connected by a flexible variator belt , which has the cross-sectional shape of an isosceles trapezoid. Depending on the position of the pulley cheeks relative to each other, the belt in the variator pulley can be either closer to the pulley axis (inside) or closer to the outer edge of the pulley (outside). The closer the belt is to the pulley axis, the smaller the radius along which the belt runs, or, as they say, the working radius of the variator pulley. Now let's imagine a system of two pulleys and a belt in action. If the “working radii” of each pulley are the same, then when one rotates, the other will rotate at exactly the same speed. If we rotate a pulley whose working radius is larger, then the other one (whose radius is smaller) will rotate faster. Here it’s time to remember “bicycle sprockets” again; it’s just that in a variator, a larger sprocket corresponds to a larger working radius of the pulley, and a smaller sprocket corresponds to a smaller radius.
Problems when paying with bank cards
Sometimes difficulties may arise when paying with Visa/MasterCard bank cards. The most common of them:
- There is a restriction on the card for paying for online purchases
- A plastic card is not intended for making payments online.
- The plastic card is not activated for making payments online.
- There are not enough funds on the plastic card.
In order to solve these problems, you need to call or write to the technical support of the bank where you are served. Bank specialists will help you resolve them and make payments.
That's basically it. The entire process of paying for a book in PDF format on car repair on our website takes 1-2 minutes.
If you still have any questions, you can ask them using the feedback form, or write us an email at [email protected]
Limiters in the variator
This can be either a restrictive ring between the cheeks of the variator, or a plate screwed to the variator on the side where the weights are installed (depending on the engine model). Both of these plugs have the same purpose, namely, to prevent the variator cheeks from shrinking completely. Thus, the belt does not reach its maximum radius. Those. travel speed is limited. Reaching, for example, 45-50 km/h, the scooter does not accelerate further, while the crankshaft speed increases. On the other hand, to prevent the engine from breaking down due to too high speeds, a limiter is installed in the switch. The idea is that when a certain number of engine revolutions is reached, the ignition of the fuel stops. We will talk about this later, but for now – the variator.
We disassemble the variator, remove the gear and belt. Here it is, the restrictive ring.
Just remove this ring and you can put everything back together. If there is no ring, then remove the inner cheek of the variator. A thrust plate can be screwed on from the inside, and there are weights under it.
Unscrew this plate
and put everything in place (no need to put the plate in!).
This is what the variator should look like after removing the restrictor plate
If it happens that neither the plate nor the ring is installed in the variator, then pay attention to the bushing. It may have a protrusion that acts as a ring
There are two options: You buy a new bushing or look for a turner who will turn it. The main thing is not to oversharpen! The surface must then be sanded. We put everything in place and assemble the variator.
Troubleshooting a scooter's CVT
Everyone is happy with the transmission, which is based on a variator: it is quite reliable, durable, repairable, it works without steps and in fully automatic mode, but, as we all know: “nothing lasts forever,” therefore, after reaching a certain mileage of the scooter, the parts of the variator wear and a number of malfunctions characteristic of this type of device appear.
The malfunctions of the variator themselves are not as terrible and critical as, for example, in the braking system or in the steering, but still, the variator is the main element of the scooter’s transmission - directly affecting the maximum speed, dynamics, control comfort, belt service life and the overall safety of operating the scooter .
It is advisable to carry out a complete inspection of the condition of the variator parts at the beginning of each season, or, in extreme cases, once every two seasons. Taking into account the fact that you bought the scooter in a store “from scratch” and no one had time to stick their dirty paws in there before you. For used scooters, the CVT should be inspected immediately after purchase.
So, we remove both variators from the engine for edrenefene, prepare a work place for ourselves in advance, look for or take from someone a straight metal ruler (preferably a pattern), buy some kind of refractory grease, I use copper grease to lubricate the variator (if anyone has objections on this matter, then please speak out in the comments) or pasta - it doesn’t matter. The name is different, but the meaning is the same.
We remove all the rollers from the front variator housing and carefully inspect them. The rollers must be perfectly round (minor abrasions on the working surface of the rollers are allowed), and not hexagonal (as is usually the case), the working surface of the rollers must be intact and without cracks, the weight and size of all rollers must be strictly the same.
An example of “dead” rollers that are unsuitable for further use:
Severe wear on the working surface
Crack on work surface
We take the outer plate of the variator and carefully inspect it for visible damage, wear of the working surface and pay special attention to the condition of the internal splines for the crankshaft axle.
An example of a variator impeller that has damage in the form of two broken fan blades. By and large, a couple of broken fan blades is not such a big problem. But it’s still a problem, no matter how you look at it.
At high engine speeds, this weight imbalance can cause accelerated wear on the crankshaft main bearing and cause increased engine vibration. Therefore, in order to restore balance, you should strictly go in the opposite direction - break out entire fan blades (marked with arrows) in an amount equal to the missing ones. And then the weight balance will be completely restored.
We take the second plate of the variator in our hands and carefully inspect the integrity of the guides for the support washer, the slots for the rollers, the degree of general wear and the presence of visible damage.
Particular attention should be paid to the condition of the guides under the support washer. Because the torque developed by the engine while the scooter is moving has a direct impact on them, and in the event of critical wear or extreme loads on the engine, the guides break, the support washer rotates in the variator body, and then how lucky... Either the engine floor or only the variator will grind .
Examples of common damage to the internal plate; with such damage, these variator parts are unsuitable for further use.
The absence of one guide (it was broken off when they tried to unscrew the nut on the trunnion without a puller). The absence of one of the guides risks the fact that the entire load will be transferred not to three points, but to only two, which will lead to a significant increase in the load on the remaining guides.
Critical wear of the plate body at the point of contact with the support washer. As you can clearly see, the support washer ate a decent piece of metal in the body.
Critical wear of the guides under the support washer. There is nothing to comment on here; the thickness of the guide together with the greatest wear does not exceed one millimeter. Just a little more and the plate would have turned in the body.
Not critical, but already the maximum permissible wear of the guide; for clarity, a ruler is attached to the place of greatest wear. In principle, you can still drive with such wear and tear, but not far...
An example of a plate in perfect condition. As you can see: there are completely no signs of wear, all the guides are intact and undamaged, there are no visible damages either.
The support washer must be of the correct shape, the central hole for the crankshaft journal must be free of visible wear and damage
After everything has been done, we alternately check the working surface and the variator plates for acceptable wear. To do this, put a ruler on the work surface and look at the whole thing against the light. The ruler should lie flat on the surface with no gaps, and therefore there should be no gaps on the working surface.
An example of a variator working surface in perfect condition
The ruler lay along the entire surface without a gap
At first glance, it may seem to you that the presence of wear on the working surface of the variator is not a serious problem and such a variator can still be used and used...
Actually this is not true. As the working surface wears out, the original geometry of the pulley is disrupted. The optimal angle at the place of constant operation of the belt becomes blunter, and the distance between the pulleys and the angle at different radii of the belt operation become different. Plus, as they wear out, depressions and ridges appear on the surface of the pulleys - the so-called “lips” - when passing through them, the belt is subject to severe wear.
What does this all ultimately lead to? Moreover, in different modes of operation of the variator, the belt will not come into contact with the plane of the pulley with the entire working surface, but only with a small part of it.
That is, at low engine speeds (small radius), the belt will come into contact with the pulley surface with its entire working surface (the contact patch will be maximum). Since, in low engine speed mode, the scooter is practically not used, so the output at a small radius will be minimal, even with a large mileage of the scooter.
And as the engine speed increases, the belt will extend to a larger radius where there is a strong wear on the working surface of the pulleys, and therefore the original angle and distance between the pulleys is violated.
All this will lead to the fact that the contact patch in the place of maximum production, between the belt and pulleys, is reduced to a minimum and the belt simply begins to slip, overheat and ultimately break or burn.
An example of a terrible development, on the order of several millimeters. A plate with such a huge output cannot be used for further use.
Another important point: many idiots like to sharpen the end of the variator guide bushing, and they do it with very zealous zeal... How many times have I asked these idiots: “WHY THE FUCK DID YOU GRIND IT???” Answer. Almost always it was the same: “the belt will tighten better”... ??? I'm sick of these tusks...
Of course, it’s their business - they want to sharpen it, they want not to sharpen it. The point is not this, but the fact that when the length of the bushing is reduced, either upward or downward, the alignment of the central axes of the pulleys is disrupted, which is why the belt works with a severe misalignment and ultimately burns out prematurely or breaks.
An example of a loosened bushing. On the left is the drainage, on the right is the collective farm. By the way, the belt burned on the scooter within a week and continued to burn, and the bushing was sharpened and sharpened until it was ground down a whole centimeter...
We have sorted out the front variator a little and it’s time to move on to the rear, the so-called torque driver. We put the rear variator on some table - we disassemble it, wash all the parts and start checking.
We carefully inspect the working surface of the central axis; there should be no scratches or traces of wear on it; the surface of the axis should be smooth and shiny without the so-called faceting and sagging of metal.
Thoroughly wash both halves to remove any remaining old grease and dirt. We connect the halves to each other and try to swing them with our hands. There should be no play between the two halves, well, maybe if you feel a slightly noticeable play, then in principle there is nothing to worry about. But if you feel a pronounced play, then there is nothing you can do, you will have to throw the variator in the trash.
We inspect the holes along the pins; the holes should be perfectly straight without signs of wear or damage. The pins, after being installed in the hole, should be straight along the axis without distortion.
Example of heavily worn pin holes
Due to severe wear of the holes, the pins during operation of the rear variator stood with a large distortion relative to the central axis and their side edge ate the spring guide.
We inspect the guides along which the pins run. The working surface of the guides must be smooth without holes, edges, or metal deposits.
An example of severe wear on the guide; a deep pothole has formed at the point of constant contact between the guide and the pin. This guide is not suitable for further use.
Inside view
An example of a guide in perfect condition. There are no potholes, sagging, wear and tear on its surface.
Inspect the pins for wear. The pins must be in the correct shape without wear or damage.
We check the condition of the bearings, and there are two of them in the rear variator - one needle, and the second regular - ball. And the condition of the rubber seals, if there is any suspicion of wear of the bearings or rubber rings, we change these parts without regret.
We apply some high-temperature lubricant (I use copper) into a special recess on the inner surface of the movable plate of the variator, rub the whole thing evenly over the surface and remove excess lubricant.
We assemble the halves and put a little of our lubricant into the guides.
Several times we move and push the halves together, remove any excess lubricant from the working surfaces and complete the final assembly of the variator.
scooter-mania.ru
What is the optimal weight for rollers?
And so, let’s repeat the principle of operation of rollers for a scooter’s variator. When the crankshaft rotates, the rollers diverge by a certain amount. The higher the speed of the power unit and the rotation of the crankshaft, the greater this value. This means the belt extends more and the scooter starts faster. The two-stroke power unit on a scooter is characterized by operating at maximum speed. For the most part, scooter rollers cope with this task.
Quite heavy rollers accompany belt extension at low speeds. At the same time, a drop in dynamics is observed. But, at the same time, the maximum speed is achieved. The operating principle of light rollers is the opposite. That is, the productive element works to its maximum in order to gain maximum speed. Dynamic qualities are reduced back. At the start, the speed will increase quite quickly, but up to 30 km/h. After that, it will be more and more difficult to gain speed.
Based on this, we can draw the following conclusion. The weight of the rollers should be average, optimal. It should be borne in mind that the speed of a moped does not always depend on the weight of the rollers. A significant influence is exerted by the current drive spring - a large spring that is located behind the clutch. What is it for? – responsible for belt fatigue and tension. When it is weakened, the belt is ejected to a larger radius. Thus, with normal weight of the rollers, it is difficult to reach the maximum speed. Often, in such situations, the spring is replaced.
First you need to try rollers half a gram lighter than indicated in the instructions. Experienced scooter riders always have rollers of various weights in “steps” of 0.5-1 grams. The optimal rollers are determined by trial and error. It is difficult and practically impossible to indicate which rollers to install on a scooter without “experiments”. After all, each scooter may have a different condition of the CPG, belt and spring, and variator. One thing can be said for sure, without any doubt: it is impossible to install rollers of different weights in one set. This leads to an imbalance in the operation of the crankshaft and the rapid replacement of its bearings.
Types of rollers
The rollers on the scooter's variator differ from each other. Let's look at the existing types:
- Cast rollers are characterized as easy to use and very reliable during operation. They are equipped with a friction layer around the circle.
- Composite rollers will last a long time only if they are supported inside the structure. This type of roller consists of a clip that contains a weight.
- Composite rollers without stop. They are characterized as unreliable rollers that destroy the scooter's variator from the inside. Cargo placement is very tight inside. But, despite this, it is deformed and has a negative impact on the partitions and the variator as a whole.
- Polygonal rollers are new. Sold in cast and composite form. The belt is pushed out over a large radius. If installed incorrectly, they will not function.