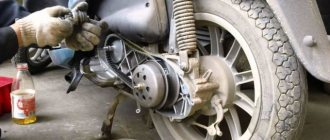
Any scooter, be it Japanese or Chinese, has the ability to start from an electric starter or a kick starter. If the first one doesn’t work for you, which is a very common problem, kickstarter comes to the rescue. Let's look at the reasons for its breakdowns.
There may be several reasons for the breakdown, because they are the ones that most often happen to most scooter riders.
Broken variator cover . Most often it happens with Chinese scooters, which I myself have witnessed more than once. If you press the leg with great force or sharply, the cheap and low-quality material of the variator cover will simply crack around the leg. Here, repairing a variator on a scooter is unlikely to help, as well as welding. The Chinese variator cover is difficult to weld, the weak material does not allow this, so the only option is to buy a variator cover.
We looked at several reasons why the kick starter breaks down; repairing this rather problematic element may take you a little time, but when you have a similar breakdown on the road, you will have to roll the scooter. There may also be three repair options. In the case of cracked teeth, the only possible solution is either replacement or welding. In the case of replacing a kick starter, you simply need to correctly assemble the entire structure, which will be discussed in another article. And if the variator cover is cracked, all you have to do is replace the cover itself. You can try to weld it, but I’ll tell you right away that there is little chance of fixing it this way.
What is a car with a CVT?
CVT (Continuously Variable Transmission) - translated from English means “transmission with continuously varying torque.” The principle of continuously variable torque transmission was first voiced by Leonardo da Vinci.
Interesting materials:
How to turn on the keyboard backlight on Huawei Matebook D 14? How to turn on the keyboard backlight on a Lenovo y520 laptop? How to enable site search in Yandex? How to enable FPS? How to enable full screen mode in an application? How to enable tethering in power point? How to enable the extension in Google Chrome? How to enable advanced search on Twitter? How do I enable Google device registration? How to enable repost on Facebook?
Troubleshooting a scooter's CVT
Everyone is happy with the transmission, which is based on a variator: it is quite reliable, durable, repairable, it works without steps and in fully automatic mode, but, as we all know: “nothing lasts forever,” therefore, after reaching a certain mileage of the scooter, the parts of the variator wear and a number of malfunctions characteristic of this type of device appear.
The malfunctions of the variator themselves are not as terrible and critical as, for example, in the braking system or in the steering, but still, the variator is the main element of the scooter’s transmission - directly affecting the maximum speed, dynamics, control comfort, belt service life and the overall safety of operating the scooter .
It is advisable to carry out a complete inspection of the condition of the variator parts at the beginning of each season, or, in extreme cases, once every two seasons. Taking into account the fact that you bought the scooter in a store “from scratch” and no one had time to stick their dirty paws in there before you. For used scooters, the CVT should be inspected immediately after purchase.
So, we remove both variators from the engine for edrenefene, prepare a work place for ourselves in advance, look for or take from someone a straight metal ruler (preferably a pattern), buy some kind of refractory grease, I use copper grease to lubricate the variator (if anyone has objections on this matter, then please speak out in the comments) or pasta - it doesn’t matter. The name is different, but the meaning is the same.
We remove all the rollers from the front variator housing and carefully inspect them. The rollers must be perfectly round (minor abrasions on the working surface of the rollers are allowed), and not hexagonal (as is usually the case), the working surface of the rollers must be intact and without cracks, the weight and size of all rollers must be strictly the same.
An example of “dead” rollers that are unsuitable for further use:
Severe wear on the working surface
Crack on work surface
We take the outer plate of the variator and carefully inspect it for visible damage, wear of the working surface and pay special attention to the condition of the internal splines for the crankshaft axle.
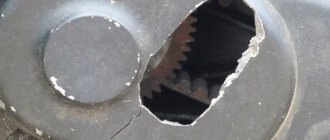
An example of a variator impeller that has damage in the form of two broken fan blades. By and large, a couple of broken fan blades is not such a big problem. But it’s still a problem, no matter how you look at it.
At high engine speeds, this weight imbalance can cause accelerated wear on the crankshaft main bearing and cause increased engine vibration. Therefore, in order to restore balance, you should strictly go in the opposite direction - break out entire fan blades (marked with arrows) in an amount equal to the missing ones. And then the weight balance will be completely restored.
We take the second plate of the variator in our hands and carefully inspect the integrity of the guides for the support washer, the slots for the rollers, the degree of general wear and the presence of visible damage.
Particular attention should be paid to the condition of the guides under the support washer. Because the torque developed by the engine while the scooter is moving has a direct impact on them, and in the event of critical wear or extreme loads on the engine, the guides break, the support washer rotates in the variator body, and then how lucky... Either the engine floor or only the variator will grind .
Examples of common damage to the internal plate; with such damage, these variator parts are unsuitable for further use.
The absence of one guide (it was broken off when they tried to unscrew the nut on the trunnion without a puller). The absence of one of the guides risks the fact that the entire load will be transferred not to three points, but to only two, which will lead to a significant increase in the load on the remaining guides.
Critical wear of the plate body at the point of contact with the support washer. As you can clearly see, the support washer ate a decent piece of metal in the body.
Critical wear of the guides under the support washer. There is nothing to comment on here; the thickness of the guide together with the greatest wear does not exceed one millimeter. Just a little more and the plate would have turned in the body.
Not critical, but already the maximum permissible wear of the guide; for clarity, a ruler is attached to the place of greatest wear. In principle, you can still drive with such wear and tear, but not far...
An example of a plate in perfect condition. As you can see: there are completely no signs of wear, all the guides are intact and undamaged, there are no visible damages either.
The support washer must be of the correct shape, the central hole for the crankshaft journal must be free of visible wear and damage
After everything has been done, we alternately check the working surface and the variator plates for acceptable wear. To do this, put a ruler on the work surface and look at the whole thing against the light. The ruler should lie flat on the surface with no gaps, and therefore there should be no gaps on the working surface.
An example of a variator working surface in perfect condition
The ruler lay along the entire surface without a gap
At first glance, it may seem to you that the presence of wear on the working surface of the variator is not a serious problem and such a variator can still be used and used...
Actually this is not true. As the working surface wears out, the original geometry of the pulley is disrupted. The optimal angle at the place of constant operation of the belt becomes blunter, and the distance between the pulleys and the angle at different radii of the belt operation become different. Plus, as they wear out, depressions and ridges appear on the surface of the pulleys - the so-called “lips” - when passing through them, the belt is subject to severe wear.
What does this all ultimately lead to? Moreover, in different modes of operation of the variator, the belt will not come into contact with the plane of the pulley with the entire working surface, but only with a small part of it.
That is, at low engine speeds (small radius), the belt will come into contact with the pulley surface with its entire working surface (the contact patch will be maximum). Since, in low engine speed mode, the scooter is practically not used, so the output at a small radius will be minimal, even with a large mileage of the scooter.
And as the engine speed increases, the belt will extend to a larger radius where there is a strong wear on the working surface of the pulleys, and therefore the original angle and distance between the pulleys is violated.
All this will lead to the fact that the contact patch in the place of maximum production, between the belt and pulleys, is reduced to a minimum and the belt simply begins to slip, overheat and ultimately break or burn.
An example of a terrible development, on the order of several millimeters. A plate with such a huge output cannot be used for further use.
Another important point: many idiots like to sharpen the end of the variator guide bushing, and they do it with very zealous zeal... How many times have I asked these idiots: “WHY THE FUCK DID YOU GRIND IT???” Answer. Almost always it was the same: “the belt will tighten better”... ??? I'm sick of these tusks...
Of course, it’s their business - they want to sharpen it, they want not to sharpen it. The point is not this, but the fact that when the length of the bushing is reduced, either upward or downward, the alignment of the central axes of the pulleys is disrupted, which is why the belt works with a severe misalignment and ultimately burns out prematurely or breaks.
An example of a loosened bushing. On the left is the drainage, on the right is the collective farm. By the way, the belt burned on the scooter within a week and continued to burn, and the bushing was sharpened and sharpened until it was ground down a whole centimeter...
We have sorted out the front variator a little and it’s time to move on to the rear, the so-called torque driver. We put the rear variator on some table - we disassemble it, wash all the parts and start checking.
We carefully inspect the working surface of the central axis; there should be no scratches or traces of wear on it; the surface of the axis should be smooth and shiny without the so-called faceting and sagging of metal.
Thoroughly wash both halves to remove any remaining old grease and dirt. We connect the halves to each other and try to swing them with our hands. There should be no play between the two halves, well, maybe if you feel a slightly noticeable play, then in principle there is nothing to worry about. But if you feel a pronounced play, then there is nothing you can do, you will have to throw the variator in the trash.
We inspect the holes along the pins; the holes should be perfectly straight without signs of wear or damage. The pins, after being installed in the hole, should be straight along the axis without distortion.
Example of heavily worn pin holes
Due to severe wear of the holes, the pins during operation of the rear variator stood with a large distortion relative to the central axis and their side edge ate the spring guide.
We inspect the guides along which the pins run. The working surface of the guides must be smooth without holes, edges, or metal deposits.
An example of severe wear on the guide; a deep pothole has formed at the point of constant contact between the guide and the pin. This guide is not suitable for further use.
Inside view
An example of a guide in perfect condition. There are no potholes, sagging, wear and tear on its surface.
Inspect the pins for wear. The pins must be in the correct shape without wear or damage.
We check the condition of the bearings, and there are two of them in the rear variator - one needle, and the second regular - ball. And the condition of the rubber seals, if there is any suspicion of wear of the bearings or rubber rings, we change these parts without regret.
We apply some high-temperature lubricant (I use copper) into a special recess on the inner surface of the movable plate of the variator, rub the whole thing evenly over the surface and remove excess lubricant.
We assemble the halves and put a little of our lubricant into the guides.
Several times we move and push the halves together, remove any excess lubricant from the working surfaces and complete the final assembly of the variator.
Repair of a variator on a scooter. Replacing elements
A change in acceleration speed and the appearance of extraneous noise in the variator indicate that some part (or parts) are worn out and require replacement.
To find out the cause of the malfunction, you should disassemble the variator:
- Remove the cover. We do this carefully so as not to damage it. As a rule, the variator cover on scooters has a sealing gasket. It is necessary to evaluate its condition and, if necessary, change it.
- To remove the belt from the variator, you need to remove the drive pulley. And you can get to it only by removing the retaining ring, clutch and gear.
- When the belt and pulley halves are ready, remove the rollers.
- All items must be carefully inspected and tested. Serviceable cheeks have a smooth surface without chips or burrs. The presence of any lubricants on the belt is excluded. If it looks shabby, then it's time to change it.
- After identifying faults, we assemble the variator in the reverse order.
There are two main signs by which the quality of the variator is determined: belt movement and engine speed. In a working variator, the belt does not slip in the pulleys. But, if the engine roars and the scooter does not move, this is the first signal that it is time to look inside the device and examine the condition of the belt and spring.
The operating speed of the engine must correspond to the speed of its maximum power. If this does not happen, it’s time to start adjusting the operation of the variator.
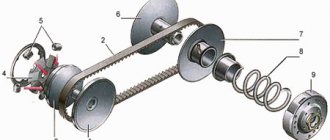
CVT components
The scooter has a small weight and dimensions (compared to motorcycles and cars), respectively, and the gearbox should be small.
From the automobile, the scooter's variator inherited:
- two pulleys - driving and driven (though here they are wedge-shaped, and each consists of two halves);
- belt (its shape is trapezoidal, unlike a car belt).
That's all the legacy.
The position of the wedge-shaped halves (cheeks) of the drive pulley is regulated by rollers. The opening and closing of the driven pulley cheeks is carried out by a central spring connected to the clutch.
More about the operating principle
So. The scooter is started and idling. What happens in the variator? The drive pulley rotates at minimum speed. The strap is located just above the center of the cheeks. The slave's cheeks are compressed by a central spring. The belt on them moves along the maximum radius.
The scooter started moving. It's worth mentioning the videos here. They are located behind the inner cheek of the drive pulley. When the speed of rotation of this pulley increases, centrifugal force pushes the rollers towards the outer radius, thereby pressing the halves of the drive pulley together. The belt between these halves moves outward - the radius of its rotation on the leading cheeks increases.
The driven pulley acts exactly the opposite. During acceleration, a centrifugal force acts on it, just like on the rollers, with the help of which the cheeks move apart, compressing the central spring and passing the belt between them. This is how acceleration happens.
Due to this synchronous operation of the pulleys, speed increases at constant speed and maximum engine power.