For the proper operation of any engine based on the principle of internal combustion, optimal dosing of the air-fuel mixture (FA) is important. If the balance of the ratio is disturbed, the equipment begins to malfunction.
Even the most precise mechanisms require periodic adjustments. Adjusting the carburetor on a Chinese scooter is not a frequent procedure, but it is necessary for the proper functioning of the equipment.
Purpose and principle of operation of the carburetor
The carburetor is an important component of an internal combustion engine, responsible for preparing the air-fuel mixture and supplying it to the working cylinder in the required ratio. A scooter engine with an unadjusted carburetor cannot function properly. The stability of speed, the power developed by the engine, gasoline consumption, response to turning the throttle, as well as ease of starting in the cold season depend on the correct settings of the engine power supply.
An important component of an internal combustion engine is the carburetor.
This unit is responsible for preparing the air-gasoline mixture, the concentration of the components of which affects the nature of the operation of the power plant. The standard ratio is 1:15. Leaning the mixture to a ratio of 1:13 ensures stable engine operation at idle. Sometimes it also becomes necessary to enrich the mixture by maintaining a ratio of 1:17.
Knowing the structure of the carburetor and knowing how to adjust it, you can ensure stable operation of the engine on two-stroke and four-stroke scooters.
Thanks to a properly configured carburetor, easy and quick starting of the vehicle engine is ensured, as well as stable operation of the engine, regardless of the ambient temperature. Any carburetor is equipped with jets with calibrated holes, a float chamber, a needle that regulates the cross-section of the fuel channel, as well as special adjusting screws.
The adjustment process involves specially rotating the screw in a clockwise direction or in the opposite direction, which causes, respectively, the enrichment or depletion of the working mixture. Adjustment measures are carried out on a warmed-up engine. In this case, the carburetor unit must first be thoroughly washed and cleared of blockages.
Soot contamination
Type of spark plug: dry soft soot of intense black color on the insulator, electrodes and spark plug body.
Consequences: poor start of the scooter engine; poor operation of a cold scooter engine; interruptions in ignition of the air-fuel mixture; bad reaction to gas.
Probable causes: excessively rich air-fuel mixture; The scooter's air filter is very clogged; The thermal range is incorrectly selected - the candle is too “cold”.
Remedy: adjust the working mixture; adjust the cold start system of the scooter engine; change the scooter air filter; clean the spark plugs or replace them with new ones - with the correct heat rating.
This is interesting: A method that can help turn off a diesel engine when it is running
Why do you need to regulate?
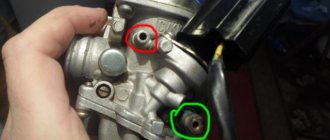
During the adjustment process, the scooter carburetor needle is adjusted, the position of which affects the proportions of the air-fuel mixture, as well as a number of other adjustments.
Adjusting the scooter carburetor needle is done during the adjustment process
Each tuning operation has a different effect on engine operation and fuel preparation:
- adjusting the idle speed ensures stable operation of a running engine when the transmission is turned off;
- changing the quality of the air-gasoline mixture using a special screw allows you to deplete or enrich it;
- adjusting the position of the carburetor needle affects the change in the quality of the fuel mixture;
- Ensuring a stable level of gasoline inside the float chamber avoids flooding of spark plugs.
A power unit with an adjusted carburetor operates stably in any conditions, is economical, throttle response, develops rated power and maintains speed, and does not cause problems for its owner.
Oil contamination
Type of spark plug: wet oily black deposits on the insulator, black oil deposits on the insulator, electrodes and spark plug body.
Consequences: poor start of the scooter engine, interruptions in ignition.
Probable causes: too much oil in the fuel mixture (for two-stroke engines); wear of the rings and/or piston liner - wastes oil.
Remedy: mix gasoline and oil in the correct proportion, install new spark plugs for the scooter (for two-stroke engines); inspect the condition of the scooter engine, if necessary, repair the engine, CPG; .
Signs that adjustment is needed
Based on certain signs that appear in abnormal engine operation, we can conclude that the carburetor needs adjustment.
The list of deviations is quite wide:
- the power plant does not develop the required power under load;
- when the scooter accelerates sharply, failures in engine operation are felt;
- a cold engine is difficult to start with the starter after a long period of parking;
- the scooter's power unit consumes fuel in increased quantities;
- there is no quick response of the engine to a sharp turn of the accelerator handle;
- The engine may suddenly stop due to insufficient fuel mixture.
The carburetor should be adjusted if there are signs that adjustment is necessary.
If one or more of these symptoms is present, you should adjust the carburetor, and then diagnose its condition and check the operation of the engine.
Overheat.
Plug Type: Extremely white insulator with small black flecks and premature electrode erosion.
Consequences: loss of scooter power at high speed or under load.
Probable causes: the spark plug is not screwed in enough; The scooter's engine cooling system is not working properly; ignition of the scooter too early; The thermal range is incorrectly selected - the candle is too “hot”.
Remedy: check the torque of the scooter's spark plug; operation of the scooter engine cooling system; adjust the ignition timing; select the correct spark plug heat rating.
Type of spark plug: melted and burned central and grounding electrodes (or one of the electrodes) of the scooter spark plug; bubbling insulator with metal deposits on it.
Consequences: significant loss of scooter engine power; ignition interruptions. Continued use of such spark plugs may cause serious damage to the scooter engine.
Probable causes: thermal overload; significant overheating of spark plug parts due to glow ignition - combustion begins before a proper ignition spark appears; use of low-quality fuel; burning out of the remaining air-fuel mixture in the combustion chamber due to an incorrectly adjusted fuel system of the scooter or the ignition timing of the scooter; The thermal range is incorrectly selected - the spark plug is too “hot”.
Remedy: check the scooter engine, ignition system and fuel system, as well as the quality of the working mixture and the ignition timing of the scooter. Install new spark plugs with the correct heat rating.
How to adjust engine idle speed
Work on setting up the power system is carried out after the engine has warmed up to operating temperature. All types of carburetors installed on scooters are equipped with a screw designed to regulate idle speed. Changing the position of the adjusting element allows you to ensure that the engine operates at stable speeds during idling.
Depending on the vehicle model, the adjusting elements are located in different places, so you need to carefully study the instructions and determine where the idle speed adjustment screw is located on the scooter.
Rotating the screw in a clockwise direction allows you to increase the crankshaft speed. Turning in the opposite direction, accordingly, ensures a decrease in speed. To perform adjustment operations, it is necessary to warm up the power unit of the scooter for a quarter of an hour.
Setting the engine idle
Then the screw is screwed in or unscrewed until a stable and precise speed of rotation of the vehicle engine is achieved. The adjustment is made in small increments by smooth rotation. After each manipulation, the engine should be run for several minutes to stabilize the speed.
How to change the quality of the fuel mixture
For all scooter engines, it is important to receive fuel with an adjusted ratio of gasoline to air. A lean mixture leads to improper operation of the engine, a drop in power and overheating of the engine, while a rich mixture leads to an increase in consumption and the formation of soot.
Adjustment operations are performed by changing the position of the quality screw and moving the throttle needle.
Turning the screw to the right causes the mixture to become richer, and unscrewing in the opposite direction causes it to become leaner. The same happens with the needle: when the needle is raised, the mixture becomes richer, and when lowered, it becomes poorer. The integrated use of both methods allows you to achieve optimal results during setup. However, not all carburetors have this feature, so, as a rule, one of two options is used.
Lifehacks for the last time
- — Before adjusting, you need to check that the air filter is clean and soaked in engine oil. How to clean the air filter, read the article: Scooter maintenance.
- — If the rubber cuff on the quality screw is torn, then it can be replaced with a cuff from the quality screw of the classic Lada carburetor.
- — On Suzuki Sepia models, lets 2,
In the latest models of Honda Dio 34 everything is simpler. The carburetor has only one large screw, which is used to regulate the XO. The small one on dio 34 is located under the plug.
The first time the setup will take 15 - 20 minutes, and then everything will be automatic. Feel free to get down to business and share your experience in the comments.
Subscribe and see you for new articles!
Setting the gasoline level and the correct position of the float in the chamber
A correctly adjusted fuel level in the float chamber does not allow the spark plugs to get wet and the engine to stall. In the chamber where the floats and jets are located, there is a valve that provides fuel supply. The correct position of the floats determines the closing or opening phase of the valve and prevents fuel overflow in the carburetor. The position of the floats is changed by slightly bending the fastening bar.
The closing or opening phase of the valve is determined by the correct position of the floats
Gasoline level is monitored with the engine running using a tube made of transparent material attached to the drain point and raised up. The gasoline level should be a few millimeters below the flange mounting of the cover. If the level is insufficient, remove the cover and adjust the needle firing phase by slightly bending the metal antennae.
Medium and high speed tuning
Using the quality adjustment screw, the fuel proportions at idle speed are ensured. For medium and high rotation speeds, the engine operating mode is adjusted using a different method. After turning the gas handle, the fuel nozzle starts working, supplying gasoline to the diffuser. An incorrectly selected jet cross-section causes a deviation in the fuel composition, and the engine may stall when gaining power.
To ensure uninterrupted operation of the motor at a higher frequency, it is necessary to perform a number of operations:
- remove debris from internal cavities;
- set the gasoline level in the carburetor;
- adjust the operation of the fuel valve;
- check the cross-section of the jet.
The correct operation of the engine is indicated by its quick response when turning the throttle.
A quick response when turning the throttle indicates proper engine operation.
Thursday, September 28, 2022
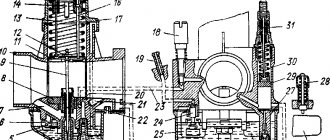
Carburetor diagram for 139qmb
Check all O-rings for damage. Replace if necessary.
When cleaning the carburetor, remove the vacuum diaphragm before using purge air or cleaning solvents. This will prevent damage to the diaphragm.
Possible malfunctions of the CVK carburetor
1.The engine is difficult to start
— No spark - Poor compression
2. There is no fuel in the carburetor
-Closed fuel line -Closed fuel filter -Blocked vacuum line -Damaged Broken vacuum line -Clogged inlet needle -Float level set too high
3. Too much fuel for the engine
-Dirty air filter -Air leak in the manifold -Faulty enrichment valve -Blocked air passage in the carburetor
4. Air/fuel mixture too rich or too pale
-Faulty enrichment valve -Tightened idle screw -Float needle stuck or dirty -Float height too high or too low -Blocked carburetor air passage -Dirty air filter -Carburetor or manifold air leak
5. Engine does not accelerate
-Bad spark -Air mixture screw too tight -Accelerator pump faulty
6. Almost does not respond to the throttle
-Weak spark/poor ignition -Blocked fuel line -Blocked fuel filter -Bad fuel -Water in fuel -Air leak in carburetor or manifold -Faulty enrichment valve -Fuel flow difficult in carburetor -Vacuum choke stuck -Damaged vacuum diaphragm -Dirt in carburetor
Removing the carburetor
1. Remove the seat and container underneath. 2. Remove the right side panel. 3. Disconnect the starter cable connector. 4. Loosen the carburetor drain screw and drain the fuel from the float chamber. 5. Loosen the clamps in the intake pipe and intake manifold. 6. Loosen the throttle cable and pull it out of the caliper and out of the throttle control sector. 7. Disconnect the fuel line from the carburetor. 8. Remove the air intake tube and pull the carburetor straight back out of the intake manifold. 9. Remove the starter enricher from the carburetor.
Checking the enrichment valve
1. Check the resistance level. 2. The standard value is below 5 if it is cold. 3. Connect the enricher to a 12 V battery. 4. The plunger should extend 3/8 inch (approximately 10 mm) after 5 minutes.
5. Check the needle and its working place in the carburetor. 6. Replace if necessary. 7. Place the enrichment valve in the installation location and press down. 8. Install the retaining ring and tighten the screws.
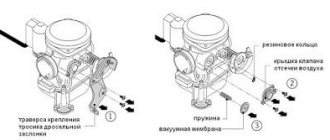
Air shut-off valve
1. Unscrew the two screws of the traverse, the throttle cable, and remove it. 2. Unscrew the two screws of the air shut-off valve. 3. Remove the spring and vacuum membrane. 4. Check for membrane wear, replace if necessary. 5. Clean the channels, remove dirt.
Vacuum chamber
1. Remove two screws and remove the cover. 2. Remove the spring and membrane flap. 3. Remove the fuel needle. Be especially careful not to damage the membrane. Replace if damaged.
This is interesting: What should you not do with your wipers in winter?
1. Check the needle for wear and replace if necessary.
Float chamber.
1. Remove the three screws and float chamber pan. 2. Remove the pin that holds the float. 3. Remove the main fuel jet, idle speed jet and idle mixture quality adjustment screw.
Be careful not to break the fuel jets and mixture screw. Count the number of revolutions when removing the mixture quality screw. When reinstalling the jets and screw, do not tighten them.
4. Clean the jets with solvent and compressed air. 5. Clean the carburetor body and all passages with compressed air.
1. Check the float needle and its seat and blow off any dirt. 2. Install the idle jet, fuel needle nozzle, main fuel jet into the carburetor.
3. Install the float. Adjust the fuel quality screw. Standard setting is 2 turns, plus or minus 1/4 turn. 4. After installing the float chamber pan, check the fuel level using a small ruler or calibrator. The correct fuel level is 20.5 mm (0.807 in).
How to set up a carburetor on a scooter - features for the 2t model
Adjusting the carburetor of a two-stroke scooter differs from adjusting the power system of four-stroke engines. Most two-stroke engines are equipped with a simple carburetor with a mechanical enricher, the trigger of which is pulled before starting the device. Scooter owners call the starting enrichment a choke; it is closed after the engine warms up. To adjust, the power system is disassembled, the needle is pulled out and mechanical intervention is carried out in the fuel chamber. Further adjustment is carried out in the same way as for four-stroke engines.
Setting up the carburetor on a 4t scooter - important points
Setting up the carburetor on a four-stroke scooter is easy to do on your own and is not difficult for motorcyclists. Setting up the carburetor of a 4t 50cc scooter (China) requires certain skills and patience and is performed according to the above algorithm. It is possible that the manipulations will have to be repeated many times until the desired result is achieved. If the carburetor setting on a 4t 139 qmb scooter or a similar model with a different engine is done correctly, the engine will operate stably.
It will be able to start regardless of the ambient temperature and the piston group in the engine will wear out less.
Debriefing, or Adjusting the carburetor unit of the Alpha moped
After the moped has been run-in, a full cycle of technical inspection is carried out, which includes changing the oil in the transmission and engine, as well as adjusting the valve clearance. In addition, the manufacturer recommends replacing the air filter element. During operation, disturbances in dynamics are possible, requiring individual adjustment of the carburetor on an Alpha moped. Qualified adjustment of this unit will improve driving performance and help reduce fuel costs. This operation is similar to adjusting the carburetor on a scooter and will not cause much trouble for both beginners and experienced motorcyclists.