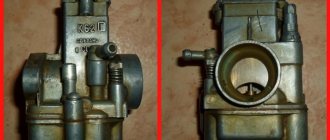
The Japanese scooter Suzuki Sepia is considered a fairly popular model in Russia and other countries, in particular due to its attractive appearance and simple design of the engine and other parts. But problems with this scooter are quite common and are caused by malfunctions of such components as the CPG, carburetor and variator. It is important to carefully monitor their condition to prevent damage. As for the carburetor, the Mikuni carburetor is used here; the Suzuki Sepia is ideal for this carburetor model, which is also used on other equipment. In particular, you can see a similar model on the no less famous Suzuki Adress scooter. The carburetor is characterized by its simple design, good quality and the ability to quickly adjust. But judging by the frequent problems of owners, it will be extremely difficult to adjust the carburetor for optimal operation of the scooter; the entire procedure will have to be carried out exactly according to the specified rules. If you are the owner of a Suzuki Sepia, get ready to clean the carburetor frequently, because its location is so inconvenient that the carburetor becomes clogged with dust very often. Below is a carburetor setting option.
Needle adjustment
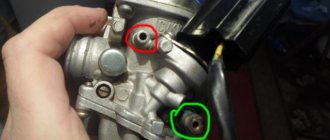
The peculiarity of this carburetor is the absence of a jet for the quality of the mixture; its adjustment here occurs by raising or lowering the locking ring on the needle. If you notice that the mixture is too lean, you will have to install the ring higher by 1 or 2 grooves; accordingly, the mixture will be rich when installing the same ring on the 4th or 5th step. The center position on the 3rd groove indicates the standard throttle needle setting. If configured correctly, the scooter will have good traction, speed and consume fuel according to the specified characteristics.
How to choose a carburetor for a Suzuki scooter
The Japanese scooter Suzuki Sepia is considered a very popular model in the Russian Federation and other countries, especially due to its attractive appearance and conventional design of the motor and other parts. But the problems with this scooter are quite constant and are caused by breakdowns of such components as the CPG, carburetor and variator. By the way, if you are interested in the carburetor of a Suzuki scooter, go to the website moped.in.ua.
The main thing is to carefully monitor their condition to prevent problems. As for the carburetor, the Mikuni carburetor is used here; the Suzuki Sepia is perfect for a similar carburetor model, which is also used on other equipment. In particular, you can see a similar model on the no less famous Suzuki Adress scooter. The carburetor is distinguished by its design simplicity, the best quality and the ability to quickly adjust. But judging by the common problems of owners, it will be very difficult to adjust the carburetor for good operation of the scooter; the entire procedure must be carried out exactly according to the specified rules. If you are the owner of a Suzuki Sepia, prepare to frequently clean the carburetor, because its placement is so uncomfortable that the carburetor most often becomes clogged with dust. Below is a carburetor setting option.
Adjusting the Suzuki Sepia carburetor
Before the procedure itself, you must not forget that when changing parts such as a cylinder, filters, muffler, the old carburetor settings will be invalid and you will need to make adjustments again. It is also very, very important to adjust the jets when the engine is already warm. The process is performed as follows:
Adjustment of needle and venturi tube size at 1/3 gas; Adjusting idle speed and mixture quality. Needle adjustment
The characteristic feature of this carburetor is the absence of a jet for the quality of the mixture; its adjustment here occurs by raising or lowering the locking ring on the needle. If you notice that the mixture is too lean, you will have to install the ring higher by 1 or 2 grooves, so the rich mixture will be when installing the same ring on the 4th or 5th level. The center position on groove 3 indicates the standard throttle needle setting. With proper settings, the scooter will have good traction, speed and consume fuel according to the specified properties.
Setting the air screw
Also in the carburetor there is a jet responsible for the amount of air, located under the cover. The jet is located in the air duct, so when you tighten the screw, the throttle rises and the air flow increases. At the same time, the engine speed increases.
Configuration is carried out as follows:
fully screw in the screw and unscrew it 4-5 turns; the engine should start to stall; gradually screw in the screw until the speed increases to the highest; Upon reaching the highest speed, you can unscrew the screw by ? turnover; adjust the idle speed screw for good speed. Unmarried move: setup specifics
Adjusting the Suzuki Sepia carburetor is not possible without using idle speed. It changes the number of revolutions, where when the screw is tightened, the speed indicator becomes higher and the wheel rotates on its own without the throttle. When you unscrew the idle speed screw, the scooter will start only when you add more revolutions with the throttle handle. It would be a good idea to adjust this jet as a last resort, in other words, first adjust the quality of the mixture, the needle in the throttle valve, if necessary, the air screw, and then adjust the unmarried stroke.
This procedure is different from those used by other experts, but the Suzuki Sepia carburetor is very extravagant, and because of this it requires a personal approach when tuning. Probably any owner of a Japanese model has encountered a similar difficulty, so the main thing is to learn how to adjust all the jets and promptly clean the Mikuni carburetor.
Setting the air screw
The carburetor also has a jet responsible for the amount of air located under the cover. The jet is located in the air channel, so when you tighten the screw, the throttle rises and the air flow increases. At the same time, the engine speed increases.
Configuration is carried out as follows:
- completely tighten the screw and unscrew it 4-5 turns;
- the engine should start to stall;
- gradually tighten the screw until the speed increases to maximum;
- upon reaching maximum speed, you can unscrew the screw ¼ turn;
- adjust the idle speed screw for optimal speed.
Setting up the carburetor on the Suzuki Address 110 scooter
A small cog on the Suzuki Address carburetor is responsible for the supply of gasoline at idle. It is unscrewed about one and a half turns. The screw blocks the air channel, i.e. the more it is twisted, the more gasoline is supplied; The more it is unscrewed, the less gasoline and more air. Through the gasoline supply hole at idle, fuel is always supplied - even during main engine operation, i.e. they can slightly regulate the supply of gasoline at operating speeds. The large screw adjusts the level of lowering of the carburetor choke. There is a needle in the valve; it should be in the middle position. The large screw regulates the air supply at idle. It is adjusted for a small screw, i.e. after the little one.
The main gasoline supply (for driving) is adjusted by selecting jets and raising/lowering the main damper needle. Carburetor jets: large 77.5, small 15 - on the new version, with alloy wheels.
So, actually adjusting the scooter carburetor :
- place the scooter on the center stand
- We provide free access to the carburetor adjusting screws
- idle screw (small), unscrew 1.5 turns from the screwed state
- Use a large screw to adjust the throttle lift level (idle speed) so that the engine does not stall
- by unscrewing or tightening the idle screw to achieve a maximum increase in engine speed
- tighten the screw a little so that the engine speed becomes just a little lower
- If the speed does not change when you turn the screw, then you need to flush the carburetor
- Use the large screw to set acceptable idle speed so that the scooter does not vibrate or stall
A correctly configured Suzuki scooter carburetor is checked by sharply opening and releasing the throttle - the engine should pick up speed evenly and not stall.
Thank you for your attention, now you know how to adjust the carburetor of the Suzuki Address 110 scooter .
The first step before starting the procedure for adjusting the scooter carburetor is to study its structure and operating principle. This way you can quickly and accurately adjust the carburetor on your scooter. A correctly configured carburetor makes it possible to obtain lower fuel consumption, improve dynamic characteristics and completely enable the scooter to start and operate normally. Before the procedure itself, it is important to warm up the engine well; also, if possible, thoroughly clean the entire carburetor from dust and dirt.
- Correct setting of the scooter carburetor
Standard carburetor adjustment procedures include the following:
- Idle speed adjustment;
- Adjusting the fuel level in the float chamber;
- Adjustment by adjusting the mixture quality screw on the carburetor;
- Adjusting the mixture quality through the needle inside the carburetor.
Idle speed adjustment
Does your scooter not work properly when idle and often stalls? Most likely your idle speed screw is not adjusted sufficiently. Before the procedure, be sure to warm up the engine, then find the idle screw, which is present on absolutely all scooters. You will have to warm up the scooter for 10-15 minutes, this will allow you to achieve optimal engine performance.
- Do-it-yourself carburetor adjustment for VAZ 2107
After this, you need to turn the idle speed screw, where clockwise rotation increases the speed, and unscrewing it decreases it.
Do-it-yourself cleaning of the Mikuni carburetor of a Suzuki Djebel 200 motorcycle.
The other day I went to clean the Mikuni carburetor of a Suzuki Djebel 200 motorcycle and decided to make a short article about it, although everything is so simple there, compared to blocks of 4 Keihin carbs, that it’s not even interesting. But if it is useful to someone, I will be glad.
The process is so simple that even a child can do it. The Mikuni carburetor from the Keikhin carburetor, which are installed on Sibishki, is structurally no different - they are both membrane ones. For cleaning we need any carburetor cleaning liquid and a pair of screwdrivers. I got into the carburetor because my float chamber gasket had dried out and the carb began to leak. In order not to wait for a carburetor repair kit, I decided to stupidly put the float chamber cover on the sealant, although I usually don’t do this - pieces of sealant can get inside the carburetor and clog the jets. Accordingly, I also needed gasket sealant.
Why do you need to regulate?
During the adjustment process, the scooter carburetor needle is adjusted, the position of which affects the proportions of the air-fuel mixture, as well as a number of other adjustments.
Adjusting the scooter carburetor needle is done during the adjustment process
Each tuning operation has a different effect on engine operation and fuel preparation:
- adjusting the idle speed ensures stable operation of a running engine when the transmission is turned off;
- changing the quality of the air-gasoline mixture using a special screw allows you to deplete or enrich it;
- adjusting the position of the carburetor needle affects the change in the quality of the fuel mixture;
- Ensuring a stable level of gasoline inside the float chamber avoids flooding of spark plugs.
Monday, March 19, 2012
Brief FAQ on Suzuki Sepia (Diagnostics of most Suzuki Sepia faults)
This manual will help you find the problem with your scooter. For your convenience, to the right of the breakdown option there is an accompanying link (sometimes several), which is designed to help eliminate this fault, or simply help you understand what exactly is broken. Non-clickable descriptions are highlighted in green bold text (like this one). Simply hover your mouse over the inscription and the text will appear. We will also be very grateful if you point out any shortcomings and other errors in this manual on our forum or answer the survey below.
Contents: 1. Engine does not start or is difficult to start 2. Engine stalls immediately after starting 3. Engine lacks power 4. Engine runs poorly at idle and low speeds 5. Engine runs poorly at high speeds 6. Clutch, drive and driven pulleys —— Control dimensions
1. The engine does not start or starts with difficulty
1. Start the engine as usual, whether it catches or not.
If it catches, but stalls · incorrectly adjusted idle speed [Carburetor adjustment] · air leak in the intake tract [Power system repair] · problems in the variator (wedge cheeks, weights, etc.) [Removing and installing the variator] · incorrect ignition angle [Checking ignition angle] (not adjustable on most scooters) · faulty reed valve [Power system repair] · low compression [Checking piston]
If it doesn't grab
2. Unscrew the spark plug and check for fuel in the cylinder.
The spark plug is “wet”, that is, fuel enters the combustion chamber. But it can also mean that: · no spark [Ignition system faults] · carburetor flooded - choke too open [Carburetor design] · mixture too rich [Carburetor setting]
The spark plug is “dry”, that is, the fuel may not reach the cylinder
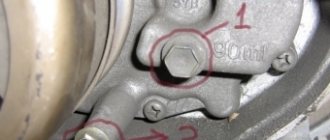
3. Check whether gasoline reaches the carburetor by unscrewing the drain screw on it.
If not, check: · whether the gas tank is empty · whether the gas filter is clogged · whether the vacuum gas valve is working · whether the rubber gas and air pipes leading to the gas valve and carburetor are clogged and intact · whether the carburetor float needle is dirty and intact [Carburetor design]
Read also: Opel Astra H bumper mounting
4. Check for a spark by bringing the metal body of the spark plug to the ground.
If there is no or weak spark: · faulty or dirty spark plug [Checking spark plugs] · broken or shorted wiring [Ignition system faults] · broken or shorted ignition coil [Ignition system faults] · broken or shorted inductive Ignition sensor · faulty ignition switch · faulty alternator [Ignition system faults]
5. Check the compression in the cylinder.
If compression is absent or low (less than 6 atm): · leakage through the crankcase, for example through crankshaft seals · torn cylinder head gasket [Removing and installing piston] · burnt or worn piston and/or cylinder and/or rings [Removing and installing piston] [Checking the piston] · crack in the cylinder head [Removing and installing the piston]
2. The engine stalls immediately after starting
1. Check whether gasoline reaches the carburetor by unscrewing the drain screw on it.
If not, check: · whether the gas tank is empty · whether the gas filter is clogged · whether the vacuum gas valve is working · whether the rubber gas and air pipes leading to the gas valve and carburetor are clogged and intact · whether the carburetor float needle is dirty and intact [Carburetor design]
2. Unscrew the spark plug, check the color of the spark plug.
The color of the spark plug is “wrong”: · faulty or dirty spark plug [Checking spark plugs] · over-rich mixture [Carburetor adjustment] · incorrect heat rating of the spark plug [Spark plugs] · splashes with oil [Power system repair]
3. Check for spark.
If there is no or weak spark: · faulty or dirty spark plug [Checking spark plugs] · broken or “shorted” wiring [Ignition system faults] · broken or “shorted” ignition coil [Ignition system faults] · broken or “shorted” inductive ignition sensor faulty ignition switch faulty alternator [Ignition system faults]
4. Check if the carburetor is clogged and adjusted. [Carburetor Overhaul] [Carburetor Adjustment]
5. Check if the intake tract is working properly.
How to check: · whether the reed valve is working [Power system repair] · whether the carburetor pipes are tightly screwed on · whether the intake manifold gaskets are intact [Power system repair] · whether the carburetor gaskets are intact [Power system repair]
6. Check the ignition timing.
If the ignition timing is incorrect: · faulty commutator (CDI) [Electrical check] · faulty alternator [Electrical check] · alternator rotor installed incorrectly
7. Check the compression in the cylinder.
If compression is absent or low (4-6 atm): · leakage through the crankcase, for example through crankshaft seals · torn cylinder head gasket [Removing and installing piston] · burnt or worn piston and/or cylinder and/or rings [Removing and installing piston ] [Checking the piston] · crack in the cylinder head [Removing and installing the piston]
3. Engine lacks power
1. Start the engine and slightly increase the gas to observe.
If the speed does not increase as it should, it may be: · clogged air filter [Air Filter Maintenance] · clogged gas filter · clogged muffler [Cleaning the Exhaust System] · clogged carburetor [Carburetor Overhaul] · faulty starter enricher [Diagnostics of starter enrichment] · clogged or leaky rubber gas and air pipes leading to the gas valve and carburetor
2. Unscrew the spark plug, check the color of the spark plug.
The color of the spark plug is “wrong”: · faulty or dirty spark plug [Checking spark plugs] · over-rich mixture [Carburetor adjustment] · incorrect heat rating of the spark plug [Spark plugs] · splashes with oil [Power system repair]
3. Check for spark.
If there is no or weak spark: · faulty or dirty spark plug [Checking spark plugs] · broken or “shorted” wiring [Ignition system faults] · broken or “shorted” ignition coil [Ignition system faults] · broken or “shorted” inductive ignition sensor faulty ignition switch faulty alternator [Ignition system faults]
4. Check to see if the engine is overheating.
If so, it could be: · too lean mixture [Carburetor adjustment] · poor quality gasoline · heavy carbon deposits in the combustion chamber [Removing and installing piston] · early ignition timing [Checking ignition angle]
5. Check the compression in the cylinder.
If compression is absent or low (4-6 atm): · faulty reed valve [Power system repair] · leakage through the crankcase, for example through crankshaft seals · torn cylinder head gasket [Removal and installation of piston] · burnt out or worn piston and/or cylinder and/or rings [Removing and installing the piston] [Checking the piston] · crack in the cylinder head [Removing and installing the piston]
Read also: Which is better, an injector or a carburetor?
6. Check the ignition timing.
If the ignition timing is incorrect: · faulty commutator (CDI) [Electrical check] · faulty alternator [Electrical check] · alternator rotor installed incorrectly
7. Accelerate quickly or continue driving at high speed.
If the engine knocks (knocks): · mixture too lean [Carburetor adjustment] · heavy carbon deposits in the combustion chamber · poor quality gasoline · clutch slipping
4. Poor engine performance at idle and low speeds
1. Check the ignition timing.
If the ignition timing is incorrect: · faulty commutator (CDI) [Electrical check] · faulty alternator [Electrical check] · alternator rotor installed incorrectly
2. Check if the intake tract is working properly.
How to check: · whether the reed valve is working [Power system repair] · whether the carburetor pipes are tightly screwed on · whether the intake manifold gaskets are intact [Power system repair] · whether the carburetor gaskets are intact [Power system repair]
3. Check the carburetor
What to check: · mixture too rich [Carburetor adjustment] · mixture too lean [Carburetor adjustment] · clogged carburetor [Carburetor overhaul] · clogged carburetor tube, which is blocked by the starter enrichment needle [Carburetor overhaul] · faulty starter enrichment [Starter enrichment diagnostics]
4. Check for spark.
If there is no or weak spark: · faulty or dirty spark plug [Checking spark plugs] · broken or “shorted” wiring [Ignition system faults] · broken or “shorted” ignition coil [Ignition system faults] · broken or “shorted” inductive ignition sensor faulty ignition switch faulty alternator [Ignition system faults]
5. Poor engine performance at high speeds
1. Check the ignition timing.
If the ignition timing is incorrect: · faulty commutator (CDI) [Electrical check] · faulty alternator [Electrical check] · alternator rotor installed incorrectly
2. Check whether gasoline flows normally into the carburetor.
If not, check: · whether the gas tank is empty · whether the gas filter is clogged · whether the vacuum gas valve is working · whether the rubber gas and air pipes leading to the gas valve and carburetor are clogged and intact · whether the carburetor float needle is dirty and intact [Carburetor design]
3. Check the carburetor
What to check: · clogged carburetor [Carburetor overhaul] · clogged carburetor tube, which is blocked by the starting enrichment needle [Carburetor overhaul] · faulty starting enrichment [Diagnostics of starting enrichment]
6. Clutch, drive and driven pulleys
1. The engine runs, but the scooter does not move.
What to check: · worn or broken belt · broken clutch plate (clutch assembly) [Clutch Disassembly #1] | [Disassembling clutch #2] · driven pulley spring broken [Disassembling clutch #1] | [Disassembling Clutch #2] · peeled off clutch pads [Disassembling Clutch #1] | [Disassembling clutch #2] · driven pulley grooves are damaged [Disassembling clutch #1] | [Disassembling clutch #2] · damaged or worn gearbox [Replacing gearbox gears]
2. The scooter barely crawls or the engine stalls immediately after starting (the rear wheel rotates at idle speed).
What to check: · Broken clutch spring [Clutch Disassembly #1] | [Disassembling the clutch #2] · the clutch pads are stuck to the clutch bell [Disassembling the clutch #1] | [Disassembling clutch #2] · driven pulley pin jammed [Disassembling clutch #1] | [Clutch disassembly #2]
3. Low traction at the start (poor ride downhill).
What to check: · worn belt · worn variator rollers [Disassembling the variator] · the movable cheek of the variator is jammed on the variator bushing [Disassembling the variator] · weak spring of the driven pulley [Disassembling the clutch #1] | [Clutch Disassembly #2] · Worn or seized driven pulley bearings [Clutch Disassembly #1] | [Clutch disassembly #2]
4. Low thrust at high speed.
What to check: · worn belt · worn CVT rollers [Disassembling CVT] · worn or seized driven pulley bearings [Disassembling Clutch #1] | [Clutch disassembly #2]
5. Abnormal noise or strange smell while driving.
What to check: · Belt contaminated with oil or grease · Worn belt · Weak driven pulley spring [Clutch Disassembly #1] | [Clutch Disassembly #2] · Worn or seized driven pulley bearings [Clutch Disassembly #1] | [Clutch disassembly #2]
Variator weights: · Dimensions: 17×12 mm, · Weight: 6.6 g
Variator belt (W x D): 16.5×664 mm
Clutch drum inner diameter: Nominal diameter: 110.0 - 110.15mm Maximum diameter: 110.50mm
Friction lining thickness: Nominal thickness: 3.0mm Maximum thickness: 2.0mm
Clutch Spring Diameter: Nominal Diameter: 23.8mm Maximum Diameter: 25mm
Free spring length: Nominal length: 110mm
The principle of operation of ignition in a 4-stroke scooter engine
Modern scooters are equipped with contactless systems. They are considered the most reliable and easy to use, do not require complex connections, and provide a constant good spark on time. However, the setting is still important; even the presence of a spark does not always allow the fuel mixture to ignite, since its power also plays a role.
The main reasons for the operation of the ignition system are quite simple: its task is to create a spark to detonate the fuel mixture. If this does not happen, you need to carefully examine each node and find out why the spark disappeared.
- In order to check whether there is a spark at all, you need to unscrew the spark plug and apply it to the engine ground; this can be done using metal objects that are not covered with paint. You cannot hold it with your hand: if there is a spark, it can give you an electric shock, and the discharge reaches 40,000 volts, which the coil creates.
Broken ignition is the cause of engine failure
An incorrectly configured or faulty ignition often causes engine failure. It would be wrong to immediately climb into the cylinder and examine the insides of the scooter, especially since this will not solve the problem. Before touching the ignition system, you need to check for other reasons why the scooter may not work.
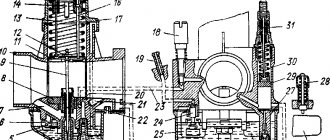
Purpose and principle of operation of the carburetor
The carburetor is an important component of an internal combustion engine, responsible for preparing the air-fuel mixture and supplying it to the working cylinder in the required ratio. A scooter engine with an unadjusted carburetor cannot function properly. The stability of speed, the power developed by the engine, gasoline consumption, response to turning the throttle, as well as ease of starting in the cold season depend on the correct settings of the engine power supply.
An important component of an internal combustion engine is the carburetor.
This unit is responsible for preparing the air-gasoline mixture, the concentration of the components of which affects the nature of the operation of the power plant. The standard ratio is 1:15. Leaning the mixture to a ratio of 1:13 ensures stable engine operation at idle. Sometimes it also becomes necessary to enrich the mixture by maintaining a ratio of 1:17.
Knowing the structure of the carburetor and knowing how to adjust it, you can ensure stable operation of the engine on two-stroke and four-stroke scooters.
Thanks to a properly configured carburetor, easy and quick starting of the vehicle engine is ensured, as well as stable operation of the engine, regardless of the ambient temperature. Any carburetor is equipped with jets with calibrated holes, a float chamber, a needle that regulates the cross-section of the fuel channel, as well as special adjusting screws.
The adjustment process involves specially rotating the screw in a clockwise direction or in the opposite direction, which causes, respectively, the enrichment or depletion of the working mixture. Adjustment measures are carried out on a warmed-up engine. In this case, the carburetor unit must first be thoroughly washed and cleared of blockages.
What is advance ignition
The quality of the mixture supplied to the engine cylinder determines the behavior of the scooter in cold weather, as well as how high the wear of the cylinder itself will be. For example, with a rich mixture, the engine starts better, but carbon deposits form; with a lean mixture, the cylinder quickly wears out and traction is lost.
In order to facilitate the process of starting the engine, you can set the ignition to advance, this will make it easier to start the engine regardless of the weather outside, slightly increase engine power, and significantly increase traction. The peculiarities of such settings are that a charge is formed in the spark plug before the piston reaches the dead center. This makes it easier to start the engine and increases engine power. However, it is worth remembering that cylinder wear may increase.
The procedure is carried out in approximately the same way as a regular ignition adjustment, but has its own nuances. To do this, all the same actions are carried out, only the tags are not completely connected. The discrepancy should be approximately half a centimeter. This is enough to get the desired effect.
How to set the lead angle (video)
About adjusting the ignition of a 4t scooter
Knowing how to set up the ignition of a 4T scooter on your own, you can save time and money, since you will not need to contact a motorcycle repair shop. The procedure is simple, even if you have no experience it takes a little time, but you will need to be patient. Regardless of the type of ignition, an important role is played by how the marks are set.
Correct adjustment is a guarantee of stable and smooth engine operation even in cold weather conditions. Often, in used vehicles, the ignition is broken: this can happen for various reasons, ranging from elementary shaking when driving to improper handling of the equipment. In order for the scooter not to let you down and for you to be able to start it whenever you want, you will need to learn how to carry out this procedure yourself. To do this, you will need to have several keys that allow you to remove the valve cover if the engine is four-stroke.
Setting up the Vision scooter ignition system
If the ignition is knocked out, this may be the reason the scooter does not work. Restoring it is not difficult if you understand how it is done.
Advice: before starting work, carefully check and clean the carburetor: this may be the reason. Adjust the quality of the mixture. In addition, it doesn't hurt to check the spark plugs.
You need to start adjusting by setting the timing belt in the desired position. As a rule, there are marks on it for this purpose; they are set at the factory. The cylinder must be installed at dead center. The mark may be indicated by the letter T or another symbol. Now make sure that the mark installed on the rotor matches the mark found on the magneto. To do this, you need to gently press the kickstarter. The rotor can also be turned using your hands, but this is more difficult.
There are also marks on the timing star in the form of holes or dots; they must be set so that the largest hole is on top and located exactly in the center. The remaining points should be below and located horizontally opposite each other. Setting the ignition advance makes sense if you want to increase the engine's power a little and make it start easily. The adjustment will help make the spark plug produce a spark earlier than the standard time. That is, a spark will appear even before the piston reaches the dead center. In cold weather, a moped configured in this way will start better.
In order to configure the scooter in this way, you will need to repeat the procedure described above. However, there is a difference: the marks should not coincide clearly, and not reach each other by about 0.5 cm. The main difficulty lies in connecting the marks.
Adjusting the fuel level
The float chamber allows you to have a constant flow of fuel in the carburetor, which is always replenished, but it is important to remember that you cannot have an excess of gasoline in the float chamber. Gasoline is drained using a special hose coming from the chamber; you will have to check the amount of fuel with the engine running. Raise the hose above the carburetor as shown in the picture below and check the fuel level. It should not differ much from the mark indicated in the picture. There is a holder antenna located on the needle inside the float chamber; it can be used to regulate the amount of fuel inside the float chamber.
Please also take into account the fact that before adjusting the carburetor, you should only have high-quality gasoline with a normal octane number. Otherwise, you will have to completely drain the bad gasoline not only from the gas tank, but also from the float chamber; it must have a special drain screw.