Although not all, but many scooter riders encounter a similar problem: they arrived the day before, put the scooter in the garage, everything was fine. Then I started to start the engine, but it wouldn’t start.
There can be many reasons for this. However, in this article we will look at the main reason why the spark plug is flooded with fuel, it doesn’t matter whether you have an injector or a carburetor. Fills the spark plugs with gasoline regardless of the type of fuel system of the scooter.
It is typical that the spark plugs are filled with gasoline less often in the warm season, and more often in winter temperatures. So we’ll try to understand in order: why the spark plug in the injector is flooded, what to do to start the engine, specifically when the spark plug is flooded, and how to prevent the spark plugs from flooding with gasoline.
Cleaning the carburetor of the Honda Dio AF18 moped
In fact, cleaning the carburetor on mopeds is not much different, so this article will apply to many models.
1. In order to get to the carburetor, you need to remove the side plastic, remove the seat with the glove compartment and remove the air vent.
2. To remove the air filter housing, you need to unscrew the 2 bolts under the housing and unscrew the clamp on the carburetor diffuser.
3. move the fuel hose clamp and the oil line clamp.
4. Unscrew the throttle valve. To do this you will need pliers.
5. Unscrew the carburetor from the inlet pipe.
6. Remove the casing from the cold start needle (unscrew 2 screws), remove the bracket and pull out the enrichment needle.
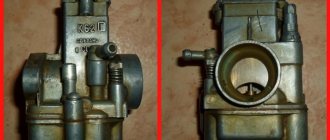
7. Using gasoline, remove dirt from the carburetor (you can use any container and a brush. A grimy carb)))
8. After we have removed all the dirt from the outside of the carburetor, unscrew the drain bolt of the float chamber and pour out all the contents. Then unscrew the float chamber.
9. Remove the float and needle valve.
10. Unscrew the idle jet and the main fuel jet with the emulsion tube. We put the unscrewed jets into the float chamber, into which we first screw in the drain bolt and fill the float chamber with any liquid for cleaning the carburetor.
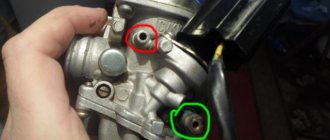
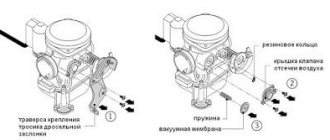
11. Unscrew the idle speed adjustment bolt, unscrew the mixture quality adjustment bolt, and pay attention here! remember the order and completeness of what will be here, and the following will be here: an adjusting screw, a spring, a washer and at the end a rubber seal. Accordingly, we then assemble everything in reverse order.
12. Wash the adjusting screws with gasoline.
13. Spray all holes in the carburetor with cleaner.
16. Wash all carburetor components with an ether-based cleaner.
17. We pay special attention to the fuel jet of the cold start needle.
18. Putting everything back together)
19. After we have tightened the adjusting screws, unscrew the idle speed screw by 2.5 turns and the mixture quality screw by 1.5-2 turns.
A clean carburetor means dirty hands.
Call center 24 hours. Any questions from those. consultations to assistance with placing an order.
Warranty on all products
Warranty for goods from 6 months to 3 years. If there is a defect, we will replace the product without any questions asked.
Secure payment methods
Pay by credit card, PayPal, bank transfer or cash upon delivery.
Delivery throughout Russia
You can choose delivery by courier, Russian Post or at a pick-up point.
We will pack it well, send it for delivery and monitor the order until delivery.
Adjusting the carburetor Honda Dio 34
Spark plugs should be checked every thousand. We pay special attention to the fuel jet of the cold start needle. In this case, you need to unscrew the mixture quality screw counterclockwise by a quarter or half a turn to lean the mixture.
In this case, the adjusting screw will close and open the air channel.
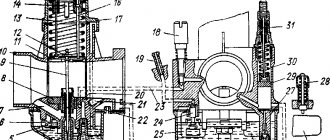
The more you unscrew the XX screw, the more fuel-air mixture will be supplied to the combustion chambers, and the idle speed will rise. Float chamber It is important that the fuel in the float chamber is always within certain limits and does not drop below the permissible norm. It is also important that gasoline does not rise above the permissible standards - this will help to avoid overfilling.
Actually, the float, which on the opposite side has a shut-off needle at its disposal, is responsible for the optimal level of fuel in the float chamber. Gasoline filling the chamber raises the float as it enters, which is constantly afloat.
Reply Reply with a quote Quote Report to moderator 0 Informadmin You can check whether gasoline is leaving by unscrewing the drain screw. If there is no gasoline, then he has run away.
Adjusting the quality of the mixture.
You can also check the amount of gasoline in the float chamber in the morning and after starting. Reply Reply with a quote Quote Report to moderator -2 Roman The same problem with exactly the same carburetor, only our Dio 34 is generally after cap.
On more expensive Dio ZX models, these shortcomings are corrected. Scooters of the Tact family are designed for novice drivers. The advantages of Honda scooters include an engine with a vertical cylinder arrangement, which provides greater ground clearance than its analogues, and, in combination with a more durable design, allows the machine to be used not only around the city, but also in poor road conditions.
Over the years, the production of Honda scooters has been transferred to the Indian branches of the company, which has affected the quality of components and assembly of the machines.
If the mixture is too lean, the scooter will lose performance and the engine will overheat.
If you overdo it with the amount of fuel, scale will form in the combustion chamber, which will lead to breakdown in the future. You can adjust the quality of the supplied mixture using the adjusting screw.
It is considered ideal to operate the engine with the mixture quality screw in the unscrewed position by 1.5 - 2 turns. Depending on engine wear and other faults, this range may fluctuate. The scooter should accelerate smoothly, without dips, and there should be no jerking while driving.
Adjusting the carburetor on a 2t scooter: setting it up together
We continue to discuss DIY motorcycle repairs.
The carburetor has been cleaned, the next step is to adjust the carburetor of the 2t scooter. Over the summer, you have to adjust and adjust the operation of the engine several times.
Anyone who is at least a little familiar with the structure of the carburetor will be able to set it up on their equipment themselves. On 2-stroke engines, carburetors are adjusted according to the same principle. Therefore, the topic will be of interest to owners of any brand of 2t 50cc scooters. Whether you have a Honda Dio 27, 34, 35, stroke, Yamaha Jog, BVS or other 2-stroke mopeds.
Carburetor assembly and operation check
After repair, the carburetor can be washed again, removing all dirt that got in during the repair. The carburetor is carefully assembled, preferably on a clean rag, and installed on the equipment.
The carburetor is installed on a motorcycle by screwing two bolts to the pipe. The hoses are connected, the gas tank is installed, the tap is opened and it is checked to see if there is any leakage from the carburetor. Even if nothing leaks right away, you need to make sure that the repair was successful. To do this, the equipment should be left with the tap open for a day. If at the end of the day there are no puddles under the motorcycle, and the gasoline in the tank remains at its level, we can congratulate you on a successful repair.
On a car, the process of installing a carburetor occurs in the reverse order of removal. First, the carburetor is screwed into its seat, then the fuel lines and all electrical wires are connected. Lastly, the throttle and choke cables are connected. After installing and connecting the carburetor, it is worth adjusting it using a gas analyzer and a quality screw.
When assembling the carburetor, do not use sealants. They will close the cracks, but over time they will clog the small carburetor holes. Carburetor sealant is used only on the road. With obligatory repair or cleaning later.
Knowing what to do if the carburetor is leaking, it will not be difficult for you to repair or clean the carburetor yourself. This operation can be carried out even on the side of the road, with a minimum set of tools in the trunk.
Read also: Oil for four-stroke motorcycle engines
Greetings. tell me something like this. I drove on gas for 3 days because it was warm, and yesterday I decided to switch to gasoline in front of the house. I started parking in a row under the house and suddenly!, gasoline poured out of a hose that was considered plugged and went from the carburetor to a place unknown to me (not the return line, it goes to the gas valve on gas).
Tell me what kind of diva this could have happened from, what kind of solution this is and whether it is needed. can it be silenced? The symptom in general is as if the return line was clogged, since gasoline flowed out of there as soon as the speed decreased (the engine began to consume less gasoline), but before that, the fuel pump pumped gasoline perfectly in a circle because the gas valve was closed.
Technology has one bad property - it breaks. The scooter is no exception to this rule. A common problem in operating a scooter or moped is the carburetor, a device that prepares the air-fuel mixture. This article draws attention to the following problem: why a scooter’s carburetor floods.
Diagnostics
Before installing the air filter, turn on the ignition and jerk the kickstarter foot several times until the engine starts.
If it does not start, then the most common reason is that the cold start system is malfunctioning.
We check this way: cover the carburetor hole with your fingers to maximally enrich the mixture with gasoline, and continue to push the kickstarter.
If the engine starts and the speed does not drop during operation, then look for the reason in the cold start system.
If the cold start system is working properly, then after starting the engine the speed will rise and gradually, within 10 minutes, begin to fall. On a warm engine, gradually unscrew the large screw (amount of mixture) until the speed drops to medium, confident idle.
At the same time, drops of gasoline should not splash or pour out of the carburetor.
If gasoline splashes out of the air supply hole, this indicates a malfunction of the reed valve in the engine. Then the valve needs to be removed and cleaned or replaced with a new one.
And if gasoline leaks out, this indicates a high level of gasoline. Adjust the float level and ensure the needle valve is sealed.
Causes of malfunction
You can determine that the carburetor is overflowing by several signs:
- Condition of the candle. A dirty spark plug indicates a rich fuel mixture, which means high gasoline content. Even a serviceable or new spark plug may not be able to cope with the flow of fuel entering the cylinder and over time it will become covered with soot, will be constantly wet and the engine will stop starting.
- Gasoline leaks through the air filter. Signs of fuel may be found in the air filter housing.
- Gasoline leaks through the float chamber gasket.
It is worth noting that these signs can appear either on their own or after repairs. For what reasons can the carb overflow?
Failure of the fuel valve
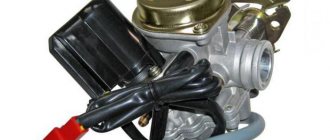
The tanks are equipped with vacuum fuel taps with three outlets. One of them is taking fuel from the tank, the other is supplying fuel to the carburetor. The third outlet is intended for supplying a vacuum hose. When a vacuum is created in the engine, the valve membrane begins to pump fuel.
Advice! If the engine does not start after a long period of inactivity (fuel is not pumped in), in order not to wait for the engine to pump it in, you can remove the vacuum hose on the other side of the tap and create a vacuum with your mouth until the carburetor is filled.
Clogged air filter
Air filter on a scooter
If there is insufficient air supply, the scooter may also overflow fuel. You can diagnose the filter for air permeability as follows. Simply disconnect the air filter. If the engine now starts to work correctly, then it is necessary to change the air filter. When the carburetor on a scooter without a filter still floods, “dig deeper”!
Locking needle
Briefly about the principle of operation of the float chamber. Fuel enters it, thereby raising the float. The float, rising, lifts the locking needle behind it. When there is enough fuel in the chamber, the shut-off function closes the fuel supply hole.
Locking needle in a scooter carburetor
If the shut-off needle is worn out (the tip or metal body is worn out), then it cannot completely close the supply hole and gasoline continues to flow. The same effect occurs if a speck (grain of sand) gets under the locking needle.
Intermediate setup
Adjusting the carburetor of a 2t scooter is carried out after installing the air filter in its place.
Start the engine and let it run for about five minutes to warm up.
Adjust the idle speed (ISR) with the quantity screw: by tightening it, the throttle rises and the idle speed increases; and when unscrewing, the throttle is lowered and the CO is reduced.
Set the speed so that the scooter operates at a lower speed.
Chainsaw engine malfunction
In most cases, the following problems occur in engine operation:
- the engine stopped starting;
- the engine starts, but after a while it stalls;
- the engine is not able to develop the required power;
- The engine is extremely unstable.
- the engine does not start - the engine runs unstably - the engine starts, but very often stalls - the engine quickly overheats - the engine runs normally at idle, but “chokes” under load - the engine smokes heavily, power drops
In certain situations, it is better to seek help from professionals and take your saw to an authorized service center. But you can deal with some problems yourself.
In general, in order to eliminate the cause itself, you must first correctly identify it, otherwise the entire repair will be tantamount to shooting at sparrows from a cannon, and perhaps even shooting at “fictional” sparrows, since there may not be any breakdown.
If you are trying to start a chainsaw, but it does not start, and at the same time does not make any strange sounds that are not typical for it (knocking, grinding), then you are simply starting it incorrectly (if you pull the chainsaw on the choke for a long time, the internal combustion engine is filled with fuel, and then start its difficult).
How to start a cold engine correctly? 1. Set the lever or switch to the “flap closed” position. 2. If the model is equipped with a fuel priming pump, pump the fuel mixture into the carburetor. 3. Pull the starter handle until resistance appears, then vigorously pull in amplitude, moving your hand to the side (2-3 times).
No need to try to “rip” the starter cord out of the chainsaw! The saw should start and then stall. 4. If the engine does not start, move the lever to the half-throttle position or to the working position, and try to start the chainsaw in this mode. Please note: Some models have a push-button ignition switch, make sure it is turned on.
What to do if the engine still doesn’t start? First, unscrew and inspect the spark plug. It happens that when starting a chainsaw in cold weather, the combustion chamber is accidentally filled with fuel mixture. In this case, you should also unscrew the spark plug, dry the combustion chamber by idling, clean the spark plug, and try to start the saw again.
How to check for spark on a spark plug? Place the unscrewed spark plug connected to the high-voltage wire on the cylinder and pull the starter. Be careful! You cannot touch the candle with your hands during this procedure! If you see a blue spark, the spark plug is OK. We screw the spark plug into place and try to start the saw again. If we fail again, we’ll check the connection of the high-voltage wire to the spark plugs, the coil and the ignition system.
- Dry candle. Apparently, the fuel mixture will not get into the cylinder. The problem is not in the spark plug, so we screw the spark plug back in. And we check the fuel supply system.
- A wet, heavily fuel-stained spark plug. The reason for excess fuel is hidden either in violation of the model factory rules, or in incorrect carburetor adjustment.
- The candle was covered with black soot. This may indicate the use of low-quality oil (so use only original oil for your saw), an incorrectly adjusted carburetor, or an incorrectly prepared fuel mixture. The spark plug needs to be washed, thoroughly cleaned of carbon deposits with an awl or a needle, the electrodes should be wiped with sandpaper and screwed into place.
When checking the spark plug, pay attention to the gap between the electrodes (it should be 0.5 - 0.65 mm). A worn gasket must be replaced.
Lifehacks for the last time
- — Before adjusting, you need to check that the air filter is clean and soaked in engine oil. How to clean the air filter, read the article: Scooter maintenance.
- — If the rubber cuff on the quality screw is torn, then it can be replaced with a cuff from the quality screw of the classic Lada carburetor.
- — On Suzuki Sepia models, lets 2,
In the latest models of Honda Dio 34 everything is simpler. The carburetor has only one large screw, which is used to regulate the XO. The small one on dio 34 is located under the plug.
The first time the setup will take 15 - 20 minutes, and then everything will be automatic. Feel free to get down to business and share your experience in the comments.
Subscribe and see you for new articles!
The membrane has leaked and is leaking fuel.
The reasons that caused the appearance of holes in the membrane and, as a result, the appearance of fuel in the air filter may be:
- natural wear and tear of the membrane and its physical aging;
- mechanical damage caused by unprofessional repairs;
- Road accident or extreme driving.
A symptom of membrane damage is deterioration of vacuum in the intake manifold and air filter. There is a gradual deterioration in the technical characteristics of the car. It may take more than one month before the iron friend finally stalls.
To determine whether fuel is leaking through the membrane, it is necessary to disassemble the carburetor. Diagnostics is performed by visual inspection.
To repair, you will need to replace the membrane with a new one. Before replacing, you should bleed the carburetor to prevent debris from getting into the jets or under the shut-off needle.
Tuesday, March 24, 2015
Setting up a scooter carburetor, using the example of a Honda Dio.
54 comments:
Question: Tell me what could be. Gasoline rushes from the carburetor into the air filter and flows out at the carburetor-air filter connection. This happened after cleaning and blowing the carburetor. Answer: Your scooter carburetor is overflowing. That is, the fuel level is higher than possible, obviously the needle or float is not working correctly. The carburetor may not be assembled correctly.
Thank you. I took it apart and it turned out that the float was prevented from working normally by silicone sealant, which I smeared under the gasket in the carburetor. When twisting the carburetor, it went beyond the possible limits and the float simply got stuck.
Look at the gasoline connection, you mixed up the air connection with the gasoline connection.
Tell me what size needle carburetor Honda Dio scooter 34/35.
My Honda Dio scooter won’t start and gasoline is gushing out of the orange hose when I start the scooter. Please help me.
Nikita. First, tighten the screw in front of the hose, this screw is for draining gasoline from the carburetor. And start the scooter, it will not start immediately when the carburetor chamber is filled, unless there are other reasons and breakdowns, unless of course we are talking about the hose that I thought of.
Tell me I have a Honda Tact. starts and works only when the screw is fully tightened to enrich the mixture. If you let it go, the moped stalls and the idle screw does not help. what could it be?
In short, the cause may be a clogged carburetor, poor idle speed, or a malfunctioning or incorrectly working enrichment system. Accordingly, the cause must be eliminated. I would start by cleaning the carburetor and look at the color and condition of the spark plug. Do not forget to make carburetor adjustments on a warm engine, and a temporary mixture enricher is responsible for a good start.
How to adjust mixtures on Honda dio 27
Good day everyone, how to adjust the carburetor on a Honda dio, not like from the factory 1.5 turns, the quality of the mixture, but individually for the engine. There are a lot of topics on the Internet about carburetor tuning.
We adjust the Honda Dio 27 carburetor with our own hands. You can adjust the quality of the supplied mixture using the adjusting screw. By tightening it, you can achieve fuel enrichment, and by unscrewing it, you can achieve fuel depletion.
Honda is a relatively young Japanese automaker; it was founded in 1948. At the moment, in addition to cars, the concern also produces motorcycles, airplanes and is engaged in robotics. Many experts consider Honda cars to be one of the most reliable.
On the Honda Dio scooter, the idle speed adjustment screw is located in the center, and the mixture quality adjustment screw is located to the left. Honda Dio 27, starts well when cold, after 3-5 minutes of warming up at idle it stalls even when trying.
Four-stroke scooter and moped engine - design and operating principle. I took it apart and it turned out that the float was prevented from working normally by silicone sealant, which I smeared under the gasket in the carburetor. Let's return to the question of what should I do with the moped. Give advice on which company is better to buy a carburetor for it? Application forms for the issuance of repeated certificates.
Instructions for setting up the carburetor Honda dio 27
An incorrectly configured carburetor leads to increased fuel consumption, loss of idle speed, loss of power and incorrect engine operation. When is carburetor adjustment necessary? The need to adjust the carburetor arises after a major overhaul of the engine, replacement of the carburetor, its repair and cleaning. On different scooter models, some adjustment nuances may vary, but the principle is always the same.
Let's look at setting up the carburetor on such a popular scooter as the Honda Dio. Adjustment steps When adjusting the carburetor, idle speed and mixture quality are adjusted by moving the needle and a special screw, as well as adjusting the fuel in the float chamber. Adjusting idle speed and mixture quality Before you begin adjustment, you need to warm up the engine thoroughly. On the Honda Dio scooter, the idle speed adjustment screw is located in the center, and the mixture quality adjustment screw is located to the left.
In this case, it is necessary to adjust the idle speed so that the engine runs stably and does not stall. A decrease in idle speed occurs when the screw is unscrewed, and an increase on the contrary. On some models of Suzuki scooters, the mixture quality is regulated only by moving the needle in the throttle valve. How to adjust the fuel level In order for there to be a normal fuel level in the chamber, the float must be strictly horizontal, and the carburetor must be perfectly clean before adjusting.
There are jets inside the carburetor chamber that must be fully tightened. Subscribe to notifications of new comments. What tires did I put on the Skoda Octavia? CVT rollers for scooters: myths and reality. Pay attention to smartphones from China. What kind of oil should I put in my scooter? The design and principle of operation of a scooter carburetor. Happy Birthday. Goodbye school, goodbye school. Have a nice working day, verse.
Scooter carburetor. Correct adjustment
The carburetor is a unit whose importance cannot be overestimated. Since it is in the carburetor that gasoline is mixed with air and, thus, a fuel mixture is formed before it is directly supplied to the scooter cylinder. The quality and correct composition of the fuel mixture determines fuel consumption, wear of the cylinder-piston group and spark plugs, maximum speed and dynamics of the scooter, and much more. This is why it is so important to take a responsible and comprehensive approach to setting up the carburetor. A properly adjusted carburetor will ensure stable, reliable and productive engine operation, as well as make driving comfortable and safe.
Unfortunately, scooter riders often, due to ignorance or lack of experience, underestimate the importance of comprehensive carburetor tuning. For example, there is an extremely widespread misconception that adjusting the degree of richness of the mixture only means adjusting the quality screw on the carburetor. In fact, this setting allows you to achieve the correct mixture only at idle and low speeds. At the same time, at medium and high speeds the proportions of the fuel mixture can be completely disrupted. Let's figure out how to properly configure the carburetor.
Before proceeding directly to adjusting the carburetor, you need to make sure that such adjustment is necessary. There are several sure signs that will help you understand whether the mixture is over-rich or, on the contrary, it is too lean. For different engine operating modes, these signs are slightly different.
Carburetor adjustment at idle and low speed
You can determine a lean mixture at low and idle speeds by the following signs:
- The scooter is hard to start and keeps trying to stall.
- Turning the throttle does not lead to the expected level of increase in speed. Information content is extremely low
- When the throttle valve is opened very sharply, the carburetor begins to make characteristic popping noises.
- The surest and most reliable sign: with a lean mixture, the spark plug will remain white, even after prolonged operation.
A too rich mixture at low speeds also has several characteristic signs:
- Rough, floating engine idle
- Significant increase in fuel consumption compared to the parameters specified by the manufacturer
- The spark plug will be a pronounced black color with noticeable carbon deposits, since the fuel mixture simply does not burn out in the cylinder.
If you notice the presence of one of these groups of symptoms on your scooter, then the quality of the mixture and idle speed need to be adjusted. This is done quite simply, using adjustment screws.
Why Doesn't Gasoline Get into the Carburetor of a Petrol Mower?
Adjusting the carburetor of the lawn mower
performed at home
Petrol mowers, like all petrol-powered garden tools, are not difficult to maintain equipment. It is possible and necessary to repair and configure without the help of others. For example, adjusting the carburetor of a lawn mower in makeshift conditions takes 5 minutes.
Carburetor
from a lawn mower - this is a node in the power system. In a personal computer, like all carburetors, the process of mixing air and fuel (gasoline) is underway for subsequent supply to the engine cylinders.
In this process, the main thing is the correct proportion of fuel and air, for which purpose the carburetor .
Main problems and malfunctions of the carburetor.
Mesh filter. There are usually only two problems with this element:
To find out the cause of the breakdown, unscrew the fuel filter cap to remove the strainer. If it just has accumulated dirt, then washing it in gasoline or blowing it out will help.
If there is visible damage to the mesh filter, it is imperative to install a new one. Damage also occurs on the fuel supply pipe (when performing repairs, it is practiced to check this element).
The carburetor starter almost always does not work due to blockages. Acetone or the same gasoline
.
You may also like
- What Hose Diameter is Needed for a Pneumatic Impact Wrench Any master knows that the most labor-intensive process when installing structures or repairing mechanisms is unscrewing and tightening threaded connections. But if pneumatic wrenches are used for these purposes, then such work becomes pro...
- How to Unscrew a Drill Without a Key Video
It’s hard to imagine a house without an electric drill. This is a favorite remedy for almost every man. Usually the user does not worry about the drill, the tool works itself and allows him to work. But then there was a strong beating of the drill bit or a jam... - How to Change the Cable on a Forester Trimmer
An electric manual trimmer is considered a competitor to gasoline-powered scythes. Many manufacturers offer many models. The unit is selected according to technical and operational parameters. Which trimmer is better, electric or gasoline? There are trimmer models... - Which Trimmer is Better: Collapsible or Non-dismountable
Gasoline trimmers are reliable assistants for any summer resident or simply the owner of a personal home. The abilities of this mechanism make it possible both to clear vast areas of dense thickets from weed, and to do more specialized work - for example, processing... - How to Adjust the Carburetor on a Trimmer
Adjusting carburetor gasoline can be done with your own hands. Gasoline, as well as all gasoline garden tools, is not difficult to maintain in technology. Repairs and adjustments can and should be done on your own. For example, adjusting a gasoline carburetor... - Cutting dead wood for firewood 2019
new entriesrecent commentsHeadlines 08/09/2018 / 0 comments403 ForbiddenNot far off. one more news. Deputies plan to exempt Russians from income tax when passing through garbage. All this is not a joke, but the result of legislative activity...
Blowing clogged carburetor parts with compressed air is an acceptable and comfortable repair practice.
The throttle body, the joints of the carburetor parts, the intake or exhaust pipeline - what remains for our client to do, the listed parts are subject to depressurization. There is probably a simple option to check - spread soap foam on the problem area.
The structure of a lawn mower carburetor
The base of the lawnmower carburetor is a duralumin body. A diffuser is located here (a hole with internal contours). Air is forced through this hole. The oxygen (air) supply rate depends on the cross-section (pass hole) of the diffuser.
The diffuser is equipped with fuel channels. Fuel is drawn in there using air flow.
Install externally on the carburetor:
- fuel pump;
- jet system;
- system for adjusting the consistency of fuel with air;
The principle of operation of a lawn mower carburetor
The throttle valve determines the amount of air supplied, and for this reason the engine power directly depends.
Trimmer won't start, carburetor REPAIR!!!
The trimmer is not
it starts, what should I do? We carry out an initial inspection and identify obvious faults. We change the gasket.
Step-by-step operation of the device:
- Air supply into a tube with an air baffle (damper). The partition regulates the intensity of the air flow.
- The fuel supply system is necessarily narrowed by the mixer in order to increase the flow rate.
- Gasoline
through the float chamber and the nozzle tube with a narrowing. A chamber with a float regulates the temporary volume of gasoline. In the float chamber the pressure level is neutral, in the tube with a narrowing it is already small. Due to the pressure difference, fuel leaks through the nozzle. - Acceleration of the air flow promotes the transfer of fuel (gasoline) and its atomization. As a result, an air-fuel mixture of the required proportion or density appears.
- The air-fuel mixture seeps into the engine cylinder through the fuel pipe.
The level of air density in the system depends on the area of the open air damper. The wider the damper is open, the greater the fuel consumption and power.
Simply put, adjusting the carburetor on a lawn mower is to create a good fuel consistency due to the correct air supply.
How to adjust the carburetor on a lawn mower
Before adjustment, you need to carefully clean the filters according to the technical maintenance instructions.
The upcoming adjustment of the lawn mower's carburetor is done on your own using adjusting screws. There are three in total:
You may also like
- Replacing the Piston with the Patriot 3355 Trimmer A type of lawn mower, such as a trimmer, It is divided into several main categories: gasoline, battery, mechanical and electric. Each has a unique structure. In a gasoline engine, fuel is mixed with air until it...
- How to Install a Line on a Petrol Scutter
We will learn how to properly align the line in a trimmer, but beginners rarely know even the most basic rules for caring for this equipment. So, the most common question. how to properly align the line in the trimmer. Brief introduction First of all, knives or lines can… - How to Thin Oil in a Gasoline Trimmer
The trimmer specifications include references to recommended fuels and lubricants. The octane number of the gasoline brand is indicated, but for oils there is a long explanation of the need to use products from a specific manufacturer. To be convincing... - What Hose Diameter is Needed for a Pneumatic Impact Wrench
Any master knows that the most labor-intensive process when installing structures or repairing mechanisms is unscrewing and tightening threaded connections. But if pneumatic wrenches are used for these purposes, then such work becomes pro... - Footballer's Beard |Sergio Ramos Style, How to Use a Trimmer
Footballer's Beard |Sergio Ramos Style, How to Use a TrimmerCreated by: BeardStylePosted: Jun 23 2017 Views: 3,646 Likes: 69 Dislikes: 4 Beard in the image of Sergio Ramos. there is nothing simpler)) How to use a trimmer. ... - Changing the Oil in the Gearbox of the Neva
Motoblock Gearbox for the Neva MB-2 walk-behind tractor assembledHome > DocumentReducer for the Neva MB-2 walk-behind tractor assembled Since June 2013, they have been producing the MB-23 series, where the gearbox and engine are reinforced. The gearbox is designed to transmit torque from the motor (via clinorem...
Right (L) – adjusting the fuel consistency for low speeds.
It is necessary to find the highest idle speed. For this purpose, you slowly unscrew the screw (L) to the right and to the left.
To adjust, turn the screw a quarter turn, always counterclockwise.
Bottom (T) – is responsible for adjusting the engine at idle.
- clockwise – increase;
- counterclockwise – decrease.
For correct idle speed adjustment it is typical:
- stable operation of a cool motor;
- not over-revving a hot engine;
- there is a large supply of revolutions for the trimmer head;
- stable operation of the motor when changing position (sharp raising or lowering of the knife).
Left (H) – consistency adjustment at high speeds. (The screw is adjusted last).
The overall adjustment of maximum speed, engine power, temperature and gasoline consumption depends on the left screw (H).
Setting up the carburetor
lawn mowers with the last screw are made as follows:
- Open the throttle to full, in this case, give full throttle. Turn the screw clockwise until the speed drops (in this case, they are guided by ear).
- Turn the screw as slowly as possible counterclockwise until the engine runs unevenly.
- Then turn back just a little, barely hearing measured, even work.
- For a more pleasant implementation of abilities, it is more convenient to see the work of an experienced user:
It is interesting that, based on the beliefs of the video creator, the setting (its correctness) is determined by the color of the candle, and not just by the speed and stability of the engine.
Why doesn't gasoline flow into the carburetor of a lawn mower?
The correct setting of the carburetor in makeshift conditions in our example is the combustion of the fuel mixture without residue; the color of the spark plug is light brown.
Source
Post Views: 9
The principle of operation of the carburetor
The carburetor can be either purely mechanical or incorporating electronics, but the operating principle does not change. When the engine is running, a reduced pressure is created in the combustion chamber, and air is drawn into the engine, cleaned by the air filter. Gasoline is sprayed into this air stream, turning into something similar to an aerosol. The fuel mixture enters the combustion chamber, where it is ignited by a spark and moves the piston. The cycle repeats.
For smooth engine operation, the fuel mixture must be optimal. It is important to consider not only the model of your two-wheeled friend, but also climatic conditions and engine wear. The carburetor installed on a moped always supplies the same portion of fuel, regardless of the speed gained and the time of year. You will have to adjust the device manually.
There is no need to do this often. But if you are lazy, the consequences can be unpleasant: increased fuel consumption, faulty spark plug, engine wear due to overheating. To prevent this from happening, you need to monitor the condition of the scooter. If the engine begins to “overeat”, it is difficult to start, and black smoke comes out of the exhaust pipe, it is worth checking. It may be time to properly tune the carburetor, although other systems may be the problem.
Idle speed adjustment
When idling, the engine runs normally but does not use fuel to keep the wheels spinning. When you press the throttle, a choke in the carburetor rises, preventing the fuel mixture from flowing. The higher the damper, the more fuel will have time to enter the combustion chamber. Accordingly, at idle speed, the fuel mixture entering the chamber is only enough to prevent the scooter from stalling. If the adjustment does not work correctly, then at idle speed the engine will consume more gasoline than necessary. But gasoline still costs money. In addition, this causes the engine to overheat.
There is an idle air adjustment screw on every carburetor; all you have to do is find it and select the appropriate screwdriver. The exact location of the screw for your model can always be found on the Internet. For example, adjusting the carburetor on a Honda Dio scooter takes place without any problems. In its original carburetor, the idle speed adjustment screw is in the center, and the mixture quality screw is on the left. But on a Chinese moped, most likely, there is a carburetor with a single screw, which is responsible for adjusting the idle speed. The sequence of actions will not cause difficulties:
- Turn on the engine and let it warm up. Don't turn it off.
- To increase speed, turn the screw clockwise.
- To lower, respectively, counterclockwise.
- After each turn, run the engine for two minutes.
- If it runs smoothly, then the idle speed is adjusted.
Adjusting the mixture quality
When the fuel mixture in the cylinder burns, the ratio of gasoline to oxygen must be strictly 1/15. Unfortunately, the carburetor cannot know exactly how much oxygen is in the air. For example, there is much more of it in cold, winter air, and if the carburetor was adjusted in the summer, the spark plug may be flooded.
How to properly adjust the carburetor on a Honda Dio 34 scooter
I've driven about 100km on them, maybe more.
I drove 30 mph at the end of the day and accelerated to see how long it would go (55 mph). Passed the test =) drove on. It was like I was driving at 40 and suddenly it was as if a spark plug was flooded and the exhaust became louder in sound and the speed dropped to 30. I think the brain needle is floating. I continued to gas the food normally. I arrived, put it in the garage, 3 hours later I came to start it, it started smoking, but it worked smoothly. He sat down a little. I give it gas and it doesn’t move. Eventually it stalled. It starts but doesn't want to run any further. Disassembled. I see the tip of the oil scraper ring is broken off. Plus I also found out that the piston was turned 180 degrees =). I replaced the rings, set the piston as it should, with the “X3” mark closer to the exhaust manifold (there are scuffs in the cylinder, but not fatal). I'm starting it up. again the same thing. It works fine at first with a good spark plug, then I hold the gas a little. I'm pumping up the gas. Eventually it stalls. I start it again with a kick 3 times, it works for a few seconds and then stalls. If you turn off the gas it doesn't pull. I unscrew the spark plug and look. throws oil. The carburetor did not turn, everything was as it was driving and still standing, the cables were fine. What could be the problem? I blame the oil pump. but why should it break so suddenly?
If you change the spark plug, it first starts to work as it should, then it throws oil on again and the same crap starts again. Vozduhan filmed the same thing without him.
Tell me what the problem is. Thanks in advance!
Nikolay (Akeisha) I installed the rings correctly. look, the letters must go to the muffler and the red cube on the rings must be on top. Did you put another ring under the oil ring like a darn***?
Artem (Vajran) Try adjusting the carburetor
Andrey (Bariah) It seems to me that there is something wrong with the oil pump control. Perhaps the cable is jammed (broken, which is very doubtful) in the open position and it does not return back. Identified through the hatch under the seat. When the throttle is fully open, the marks on the oil pump should match.
Igor (Carme) Maybe the muffler is clogged? If it's clogged, I don't drive more than 30 km..(((
Dmitry (Wioletta) definitely installed the rings correctly =) this is at least my first scooter, but how to install it, I’m not a fool. I installed new rings again. also crap. PUT IT CORRECTLY!
I didn't even touch the carbure. I drove normally... after 2 hours of inactivity it started to do weird things. Weird.
the cable is fine. the marks match.
The muffler has nothing to do with it. he works, there is no traction. covers the candle with oil.
Nikolay (Akeisha) in short, try to remove the oil hose so that it works on gasoline and try to drive if it’s ok, just mix the oil into the gasoline and that’s it
Andrey (Bariah) And the engine without oil will successfully lick the chrome from the rings, the compression will drop and hello. Or it might just jam. So you should try it right away with gasoline and oil. But I still think the oil pump can be repaired.
Serega (Loana) tell me what the problem is, I start the scooter and something starts knocking, they say maybe the crankshaft bearing needs to be changed. Does anyone have any thoughts on this?
Valdemar (Gualtiero) may have broken the knee bearing on the variator side.
Kolya (Dicey) Nikolay, yes I did
Alexander (Bayard) immediately fills the spark plug as soon as the engine is started. and it drips onto the wheel, one might say. and the level in the barrel immediately dropped.
Max (Qadeer) Tell me guys. Honda dio! The moped works, but the spark plug is filled with oil, the oil pump cable is adjusted, even at idle it throws, the carbur inside is covered in oil. The muffler was burned out, the air filter was removed, the piston was changed. Why is there a lot of oil coming in and the pump has failed? Can the pump break in the other direction and pump to the maximum even at idle?
Max (Qadeer) Who will tell you what.
Yarik (Valeska) is worth considering as an option - the candle was not selected correctly (heat number - less is needed)
Tags: How to properly adjust the carburetor on a Honda Dio 34 scooter
How to disassemble, clean, configure, adjust, assemble the carburetor of a Honda dio scooter.
fills the carburetor Vladimir | Topic author: Arthur
After yesterday's trips there was minimal fuel left in the tank. I refueled. Started up and drove on. Then the scooter began to stall. I paid attention to the air filter. Gasoline was leaking from it. I took it out to dry. After that, the scooter was difficult to start + gasoline leaked from it. This is where the air filter is put on. I tried to lean the mixture to no avail. I thought of removing the hose supplying gasoline to the carburetor in order to empty the carburetor. The scooter started up and even worked stably. Having put the hose back on, it started to flood again. The carburetor has been adjusted correctly. Yesterday I was driving home without an air filter. It seemed to be driving normally, without failures. Help, where should I go next? Maybe someone had such a problem. I wanted to reset the carburetor yesterday, but it was a little dark and I didn’t have a screwdriver at hand.
Features of setting up the carburetor of a 2-stroke scooter
Some mopeds have their own characteristics. Perhaps the simplest carburetors are made in China. And a 2t scooter has a simpler carburetor than a four-stroke. Adjusting such a model should not be a serious obstacle. However, there are some peculiarities here too. It should be noted that the needle in the 2t carburetor determines the quality of the mixture only while the throttle valve is not raised all the way. Otherwise, the fuel jet has a much stronger effect. There is also a connection with the idle system, but not on all models.
In 2T carburetors, the fuel level is much more significant than in 4T carburetors. You can set up the float chamber according to the instructions above; there are no significant differences, although the jets are different.
Scooter rider
A scooter can have many breakdowns and malfunctions and they always arrive at the wrong time. One of these breakdowns is when the carburetor on a scooter floods. In this article we will look at the following questions: – Why the carburetor on a scooter floods – Symptoms of a carburetor on a scooter flooding – How to fix this problem
Symptoms of a flooded carburetor on a scooter
If the carburetor is flooded , this can be determined in simple ways. The manufacturer of your vehicle is of great importance. Because Japanese scooters are very different from Chinese ones. In our case, the main symptom that the carburetor is flooded in a scooter is a wet spark plug. If the scooter stalls, jerks, or does not work confidently, you need to check the spark plug. If you have a Chinese scooter , then in addition to a wet spark plug, you may find that gasoline is leaking from the air filter.
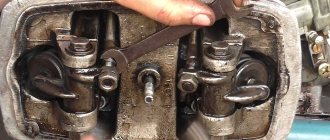
First you need to check that the valve clearances are set correctly. If everything is fine with this, then we are looking for what could be wrong.
- Check the shut-off needle in the float chamber. Dirt can get under it and jam it, so the needle can no longer close the hole tightly and the fuel supply to the carburetor is disrupted. In this case, fuel may leak even if the engine is turned off. Also check the tongue on the floats. It may be bent or vice versa, this also disrupts the fuel supply. In general, you need to be very careful with these things. There is no need to go there without a good reason.
- If option 1 did not help, then the next reason why the carburetor on a scooter is flooded is the vacuum valve , or rather its malfunction. This is a kind of pump that can simply pass fuel into the carburetor, which leads to carburetor flooding. The vacuum valve may not perform its functions due to a cracked membrane. As a rule, the reason why the carburetor on a scooter is flooded is one of the first two. Although it may also be that the air filter is clogged. In this case, no air will flow into the carburetor, there will be no pressure, this can lead to carburetor overflow.
- If the carburetor is filled through the air filter , then this can be easily checked. You just need to remove the filter. If after this the problem is solved, then the problem is in the filter and you need to clean it.
- And as an option, although extremely rare, the jets are clogged. In this case, you just need to clean the carburetor , this will solve the problem.
We looked at the most important and common problems why the carburetor on a scooter floods . If you have any questions, you can leave them in the comments.
Features of tuning the carburetor of a 4-stroke scooter
Tuning the carburetor on a four-stroke scooter is not as difficult as it might seem. Although problems can arise at any stage, the fuel delivery system is still a fairly delicate device. But all difficulties can be overcome if you follow the instructions and carefully read the manufacturer’s recommendations.
Carburetors on four-stroke scooters are similar to each other, so the instructions are suitable for both the delta moped and the domestic automobile industry. Although electronic systems are gradually replacing mechanical ones, the main advantage of the carburetor is its reliability. Therefore, it will be possible to meet the iron horse with him for many more decades.
Causes of overflow
Let’s say that there is no doubt that the carburetor began to pour gasoline mercilessly. What to do next? First of all, it is important to determine the cause of the problem. By answering the question “Why is the carburetor flooding?”, any vehicle owner will be able to fix the problem on their own. Often the cause of such a breakdown is one of the following:
- There is a malfunction in the needle valve. A similar “sore” often affects the carburetor on a moped and similar components on a trimmer or similar devices. A malfunction of the needle valve often occurs due to its loss of a sealed state, in which it promptly and completely closes the fuel channels, thereby dosing its supply. If the valve is heavily worn or “stuck” in the open position, gasoline overflows cannot be avoided. This unit can be checked for correct functioning by supplying discharged air to it; during normal operation, the needle should stably close the fuel paths and not allow air to pass through;
- The float in the float chamber is either leaking or touching the walls of the carburetor. The owner of any carburetor unit is not insured against this kind of problem. You can check the normality of the float by removing the float chamber cover and conducting a detailed inspection of the unit;
- The level in the float chamber has increased or the one that was present all the time has ceased to be relevant. This often happens when a motorcycle, moped or car has had a faulty component for a long time that increases fuel consumption. The part has been replaced or successfully repaired, but gasoline continues to be supplied in the same quantities. As a result, it turns out that the carburetor is “flowing”. Checking for the presence of such a problem is carried out exclusively by an empirical method, that is, by “playing” with the fuel level in the float chamber;
- The fuel pump is faulty. Perhaps this is also a problem from which it is impossible to insure yourself. It appears for only one reason - the fuel pump has failed due to some of its elements. In such a situation, all that remains is to disassemble, inspect and repair the broken part;
- The check valve that returns gasoline to the fuel line when there is overflow in the float chamber has broken down. Relevant for any Solex carburetor and similar components. You can check for a problem with the “return” by disassembling it, visually inspecting it, and blowing it with compressed air. If such manipulations do not correct the situation and no other problems are observed, then you should think about replacing the check valve.
The reasons described above for the carburetor overflowing on a scooter, car or other unit occur in 80-90% of all cases during a breakdown of this kind. Much less often, gasoline overflow occurs due to a malfunction or incorrect configuration of individual elements of the fuel distribution unit. Mainly affected are rubber nozzle seals, power mode economizers, throttle valves, solenoid valves, carburetor gaskets and mixture quality adjustment screws. The functioning of these elements is checked by disassembling the carburetor and inspecting it in detail, followed by subsequent repair measures.
Recommendations for carburetor tuning (video)
Despite all the difficulties and apparent complexity of the device, adjusting the carburetor on a scooter is possible both at home and in the field. It is recommended to carry it out at least once a season, especially during frosts - this will avoid flooding the candle. If your old engine starts to feel bad, adjusting the carburetor can extend its life. Although the moped will lose a little power. And yet, with the help of proper carburetor settings, you can make life much easier for yourself and your iron horse.
Debris that can cause gasoline to enter the air filter
The main sources of debris in the fuel system are:
- gasoline filled at an untested station, especially immediately after the fuel truck has left;
- rust from the inside of the tank, for example, coming off after hitting the gas tank;
- carburetor gasket elements crumbling due to physical aging;
- dirty fuel filter;
- the external environment, or rather a careless attitude towards the refueling process, when foreign debris gets into the gas tank.
This problem is especially relevant for scooters and motorcycles not equipped with fuel filters.
The debris, following into the carburetor, falls under the shut-off needle located in the float chamber. As a result, it does not descend into its seat and is not able to block the fuel channel.
To correct the problem, you need to disassemble the carburetor. After removing the float, remove the needle and put it in a dust-free place. Using compressed air, you need to blow out the carburetor. When reassembling the fuel system, it is important to protect it from debris, otherwise gasoline will end up in the air filter again.
To facilitate diagnostics, if possible, you can install a similar carburetor on your vehicle. If gasoline gets into the air filter even with a new unit, you should continue troubleshooting without wasting time disassembling the carburetor.