Tools and materials: 17 (or 19) socket wrench, 1 liter container, preferably wide so as not to tip over, funnel, some gasoline, rags.
Although there is nothing supernatural in this, we will describe the process for beginners.
First you need to warm up the engine for 5-10 minutes. This will thin the oil, making it easier to change, and will also lift and mix dirt (if any) with the oil.
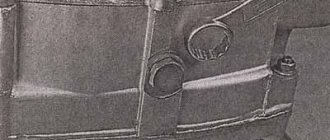
It is also advisable to clean the area around the filler and drain holes of any dirt. The filler is located on the left side, next to the generator flywheel. There are usually two drain holes - one at the bottom of the engine, the other on the side, on the left (see photo).
Unscrew the cap (also the dipstick) of the filler hole. Without this, the oil will not drain. Next, slowly unscrew the drain hole nut. It is better to unscrew the bottom drain to rinse the metal filter. Be careful, there is a spring on the nut that can jump, and a filter, don’t lose them. Remember how they are located. You'll have to get a little dirty, it's not fatal)). While the oil is draining, wash the nut, filter and spring with gasoline. As soon as it drains, you can still rock the moped to the sides and drain it a little more.
Tighten the nut with the filter and spring. Let's start filling in new oil.
Using a funnel, fill the crankcase with oil. Be careful here - you need to pour slowly, and of course, leave room for air to escape. At the same time, we make sure not to overfill the crankcase. The first 700 ml can be poured safely, then more carefully - different mopeds require from 800 to 1000 ml of oil. It is necessary to eliminate both shortage and excess of oil. Excess can be removed using an empty tube of gear oil - these tubes, as a rule, have a long spout, which is just suitable for our case. Check the level using the dipstick.
Ready. Check the level periodically, top up if necessary.
Motorcycle oil must be used for four-stroke engines. Viscosity depends on the engine and time of year. Read more about scooter oils.
See the manual for replacement intervals. If it is not there, usually the first oil change is done after the first 300 - 500 km. The second after 1000. Then every 2000 - 4000. (On my Baotian every 3000 km).
Everyone who takes the path of a motorbike enthusiast is faced with the problem of choosing and changing oil for a scooter or motorcycle. While some people change it immediately after purchase, others travel several thousand kilometers and only then change the oil. But there are also those who do not change it at all; this, of course, does not last long. To choose which oil is suitable for your scooter, you need to know the type of engine of your scooter. There are two-stroke (2t) and four-stroke (4t) scooters. Accordingly, there is oil for 2t and 4t scooters. For each of them there are three types of oil: mineral, synthetic and semi-synthetic.
Let's decide on the type of oil that suits your scooter. To do this, determine the type of engine: two-stroke or four-stroke. After this, you can start making your selection.
How much oil for 5 liters of gasoline for a boat motor?
A typical outboard motor fuel mixture contains fuel and oil in a ratio of 50:1, that is, 100 ml of oil for every 5 liters of gasoline. During break-in, the oil content in the fuel mixture should be increased to a ratio of 25:1, that is, 200 ml for every 5 liters of gasoline.
Interesting materials:
How are period and frequency related? How to link your Steam account to Uplay? How to connect Instagram and messenger? How to link Uplay account to Epic Games? How to connect Uplay and Twitch? How to contact Instagram? How to contact the magnet store? How can I contact Microsoft? How to contact the outlet manager? How to contact life operator Belarus?
Preparation
To ensure that all the used oil leaves the engine without any residue, the engine should be thoroughly warmed up before changing the oil. Or, what would be best, start changing the oil immediately after a 5-10 km trip.
The second preparatory stage is that we need to prepare in advance a flat area on which to install the scooter in the most level position possible and prepare a suitable container for used oil.
The tools you use also play an important role. Don't skimp - buy a new head with a knob. You will only need two of them: for 17 and 10. Those who neglect this point pay dearly later, and out of their own pocket.
Changing the oil in the gearbox
At the very bottom of the engine, on the left side in the direction of travel, we are looking for the drain and filler plug of the gearbox. The filler plug is located on the side or on top, and the drain plug is always at the bottom.
Place a container under the drain plug and unscrew both plugs.
We wait about ten minutes until the old oil drains from the gearbox.
We wipe the drain hole and plug dry, apply sealant to the plug and screw it into place.
Let's take the oil. I take a liter canister, it’s cheaper and lasts for about 10 replacements. If you change oil infrequently, buy a special tube of branded oil for scooter gearboxes. There is more than enough of it for one replacement, and without unnecessary headaches, pump it into the filler hole using a special spout.
For those who prefer to save money, there is only one thing left to do: pump oil into the gearbox in small portions using a regular syringe. Unfortunately, there is no other way to fill the gearbox with oil because the filler hole is too small.
Checking the oil level in the gearbox
We pump oil into the filler hole, also known as the control hole, until it begins to flow out of it. As soon as the oil starts to flow, stop pouring, wait a couple of minutes for the excess to drain, and tighten the plug.
On some models of scooters, there is no control hole through which we can determine the required oil level and instead there is a filler located on top of the gearbox and a drain. In this case, the recommended oil level should be marked on the engine crankcase. This simplifies the work: measure out the required amount of oil and pour it through the filler hole into the gearbox.
Tool and material:
17 (or 19) spanner, 1 liter container, preferably wide so that it doesn’t tip over, funnel, some gasoline, rags.
Although there is nothing supernatural in this, we will describe the process for beginners.
First you need to warm up the engine for 5-10 minutes. This will thin the oil, making it easier to change, and will also lift and mix dirt (if any) with the oil.
It is also advisable to clean the area around the filler and drain holes of any dirt. The filler is located on the left side, next to the generator flywheel. There are usually two drain holes - one at the bottom of the engine, the other on the side, on the left (see photo).
Unscrew the cap (also the dipstick) of the filler hole. Without this, the oil will not drain. Next, slowly unscrew the drain hole nut. It is better to unscrew the bottom drain to rinse the metal filter. Be careful, there is a spring on the nut that can jump, and a filter, don’t lose them. Remember how they are located. You'll have to get a little dirty, it's not fatal)). While the oil is draining, wash the nut, filter and spring with gasoline. As soon as it drains, you can still rock the moped to the sides and drain it a little more.
Tighten the nut with the filter and spring. Let's start filling in new oil.
Using a funnel, fill the crankcase with oil. Be careful here - you need to pour slowly, and of course, leave room for air to escape. At the same time, we make sure not to overfill the crankcase. The first 700 ml can be poured safely, then more carefully - different mopeds require from 800 to 1000 ml of oil. It is necessary to eliminate both shortage and excess of oil. Excess can be removed using an empty tube of gear oil - these tubes, as a rule, have a long spout, which is just suitable for our case. Check the level using the dipstick.
Ready. Check the level periodically, top up if necessary.
See the manual for replacement intervals. If it is not there, usually the first oil change is done after the first 300 - 500 km. The second after 1000. Then every 2000 - 4000. (On my Baotian every 3000 km).
What happens if you don't follow the manufacturer's recommendations?
If the rules for preparing fuel and lubricant mixtures are violated and the proportions are not observed when adding oil to gasoline with the Shtil 180 chainsaw, the following problems arise:
- With increasing friction, the wear of the working surfaces of parts will increase.
- Due to insufficient lubricant, the bearings will begin to fail.
- The full functioning of mechanical components is disrupted due to premature wear of parts, and their service life is significantly reduced.
- When using low-grade gasoline and oils, the performance of the unit decreases with subsequent breakdown of important components and parts.
The fuel is prepared before refueling the saw, avoiding unnecessary contact with oxygen. After finishing the work, the remaining mixture must be drained.
Signs of misuse
Using a dirty or disproportionate mixture can cause serious engine problems. If you make a mistake when mixing, it’s okay, because the car itself will tell you about it. You just need to be attentive to some signs, including:
- The appearance of dirt and various deposits on the carburetor.
- Rapid contamination of the fuel filter located in the gas tank.
- Oxidation of the carburetor walls and loss of elasticity of the rubber diaphragm in various parts of the gas tank. This symptom appears only when the unsuitable mixture is stored for a long time directly in the gas tank of the car.
This is interesting: What antifreeze can be mixed with each other?
What kind of gasoline should I put in a 2-stroke scooter?
Sometimes the documentation does not contain clear recommendations on the choice of fuel. In this case, you need to take into account the characteristics of the engine, or more precisely, its compression ratio. If this indicator is low, then it is better to choose the A-92. This fuel is suitable for almost all two-stroke vehicles.
Interesting materials:
How to transfer contacts from iPhone to iPhone with another account? How to transfer contacts from iPhone to Android using the application? How to transfer contacts from iPhone to another phone? How to transfer contacts from iPhone 4 to computer? How to transfer contacts from a SIM card to iPhone 4? How to transfer a copy of WhatsApp chats from iPhone to Android? How to transfer media library from iPhone to iPhone? How to Transfer MP3 to iPhone? How to transfer music from iPhone to iPhone without a computer? How to transfer music from iPad to iPhone?
Changing engine oil
Draining used oil
We place the scooter on the center stand; if it is crooked, we straighten it. On the left side in the direction of travel of the scooter, at the very bottom of the engine, look for the drain plug, place a previously prepared container under the plug and unscrew the drain plug with a 17mm head.
While the oil is draining, go to the right side of the scooter and unscrew the dipstick and the oil filter plug, which is located at the very bottom of the engine.
We put a good 17 socket on the plug, unscrew it and remove it with all its contents from the engine.
This is the oil filter. Immediately after unscrewing it, while the point is still important - throw all this junk into clean gasoline, give it a good shake, and then blow it out and dry it.
After the oil filter plug is removed from the engine. In order to remove any remaining oil from the engine, pump the engine several times using the kickstarter.
Then we wait about five minutes - wipe the drain holes dry, for greater reliability, apply sealant to the plugs and screw them into place.
Filling the engine with new oil and checking its level
Depending on the design of the canister, pour oil into the neck either directly from the canister itself or through a funnel. The funnel must be clean!
Oil level control
The oil level is checked as follows: pour the first portion of oil into the engine, approximately 600-700 ml, wait a couple of minutes until the oil spreads evenly over the crankcase without twisting, insert the dipstick all the way into the filler neck, remove it and check the level.
The oil level must be within the control area.
- If the level is lower, add a little oil, wait a couple of minutes and take a measurement.
- If the oil level is higher than normal, drain it or, better yet, pump it out using a syringe with a tube from the neck.
The control area is indicated by red arrows. In my case, the oil level is exactly in the middle of the control section and is indicated by a blue arrow. Ideally, the oil level should be near the upper boundary of the control section. But this is ideal, but in practice, the average level is quite acceptable and does not in any way affect the reliability and durability of the engine.