Good afternoon everyone! In this review we will talk about perhaps my most exciting DIY project, which brought such a lot of positive emotions to both children and their parents. We will make a children's tricycle (trike) from an old Chinese mini-Segway/hoverboard and a children's bicycle. As always, in the review I will present in detail the available components and components used, the process of manufacturing and assembling the design of a tricycle with rear suspension, preparing and installing electrical components, setting parameters and firmware of the motor-wheel controller for comfortable riding and control. The review turned out to be quite voluminous, I tried to present all the main points and features of the implementation of the task, so I will have to allocate considerable time to familiarize myself with the material in detail.
I will immediately ask mechanical engineers, electrical engineers and programmers to forgive me for errors in the terminology I use, I am just trying to understand this, please treat it with leniency, as a review from a construction linguist).
Tools and materials
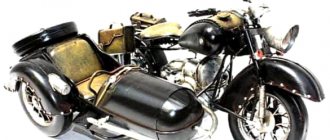
A good option would be to make a vehicle from an Alpha moped. Instead of standard propellers, it is recommended to use wheels from an Izh motorcycle. But you can get a good device from Dnepr. Even models from very old series are suitable, including those in extremely worn condition.
For the rear part, use car wheels. The ideal donor for wheels and axles will be VAZ cars of any model.
Sometimes a tricycle is also obtained from the Voskhod motorcycle. The basic mechanism has excellent speed characteristics, which increases the significance of this option. The gearbox is taken from any cargo scooter. The body is made by hand. It is advisable to install forced cooling and change the gear ratio.
When they say that a three-wheeled vehicle is made from a chainsaw, they mean that the engine was taken from there. Of course, you can use motors only from the most powerful saws as a basis. The remaining components are:
- frame made of ordinary VGP;
- wheels and axles removed from garden carts;
- a driven sprocket and chain taken from a bicycle;
- small leading star with D-6;
- handcrafted wings.
If you decide to make a three-wheeler from an “ant,” then additional components are usually taken from Izh motorcycles. The engine and variator can be anything, even made somewhere in Asia in semi-underground conditions. The frame, gearbox, hubs and shock-absorbing unit are removed from the “ant”. The axle shafts are borrowed from VAZ.
Hydraulic components and brakes can be collected from the Minsk motorcycle. But experienced experimenters sometimes even make them themselves.
One original and quite convenient variation is a three-wheeled vehicle made from a pit bike. Despite the “childish” purpose of the original vehicle, it can turn out to be a real all-terrain vehicle that can overcome off-road conditions perfectly. On the ATV, part of the stationary axle is cut out, leaving the factory brake and main sprocket. You can add a differential, but then you will have to deal with scrupulous alignment. FYI: An excellent trimmer tricycle can be created based on the Champion.
It is appropriate to complete the analysis of possible options using the example of three-wheeled transport from OKI. It is rarely used in its pure form; it is much more correct to create “hybrids” with motorcycles such as “Ural”.
For the work itself you will need:
welding machine (an inverter is possible, although not necessary);
- electrodes of a suitable type;
- grinder (for cutting and grinding metal, removing burrs);
- spanners;
- screwdrivers;
- electric drill;
- other tools and components - at personal discretion.
Manufacturing
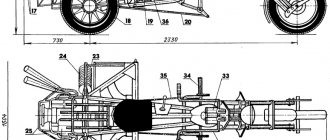
It is not necessary to study and draw up complex drawings; experienced DIY enthusiasts can make a device based on the general diagram. This shows the outline of the front windows, the cabin, the front end, and the general configuration.
And here the main possible sizes are already shown. The distance between the wheel axles is 1.23 m. Between the extreme steering point and the center of the rear wheel, the distance is 0.98 m.
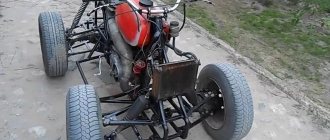
Making a homemade tricycle with your own hands is possible even practically from scrap metal. One of the possible options is characterized by simplicity of design. The main parts will be:
- CVT engine from a scooter and a wheel from the same;
- rear wheels from garden wheelbarrows;
- steering wheels and seats from any cars;
- steering knuckles from GAZ-21;
- pipes and other components.
The tricycle frame is assembled from pipes. Only the rear suspension is used, and the front is simply not provided. You can make the steering rack with your own hands.
You can also consider making a tricycle step by step at home based on the old Zaporozhets car. They start by removing the engine and gearbox.
Next they select:
- wires;
- rear suspension;
- seats;
- any components related to the operation of the clutch and brake units.
It is better to throw away all other components except those listed or use them in another way. Additionally, you will need various pipes and channels in large quantities. They begin work by preparing the transitional wheel fastening elements. The rear segment of the frame is welded from channels. The front fork parts will need to be carefully polished and coated with a layer of chrome; Maximum attention will have to be paid to the frame, because it is the work on it that is most difficult.
The following manipulations are:
- manufacturing seat frames from bent pipes;
- covering this frame with leather;
- chrome plating of the fuel tank;
- laying out all the necessary wiring;
- formation of the dashboard.
Tricycles with Lifan engines are quite common. You can take various models of Ural motorcycles as a basis.
- The solution with a reduction gearbox and an automatic clutch system is not very complete - in the forest and over rough terrain you can accelerate to a maximum of 25 - 30 km/h. It is worth considering that, according to many enthusiasts, the power is 6.5 hp. With. enough even for devices weighing about 500 kg.
- But sometimes they try to assemble a tricycle with a motor unit from a walk-behind tractor. The frame is welded from round pipes. To increase cross-country ability, it is worth abandoning the suspension and mounting the structure on low-pressure tires. A small shock absorber is usually located under the seat. It is preferable to use air-cooled engines with a centrifugal clutch.
- The wheels are assembled by attaching ATV tires to traditional car rims. Rear chains should be taken from motorcycles. The rear wheels are usually equipped with 77-tooth sprockets. Such a device can reach speeds of up to 45 km/h. In general, this assembly is quite convenient and works stably.
- The construction of an excellent all-terrain tricycle, suitable even for difficult off-road conditions, is possible on the basis of the Izh Planet motorcycle. The “flat” wheels from GAZ cars contribute to increased cross-country ability. Tires of the 66th model after stripping become significantly lighter without losing any of their capabilities.
It is recommended to cut a new tread that can successfully overcome virgin snow, slushy mud and soil. The gearbox and rear axle can be taken from a Zhiguli.
It's also worth considering a mini-tricycle. To work you will need:
- kart wheels;
- brake drums;
- gasoline engine;
- steel pipes;
- housing bearings;
- a number of other smaller details.
The use of kart wheels is attractive because they are immediately equipped with a mount for attaching an axle. If we talk about original designs, then it is useful to take a closer look at reverse tricycles. Instead of the usual design (one wheel in front, two in back), it uses two front and one rear wheel. The steering is quite comfortable and differs little from conventional solutions. The rider can turn either by turning the wheels, or by moving the axle and tilting the wheels relative to each other.
Electric homemade tricycles are also quite common. They usually use brushless electric motors. Each wheel will have to be equipped with its own set of disc brakes. They are activated when you press the steering brake lever. The steering wheel, which turns the front wheel, is complemented by the front part of the tricycle frame that tilts to the sides.
It is the inclined connections that guarantee the vehicle’s rapid deflection to the side.
It would be impossible to achieve the same with a rigid structure. If you make a tricycle on tubes instead of simple wheels, then it also acquires the properties of a swamp vehicle. Motorcycles from the Izh Planet line and other unpretentious bikes are usually taken as a basis. No special turning work is required; It is worth considering that for winter use tricycles are usually also equipped with a cabin.
DIY tricycle from Zaporozhets
- Alexey Smirnov from Nizhny Novgorod, built an original trike. An old Zaporozhets 968 M was used as a donor.
- Then, the author took up the grinder.
- The Zaporozhets had to be cut in half, a frame made of a 50 x 30 profile pipe was welded to the rear of the car.
- The engine and gearbox remained from ZAZ.
- The front part of the motorcycle frame is welded to the car frame, along with the front fork. A homemade steering wheel and lighting equipment were installed.
- The rear body panel is also sawed off for better engine cooling and originality.
- It turned out to be an excellent tricycle, a weekend machine.
- A homemade tricycle with a 1.2 liter engine reaches speeds of up to 90 km/h.
Result
The trike turned out to be quite suitable for use. Of course, there cannot be special dynamics with such power, and it is not needed. As I already said, the average speed in the forest rarely exceeds 25-30 km/h, and even then on a relatively flat surface. The power of this engine is enough to confidently maintain a speed of around 20-25 km/h in 4th gear. Then there just isn't enough momentum. I'm thinking of increasing the maximum speed with the help of stars. Now with 15 teeth on the motor and 35 teeth on the gearbox, the speed is as follows:
- in 1st gear - about 3-4 km/h;
- on the 2nd - 6-8 km/h;
- on the 3rd - 14-17 km/h;
- in 4th - up to 24 km/h.
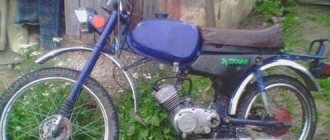
Homemade swamp tricycle on IZh Planet
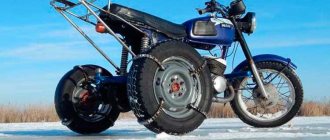
The design of this homemade swamp vehicle is so simple that almost any car enthusiast can repeat it in his own garage. The basis of the swamp vehicle is the IZH Planet 3 motorcycle. IZH Planet motorcycles often become donors in all-terrain homemade vehicles, this is primarily due to the endurance and unpretentiousness of their engines.
The bridge was taken from a Muscovite and modernized. We cut out the bearing mounts from the doll with a grinder, then welded the yoke to the bridge stocking (if it is not welded, the stocking will warp when you cut it in half), then cut the stocking itself in order to secure the sprocket. The chain tensioner was also borrowed from the combine.
The KF-97 cameras are used from the agricultural trailer of the T-150 tractor. The tire for such a tube wheel is the same tube, only cut to a smaller diameter. First, the “tire” is put on, then it is tightened with belts. The transverse harnesses turned out to be 1.02 m long, and the longitudinal strip was 3.5 m long. The width of the longitudinal strip is 30 centimeters. The transverse belts with the longitudinal strip are connected using bolts.
The basis was taken from cornfield disks, cut in half using a small grinder and extended by 30 centimeters with steel plates welded between the disk halves (6 plates in total). The disc is covered with a chamber from a VAZ car, cut to a larger diameter. Since the disks were used from a Niva, and the axle from a Muscovite, the rear disks at the mounting points had to be trimmed.
Frame, brakes and transmission
The motorcycle frame has been lengthened and strengthened. To prevent the pendulum fork from “walking”, it was welded. The chain and sprockets are borrowed from the combine. Their ratio is 2 to 1. A small star with 25 teeth, it is attached to the drum using eight hardened 10-point bolts. A large star with 50 teeth. The braking system of a swamp vehicle is no different from any other, so the brakes are left unchanged. But the drum was modernized to accommodate sprocket mounts.
Project budget:
| № | Name | Price, rub.) |
| 1 | Hoverboard | 2'000 rub. |
| 2 | Metal. profile | 700 rub. |
| 3 | Barbell | 430 rub. |
| 4 | Foam rubber/glue/eco leather | 800 rub. |
| 5 | Fasteners | 500 rub. |
| 6 | Tires/tube | 800 rub. |
| 7 | Knob/button/terminal blocks | 950 rub. |
| 8 | Shock absorber | 650 rub. |
| 9 | Bike | 1'500 rub. |
| 10 | Paint/primer/varnish | 960 rub. |
| 11 | Programmers | 250 rub. |
| — | TOTAL: | 9'540 rub. |
That's all! If you have questions, I will try to answer. If there are suggestions for refinement and improvement, let’s discuss it together, especially since this is already the second review on this topic.
Do-it-yourself tricycle assembly from the Urals
Before starting work, it is necessary to think through the design of the future tricycle and the location of all elements. Ideally, make a drawing of the future vehicle.
Important design points:
- All joints must be reinforced.
- Car cups are welded to the top beam. It also serves as a support for shock absorbers.
- Frames are welded to the central beam, which serve as footrests for passengers and also support the suspension bump stops.
- The base for the pedal weights is the lower transverse tube, which is attached to the frame.
- A support for the gearbox is also made on the transverse frame.
- The main difference between a tricycle and a motorcycle is that the engine is located at the rear and therefore the center of gravity of the vehicle is shifted back. When accelerating, such a tricycle rears up a little. Below you can see a diagram of how to convert a Ural motorcycle into a tricycle.
INTRODUCTION.
The idea to implement this project arose when our mini-Segway called “A8,” which is already 4 years old, broke down once again.
The Segway stopped responding to turning the handle, and accordingly the rotation function disappeared. It was necessary to deal with the Hall sensor, but to be honest, I no longer had the desire to do this. The Segway had already begun to show signs of inappropriate behavior: it switched off several times while driving, tilted excessively backwards when accelerating, and it was already becoming dangerous to ride. Therefore, the idea was born to use its motor-wheels and make a tricycle as the simplest design. Having gone online to develop the idea, I suddenly realized that everything had been happening for a long time without me, and my idea had long been worked out by a large number of people). Therefore, before direct implementation, I familiarized myself with the experience of other home-made people, and noted the following main points for myself:
— the tricycle must have a rear suspension, since we live in the private sector, and we do not have smooth asphalt roads near our house (maximum dirt roads rolled with asphalt chips), and driving onto the city roadway is not entirely correct; — the tricycle should be a two-seater, since we have two children, and organized alternate riding, sooner or later, will still lead to loud conflict and complaints; — the tricycle must be assembled on a native controller from a Segway/hoverboard, since many enthusiasts are working on open firmware for boards on STM32/GD32 microcontrollers, which are installed in these Chinese products. It becomes possible to get software fixes, flexible settings, and additional functions, unlike ready-made Chinese controllers for electric vehicles.
The ideological inspiration for my tricycle was the work and videos of the author of the Youtube channel ILYANOV. He developed his own tricycle design, and also made his own alternative firmware for the hoverboard controller for convenient control as a tricycle. It has a free (with maximum speed limitation) and paid firmware version. The amount for paid firmware is more symbolic, but I soon came across other alternative firmware options online, with more flexible configuration and more efficient operation of motor wheels. More on this later. I’ll say right away that I borrowed the idea of the rear suspension from my friend ILYANOV, as a simple and affordable option, but I did not use the frame of the hoverboard itself in my design.
During a short simulation, the following tricycle design was obtained and agreed upon with the children:
Location of tricycle parts
As we have already said, the engine of a Ural tricycle is not located on the main axis, like in motorcycles. It is placed between the rear wheels, because of this, when accelerating quickly, the tricycle easily rears up. But this is a much safer event than on a motorcycle and adds adrenaline and entertainment to the trip.
As a motor, you can use a native motor from the Urals or take a car engine. The main parameter of choice is its capacity between the rear wheels. Be sure to securely fasten it in at least three places. Most often, if the power unit is in good condition, then you don’t even need to do anything to it. And if the engine is old, then you can replace the radiator or some other elements.
Depending on the engine you choose, you will also have to change the exhaust system by installing one muffler for each cylinder.
When converting a motorcycle from the Urals into a tricycle with your own hands, the gearbox is usually installed on the left side, because you usually need to hold the steering wheel firmly with your right hand. You'll have to think a little about how to connect it to the engine, because now the gearbox will be located at a much greater distance from it.
- The standard motorcycle suspension will have to be redone due to the fact that the load on the wheels in the Ural moto tricycle is distributed differently.
- This is done using two consoles and two large springs (aircraft springs are ideal, but car springs will also work). The consoles are connected by levers through which the front axle passes.
- Powerful springs are needed because when moving, a huge load is placed on the front wheel and suspension. The remaining springs can be left as standard motorcycle springs.
Headlight
The engine is not equipped with a lighting coil, so the battery is used as a source of electricity, which is pre-charged before a long trip. In this regard, the standard Ural headlight was replaced with a 9-watt flashlight with 3 LEDs, the light of which is more than enough when driving on light off-road conditions. It was, of course, possible to match the LED to the standard Ural headlight, but I decided to replace it completely. Using a switch on the handlebar, you can turn on either this 9-watt headlight or two 12-watt ones located on the arch.
Gear lever
Initially, the lever was short and suitable for the right hand, which is very inconvenient in movement. Therefore, it was decided to lengthen the lever and bring it under the left hand. Now, in order to change gear, you don’t need to lean over and take your hand off the gas, which is much more convenient.
Muffler
The previous muffler was simply welded to the frame, which limited the engine's movement to tighten the chain. Plus it was too heavy. The new homemade muffler, although direct-flow, reduces engine noise better than its original muffler. In addition, it is not welded to the frame, but bolted, so it does not limit the movement of the engine.
Top chain protection
It is necessary, first of all, so that when overcoming a ford, water does not fountain upward from the chain.
Additional small tool box
There are essential tools there: a set of keys, a funnel for refueling, etc.
Engine switch
Due to the fact that my standard rotary switch broke twice, I decided to replace it with what I think is a more reliable one. I bought it on Aliexpress for about 70 rubles. I attached it to the frame under my arm, next to the engine. It's still working.
Tachometer
I also ordered from China. It cost about 400-odd rubles. Quite a cool and useful thing. Shows the current engine speed and works as an hour meter. But he is afraid of vibration. After a while he simply switched off. An autopsy showed that the battery was soldered there and its negative contact was unsoldered. I couldn’t crawl up and solder it properly, so I pressed the battery down firmly with a sponge and closed the lid. It's still working.
By the way, thanks to the tachometer it turned out that the engine spins up to 4,500 rpm instead of the required 3,600 rpm. The speed controller is probably faulty. In principle, it’s okay, because... I rarely rev it above 3,500 rpm. The tachometer can be adjusted to any gasoline engine, both 2- and 4-stroke. To connect, simply wind the tachometer wire onto the spark plug wire. I actually wound it around a candlestick - it was more convenient.
Gear box
When you make a tricycle from the Ural with your own hands, you definitely need to take into account where exactly the gearbox will be located. You already understand that the engine itself will be off the axle, behind the seat, between the two rear wheels. At the same time, make sure that it is attached as securely as possible in at least three places - especially if you plan to perform various tricks, as described above.
As for the gearbox, it is better to install it on the left side of the steering wheel, since your right hand will be occupied most of the time. It is unlikely that if you take the engine and gearbox from a car, you will be able to make a design that is convenient enough to change gears without stopping driving.
Also don't forget that you need to take care of connecting the box to the motor, which is a bit more difficult considering that it is now located a little further from the box than it should have been in the original. But if you're trying to figure out how to make a tricycle with your own hands, you always need to be prepared for these kinds of surprises and difficulties.
Frame
It will be easier to make an Izh tricycle with your own hands if you have experience in welding and understand the design of motorcycles or cars. The frame will have to be completely manufactured from scratch, have a pre-designed shape and structure.
Usually the calculation is made in such a way as to exclude breakdowns and places with vulnerable structures, so that the trike can travel hundreds of kilometers without maintenance.
Strengthening is achieved by welding corners and additional pipes so that the fork does not vibrate. The basis of the transmission can be taken from a walk-behind tractor or combine harvesters. If you want to get a traction type Izh Planet tricycle, it is better to use sprockets in a ratio of 2:1, i.e. 50 and 25 teeth respectively.
Recommendations
The joints of the frame parts must be reinforced with gussets made of sheet steel. To make the design more correctly, it is advisable not to limit yourself to simple drawings, but to use large-scale models.
It is immediately necessary to provide attachment points:
- engine;
- shock absorber;
- seats;
- fuel tanks;
- pendants
It is advisable to install the engine so that there is a free flow of air around it. This rule is important even when water cooling is used.
You should definitely take care of the appearance of the vehicle. An elegant, attractive appearance is often created through chrome surfaces and individual parts. To make using a tricycle more comfortable, it can be equipped with fog lights, speaker systems, and so on.
The front part is often made on the basis of silent blocks. The rear main rail is equipped with fasteners that support the body. It is advisable to use tractor generators as a source of energy in electric tricycles. The gearbox and axle shafts can be bored to size on a good lathe. The installation of an electric motor capable of pumping additional air will help prevent overheating of cylinders made of aluminum.
Craftsmen never cease to amaze with their ideas; each homemade product is unique and one of a kind.
Tricycle with Chinese engine. Part 2 - Finalization of the design
Hi all! Now the time has come to remove the Chinese Forza engine from the motorized towing vehicle and install it back on the trike, which was discussed in detail in this article. Along with this, some changes were made to the design of the tricycle, which will be discussed in this article. So, let's start with the basics...
If you don’t want to read, you can watch the following video, which repeats the meaning of the article:
It was decided to weld the front part of the trike frame for a more comfortable position for the driver. Before this, the too wide square frame on top was a bit of a nuisance to the legs, and also looked “not very good.”