Do-it-yourself tricycle assembly from the Urals
Before starting work, it is necessary to think through the design of the future tricycle and the location of all elements. Ideally, make a drawing of the future vehicle.
Important design points:
- All joints must be reinforced.
- Car cups are welded to the top beam. It also serves as a support for shock absorbers.
- Frames are welded to the central beam, which serve as footrests for passengers and also support the suspension bump stops.
- The base for the pedal weights is the lower transverse tube, which is attached to the frame.
- A support for the gearbox is also made on the transverse frame.
The main difference between a tricycle and a motorcycle is that the engine is located at the rear and therefore the center of gravity of the vehicle is shifted back. When accelerating, such a tricycle rears up a little. Below you can see a diagram of how to convert a Ural motorcycle into a tricycle.
1, 2 — front wheel and wing; 3 — front wheel suspension system; 4, 5 — headlight and headlight bracket; 6 — speedometer; 7 — gas tank; 8, 9 — gear lever and gearbox; 10 - battery; 11 — seat back; 12 — rear lights; 13 — air filter; 14 — engine; 15 — cooler; 16 — oil-air radiator; 17 — mufflers; 18 — rear wheel; 19 — elastic coupling; 20 — brake rod; 21 — brake pedal; 22 — beep; 23 — rear wing struts; 24 — shock absorbers; 25 — frame for mounting the radiator and muffler; 26, 27 — rear wing and its mounting bracket; 28 — front console; 29 — wing bracket; 30 — rear wheel suspension arms; 31, 32 — gas and brake handles, respectively; 33 — ignition switch; 34, 35 — clutch pedal and clutch rod; 36 — speed switch; 37 - steering wheel.
Location of tricycle parts
As we have already said, the engine of a Ural tricycle is not located on the main axis, like in motorcycles. It is placed between the rear wheels, because of this, when accelerating quickly, the tricycle easily rears up. But this is a much safer event than on a motorcycle and adds adrenaline and entertainment to the trip.
Engine
As a motor, you can use a native motor from the Urals or take a car engine. The main parameter of choice is its capacity between the rear wheels. Be sure to securely fasten it in at least three places. Most often, if the power unit is in good condition, then you don’t even need to do anything to it. And if the engine is old, then you can replace the radiator or some other elements.
Engine for a tricycle from the Urals
Depending on the engine you choose, you will also have to change the exhaust system by installing one muffler for each cylinder.
checkpoint
When converting a motorcycle from the Urals into a tricycle with your own hands, the gearbox is usually installed on the left side, because you usually need to hold the steering wheel firmly with your right hand. You'll have to think a little about how to connect it to the engine, because now the gearbox will be located at a much greater distance from it.
Suspension
The standard motorcycle suspension will have to be redone due to the fact that the load on the wheels in the Ural moto tricycle is distributed differently.
This is done using two consoles and two large springs (aircraft springs are ideal, but car springs will also work). The consoles are connected by levers through which the front axle passes.
Powerful springs are needed because when moving, a huge load is placed on the front wheel and suspension. The remaining springs can be left as standard motorcycle springs.
Battery
A separate frame is usually welded under the battery, which is attached between the engine and the driver’s seat. All the main details are thus arranged in one place. And if you attach panniers to the tricycle, they will completely hide all the important elements.
Coloring
Since a do-it-yourself tricycle based on the Urals is assembled from different parts, as well as other motorcycles and cars, all the parts turn out different and therefore need painting. After painting, it is advisable to apply a clear varnish and polish. And metal elements are chrome plated.
Drifting on a bike. All about custom trikes for serpentine roads
What does a normal person think of when they hear the word “drift”?
Perhaps cars with the appropriate surroundings around them. What does a cyclist mean by drifting...
A good downward slope, an asphalt winding path, three wheels, two pedals, low seating, speed, a good and “fragile” angle and of course - a generous pinch of real custom! – all this is bicycle drift.
Many people have heard about tricycles for drifting, and perhaps many have seen these toys in cool foreign videos, but, of course, this trend cannot be called popular in our country. Trike is an exclusively fun phenomenon, supported until recently by the desire to do something with your own hands.
Now tricycles for drifting are beginning to actively appear on sale. The starting price is $200, the cost of advanced models exceeds the level of $1000 or more. But it is custom trikes that are the coolest component of this unusual cycling phenomenon!
How to make a drift bike
To create a drift trike, an old and broken BMX, or a children's bike on 20-inch wheels, is most suitable.
The bike will need the front part - a wheel, fork, handlebars, stem and a piece of frame with the lower tube of the front triangle, and the rear part - a cart with a beam and two wheels wrapped in plywood cylinders, will be assembled separately and welded to the front part of the future trike.
Pedals on a drift bike are optional - you can do without them by installing pegs on the front of the bike to hold your feet.
If you decide to install pedals, then you will have to solve the issue with idle speed, which will require a “Kulibin” approach to adapting the rear bushing and connecting rods to the frame fork, or searching for specialized parts rarely found in nature.
Some people install a controlled electric drive on a drift trike. We have already written about electric motors on sports equipment, telling you about longboards with a power plant
.
But the pinnacle of custom is installing an internal combustion engine on a trike!
Drift trike with engine. Video assembly instructions from a Russian master
The three-wheeled monster with an internal combustion engine also lives in Russia. It was assembled by the famous Ufa customizer Maxim Klyuch, who recorded the entire assembly process in the form of a series of interesting videos.
Rides
Even in those places on the planet where the number of tricycles for drifting is more than one for the whole city, nothing larger than local mini-competitions or fun rides usually happens.
But its rarity, of course, doesn’t make this entertainment any worse!
Beginning of work
You should prepare in advance for assembling the trike. You will need to find a ZAZ-968 and a Ural motorcycle at a disassembly site in decent condition. From ZAZ you will need an engine, from Ural - most of the components. You will have to make the frame yourself and this is the most difficult stage of the whole undertaking. As a result of manipulations, converting a Ural motorcycle into a tricycle can turn into a presentable, powerful vehicle, no worse than its factory counterparts.
The frame plays the role of a connecting link on which all the parts will be installed. It must be reliable and comply with the drawings. There are only a few nuggets that can produce a similar product with precision up to 5 mm; if you doubt your abilities, it is better to entrust the work to professionals. Before installing the parts, spend an hour and measure the frame with a tape measure, check the locations of the holes and clamps.
Recommendations
The joints of the frame parts must be reinforced with gussets made of sheet steel. To make the design more correctly, it is advisable not to limit yourself to simple drawings, but to use large-scale models.
It is immediately necessary to provide attachment points:
- engine;
- shock absorber;
- seats;
- fuel tanks;
- pendants
It is advisable to install the engine so that there is a free flow of air around it. This rule is important even when water cooling is used.
You should definitely take care of the appearance of the vehicle. An elegant, attractive appearance is often created through chrome surfaces and individual parts. To make using a tricycle more comfortable, it can be equipped with fog lights, speaker systems, and so on.
The front part is often made on the basis of silent blocks. The rear main rail is equipped with fasteners that support the body. It is advisable to use tractor generators as a source of energy in electric tricycles. The gearbox and axle shafts can be bored to size on a good lathe. The installation of an electric motor capable of pumping additional air will help prevent overheating of cylinders made of aluminum.
Craftsmen never cease to amaze with their ideas; each homemade product is unique and one of a kind.
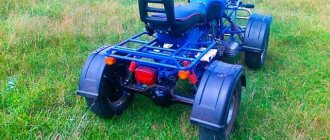
Purpose of a 3x3 all-terrain vehicle
The vehicle in question is designed to overcome any off-road conditions. The tricycle will go through forest paths, sand, mud, ice, shallow water and shallow snow.
ATVs are popular among hunters and fishermen.
Owners appreciate the increased cross-country ability, compactness, and maneuverability of the unit.
Such modifications are of interest to residents of the outback and villages. All-terrain vehicles will confidently overcome country roads, reaching speeds of up to 60 km/h. Moreover, the price of such a vehicle (especially a home-made one) is an order of magnitude lower than its automobile counterpart or ATV.
Peculiarities
A tricycle from the Ural can be designed in your own garage. This work will not take much time and will not require large financial costs. To get the desired vehicle, it is enough to take a Ural motorcycle and components from a Moskvich or Zhiguli.
Today there are a lot of other options offered, but a homemade tricycle based on Russian production is considered the most successful, which is not accidental. After all, domestic manufacturers produce equipment that allows you to travel long distances comfortably.
The result is a tricycle that is easy to control.
The future owner of a tricycle will quickly cope with the task if he prepares in advance for the upcoming work. For example, he will have to find a ZAZ-968 and a Ural motorcycle at a disassembly site. From the first you need to take the engine, from the second - the components.
The advantages of a tricycle are obvious: it is comfortable to ride off-road, it does not require large maintenance costs, and the engine does not overheat. However, this transport also has a number of disadvantages.
For example, a tricycle can only go forward. If there is no way to turn around, the owner will have to literally push the unit out. The vehicle is difficult to control when cornering, it goes too fast in first gear, and the load on the front axle is excessively high. Still, the advantages of a tricycle outweigh the disadvantages, so many people strive to assemble it themselves.
DIY trikes: where to start
Donors for a tricycle can be any kind of vehicle, but the most often collected is a tricycle from the Ural or a tricycle from IZH.
In this option, you have to do the least amount of modifications, because the motorcycle base is most suitable for trikes.
Many people make Ural and ZAZ trikes with their own hands, putting these two vehicles together.
The first stage of work on the trike is the creation of the frame and rear axle. The axle can be attached to the frame using rods, similar to VAZ cars, or mounted on springs, as is done in Moskvichi. Naturally, the frame will have to be extended, but this is easy to do with the help of pipes and profiles. If you are planning to make a homemade trike from the Ural with your own hands, almost everything will remain original - the fork, brake discs, hydraulics, fender, etc. By the way, such homemade tricycles look good in the chopper style with elongated forks and a low seat. On the Internet you can see photos of tricycles -
The article is compiled based on forum materials, link to source
Some information on the caracat, although everything is clear from the photographs, but it may still be interesting. The engine is from an IZH Planet motorcycle, the left cover with a fan is from an SZD disabled person. The standard electrical equipment was replaced with Voskhodovskoe, which does not require a battery and is much more reliable since it has a chroll sensor instead of cams.
>
UAZ differential and two long UAZ axle shafts. The axle shafts are shortened since the karakat karakat would turn out to be very wide. The original hubs are cut and pressed from Moskvich ones, since the wheels are made on the basis of lighter Moskvich wheels.
>
The motorcycle wheel disk is halved and a disk for the Bel-79 is made on its basis. In general, two sets of wheels were made, one based on Bel - 79 for mud, one based on tubes for swamps. Upon completion, an unexpected thing emerged: the tube wheels turned out to be somewhat heavier. This year the summer was dry and on the factory wheels we drove through the swamp without any problems; I haven’t “put on” the tube ones yet.
>
>
The frame is reinforced with gussets, at the bottom at the engine mount and in the fork mount area. A bronze bushing is inserted into the fork mount for strength, since even without such loads as in the swamp near IZH, the bearings break in this place. The body is made of sheet aluminum and aluminum corner with rivets:
>
The price of the karakat turned out to be very decent, but this is because a lot had to be redone during the work, since there was no experience in manufacturing just such devices. Various technical problems were also solved along the way. The design mainly used only new parts and materials, which is why the price was high. The device is being modified as it goes into use; it has been out through the summer and half of the fall through mud swamps, etc. no problems so far. Below are photographs of the making of this all-terrain vehicle.
>
>
>
>
>
The caracat's cross-country ability is excellent, it rushes through the swamp as it should, the engine is high-torque and even with a load it moves confidently through a completely off-road swamp. Very maneuverable and well controlled, of course not like a regular motorcycle, but quite normal and not heavy. In the north of the Omsk region and in Tyumen it is very rare to see a four-wheeled carakat; three-wheeled ones have been tested by time, and they are simpler in design than four-wheeled ones, less iron and components, which means more reliable.
And this caracat is, so to speak, the prototype and predecessor of this caracat.
>
Checking the caracat's buoyancy, as you can see, it floats on the water and not badly. There is a current on the river, so I tied it with a rope; when crossing a river, we usually tie such devices to a motor boat and then cross it that way.
>
Photo of the rear drive from below
>
>
It took 63,000 rubles to build and finalize this karakat, this price was due to the fact that everything we needed for its construction was purchased new, even the smallest thing, the work of a turner and so on. The engine was overhauled, replacing the piston, we bought a left cover with cooling from a disabled person and more.
In terms of its driving characteristics, a tricycle is closer to an ATV and is very useful in places where a regular Ural motorcycle cannot pass. In addition, it is more comfortable to travel long distances on a tricycle, which is important in rural areas. After the modification, the motorcycle becomes more stable, moves faster and can carry more cargo.
How to make a tricycle from the Ural?
A tricycle will go where a regular motorcycle gets stuck. This vehicle is suitable for covering long distances. The tricycle's stability, speed of movement and ability to transport bulky loads make it indispensable for trips through rural areas. Not everyone can afford ready-made models, so it’s worth learning how to make a tricycle from a domestic Ural with your own hands.
Power unit
Naturally, when you think about making a tricycle with your own hands, you will need to choose a suitable engine. In this case, you do not have to take a power unit from another motorcycle - an engine from a car will also work. The main thing is that it fits properly between the rear wheels. This way you can improve the performance of your vehicle. In some cases, you won’t even have to make any changes or improvements; in others, you won’t even have to replace the radiator or some other part. It is also recommended to install other mufflers, and increase their number by installing one on each cylinder. Naturally, there are other options - it all depends on which power unit you decide to choose. For example, if you make a tricycle from the Ural with your own hands, then it is better to replace the engine completely.
Making a tricycle with a differential
The stable design of a tricycle is chosen not only by parents of small children, but also by people in old age, so more and more people are interested in how to make a tricycle without any help. The convenient design of the vehicle with three rims ensures the safety of the cyclist, prevents injury during sharp turns and minimizes the load on the back and legs.
Bicycle with three wheels
Another advantage is that the three-wheeled unit is comfortable to ride regardless of physical fitness, the low-mounted frame ensures a comfortable fit, and the high load capacity allows even obese people to engage in cycling.
Preparatory stage
Important Rules
In order for riding a bicycle to bring joy and pleasure, it is necessary to take into account the basic requirements for a vehicle with three wheels. When creating a homemade tricycle, pay attention to the following subtleties:
aktsport.ru
General technical specifications
Homemade tricycles are mainly made on motorcycle frames or structures hand-welded from a metal profile. Wheels from trucks or tractors are used as wheels. The transmission, brakes, steering rod are formed from spare parts of domestic and foreign cars or motorcycles.
For comparison, the table shows the parameters of 2 serial domestic tricycles.
| Characteristic | TMZ-5.971 | ZID-200 (Farmer) |
| Engine capacity (cc) | 199 | 196,9 |
| Power (hp) | 13,6 | 13,0 |
| Dimensions (m) | 2.3x1.35x1.25 | 2.2x1.5x1.2 |
| Weight, kg) | 250 | 210 |
| Wheel base (m) | 1,52 | 1,5 |
| Ground clearance (cm) | 16,0 | 13,0 |
| Maximum speed (km/h) | 70,0 | 50,0 |
Tricycle from the Urals and VAZ-2101
When creating a cargo tricycle with your own hands from the Urals and parts of a VAZ-2101 car, the easiest thing will be to install a regular bridge and make a car suspension with shock absorbers from the Urals.
The bridge from the VAZ-2101 is turned over, after welding the differential. This is reflected in the handling - the steering wheel is quite difficult to turn, however, the trike's cross-country ability increases.
The driveshaft is shortened and welded to the fork on the final drive and connected to the axle through a rubber coupling. It is better to take the original Uralov clutch, in this case the transmission will be softer.
Tricycle from the Urals and VAZ-2101
To avoid bending the cardan drive, you can move the engine to the left by 7-9 cm, or move the axle to the right or increase the wheelbase.
It is better to leave the engine as a whole unchanged, but instead of two carburetors, make one Chinese one. And for forced cooling, use an air filter from Izh.
Additionally, to cool the engine when operating in difficult conditions, you can install two fans and run them separately if necessary.
Pros and cons of the design
| + Comfort when driving off-road; + Simple and cheap transport; + The engine does not overheat. | — Poor handling, especially when cornering; - Can only go forward; — Too much load on the axle with the front wheel; — Goes too fast in first gear. |
Homemade tricycle IZH Jupiter-5
This tricycle based on Jupiter-5 was assembled by the village “homemade craftsman” Vitaly Borovskoy. This wheel arrangement allows the motorcycle to behave stably in complete off-road conditions, which provides quite comfortable driving conditions in contrast to its two-wheeled counterparts.
The motorcycle remains practically unchanged, only the rear wheel is sent for replacement, instead of which a gearbox with axle shafts from the Ant cargo scooter is installed. But in this case, the author took a rather unconventional path and made homemade axle shafts from scrap, ordering splines to be bored to the standard size from a familiar turner .
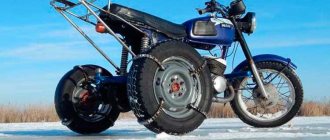
The rear wheels and hubs are from the domestic VAZ car; in the winter and snowy seasons, for better traction with the road surface, the author puts chains on the wheels, thus the cross-country ability of the tricycle increases many times over.
It is advisable to install forced air cooling, because the load on the engine with two rear wheels is slightly higher than in the standard configuration. The problem of overheating of aluminum cylinders of a motorcycle engine is solved by installing an electric motor with the ability to pump air (a motor from a car heater) is connected to the on-board network of the tricycle and air is supplied to the cylinder heads through corrugated bells.
And so let's look at the design features of a homemade tricycle assembled on the basis of the Soviet motorcycle Jupiter-5
The tricycle is stable and you can easily ride it off-road. Putting chains on the rear wheels increases cross-country ability.
Having settled the motorcycle in the spring snow along the very axle shafts, the movement still continues, but the main thing here is not to overheat the internal combustion engine until forced cooling is installed.
He doesn't care about the spring thaw.
Not every person can find a vehicle to suit their own taste - especially if he wants something unusual. Therefore, it is worth thinking about the fact that you will have to do everything yourself - this is the only way out, but it is also the best one if you understand mechanics and know a lot about assembly. But what can you put together on your own that will surprise everyone around you? A great example of this would be a tricycle - you can't buy them in stores, they are rarely mass produced, so you can create your own unique vehicle that will be the envy of everyone around you. However, a serious question arises here - how to make a tricycle with your own hands? To do this, you will need a wide variety of spare parts that you can get, while using the base and parts of one of the available motorcycles, such as the Ural or Izh. Chances are you have one of these in your garage. They can be easily converted into a tricycle or used to assemble your own unique model from scratch. Accordingly, you will need to think through everything in advance, make a drawing or download it from the Internet, because there are definitely enough enthusiasts like you on the network. And then you need to prepare for long and not the easiest work, which a few tips can make easier. You can read them further.
Spare parts and materials
The most time will be spent on manufacturing the frame, which is the connecting link for the installed parts. During the work, you must carefully follow the drawings. Only then will it be possible to create a powerful vehicle whose performance is in no way inferior to its factory counterparts.
If you are not sure that you will be able to make a frame for a future tricycle yourself, it is better to entrust this matter to professionals.
Immediately before installing components, you should check the location of the holes and fasteners. If everything is in order, you can begin selecting and installing spare parts.
Component layout
You should decide on the layout of components for the future tricycle . For example, the power unit will have to be moved behind the axle and placed between the rear wheels (on a motorcycle, a similar spare part is located directly on the axle, improving the balance of the vehicle).
As a result of the “rearrangements,” the stability of the tricycle decreases and it becomes more difficult to control. Therefore, it is better to design it by an experienced driver who can cope with any situation. And extreme sports enthusiasts will certainly appreciate the opportunity to rear up a tricycle and ride on its rear wheels. It looks impressive, but there is practically no risk. When the issue with the arrangement of spare parts is finally resolved, you should begin selecting the remaining spare parts.
Power unit
For the future tricycle, an engine from either another motorcycle or a car will be suitable. It is important that the owner places the unit between the rear wheels. Thus, the performance of the structure will increase, and it will not need additional improvements.
The motor must be attached in 3 places. It is believed that a reliable mount will allow you to perform tricks of any complexity. But at the same time, this precaution serves to ensure the strength of the structure.
Experienced motorcyclists recommend replacing the “original” mufflers with others and increasing their number . This is not difficult to do: just install one muffler on each cylinder. It is better to take the power unit from the car. The situation is similar with the brakes and rear axle from the Zhiguli, Moskvich or Zaporozhets.
Transmission
The gearbox should be installed to the left of the steering wheel. However, you will have to tinker with connecting the gearbox to the engine. After all, he is further away than usual. In order not to suffer with complex drawings and diagrams, experienced designers advise taking the gearbox and engine from any car (for example, a gearbox with a Lifan engine). Then you will definitely be able to change gears without being distracted from driving.
Suspension
The suspension will have to be modified to suit the needs of the future vehicle. For the suspension you will need a pair of consoles and two powerful springs - car, helicopter or airplane. The last two options are difficult to obtain, but if possible, they can also be used to make a pendant.
The consoles are connected to each other by levers. The front wheel axle is passed through the levers. The pendant is ready. There are more difficult options for making a pendant, but the proposed method is considered the simplest and most effective.
Battery
The battery is installed under the driver's seat. Immediately before installation, you should construct a frame that will be located above the engine.
In addition, it is worth thinking about the passenger seat, which is located immediately behind the driver’s seat.
This will kill two birds with one stone. Firstly, several people can travel on a tricycle at once. Secondly, panniers attached to the passenger seat will cover both the engine and the battery. As a result, the vehicle will have a neat and complete look.
Additional accessories and painting
At the final stage, elements such as rear-view mirrors and headlights should be installed . There are no specific installation requirements. It is important that these elements are conveniently located and easy to use.
When the main work is completed, the tricycle should be painted, because parts from different vehicles were used during the work. After painting, the tricycle is varnished and polished. Metal parts can be chromed to make the vehicle look like new.
Battery
The battery for your tricycle must be installed under the driver's seat - for this purpose a special frame is created, located above the engine. This way, everything important about your vehicle is in one place. You should also consider making the passenger seat behind the driver's seat. Not only does it allow more people to ride at the same time, it can be attached with saddlebags that will completely enclose the engine and battery, making your trike complete.
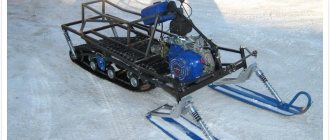
Homemade swamp tricycle on IZH Planet 3
The design of this homemade swamp vehicle is so simple that almost any car enthusiast can repeat it in his own garage. The basis of the swamp vehicle is the IZH Planet 3 motorcycle. IZH Planet motorcycles often become donors in all-terrain homemade vehicles, this is primarily due to the endurance and unpretentiousness of their engines.
The bridge was taken from a Muscovite and modernized. We cut out the bearing mounts from the doll with a grinder, then welded the yoke to the bridge stocking (if it is not welded, the stocking will warp when you cut it in half), then cut the stocking itself in order to secure the sprocket. The chain tensioner was also borrowed from the combine.
The KF-97 cameras are used from the agricultural trailer of the T-150 tractor. The tire for such a tube wheel is the same tube, only cut to a smaller diameter. First, the “tire” is put on, then it is tightened with belts. The transverse harnesses turned out to be 1.02 m long, and the longitudinal strip was 3.5 m long. The width of the longitudinal strip is 30 centimeters. The transverse belts with the longitudinal strip are connected using bolts.
The basis was taken from cornfield disks, cut in half using a small grinder and extended by 30 centimeters with steel plates welded between the disk halves (6 plates in total). The disc is covered with a chamber from a VAZ car, cut to a larger diameter. Since the disks were used from a Niva, and the axle from a Muscovite, the rear disks at the mounting points had to be trimmed.
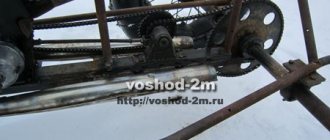
Frame, brakes and transmission
The motorcycle frame has been lengthened and strengthened. To prevent the pendulum fork from “walking”, it was welded. The chain and sprockets are borrowed from the combine. Their ratio is 2 to 1. A small star with 25 teeth, it is attached to the drum using eight hardened 10-point bolts. A large star with 50 teeth. The braking system of a swamp vehicle is no different from any other, so the brakes are left unchanged. But the drum was modernized to accommodate sprocket mounts.
Frame
It will be easier to make an Izh tricycle with your own hands if you have experience in welding and understand the design of motorcycles or cars. The frame will have to be completely manufactured from scratch, have a pre-designed shape and structure. Usually the calculation is made in such a way as to exclude breakdowns and places with vulnerable structures, so that the trike can travel hundreds of kilometers without maintenance.
Strengthening is achieved by welding corners and additional pipes
so that the fork does not vibrate. The basis of the transmission can be taken from a walk-behind tractor or combine harvesters. If you want to get a traction type Izh Planet tricycle, it is better to use sprockets in a ratio of 2:1, i.e. 50 and 25 teeth respectively.
Advantages and disadvantages
Let's start with the advantages that a homemade trike from a Ural motorcycle has: - excellent cross-country ability, especially in mud; - comfort and less fatigue; — simplicity, low cost and reliability of the design; — minimal risk of engine overheating.
The trunk allows you to secure everything you need
And now about the disadvantages: - difficult control (due to a blocked bridge); — lack of reverse gear, which would be very useful (to be solved); — the intake manifold is strongly cooled until condensation appears (possibly having a negative effect on the combustible mixture); — a large load on the front axle (the front wheel sinks in mud, which significantly worsens cross-country ability); — high speed in 1st gear.
If there was a reverse gear, there would be no need for a shovel
In general, these shortcomings can be considered insignificant, especially considering the significant improvement in cross-country ability. In addition, many of them can be eliminated.
Trike from the Urals
Assembly steps
There are ready-made drawings according to which you can convert a motorcycle into a tricycle with your own hands. Depending on the assigned tasks, this can be cargo or passenger transport.
In the first case, modifications to the body will be required, in the second, the installation of a passenger seat will be required. Any scheme will allow you to convert a motorcycle into a trike to suit your own needs.
The sequence of actions for assembling the tricycle is as follows.
- You should take the rear axle from any domestic car. Attach the engine, exhaust system to the axle, and install filters and an oil cooler.
- The frame must connect the rear axle, engine and front fork. It is better to install everything using a lift or jack. Before installing the parts, the frame must be primed and painted.
- All joints should be strengthened . It is better to weld all metal elements to the frame, cross members or rear axle.
- Shock absorbers rest on the upper beam . Car glasses are also welded to it.
- A support for the gearbox is installed on the transverse frame
- To fix the tricycle on the ground, you need to install a front fork with a shock absorber.
- When fixing elements, any extraneous sounds should be excluded . If a part can loosen over time due to vibration, it is worth using lock nuts.
- When the tricycle is fixed on low-pressure tires, a fuel tank, trunk, and seat are installed on it.
- Frames must be welded to the central beam to serve as footrests for passengers. They are also the support for the suspension bump stops.
It should be noted that a tricycle assembled with your own hands is in no way inferior to its foreign counterparts . It looks great and allows you to develop high speed on the track. Looking at stylish additions like leather fringe or chrome details, no one would ever think that the entire structure was assembled in a barn or garage.
For information on how to make a tricycle from the Ural, see below.
Gear box
When you make a tricycle from the Ural with your own hands, you definitely need to take into account where exactly the gearbox will be located. You already understand that the engine itself will be off the axle, behind the seat, between the two rear wheels. At the same time, make sure that it is attached as securely as possible in at least three places - especially if you plan to perform various tricks, as described above. As for the gearbox, it is better to install it on the left side of the steering wheel, since your right hand will be occupied most of the time. It is unlikely that if you take the engine and gearbox from a car, you will be able to make a design that is convenient enough to change gears without stopping driving. Also don't forget that you need to take care of connecting the box to the motor, which is a bit more difficult considering that it is now located a little further from the box than it should have been in the original. But if you're trying to figure out how to make a tricycle with your own hands, you always need to be prepared for these kinds of surprises and difficulties.
How to properly design a mini-tractor?
The conversion of a walk-behind tractor into a mini-tractor is carried out in several stages. First you need to take care of the frame. It is made of durable metal, which is cut into pieces of the required length and then welded together. When the frame is ready, you can start assembling the chassis.
If the motor is placed in the front part, then the width for the wheels can be left the same as in the walk-behind tractor. In order to attach the wheels to the rear, you will need an additional axle. It is made to the required length; an ordinary piece of pipe is suitable for this, the main thing is that the width is suitable. Bushings and bearings must be installed at the ends of the pipe. You can then install wheels on them.
If you decide to place the engine at the rear, then the width of the wheels must be increased, otherwise the minitractor will not have the necessary balancing. So, you need to remove its wheels from the walk-behind tractor, after which you need to make the bridge a little wider.
To control the mini tractor, you can take the handles from the walk-behind tractor. However, this will make the converted tractor look like a motorcycle and will be a little awkward to drive. For convenience, it is better to install a regular steering column.
The driver's seat can be made from a sled frame that needs to be welded. In addition, you need to remember to install the headlights, as well as the dimensions. After fully assembling the mini tractor, you must definitely lubricate all the parts and also run it in.
From all this it follows that almost every person who is at least a little familiar with technology can convert a walk-behind tractor into a mini tractor.
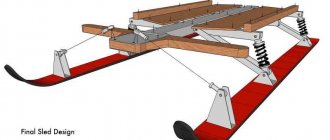
Manufacturing
It is not necessary to study and draw up complex drawings; experienced DIY enthusiasts can make a device based on the general diagram. This shows the outline of the front windows, the cabin, the front end, and the general configuration.
And here the main possible sizes are already shown. The distance between the wheel axles is 1.23 m. Between the extreme steering point and the center of the rear wheel, the distance is 0.98 m.
Making a homemade tricycle with your own hands is possible even practically from scrap metal. One of the possible options is characterized by simplicity of design. The main parts will be:
- CVT engine from a scooter and a wheel from the same;
- rear wheels from garden wheelbarrows;
- steering wheels and seats from any cars;
- steering knuckles from GAZ-21;
- pipes and other components.
The tricycle frame is assembled from pipes. Only the rear suspension is used, and the front is simply not provided. You can make the steering rack with your own hands.
You can also consider making a tricycle step by step at home based on the old Zaporozhets car. They start by removing the engine and gearbox.
Next they select:
- wires;
- rear suspension;
- seats;
- any components related to the operation of the clutch and brake units.
It is better to throw away all other components except those listed or use them in another way. Additionally, you will need various pipes and channels in large quantities. They begin work by preparing the transitional wheel fastening elements. The rear segment of the frame is welded from channels. The front fork parts will need to be carefully polished and coated with a layer of chrome; Maximum attention will have to be paid to the frame, because it is the work on it that is most difficult.
The following manipulations are:
- manufacturing seat frames from bent pipes;
- covering this frame with leather;
- chrome plating of the fuel tank;
- laying out all the necessary wiring;
- formation of the dashboard.
Tricycles with Lifan engines are quite common. You can take various models of Ural motorcycles as a basis.
- The solution with a reduction gearbox and an automatic clutch system is not very complete - in the forest and over rough terrain you can accelerate to a maximum of 25 - 30 km/h. It is worth considering that, according to many enthusiasts, the power is 6.5 hp. With. enough even for devices weighing about 500 kg.
- But sometimes they try to assemble a tricycle with a motor unit from a walk-behind tractor. The frame is welded from round pipes. To increase cross-country ability, it is worth abandoning the suspension and mounting the structure on low-pressure tires. A small shock absorber is usually located under the seat. It is preferable to use air-cooled engines with a centrifugal clutch.
- The wheels are assembled by attaching ATV tires to traditional car rims. Rear chains should be taken from motorcycles. The rear wheels are usually equipped with 77-tooth sprockets. Such a device can reach speeds of up to 45 km/h. In general, this assembly is quite convenient and works stably.
- The construction of an excellent all-terrain tricycle, suitable even for difficult off-road conditions, is possible on the basis of the Izh Planet motorcycle. The “flat” wheels from GAZ cars contribute to increased cross-country ability. Tires of the 66th model after stripping become significantly lighter without losing any of their capabilities.
It is recommended to cut a new tread that can successfully overcome virgin snow, slushy mud and soil. The gearbox and rear axle can be taken from a Zhiguli.
It's also worth considering a mini-tricycle. To work you will need:
- kart wheels;
- brake drums;
- gasoline engine;
- steel pipes;
- housing bearings;
- a number of other smaller details.
The use of kart wheels is attractive because they are immediately equipped with a mount for attaching an axle. If we talk about original designs, then it is useful to take a closer look at reverse tricycles. Instead of the usual design (one wheel in front, two in back), it uses two front and one rear wheel. The steering is quite comfortable and differs little from conventional solutions. The rider can turn either by turning the wheels, or by moving the axle and tilting the wheels relative to each other.
Electric homemade tricycles are also quite common. They usually use brushless electric motors. Each wheel will have to be equipped with its own set of disc brakes. They are activated when you press the steering brake lever. The steering wheel, which turns the front wheel, is complemented by the front part of the tricycle frame that tilts to the sides.
It is the inclined connections that guarantee the vehicle’s rapid deflection to the side.
It would be impossible to achieve the same with a rigid structure. If you make a tricycle on tubes instead of simple wheels, then it also acquires the properties of a swamp vehicle. Motorcycles from the Izh Planet line and other unpretentious bikes are usually taken as a basis. No special turning work is required; It is worth considering that for winter use tricycles are usually also equipped with a cabin.
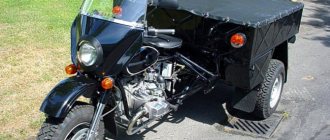
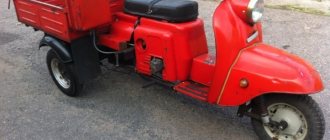
Ural Hercules - factory Ural tricycle
The Irbit Motorcycle Plant has released a three-wheeled modification in its model range for transporting cargo up to 500 kg. The model is called “Hercules” and moves well both on city roads and off-road. The sides of the tricycle are also removable and this allows it not to be limited in the size of the cargo it transports. Hercules is a truck that does not require a category “C” license.
Ural Hercules
Technical characteristics of the Hercules tricycle:
- Dimensions: 335x150x115 cm
- Ground clearance: 185 mm
- Weight: 500 kg
- Fuel tank capacity: 19 l
- Maximum speed: 70 km/h
- Engine capacity: 750 cc
- Power: 45 hp
- Engine type: opposed 4-stroke with two cylinders
- Generator: 500 W
- Electrical: 12 V
- Transmission: 4-speed, with reverse gear
- Tires: 6.45 and 13 inches
Suspension
It doesn’t matter whether you make a tricycle with your own hands from an Izh or any other motorcycle. You will have to remodel the front wheel suspension anyway. After all, the distribution of forces in a tricycle is very different from that observed in a regular motorcycle. To do this, you will need two pairs of consoles, as well as two powerful springs - if possible, try to get helicopter or airplane springs, but springs from passenger cars can also be used if necessary. The consoles need to be connected to each other by levers, through which the axle of your front wheel will pass. Naturally, this is not the only way - there are a large number of ways to make a tricycle with your own hands. Drawings are available on the Internet (one of them is in our article), but this method is one of the most effective.
Tricycle layout
The first thing you need to think about if you are going to make your own trike is its layout. The fact is that the power unit, which is usually located directly on the axle of motorcycles, thereby improving the balance and reliability of the vehicle on the road, can no longer be there. Accordingly, you need to carry it by the axle, between the two rear wheels. Naturally, this affects the stability and controllability of the tricycle - and not in the best way. But if you are an experienced driver, you will be able to adapt quite quickly. Moreover, this opens up some interesting prospects - for example, the ability to rear up your vehicle without any problems when developing at high speed. It looks extremely impressive and, unlike motorcycles, in this case you do not risk anything - this is an absolutely safe action (of course, if you do not pull the car too much, but on a motorcycle such a trick is much more difficult in any case). Accordingly, you will be able to impress everyone around not only with the appearance of your vehicle, but also with its spectacular capabilities. This alone is enough to convince yourself to make a tricycle with your own hands.
What materials may be needed?
To remake a walk-behind tractor, you will need simple tools, as well as drawings. Only when everything you need is at hand can you start working on the remodel.
Tools you will need:
- a set of keys and drills;
- electric drill;
- welding machine;
- Bulgarian;
- various elements for fastening;
- Screwdriver Set.
Painting
Well, the final stage, of course, is painting, because you worked with individual parts from different vehicles. Most likely, they either do not have paint as such, or are painted in different colors. Accordingly, you need to ensure that your tricycle ends up looking perfect. After painting, you will need to cover all painted areas with clear varnish, and then polish, and if desired, chrome plate the metal parts to make the tricycle look like new.
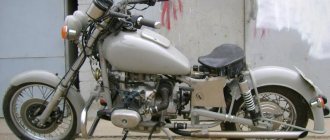
This is my second attempt to build a tricycle with my own hands. Due to the fact that my tricycle, as planned, was supposed to correspond to the ideology of the classic chopper, I did its finishing with special care.
ZAZ-968 engine installed
I’ll say right away that the front fork with a large angle of inclination had a negative impact on the handling and maneuverability of the device. This is especially noticeable at speeds above 100 km/h. In addition, at this speed, if you hit a serious pothole, there is a danger of destruction of the levers.
The basis of the machine is a spatial welded frame made of tubular elements. The combination of curved spars and cross beams makes the structure quite strong. The lower and upper spars are connected in pairs at the rear.
The central beam is combined with the upper spar into one unit and reinforced with a special box, and in the rear part it is connected to the side spars through struts.
All-terrain vehicle based on the Urals
At the preparatory stage, drawings and a diagram of the future tricycle are being worked out. In the variant under consideration, chain transmission is not provided.
The unit is suitable for 15-inch alloy wheels, which are heavier than homemade analogues, but more reliable and have a beautiful appearance.
After choosing the final concept, they move on to turning the parts of the all-terrain vehicle.
Tools and Supplies
The frame from the Ural motorcycle, converted to accommodate the installation of a car rear axle, was chosen as the base. You will also need the following items:
- ICE type Lifan (6.5 hp);
- variator from a scooter;
- tarred fiberglass;
- moped generator;
- muffler with wide cross-section;
- metal corner 32 mm;
- tires out the Shishiga wheels;
- conveyor belt.
The instrument is traditional. You will need a lathe, yews, a set of keys, screwdrivers, a gas welding machine, and measuring devices.
Main stages of rework
The process of creating a three-wheeled all-terrain vehicle can be divided into several stages:
- Preparing a variator from a 4-stroke 150 cc scooter. This part is convenient because it is easy to adjust working and coupling speeds. These modifications are mounted on motors with power up to 14 hp.
- They begin to create the rear axle of the all-terrain vehicle, including preparing the site for the automobile bridge, manufacturing cones and flanges.
- The front fork is widened and adjusted to fit a wide rim.
- The seat is made of plastic, lubricating the prepared mold with wax and then laying fiberglass in several layers.
Making odorishi
On a light three-wheeled carakat they put “strippings” from the tires of a GAZ-66 or Ural (Lapot) car, as well as medium-sized tractors. The tires become lighter, while a new tread is cut onto the old rubber, which is responsible for reliable grip when driving on snow and mud.
It’s not difficult to make wheels for an all-terrain vehicle with your own hands. Process steps:
- Using a construction knife, a cut is made around the perimeter of the tire to remove the wire.
- Mark rectangles for the future tread and cut them out.
- The wire is removed with a hook and a hand winch or a screwdriver.
- The peeled rubber is peeled off.
- Remove unnecessary layers until the frame remains.
- The discs are welded to the plates, and the surfaces are sanded.
- Put the headband on the frame.
Engine and transmission
The wheeled all-terrain vehicle in question was equipped with a Lifan engine, modified for installation on a tricycle. A moped generator and a larger cross-section muffler were also installed. The standard carburetor did not perform well, which is why a tractor starter was installed.
This approach made it possible to increase the power of the karakat by almost 2 times.
The variator works great, in the 2nd range it makes it possible to slip and drift. In mode 4, the unit starts off smoothly, accelerates to 50 km/h, and at high speeds loses stable control. A unit from Honda City, Oka, Zhiguli is suitable as a transmission box. The gearbox is mounted on the vehicle frame and is coupled to the rear axle using a cardan drive.
Final improvements
At the final stage, the reliability of the assembly and the operation of all components are checked. The seat and body are painted, oil and fuel are added. If desired, fenders, mudguards, light and signal elements are mounted.
Cost of components for a three-wheeled bike
Homemade tricycle
In stores selling spare parts for bicycles, you can see a wide range of components. The price depends on the manufacturer and the material from which the tricycle is assembled. A bridge for a homemade three-wheeled vehicle costs between 20,000–30,000 rubles, the default kit includes:
- stars;
- rear derailleur and rim.