Currently, the ATV is a popular vehicle. It is quite easy to operate, has good maneuverability and a high degree of maneuverability. However, such an all-terrain vehicle is quite expensive and not everyone can buy it. Don't be discouraged, but you can try to make it yourself. How to make an ATV with your own hands? Our recommendations will help.
If you are the owner of an old motorcycle and it is gathering dust in the garage, then do not rush to dispose of it. The Ural model is excellent for processing into an ATV. Assembly of the all-terrain vehicle will consist of the following stages:
- frame modification;
- installation of the instrument frame;
- engine installation;
- suspension installation.
What is needed for work:
- bridge;
- shock absorbers;
- welding machine;
- Bulgarian;
- brake system;
- Tie Rod;
- metal profile sheet;
- motorbike.
Before you start assembling, you should decide on the type of control of your homemade ATV. It can be motorcycle and steering. The next step is to modernize the frame; for this, the vertical seatpost tubes must be moved back 40 mm. Next, we weld the bridge to the Ural swingarm, slightly trim the lower fork and seatposts. Next to the bushings of the pendulum suspension, we weld struts made from pipes. We shorten the bridge to make the vehicle compact and more maneuverable. Now we are making a driveshaft, which can be constructed from Oka axle shafts. We need square pipes 25*25*2 mm for the manufacture of the front suspension. You can borrow steering knuckles from a Zhiguli car. Close attention must be paid to the braking system. It is better to purchase it separately to ensure maximum safety. When all the main elements are assembled, you can begin installing headlights, turn signals and brake lights. We cover the ATV with a profile and prepare it for painting.
ATV from scooter
An excellent homemade ATV can be made from a scooter. We begin the work process by drawing up drawings that you can make yourself and slightly rework the frame. Next we install the engine. We connect the engine shaft with the gear of the rear axle of the ATV using an ordinary chain drive. We bring the controls to the frame and secure the pedals and control levers. It is better to use components from the same scooter, but it is better to borrow a fuel tank from a motorcycle. The control can be set to steering or motorcycle, whichever suits you best; the brake lever must be secured to the transmission brake on the rear axle sprocket. For the body kit we use material from old automotive equipment or fiberglass.
Frame, brakes and transmission
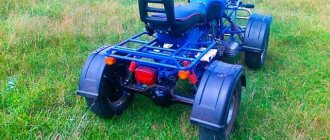
The supporting structure is the IZH-Planet frame. I digested and strengthened it using profile pipes 20x20x2.5 mm, 40x20x2.5 mm (photo 3)
.
The front fork measuring 40x40x2.5 mm was made from the same material (photo 4)
.
The peculiarity of the chain drive from the engine to the gearbox is the modification of the unit for installing the driven star on the gearbox input shaft. To relieve the load on the input shaft bearing and eliminate the possibility of bending, I installed a separate bearing with a torque transmission unit.
The node consists of:
✔ from a clutch disc from Oka, ✔ IZH-Planet gearbox cover with drive gear and bulk bearing, ✔ sheet of steel (3 mm thick, d 120 mm) for transmitting torque and mating the clutch disc with the drive gear, ✔ plates made of sheet steel (of the same thickness) to install the entire assembly at the Oki checkpoint
(photo 5)
.
The power transmission gear ratio was calculated using the formula:
N = n1хп2хпЗх. ni, where n is the gear ratio of each gear in the transmission.
I calculated it so that the torque that the engine develops (taking into account downshifts) does not exceed the permissible torque maintained by the Oki gearbox.
Braking system - VAZ-01 with brake drive from the handbrake cable. The cable was adapted to the standard motorcycle lever.
The chain tensioner was used from a VAZ-08 tension roller. The wheel drive was made from an Oka CV joint and a VAZ-01 axle shaft, connecting them by welding. I secured the axle shaft in its normal place (in the flange part cut off from the VAZ axle).
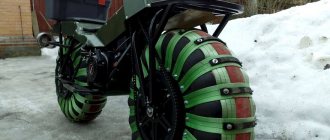
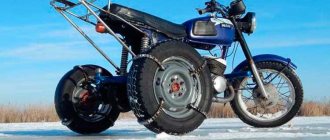
All-terrain vehicle wheels. I took wheel rims from BA3-13 as a basis and welded the spokes and rims on a homemade machine (consists of a construction pallet and plywood, 4 studs and a brake drum for fixing them) (photo 6)
.
Tires size 500×70-R20 were taken from a heavy all-terrain vehicle. I assembled them according to the “camera within a chamber” principle and tied them together with belts from a conveyor belt (photo7)
.
The karakat turned out to be light and with good cross-country ability!
ATV from the Oka car
You can breathe new life into an old car by trying to build an excellent homemade ATV out of it. Your whole family will love it. We start by studying professional drawings. We modernize the body - remove the doors and ceiling. For comfort we use comfortable seats. Next we install the engine and muffler. We attach the wheels to the frame using shock absorbers and original suspensions. It’s worth thinking about which one you will need and taking care of it in advance. The most important thing remains the brake system. You should not try to save on this element. We will use the brakes from a motorcycle. You can install a motorcycle steering wheel or leave it as original. It is important to securely fasten the tie rods. The body is sheathed in metal and painted.
Parts and material for building a do-it-yourself caracat
From a motorcycle, the first and main thing we use is, of course, the engine. Next is the steering column with steering wheel, switches, clutch lever with cable, headlight, fuel tank with cap and valve, chain, driven sprocket from the rear wheel, seat with mount, air filter with intake noise muffler and couplings, connecting wires, ignition coil and switch, high voltage wire to the spark plug.
The entire frame from the motorcycles was not used, but only certain sections were cut out. The main material for the frame is pipes of different sizes. A 34 mm pipe with a total length turned out to be approximately 5 meters 30 cm. And 28 mm pipes were used, if all the scraps were connected, it turned out to be approximately 8 meters. Several scraps were used in different smaller sizes.
For the rear axle you need a pipe with a diameter of 50 mm, a wall thickness of 5 mm, and a length of 1 meter 42 cm. During the assembly process, wire was also useful - 6 mm, iron - 2 mm, bearings 210 - 3 pcs, bearings 204 - 4 pcs. 12 volt DC electric motor from the machine's heater. Four D-242 diodes.
This material is quite enough to assemble a lightweight three-wheeled device with cameras. The speed will not be great and this is not the main thing. The main thing is that the cross-country ability will be excellent on any off-road. Easily overcomes long distances through swamps and rivers. Pneumatic tubes can be used in conditions where other equipment will not work.
Children's homemade ATV
Having an all-terrain vehicle is even more important for families with children. There is no better gift for a child than a miracle car made by dad. When manufacturing a children's all-terrain vehicle, we pay special attention to safety. After all, we are talking about the health and lives of children.
What is needed for a children's ATV
We decide on the dimensions and appearance. The possibilities are unlimited, everything will depend only on your skills and efforts.
There is no better gift for a child than a miracle car made by dad.
We draw up a drawing, it’s easy to do it yourself. The main stage is making the frame. For it, you can use a ready-made model or weld it from a square profile (25x25mm). If you make a frame with your own hands, then you need to pay due attention to the quality of the welding seams. We will buy new wheels; we choose them depending on the age of the child and the quality of the road surface. The choice of engine is quite wide. An electric motor from a Volga or scooter will do. We will install the battery in such a way that there is no need to disassemble the entire structure for recharging. After assembling all the main components, the most enjoyable part of the work begins. You can use a body kit from some old and unusable model of a children's ATV, or you can use your imagination and come up with a new original idea. A DIY 4x4 children's ATV will significantly save your budget, bring joy to your child, and working together will bring the whole family together.
PS Homemade ATVs are not easy to make with your own hands. If something didn’t work out right away, think about what and where you made a mistake. Thomas Edison made 10,000 unsuccessful attempts! before he invented the light bulb. And you will definitely succeed.
A quad bike is actually any four-wheeled vehicle, since in Latin “quadro” means “four”. In the CIS, this name most often means all-wheel drive, representing a symbiosis of a motorcycle and a car. From a motorcycle, an ATV has adopted mobility, maneuverability, lightness, and speed, and from a car - excellent cross-country characteristics, power and controllability. The result is a unique vehicle designed for a variety of purposes.
The domestic market provides only foreign models of ATVs, the cost of which is often exorbitant. At the same time, you can easily find used motorcycles and cars on the secondary transport market at an extremely low price.
For example, the Ural motorcycle is large, bulky, heavy and power-hungry, has an excellent four-stroke engine with reverse gear and costs a penny. For this reason, it is much cheaper and more fun for enthusiasts to create their own designs of these SUVs.
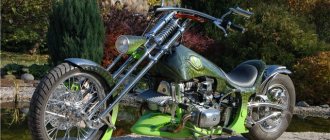
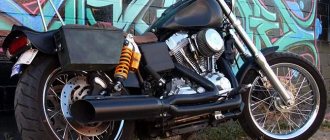
A typical factory ATV - shiny, neatly built, strong and powerful.
Its homemade counterpart, which is slightly inferior in appearance, and even more so in terms of power.
Manufacturing
If you decide to make an ATV with your own hands from the IZH Jupiter-5 , then they take both the motor and temperature and fan sensors from this device. For independent front suspension, hubs from the VAZ 2108 and shock absorbers found on Minsk motorcycles are used. The gearbox must have 4 forward and 4 reverse gears. In used gearboxes, oil seals and sometimes bearings often have to be replaced.
The frame can be made from scratch or purchased ready-made at your discretion. But the motor must be securely bolted along it. Engine installation is possible both in the front and in the rear.
The transmission and drive need to be fixed more firmly. For homemade frames, thin-walled pipes are usually used. Tubes up to 0.25 m long are used for the spars, and up to 0.2 m long for the struts and cross members.
Most often, pipe joining is done by spot welding. After this, be sure to resort to full welding to guarantee maximum reliability. The ears for the shock absorbers and levers are welded on immediately. The brackets are mounted when it is time to install the corresponding units and components.
If a 4x4 ATV is made on the basis of an existing frame, you will have to:
- remove all additional body kit;
- remove the back;
- build up the frontal area.
Following this, elements are welded to allow storing a complete set of components and assemblies. When reconstructing a motorcycle frame, it is worth moving the seatposts by 0.4-0.45 m. The luggage racks are cut out of sheet steel according to the diagram. Then they are welded to the designated places. The frame will need to be painted with construction paint for metal, but varnish will not be required.
How to make an ATV with your own hands
Before you start assembling, you need to make a detailed list of the units and parts that will be needed to create your own brainchild, develop a work plan and a design drawing.
Engine: the optimal choice
It is logical that first of all it is necessary to find the “heart” of the future “beast” - the power unit. Absolutely anything will do, from a regular walk-behind tractor to a six-liter V12 - there are such precedents. In most cases, motorcycle engines are used - they are economical and small-sized.
To use high gear ratios under normal operating conditions, a Minsk or Ural engine will be sufficient. In summer, the issue of overheating arises, so you should choose air-cooled models. Another good option is Soviet-made boxer engines, the undeniable advantage of which is powerful traction and a completely unpretentious driveline.
Suspensions: rear and front
There are two most common rear suspension solutions for ATVs.
- Gear-cardan system. The design turns out to be as lightweight and simple as possible, but there is no differential, which, in principle, can be sacrificed for the sake of the previously mentioned advantages.
- Using a road bridge. The design turns out to be extremely heavy, and if there is no desire to have an ATV with a car base, it is necessary to shorten the bridge, which is a very non-trivial task. The only advantage worth highlighting is the presence of a differential, which is useful when driving on highways.
There are huge possibilities for front suspension and steering. ATV suspension arms carry significantly less load than automobile ones; accordingly, they can be made independently, using available means. The best option is to create a suspension based on the existing Ural motorcycle.
Frame: drawings and alternatives
The best solution is a durable structure made of pipes or profiles welded together.
Ideally, remove the frame from the donor motorcycle and add the necessary elements - this eliminates a number of problems, but the design may turn out to be unnecessarily complex.
ATV assembly
Having prepared the necessary tools, donor vehicles and freed up time, you can begin to create your own ATV:
Thanks to its reliable, time-tested design, excellent power and traction, the Ural motorcycle is the most popular donor for homemade ATVs.
Video clip: “Wasp” 4x4
The video below describes the design of a homemade ATV, its characteristics, properties and features.
Photo review
Photos of ATVs based on domestic motorcycles and cars:
As you can see, using outdated and inexpensive achievements of the Soviet automobile industry, you can create amazing vehicles that will amuse your vanity and satisfy most transport tasks.
An ATV from a store is not a pleasure accessible to everyone. Therefore, many craftsmen make quadrics with their own hands. And in this article we will talk about the most interesting of them.
In making an ATV, everything that can be found in the garage and nearby can be useful. Each vehicle made by hand is unique and individual, so it is difficult to talk about drawings and diagrams.
Few people describe in detail the process of building their brainchild, which makes it extremely difficult to find specific information. But there are also exceptions.
How to make an ATV with your own hands
in 2012, the talented designer S. Pletnev shared the drawings and nuances of building his brainchild.
What was used in the design of the vehicle:
- Front and rear wheels from Niva Chevrolet 15 inches
- Engine a-m Oka
- Oka gearbox
- Inter-wheel gearboxes from the rear axles of the VAZ “classic”
- CV joint from a VAZ-2108 car, 12 pcs.
- Fuel tank 20l canister
- Passenger support from the headrest of the Oka
- Clutches from Oka
- Steering wheel from a Ural motorcycle"
- Instrument panel from Oka car
Main technical characteristics of the ATV:
ATV drawings:
The transmission is made from AvtoVAZ units with some modifications. For example, to reduce speed and increase torque, a chain drive was used instead of the main pair.
Inter-wheel gearboxes are borrowed from the classics, the axle shafts are removed and replaced with CV joints from the front-wheel drive VAZ. Constant velocity joints are also used in other transmission units.
The suspension is independent on triangular wishbones. Shock absorbers from Oka.
Homemade muffler of 2 sections, insulated with asbestos.
The body kit is made of fiberglass. The creation of such plastic took 10 kg of epoxy resin, 1 kg of plasticizer and the same amount of hardener. 15 meters of fiberglass and 5 meters of glass mat.
The ATV body kit is made of fiberglass. I glued it for the first time, and therefore first studied the recommendations for performing the relevant work. But as it turned out, this process is painstaking, although the result is worth it.
The bumpers and guardrails are welded from 20mm round pipes.
Photo of the finished ATV:
Material based on the article: https://modelist-konstruktor.com/razrabotki/853
ATV from a motorcycle
This quad is made on the basis of the Ural motorcycle.
All the details are in the video.
ATV with IZh Jupiter engine. Transfer case from Ant motorcycle.
ATV Cobra MIX
Generator, forced cooling, lowering gear, electric starter from tens, engine from a Ural motorcycle.
Video of a homemade ATV in action:
Homemade buggy "Raptor"
Homemade ATV with an Oka engine
An ATV is a four-wheeled hybrid of a motorcycle and a tractor, a vehicle that is equally successfully used in both agriculture and recreation. Just a few years ago, Russian people considered the ATV a foreign curiosity. And today he is able to independently design and manufacture it. In addition, today a much more common occurrence in Russia are home-made ATVs, rather than factory ones. Next, we will try to figure out why it happens this way and not otherwise.
Gearbox and brakes
If the quad is assembled on the basis of a car, the chain drive is replaced. This greatly simplifies vehicle maintenance. A manual transmission is installed, as it improves maneuverability. The input shafts are directed to the front and rear axles. Wheels can be removed from small cars: Oka, Niva.
The brake system is selected taking into account the mounted wheels. The steering knuckles are removed from the Niva or Oka. To assemble an all-wheel drive model, you will need: car steering, transmission drive and differentials. In this case, the frame is not used. It is better to weld the structure to suit the engine size.
The suspension is also removed from the car. A gearbox is installed on the front-wheel drive model. The next stage is the manufacture of the body. For this you will need fiberglass, fiberglass. Experts advise using the first material, as it is easier to work with.
A drawing is pre-prepared and body elements are cut out from polystyrene foam. To fix them together, glue or foam is used. Fiberglass is glued to the foam. The resulting structure is attached to the frame. The body is well dried, primed, sanded and painted.
Tires of the required size are selected. If the vehicle will be used off-road, it is necessary to create the appropriate ground clearance (distance from the bottom to the surface of the earth). For this, R17 wheels are installed.
The resulting ATV is equipped with turn signals, headlights, a dashboard, and a battery. Electrical equipment is connected according to a pre-designed diagram. For this, wiring and a multimeter are used to check the voltage in the network. The next step is to install the seats. The vehicle is checked for serviceability, and the data displayed on the drawings is compared. A quadric, correctly assembled, is not inferior in technical and operational characteristics to finished vehicles.
Final stage and finishing work
The final step in creating a homemade ATV is installing the seats and headlights. In this case, anti-theft headlights would be the ideal choice, because the ATV must be suitable for use in any weather. Particular attention should be paid to the number of seats on the ATV and decide whether it will be a driver-only seat or a driver-and-passenger seat.
Finishing work when creating an ATV consists of covering the resulting structure with metal and painting.
ATVs designed on the basis of Oka
For 20 years (from 1988 to 2008) in the vast expanses of our vast homeland, one of the most common cars was the domestic Oka (VAZ-1111, SeAZ-11116). Today, “Oka” is one of the most popular options for vehicles, on the basis of which home-made ATVs are created. In the manufacture of ATVs, the engine, gearbox, wheels and other auxiliary parts of the vehicle are usually used. Direct installation and construction of the ATV based on the Oka car is carried out in accordance with the drawings created by experienced designers. The defining moment when creating an ATV is to formulate the purpose of its use. Based on this, the future owner of the ATV opts for one of the two existing Oka engine options (35 hp and 53 hp).
Technical characteristics - do-it-yourself karakata:
The length of the all-terrain vehicle is 3 meters. The width of the all-terrain vehicle is 1 meter 70 cm. The height of the all-terrain vehicle is 1 meter 10 cm. Ground clearance is 45 cm. The engine is a Voskhod-2m motorcycle. The tires on the wheels are 1200 x 20. Rim diameter is 67 cm. Rim width is 21 cm. Wheel weight is 27 kg. Number of teeth on sprockets: Drive on the engine - 15 teeth. Driven in intermediate gear - 35 teeth. The drive on the intermediate gear is 15 teeth. The driven one on the rear axle is 72 teeth. The length of the rear axle is 1 meter 42 cm. Bearings on the rear axle are 210. Bearings on the intermediate gear shaft are 204. Bearings in the front wheel hub are 204.
ATVs designed on the basis of the Ural motorcycle
At the moment, several decades ago, the popular domestic Urals in Russia have been replaced by much more nimble and economical foreign models. In this regard, many people have their recent best “friend” standing idle and rotting in their garages. But not a single Russian person is able to allow good things to go to waste. Therefore, “Urals” are increasingly used to create a type of transport that is relatively new for Russian people. This motorcycle is unanimously recognized by folk craftsmen as the optimal basis for creating an ATV. Homemade ATVs made from it are an order of magnitude more economical and have greater draft power than their factory-made counterparts.
The creation of an ATV based on the Ural consists of two stages: designing the rear part and the front. The use of the Ural gearbox when creating the rear part of the ATV will ensure the design not only strength, lightness, but also simplicity. In the end, the finished product will not be equipped with a differential, which, in essence, can be sacrificed in the name of reducing the time spent on its creation. As for the design of the front part of the future vehicle, it will take much more effort and time than the previous stage. Most of the work is finishing up the front arms of the ATV. This is due to the fact that they should be less rigid than a car, but more powerful than a motorcycle.
Warm greetings to everyone! We continue to bring back to life the interesting motorcycle IZH-Planet 3-02. Why is he so interesting? Of course, with its history, which continues to this day. As I remember, we settled on completely disassembling the motorcycle and sending all the spare parts for sandblasting. Well, we have accumulated enough material, we can begin. Go!
A couple of days later, when the elements of the crew section were painted and ready for assembly, it was necessary to buy new fasteners. I spent the entire evening writing down all the bolts, nuts, washers, and bolts on the motorcycle and sidecar. The list turned out to be quite long.
Eh, the frame is like new. It feels like you are standing on an assembly line and slowly reviving the engine)) The quality of the paint is of course top notch!
The glove compartments, engine mounts, turn signals, traverses, handlebar mounts, steering panels, mudguards also arrived... oh, in general, everything on the motorcycle is black, it all came from painting. Every little detail was painted so that in the end it would not be noticeable.
We begin to assemble the turn signals so as not to lose all the small parts. Of course, when damaged they looked like new. It was very lucky that the glass pieces and the turn signal housing itself were intact, otherwise we would have had to look for them.
Now we move to the frame and begin to assemble this puzzle. I started with the rear mudguard. Instead of the usual BPV 14-10, there is a relay-regulator on its own separate platform. The latest modification of the Planets with a 6-volt ignition.
Next we install the glove compartments. Something is already beginning to emerge, but very faintly...
It came down to the wiring. We carefully place everything in its place, having first washed everything from dirt and dust.
It’s good that during disassembly I signed all the plugs and connectors so that when reassembling, I could quickly connect everything without getting confused. Although there are not many wires here to get confused, but still. Yes, what else did I like about the three? It’s just the wiring. I don’t know why there was a need to hang mountains of wires on the fourth generation... But oh well))
Turn signals... mmm, beauty. The holders were cleaned of plaque and dirt, now everything is shiny and pleasing to the eye.
They didn't even throw out the old clamps. Each of them was sanded with a metal brush to achieve this shine. Now everything is according to the canons of IZHMash))
We install the center stand and rear swingarm. Even on the center stand all the rubber bands were retained. Wow, we went crazy here, paying attention to all the little things. But what will everything look like later?
So, I collected what I had. It was possible to install shock absorbers and a fork, but... they were killed and required a bulkhead. In the garage, the owner of the motorcycle did not have a workbench or yew trees to sort through this stuff. So I convinced him to bring it all to my house. In the afternoon, taking the rear shock absorbers in my backpack, I went shopping to buy consumables for shock absorbers and forks, and also took all the consumables for the engine. Yeah, just for the engine) More on that soon)))) When I arrived home, I immediately disassembled the shock absorbers. Surprisingly, they were like new, with no signs of wear. But all dirty and without oil... hmm, how long they lay interestingly in the basement.
We disassemble everything, wash it, press out the silent blocks. The client wanted to buy new store-bought shock absorbers, but I advised him to sort out the old ones rather than pay 4,000 rubles for new ones. Although consumables for repairs cost only 300 rubles, they will work even better than new ones!
An hour later, the shock absorbers were ready for installation. They look and work better than the new Chinese ones - fact! Another important thing is that the chrome is safe and sound everywhere))
After another hour and a half, the fork feathers were ready. Now the entire suspension has been rebuilt and is ready for installation.
Give me the engine! Give me the engine!!! I can hear someone already wanting to see the engine we found. Here it is, my dear) I already threw in the left cover and the spare parts in it so that you can understand the form in which it came to us.
In general, the original engine was found)) It was lying with a client’s friend in a nearby garage cooperative. Cold basement... Old workbench. The engine lay there for almost 10 years. Even in his youth, his owner gave it to a friend for repairs. But something went wrong. All we found there was a crankcase with a crankshaft, cylinder, clutch drum, a couple of washers and a rusty gear shift mechanism. Hmm, I thought, it was beautifully repaired... Everything was rusty, there was no gearbox, no generator either.
I had to go down to my basement and add some spare parts to the engine. Well, some! I supplied almost half of the engine from my own reserves (not for nothing, of course). In general, the following had to be taken out of the basement: engine cover, generator assembly, internal clutch drum with all springs, bolts and cups, gearbox assembly, gear shift mechanisms, gear lock, clutch ratchet, crescent assembly. Hmmm... luckily he gave the engine away for repairs)
Inside the standard is dirt. And the speed lock was lost...
The bearing race is licked by the fallen off ratchet spring.
The crankshaft brought another surprise. He left his place. I don’t know how to turn the engine to screw up the crankshaft at 383 km. Apparently there was more than enough enthusiasm.
After washing the crankcases, they were as good as new, my hands began to pick them up! But they were not washed out so quickly. I'm tired of fidgeting with the brush... I pumped up the compressor, poured gasoline into the engine compartment and drove off! A powerful jet of gasoline wiped everything out of its path; all that remained was to wipe it with a cloth. Lapota)))
But without a crankshaft there was nothing to assemble... That same evening the client brought from the garage, ATTENTION, a new, completely new, packaged crankshaft from IZH-49! Just imagine, the spare parts are already 50 years old, and it’s completely new. It took a long time to persuade him to bring it, since he did not believe that this crankshaft would fit. And it will fit)) What a miracle... My mouth started watering when I saw it, seriously) The first time I saw it was when I was dismantling the IZH, and so I asked to bring it)
How much grease was there... It was as if he had been dipped into boiling grease and wrapped in newspapers. First, I scraped off the grease with a knife, then washed it with gasoline again. Then I heated it up with a torch to make it easier to clean. About an hour later the crankshaft was reactivated.
The replacement of the bearings in the crankcase was successful and the new crankshaft was installed in the crankcase after centering it in the crank chamber.
The gearbox is assembled, adjusted and tested. Now you can install the cover with the secondary shaft.
We also finish assembling the clutch. There is very little left.
Well, that's it, almost the finish line. We install the piston in Chelyabinsk. After a little experience with new pistons, we decided that Chelyabinsk was better. Izhevods know that the piston is first heated, then a finger is inserted and it should go in without much effort. Rostov pistons warm up no matter how much, but you still have to pin your finger a little. But with Chelyabinsk ones everything is simpler, they are installed without much effort - just warm them up a little and everything goes in by hand, according to the repair books, this is how everything should be assembled.
Well))) The carburetor was washed, the air filter finally got rid of a giant layer of dirt. Now the engine is ready to be installed on the frame, and then to conquer our roads. Everything is clean, washed, assembled, adjusted ehhh, you look and rejoice) The piece of iron was lying around idle and now it’s back in service!
That's it, end of the day, the engines are on the shelf waiting. Next to it lies an engine from Jupiter 5. Both engines arrived to me on the same day - Friday. I started doing them on Saturday morning and finished by Sunday evening. That's how the weekend spent working on the engines)) I looked at them at the end and thought, “Well, let's take them to the bathhouse!” and went to the bathhouse to wash off the oil, gasoline, and sealant))
Now we move to the garage already in the city. The owner took all the goods and brought them to him. Now we mount the shock absorbers in their place. Slowly something is already molding)
As previously mentioned, we pay attention to every detail. Here is the shock absorber bolt retainer. Before installation, we clean and sand it to make it look like new.
The moment is simply heartbreaking!!! The frame and engine found each other after 10 years of separation. Who would have thought that everything would be found and come together like this! The heart is now in its place.
The day was drawing to a close. Installed the fork and tightened the engine. We installed the front fender. That's it, it's time to go home and rest.
And tomorrow we’ll have to sort out the rest of the spare parts and remove the excess...
The next day began with installing the steering wheel, connecting the headlights, pulling cables and wiring.
We assemble the painted remote controls and mount everything on the steering wheel. The original screeds were also polished to a shine. Now we put everything as it should be!
Wiring, installation of headlights, and connection of remote controls are completed. Everything is stretched as needed - neatly! Now we checked the wiring. Everything worked except the low beam, it wouldn’t turn on. Even before this, I was confused by the lack of a light switch on the right remote control. These remote controls were like those of the fours, which were a new model at that time. I thought maybe the owners had removed everything from the remote control. So I had to remove the remote control again and install the light switch from the spare remote control that I took. I installed it, looked at it and thought that something was wrong here... There weren’t enough wires to connect. I started looking for wiring diagrams for the troika. I found it only from the earliest threes, where the other remote controls are. I smoked the manuals and smoked them!!! It dawned on me that the light switch is located in the headlight itself (I have never encountered threes, so I was dumbfounded). Well, what confused me at first was that the remote control was a half-dummy, where the switch is supposed to be. But the owner didn’t remember whether there was anything there or not... So I had to waste time on this nonsense. As it turned out later, the low beam burned out in the light bulb. There were 5 lamps, and the low beam filament in each one burned out. That's why I started messing with the remote control. Then it dawned on him that when they started demanding that they drive with lights, all their lamps burned out. Eh... how I broke my head there)) But everything turned out okay.
Now let's lower the motorcycle to the ground! I remembered the tradition of sailors when, when launching a new ship, they hit a bottle of champagne on the side so that everything would be fine. We also wanted to do something similar, but we remembered that the lining is new and it’s not fun to hit it, so we just took it off the table and rolled it)) Now it’s on wheels! The first meters...
We tighten the chain and adjust the rear brakes.
Adjust the position of the steering wheel. We tighten everything - the front corners, the headlight.
Everything shines, almost like new. Wow... gorgeous. I'm having fun...
Now we finally secure everything to the steering wheel. And we think about what to do next.
The tank has arrived from painting! Simply beautifully painted! It was painted at the service station, so they did a great job.
Now we attach the muffler, having cleaned them in advance. We are preparing for a test run. I like him even more in this state.
Now the stage of dancing with a tambourine begins. Ignition... First I set everything up. Everything is fine. We check for a spark, but there is none. What a surprise... We checked all the plugs and so on - zero emotions. We connected the battery directly to the coil, same story. I’m sitting thinking... I turn the crankshaft with the key and think further. I took a closer look - the eccentric on the cams is strange. The owner found this eccentric for me in the garage and said that it was there. I took it off and looked and realized that it was from Jupiter! But the eccentrics of planets and Jupiters are not the same! So, we change it to planetary. Still nothing. Well, I think we've arrived. We start according to the standard: spark plug, high voltage, coil, conductor. We took everything new to check it out. But before that, I decided to check the generator connection diagram again and found another jamb. The stator was from Jupiter, which is why there were two places to connect the cam. I hooked it up to the place where there was no food))) I admit, I was wrong. I picked it up - but still nothing! When they put on a new coil with a new wire, the spark was great, as they say, “it would kill an elephant.” Then the owner wanted to try the old coil, he was reluctant to pay 500 rubles for a new one if the problem was only in the high voltage. We picked up the old one - there is a spark. Great!!! Getting ready to start. Filling the carburetor. Tyrk - nothing, once again - a weak flash. There is a spark, there is fuel, but there is no use. They decided to use the pusher... They rolled him and rolled him, no signs of life at all. I started adjusting the ignition again, and not even just one more time, but 6-7 times. I had already adjusted it to such precision that it was awkward to climb into it. Then the client left on business, and I began to think what it was... After thinking, I decided to take a new reel from the store and try it. I put it on, click - the spark is simply ardent. Wow! Everything is clear: the armored wire, coil, and condenser became inoperative after 15 years of inactivity in a cold garage. Well, I think it’s time to start it, infuriate me with the kick starter.
Well, I stretch my legs, fill the tank, hook up the battery.
He stomped once and came to life! Yep, he's alive! Earned!!! Urrrraaah! Immediately I started working stably without failures. Wow, what a clear sound, not a single extra knock. Klaaaas. I warmed it up and turned it off for a while. I called the client and said: rejoice, it started!.. After 5 minutes he was already standing by the motorcycle and personally rejoicing at this success. He hadn’t heard it for so long that he fell into childhood and simply beamed with joy)))
IZH is alive! Everything works)) The hardest part has been overcome! There is very little left. Now we are waiting for the glove compartment lids and stroller to be painted. There is little left for the motorcycle itself: put on the glove compartment lids, put on the ignition cover, pump up the tires, adjust the carburetor mixture and you can go for a run-in on it! This concludes part 2. This is the kind of progress we have. I think the next part will be the final one. There I will finish everything, finish with the sidecar and it will be possible to hand over the motorcycle to the owner.
On this note, I say goodbye and see you again))) Part 3 will be coming soon 
ATVs built from scooters
A motor scooter (scooter) - a lightweight motorcycle with an engine located under the seat - is an ideal option on the basis of which you can create a homemade ATV. A vehicle created by craftsmen on the basis of a scooter is an excellent alternative to the best factory copies.
It is extremely economical in fuel consumption and at the same time has the qualities necessary for an ATV, such as mobility, light weight and relatively considerable load capacity. The peculiarities of creating an ATV from a scooter are that the frame, engine, power supply and ignition system must necessarily be transferred from the same device. But the fuel tank of the future vehicle should be a motorcycle tank, not a scooter, since it has a significantly larger capacity. The design of the rear and front axle will most likely be borrowed from a cargo scooter, the suspension from the shock absorber of a large motorcycle, and the control from the Oka or any domestic motorcycle.
Classical
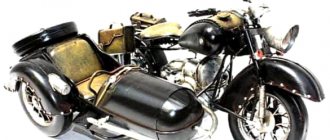
This ATV has a modest appearance due to its simple “Zhiguli” wheels, tight-fitting guards and the absence of other body kit. The base of the same MT-10 “Dnepr” was used: partly the frame, power unit, tank, seat.
In fact, a simple ATV is similar in functionality to a motorcycle with a sidecar, although it only has two seats. But it is more stable on the road.
Apparently, the owner - who is also the designer - saw his brainchild as a vehicle for leisurely walks, without encroaching on off-road exploits. The front suspension, like most analogues, is completely independent, the rear suspension is with a “Zhiguli” continuous axle, dependent, that is, without the ability of the wheels to react smoothly to difficult terrain.
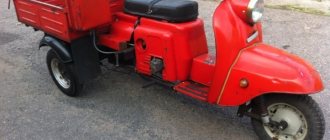
ATVs designed on the basis of the Ant scooter
For 36 years, the Soviets organized the production of Ant motor scooters. In total, over the years, 8 models have been produced, differing in gas tank volume and engine power. Today, the Ant scooter is an ideal base for creating an ATV with your own hands. In order to convert the “Ant” into an ATV, you should perform some fairly simple steps: slightly redesign the frame, work on reinstalling the seatposts, and so on. Installing the steering wheel and brakes of the future ATV will require special attention, continuous effort and time. When constructing homemade ATVs, it is strictly not recommended to use a brake system that has previously been used. It would be much safer to buy a new one. At the same time, the steering system can be used from an old Ant scooter or an Oka car. The final stage of creating an ATV from an Ant scooter is installing turn signals, headlights and stops.