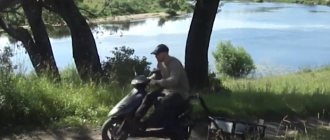
Does everyone remember this miracle? So, those who wish will find further drawings for this ATV so that they can assemble it with their own hands!
The universal motorized vehicle that I developed is designed to travel on any roads and forest paths; In addition, it can tow a trailer weighing up to 250 kg. The car has been in use for three years now, but I have had no comments on the design, handling or reliability.
In winter, it is easy to convert it by replacing the rear wheels with pneumatic ones and installing a steering ski in front; the car thus turns into a snowmobile, and the transformation takes less than an hour. The use of available materials in the manufacture of an all-terrain vehicle and the simplicity of the design may well ensure the repeatability of the machine even in a home workshop.
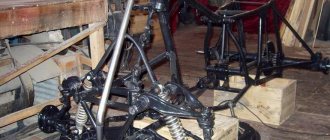
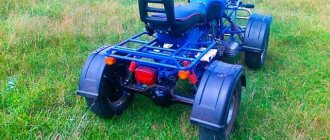
The MTS frame is made of round pipes, square profiles and angles. Its feature is detachable connections that allow you to remove the steering column assembly when installing the engine, as well as the front axle beam. Each of the connectors consists of a conventional “plumbing” coupling, a drive and a lock nut.
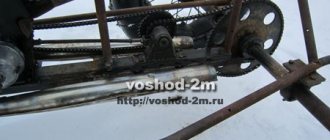
To tension the chain connecting the engine to the gearbox, the motor frame (part of the frame of the Minsk motorcycle) moves; the axle of the rear wheels with bearings also has the ability to move in the longitudinal direction, which allows you to adjust the tension of the second chain connecting the gearbox to the rear axle. The front and rear fenders are removable (they are absent in the snowmobile version). The joining of frame elements was carried out by electric welding.
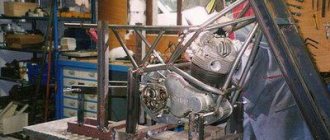
The engine of the motor vehicle is from a Minsk motorcycle; I have no comments on its operation. It is, of course, possible to install more powerful engines - from the Voskhod motorcycle or the Tula scooter; you just need to adjust the frame dimensions for them. The choice of the “Minsk” engine was due to its efficiency and low weight. Its power turned out to be quite sufficient for traveling on a snowmobile with a passenger; it is also possible to tow a skier or sled. The starting properties of the engine are quite satisfactory both in summer and winter.
The directional control of the summer version of the motor vehicle is provided by turning the front wheels using two rods; for the winter version there is a lever and a rod connecting it to the ski fork. The latter is borrowed from a moped. The front axle is from the SZD motorized stroller, although somewhat reduced: sections of its beams are cut out and the central parts (with the torsion bar mounting bolt) are welded to the peripheral ones (with the bushings of the suspension arms). In the winter version, the levers, steering knuckles, rods and torsion bars are dismantled.
The steering wheel is from a Tourist scooter; it fits perfectly with the steering shaft with an M10 bolt. The controls are standard, motorcycle ones. The brake lever is connected by a cable to brake pads mounted on the gearbox.
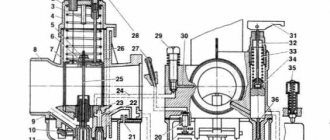
Gearbox. Its basis was the rear wheel hub of the Tula-200 scooter, to which a sprocket was welded on the brake drum side. The rear axle is driven by a chain with a pitch of 19 mm. The transmission brake allows you to significantly simplify the design of the rear axle. The sprocket is fixed on the axle with an M14 bolt; the hubs of the running wheels are fastened in the same way, as shown in the drawings. As the base of the gearbox, you can use not only the wheel hub of the “Tourist”, but also other motor vehicles.
The axle of the drive wheels is a rod with a diameter of 30 mm; its ends are machined to Ø25 mm, and turned hubs are put on these places. The wheels are used from a motorized stroller measuring 5.00X10.0. Winter wheels are of the usual design for pneumatic tires on low-pressure tires: with plywood disks, aluminum supports and inner tube fastening with belts. The axle bearings are double-row; they have conical inserts with nuts that secure the axle well and do not require high precision machining.
Optional equipment. This includes front and rear trunks, headlights, turn signals and brake lights; their attachment points are shown in the figures.
The design of the all-terrain vehicle is simple; it can be made in literally a few days in a fairly primitive workshop - of course, if all the component parts are available. And the possibilities for using such a machine are the widest: as a winch when plowing a garden, to drive a circular saw, like a simple garden tractor (excellent cross-country ability on arable land, so cultivation, hilling, etc. is possible). In addition, you can increase cross-country ability by installing twin rear wheels. You can also mount a reverse gearbox from a SZA motorized stroller, in which the differential is replaced by a shaft, and then the all-terrain vehicle will receive reverse gear. There is no wear of the tires due to the lack of a differential, and this does not affect handling.
An ATV is an excellent off-road solution. It is popular among fans of extreme recreation, fishermen, hunters and anyone who needs to get into places where a car cannot pass. This type of transport is easy to operate, has excellent maneuverability and is quite stable while driving.
Factory-made ATVs are quite expensive, so craftsmen choose the economical option: they make such machines themselves. Of course, this solution is not for everyone: you must not only have golden hands and the tools necessary for the job, but also have a good understanding of the structure of a car, motorcycle and the ATV itself.
If you have a persistent desire to make this miracle of technology yourself, you should start with planning. It is necessary to decide on the models on the basis of which the transport will be assembled, and draw up drawings for them. Be sure to think about what tools will be needed during the work process and make sure that they are in good condition. No matter how boring this activity may seem, nothing will come of it without prior preparation. If for some reason it is not possible to make a drawing yourself, you should find a ready-made version.
Next you will need the sources. From a technical point of view, an ATV is a cross between a car and a motorcycle. Accordingly, to make it you will need a motorcycle and a car. It is optimal to select domestic models on the secondary market; it will be inexpensive, but the quality is quite satisfactory for the construction of an ATV. It is better to use a small car like an Oka or Niva. Among motorcycles, the Ural is very popular for such purposes; you can take the IZH.
Technology
When the drawings are ready, the sources have been purchased, and the tools are waiting in the garage, you can begin making a homemade ATV. Ultimately, people’s lives and health depend on the quality of work, so we must take our time and do everything consistently.
First you need to select the engine and cooling system. Typically a motorcycle engine is used because it uses less gas and takes up less space, but a car engine can also be used. Since it can overheat in summer, it is better to take a model with air cooling, optimally forced (using a cooler).
The frame must be assembled so that the engine can be fixed on it. It will be located in front or behind - it doesn’t matter, the main thing is that it is securely fastened. There are two options here:
- Making a new frame from scratch from pipes. In this case, you must have equipment that allows you to bend the material.
- Take a motorcycle frame as a basis, remove the unnecessary and add the necessary.
Before making the final frame, it is advisable to do spot welding and consult the drawings.
Necessary tools and consumables
To do the job efficiently, you need to prepare the following tools:
- Bulgarian.
- Drill.
- Ruler - triangle.
- Roulette.
- Marker.
- Adjustable wrench.
- Equipment for bending pipes.
- Hammer.
- Welding machine.
Consumables:
- Circles for turbine.
- Electrodes.
- Drill.
- Sandpaper.
- Dye.
- Tassels
- Solvent and primer.
How to make an ATV with your own hands based on a finished frame?
It is necessary to remove everything unnecessary from it, leaving only the frame itself. The rear part is removed, and pipes are extended at the front, and the bridge is welded.
Next, spare parts from the car and additional metal pipes are taken; the best option would be water pipes. To make a frame for the body you will need a 70x40 pipe. Its length should be equal to or greater than the length of the spring, and its width should be the same as that of the bridge.
The cardan must be connected to the box using a rubber coupling, and to the bridge using flanges. The drive is easy to do with your own hands using a chain from IZH.
If you plan to install springs on shock absorbers, it is advisable to leave the rear pendulum with silent blocks.
After making the frame, you need to mount the engine on it. You can use a homemade muffler.
Transmission
It must be installed efficiently so that there is no play. The engine and drive can be removed from the motorcycle, and the wheels can be used from the car. The trunk is easily made from pipes with thin walls. There are two possible control options:
- Using the steering wheel (in this case, the base from the car is taken).
- Using a motorcycle handlebar. The fuel tank comes with the steering wheel. For a homemade steering shaft, a 20 mm pipe with 2.8 walls is suitable. There should be a limiter at the bottom.
The suspension can be made either front or rear. There are two options for making the rear:
- The rear axle of the car is used. It will need to be shortened. The design will be heavy, but there will be a differential, which will be useful on the highways.
- A gear-shaft design is used. A gearbox is mounted on the rear axle, and wheels are mounted on the disks. This is a lighter version of the suspension for a homemade ATV. It lacks a differential, but this is not critical.
The front suspension is used from a motorcycle. It is possible to make an all-wheel drive model, but this is much more labor-intensive work, and also requires certain skills in turning.
The pendulum arms are installed so that when turning the ATV wheels do not catch the engine. If you are using a Ural frame, you should move the wheels further out. Two bipods are welded to the steering column: on the left and right wheels. The front pillar should be inclined.
The cheapest all-terrain vehicle.
I recently gave a description of the Barkhan all-terrain tricycle, and I thought that its price of 250 thousand rubles was the minimum for all-terrain vehicles. But it turned out that there are all-terrain vehicles that are much cheaper! Here is the Vologda amphibious all-terrain vehicle called ZIS-5
Of course, the Stalin plant has nothing to do with this all-terrain vehicle. It’s just that its creators proceeded from the fact that it was as unpretentious as the legendary three-ton truck from the Great Patriotic War.
And the cost of the all-terrain vehicle at the beginning of 2022 was only 130 thousand. rubles
How was it possible to achieve such a minimum price for a four-wheeled all-terrain vehicle with all drive axles? Let's take it apart "piece by piece" and everything will become clear.
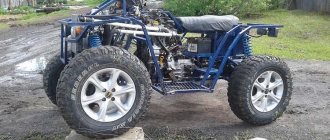
The design is a classic “fracture”, as they are also called “karakat”.
The frame is welded, made of a square profile, consists of two parts, which are connected to each other by a hinge mechanism made from a UAZ steering knuckle.
The engine, already time-tested, is simple and straightforward, single-cylinder Lifan190FD with a power of 15 hp. with electric starter and lighting coil.
In the minimum configuration of the all-terrain vehicle, the engine is started manually, but you can install a battery and use an electric starter.
The wheels are classic “rugged” ones. Made from disused rubber from heavy equipment. The tire weight is about 20 kg (from the original 80). They are used together with a tube.
Wheels of our own making. There is a special corner inside the rim that prevents the tire from “turning” on the rim.
The gearbox is taken from classic VAZ models
The gearbox is driven from the engine by a belt drive.
Instead of a conventional clutch, a circuit is used that weakens the tension of the drive belt.
Using a chain transmission (from an IZh motorcycle), torque is transmitted to the drive axles. The chain stretches very quickly, so the gearbox mount is made in such a way that the box can be moved, and thereby tension the chain.
Bridges from classic VAZ models
The brakes are hydraulic, but only on the front wheels. Steering is implemented using a steering rack from a VAZ-2108
Due to the volume of the wheels, the all-terrain vehicle can float.
The rear part of the all-terrain vehicle is a very impressive body. It can, if desired, accommodate 4 people or some cargo. The carrying capacity of the ZIS-5 is stated to be 500 kg.
And now the most interesting thing - how did you manage to make an all-terrain vehicle so cheap? This is due to the fact that most of the spare parts are used for the second time (used). Wheels, axles, gearboxes, steering, driveshafts are all restored, practically taken from scrap metal.
But with all this, the manufacturer gives a one-year warranty
An important factor in pricing was the fact that production was able to be put on stream: it is possible to produce (and sell) up to 200 of these “all-terrain vehicles” per month.
Technical characteristics of the ZIS-5 all-terrain vehicle
:Engine
Lifan190FD
gearbox
from a VAZ car
Axles
from a VAZ
car Dimensions:
length 3200 mm, width 1870 mm, height 1450 mm
Ground clearance
450 mm
Track
1650 mm
Weight
470 kg
Load capacity
(including driver) 500 kg Max.
permissible speed
no more than 25 km/h Max. water speed 5 km/h
Judging by sales volumes, there is a demand for such products. This is understandable: in order to travel from the village to pick mushrooms, pick berries or go hunting/fishing, it is quite enough, but the population simply does not have the money to buy all-terrain vehicles for huge millions.
A more complete review of the ZIS-5 all-terrain vehicle is available on UAZbuka
ATV with four-wheel drive
To make it, you will need a steering system from a car, a drive from a manual transmission, suspension and differentials. The suspension, like the steering, can be removed from the car. In such cases, the frame is cooked completely from scratch, based on the size of the engine of the future ATV. On the front suspension, you should take into account the space for the drive gearbox.
Using automotive products purchased on the secondary market, you can relatively inexpensively assemble vehicles for difficult roads and rural areas. One of the budget options for the source is the Ural motorcycle, since it is inexpensive, has rear-wheel drive and a four-stroke engine. Due to its positive aspects, it is popular.
A self-made ATV is not only a convenient and practical vehicle, it is a reason for pride and an opportunity to demonstrate your skills. Outwardly, it may be inferior to factory designs, but in terms of its technical characteristics, home-made ATVs are no worse.
Perhaps the only negative (apart from the time spent, since doing what you love is never a burden) is the need to involve auto experts in order to obtain documents and be able to register the ATV.
An ATV is a four-wheeled hybrid of a motorcycle and a tractor, a vehicle that is equally successfully used in both agriculture and recreation. Just a few years ago, Russian people considered the ATV a foreign curiosity. And today he is able to independently design and manufacture it. In addition, today a much more common occurrence in Russia are home-made ATVs, rather than factory ones. Next, we will try to figure out why it happens this way and not otherwise.
Final stage and finishing work
The final step in creating a homemade ATV is installing the seats and headlights. In this case, anti-theft headlights would be the ideal choice, because the ATV must be suitable for use in any weather. Particular attention should be paid to the number of seats on the ATV and decide whether it will be a driver-only seat or a driver-and-passenger seat.
Finishing work when creating an ATV consists of covering the resulting structure with metal and painting.
ATVs designed on the basis of Oka
For 20 years (from 1988 to 2008) in the vast expanses of our vast homeland, one of the most common cars was the domestic Oka (VAZ-1111, SeAZ-11116). Today, “Oka” is one of the most popular options for vehicles, on the basis of which home-made ATVs are created. In the manufacture of ATVs, the engine, gearbox, wheels and other auxiliary parts of the vehicle are usually used. Direct installation and construction of the ATV based on the Oka car is carried out in accordance with the drawings created by experienced designers. The defining moment when creating an ATV is to formulate the purpose of its use. Based on this, the future owner of the ATV opts for one of the two existing Oka engine options (35 hp and 53 hp).
Homemade ATVs: a detailed guide
Few people share the methodology for making ATVs, but there are those who do not hide their achievements. In this article we will share examples of the achievements of practicing auto mechanics who independently assembled all-terrain vehicles from scrap materials.
How to make an ATV with your own hands
Only knowledgeable mechanics can design and assemble an all-terrain vehicle. This will require not only experience, but also suitable components and tools.
To create an ATV, working parts from a car or motorcycle are used: for example, a motor from a Ural, Minsk, IZH Planet or Jupiter motorcycle, main components from a VAZ or Oka. Even failed but recycled components can be used.
ATV from Oka
Designer Sergei Pletnev from the Perm region assembled an ATV based on the Oka compact car. It took him a year of work to assemble.
Main components
- Steering wheel from a Ural motorcycle;
- VAZ CV joints and cross-wheel gearboxes;
- 15-inch front and rear wheels from Niva Chevrolet;
- gas tank from a 20-liter canister;
- engine, gearbox, clutch, part of the dashboard and headrest from Oka.
Specifications
Weight 430 kg Dimensions 2300 x 1250 mm Handlebar and saddle height 1250 / 900 mm Ground clearance 300 mm Wheelbase 1430 mm Track 1045 mm Maximum speed 65 km/h
ATV drawings
The two-cylinder four-stroke liquid-cooled engine from Oka produces 32 hp. With. This is not enough for a car, but for an all-terrain vehicle it is quite enough. The steering is of a hybrid type. A motorcycle lever and shaft are used on top, and car tie rods on the bottom.
The transmission of a homemade ATV is unique. It is based on modified components from VAZ.
To reduce speed and increase torque, the gear pair was removed and a chain drive was used instead. Inter-wheel gearboxes are borrowed from VAZ classics.
The auto mechanic decided to remove the axle shafts and replace them with VAZ front-wheel drive CV joints. CV joints were also used in other transmission components.
The muffler was designed by Pletnev himself. It consists of two chambers, the inlet pipe is sealed with asbestos.
To create a fiberglass body kit it took 10 kg of epoxy, 1 kg of plasticizer and 1 kg of hardener, 5 m of glass mat and 15 m of fiberglass.
ATV from a motorcycle
Another ATV by Sergei Pletnev, this time based on the heavy Ural-2 motorcycle with a range of 12,000 km. The main components were taken from the motorcycle - engine, gearbox, clutch, as well as a modified frame.
Do-it-yourself ATV - a full-fledged equipment or just a hobby?
Assembling an ATV with your own hands is fun. The creator gains experience, trains resourcefulness and patience.
However, homemade all-terrain vehicles should not be considered as a full-fledged alternative to factory models - even the best ATV, assembled with your own hands, will obviously be worse than a serial one.
In addition, self-assembly takes a long time - even experienced mechanics spend a year or more.
New equipment is covered by a factory warranty. In terms of comfort and reliability, serial CFMOTO models are unrivaled - you can go on a trip with them or go for high-speed rides.
Advantages of CFMOTO ATVs
Modern design and technology
The CFMOTO range is completely renewed every 3-5 years, and improvements in technology and design are made continuously throughout the entire production period.
High-quality components
CFMOTO equipment is equipped with components from recognized brands - CVTech (Canada), Sumitomo (Japan), Delphi (Italy, Germany), Bosch (Germany).
Room for two
All CFMOTO ATVs are full-fledged two-seater models with a comfortable fit; they allow both driver and passenger to comfortably accommodate.
Rich basic equipment
Right from the factory, most CFMOTO ATVs have: a winch, mirrors, hand protection, cargo platforms, power steering, alloy wheels and tires with mud tread.
Warranty 2 years unlimited mileage
Any CFMOTO equipment is covered by a two-year warranty without mileage limitation on all components and assemblies.
Reliability and unpretentiousness
Owners of CFMOTO equipment describe it as very reliable and high quality. The mileage of some ATVs exceeds tens of thousands of kilometers of operation in the most difficult conditions.
View addresses of CFMOTO dealer centers
ATVs designed on the basis of the Ural motorcycle
At the moment, several decades ago, the popular domestic Urals in Russia have been replaced by much more nimble and economical foreign models. In this regard, many people have their recent best “friend” standing idle and rotting in their garages. But not a single Russian person is able to allow good things to go to waste. Therefore, “Urals” are increasingly used to create a type of transport that is relatively new for Russian people. This motorcycle is unanimously recognized by folk craftsmen as the optimal basis for creating an ATV. Homemade ATVs made from it are an order of magnitude more economical and have greater draft power than their factory-made counterparts.
The creation of an ATV based on the Ural consists of two stages: designing the rear part and the front. The use of the Ural gearbox when creating the rear part of the ATV will ensure the design not only strength, lightness, but also simplicity. In the end, the finished product will not be equipped with a differential, which, in essence, can be sacrificed in the name of reducing the time spent on its creation. As for the design of the front part of the future vehicle, it will take much more effort and time than the previous stage. Most of the work is finishing up the front arms of the ATV. This is due to the fact that they should be less rigid than a car, but more powerful than a motorcycle.
Three-wheeled all-terrain vehicles
An all-terrain vehicle or ATV (all terrain vehicle) is a vehicle that is similar to a motorcycle, but has more than two wheels. It is used as a highly cross-country vehicle in many areas, and its main advantage is its all-season capability. There are several types of all-terrain vehicles: utilitarian, sports, children's; two, three or four wheels; all-wheel drive and mono-wheel drive. But our article will concern three-wheeled all-terrain vehicles.
Three-wheeled all-terrain vehicles are interesting vehicles. They are maneuverable, lightweight and unusual looking. They can be used both for overcoming off-road conditions and for transporting goods. They don't take up much space in the garage. Very easy to maintain.
To begin with, it was decided to use a motor from a Honda ST70 motorcycle. Takeuchi designed a tire measuring 22x11.0-8 (that is, with an outside diameter of 22 inches) with a pressure of only 2.2 psi (0.15 kg/cm2). Such wheels exerted a specific pressure on the ground less than a human foot, allowing you to drive anywhere without drowning in water. The engine from the Honda ST 70 was not enough, so they installed a more powerful 90 cm3 engine. The all-terrain vehicle was named ATC 90.
This model participated in the filming of the film “James Bond: Diamonds Are Forever” with Sean Connery in 1971 in the scene where Bond stole a lunar rover and security guards rushed after him. The scene turned out to be very spectacular and even today it looks very impressive.
Such tires did not last long, like the ATC90 model itself, they were very easily punctured, so it was decided to replace them with more durable and wide-profile ones, but we had to forget about the buoyancy of the device. Later, such all-terrain vehicles acquired more powerful engines and various versions, including cross-country ones. Many manufacturers, noticing that such all-terrain vehicle models had gained popularity, began to copy Honda's design. Suzuki subsequently developed the ATV. But people have not lost interest in three-wheeled all-terrain vehicles.
As for Russia, this topic came to us in the early 90s. From 1994 to 2005, the Tula TMZ-5.971 and ZDK 5 904 “Farmer” were produced. But our craftsmen made the so-called “caracats” on the bases of Izh and Ural motorcycles with low-pressure tires. In some regions of our country, such all-terrain vehicles are still used. They perform well in snow and off-road. And most importantly, assembling such a “karakat” is no problem if you have direct hands, tools and scrap metal. Instructions and drawings are available on the Internet. You can also use your imagination and assemble at least a six-wheeled “karakat” with the functionality that you require.
But what if you don't want to assemble the all-terrain vehicle yourself? Are there any inexpensive offers on the market?
Of course there are, and they are very affordable. As mentioned at the beginning of the article, there is a huge variety of all-terrain vehicles. But our article is about three-wheeled all-terrain vehicles, so let's look at some options that are available on our market and in particular in our BIKE18.RU store.
All-terrain vehicles Ataman Trike.
Three-wheeled all-terrain vehicles Ataman Trike are equipped with both gasoline and diesel engines, automatic transmission or Safari CVT. There are also options with all-wheel drive, which will allow you to go where a regular all-terrain vehicle cannot go, or go where it is almost impossible. And thanks to its light weight, large wheels and sufficient air pressure in them, it can be transported across a body of water by attaching it to a boat or pushing it in front of you. For them there are additional options such as: trunk, trailer, front rack, towbar ball. The advantages of Ataman all-terrain vehicles: simplicity of design, the presence of many options, reliability and a price that is lower than that of competitors.
Paxus all-wheel drive all-terrain vehicles are equipped with various Chinese and Japanese engines. In particular, the Paxus Veles 3x3 (ver. 2.0) can be equipped with three different engines: Lifan, 157 QMJ and Honda. They all have the same power, it all depends on your preference. If you want a reliable engine, then your choice is definitely Honda. Here are some advantages of Paxus all-terrain vehicles: only all-wheel drive, reliable and powerful engines, unique design, large load capacity.
Three-wheeled all-terrain vehicles were so popular in their time that they earned an appearance in the film of the magnificent James Bond universe, were further developed due to their unique properties and in our time are a universal vehicle for performing many tasks, be it just off-road travel or transporting goods in difficult conditions. lack of road surface.
ATVs built from scooters
A motor scooter (scooter) - a lightweight motorcycle with an engine located under the seat - is an ideal option on the basis of which you can create a homemade ATV. A vehicle created by craftsmen on the basis of a scooter is an excellent alternative to the best factory copies.
It is extremely economical in fuel consumption and at the same time has the qualities necessary for an ATV, such as mobility, light weight and relatively considerable load capacity. The peculiarities of creating an ATV from a scooter are that the frame, engine, power supply and ignition system must necessarily be transferred from the same device. But the fuel tank of the future vehicle should be a motorcycle tank, not a scooter, since it has a significantly larger capacity. The design of the rear and front axle will most likely be borrowed from a cargo scooter, the suspension from the shock absorber of a large motorcycle, and the control from the Oka or any domestic motorcycle.
Estimated technical characteristics
To determine the technical characteristics of the future unit, you can consider, as an illustration, the Tarus 2 all-terrain vehicle with 3 gears (or 2). The speed of such a machine is up to 60 km/h. The power plant is a four-stroke gasoline engine with a power of 7 hp.
Additional characteristics:
- Wheel diameter - 67 cm.
- Width - 23 cm.
- Tire pressure - 0.14 kg/cm.
- Ground pressure - 0.04 kg/cm.
- Ground clearance - 315 mm.
- The turning fork is 56°.
- The rider rises 69 cm.
- Fuel capacity - 4-8 l.
- Fuel consumption - 1.1 l/h.
- Maximum load capacity - up to 210 kg.
- Total weight - 72.5 kg.
ATVs designed on the basis of the Ant scooter
For 36 years, the Soviets organized the production of Ant motor scooters. In total, over the years, 8 models have been produced, differing in gas tank volume and engine power. Today, the Ant scooter is an ideal base for creating an ATV with your own hands. In order to convert the “Ant” into an ATV, you should perform some fairly simple steps: slightly redesign the frame, work on reinstalling the seatposts, and so on. Installing the steering wheel and brakes of the future ATV will require special attention, continuous effort and time. When constructing homemade ATVs, it is strictly not recommended to use a brake system that has previously been used. It would be much safer to buy a new one. At the same time, the steering system can be used from an old Ant scooter or an Oka car. The final stage of creating an ATV from an Ant scooter is installing turn signals, headlights and stops.
Engine and transmission
Engines from Soviet-made motorcycles such as the Ural or Dnepr are suitable as a power unit for a homemade all-terrain vehicle. For lighter and more maneuverable equipment, you can use units from Java or IZH motorcycles, which were equipped with single-cylinder two-stroke engines.
To simplify the design of the future ATV, it is better to use the same transmission and drive together with the engine that they were originally equipped with. To design a car with all-wheel drive, you will need to install an additional gearbox. This is used extremely rarely in home-made devices, since it will be difficult to implement an additional unit without dramatically adding weight at home.
Examples of homemade all-terrain vehicles
A craftsman from the Moscow region built a two-wheeled all-terrain vehicle almost from scratch. The frame was welded from a rectangular steel profile. The wheels are Chinese, for light ATVs. The driving force is a 6.5 liter Lifan type engine. The clutch was purchased along with the engine. A special feature is a one-piece gearbox with reduction gear. The brakes are scooter discs, the chainrings are 520 motorcycle ones. Steering wheel, wings, seat - from scrap materials.
Another interesting all-terrain vehicle based on the Oka car. Main components:
- steering column - from the Urals;
- CV joints, wheel gearboxes - from Zhiguli;
- wheels front and rear 15 inches - Niva Chevrolet;
- fuel tank - from a 20 liter canister;
- the engine, gearbox, clutch, headrest, part of the “tidy” are from Oka.
The result was an ATV with a mass of 430 kg, ground clearance of 30 cm, and top speed of 65 km/h. Dimensions - 2.3 x 1.25 x 0.9 m.
Frame and suspension
The frame for a homemade device is usually made independently from scratch. You can use blanks from an old motorcycle as material for the frame. The pipes from which they are made are lightweight and have the necessary strength and flexibility. As a last resort, you can choose the material yourself. The main parameter here will be weight. Excessively thick tubes or profile will make the ATV very heavy and difficult to ride quickly and maneuverably.
For suspension, you can use shock absorbers with springs from the same motorcycles. The suspension itself is shaped like the letter “A” and is movably mounted on the frame. Shock absorbers and springs should be selected in such a way that they can withstand the weight of the future car and ensure a smooth ride with good control over bumps and holes.
Steering and wheels
The steering can be partially used for a motorcycle, with the addition of two-wheel drive. The drive is carried out by adding levers and ball joints to the design, which can be borrowed from a car. The main task of the steering is accurate and comfortable steering.
Wheels for an all-terrain vehicle are best used from a car, as they are wider and will improve the vehicle’s maneuverability. The diameter of the wheels must be calculated in such a way that the homemade ATV can develop sufficient speed and also have a harmonious appearance.
Body and electronics
To install attachments, a gasoline tank and controls, you can use a motorcycle frame, which is structurally connected to the ATV frame. Particular attention should be paid to the stability of the all-terrain vehicle, its appearance and the comfort of the driver’s seat.
Don’t forget about installing all the necessary lighting and external alarm devices on your homemade ATV. The headlights, taillights and turn signals can easily be used from the same bike that everything else came from.
Look at this homemade ATV in action!
A battery-powered ATV for a child will, without a doubt, be a great gift, and at the same time safe for the environment
A battery-powered ATV for a child will, without a doubt, be a great gift that is environmentally friendly, easy to operate and does not require constant maintenance. If you want to please your child with such a gift, you have two options. The first is to buy a ready-made ATV. The second option is more complex, but will bring a lot of pleasure to those who are “friendly” with technology. As you probably understand, we mean self-assembly of a children's ATV. We will talk about how to make an ATV for a child with your own hands in this material.
If you are a creative person, then you will probably have your own ideas for creating an original model of a children's ATV. If this is a problem, you can borrow non-standard ideas from the Internet. The main thing is that you will enjoy the process and save on buying an expensive toy, because a DIY electric ATV will cost you much less than a ready-made one.
Stages of creating a homemade karakat
If you want to construct a Vologda swamp vehicle, the Karakat, or its other models at home, you should first of all purchase the necessary tools in advance, as well as acquire suitable components.
The complete list of necessary components and tools may vary and directly depends on the selected vehicle model that is planned to be manufactured. When analyzing the assembly process of such a product, it is necessary to highlight several important stages:
- Selection of the frame of homemade tractors or motor vehicles, which will become the basis of the future device.
- Planning and assembly of the rear axle and vehicle suspension.
- Selection and installation of suitable wheels.
- Installation of the power unit.
Since these types of elements seem to be key in the design of a swamp vehicle, it is advisable to consider the features of their selection and installation in more detail.
Frame
The main structural element is the frame, on which other components and assemblies will be installed in the future. Its choice directly affects the appearance of the future caracat, as well as its performance characteristics. Experienced craftsmen recommend using the frames of old domestically produced motorcycles, for example, IZH or Ural, since it is much easier to make a karakat from a motorcycle than from a car.
Spare parts from them are characterized by low cost, high strength and optimal characteristics for use as the basis for a swamp vehicle. After all, such three-wheeled models boast high maneuverability and maneuverability, which makes them universal. During the manufacturing process, it is advisable to use a frame drawing due to the complexity of the assembly.
Swamp vehicle frame
Suspension
When designing the chassis, it is strongly recommended to give preference to an independent type of suspension. This is due not only to the ease of its manufacture, but also to its excellent characteristics.
Wheels
The choice of wheels for a future swamp vehicle must be given special attention, since its maneuverability, as well as ease of operation, depend on this. Large wheels from high-power trucks are perfect for this type of use.
Be sure to read: Homemade tracked all-terrain vehicle
Low-pressure chambers are used throughout, allowing the all-terrain vehicle to overcome even large obstacles. If desired, you can make karakat discs, which will significantly improve the appearance of the structure. It should be remembered that for pneumatic tires it is necessary to use only truck tire tubes, and not the wheels themselves.
Engine
After the installation of the wheels has been completely completed, you should begin installing the engine, as well as the accompanying mechanisms necessary for the correct movement of the vehicle. As mentioned earlier, it makes sense to give preference to powerful units equipped with liquid and air cooling. A good option could be a product with a Lifan engine.
In addition, a home-made design can use not only gasoline engines, but also diesel counterparts, which will significantly increase cross-country ability, as well as make the vehicle more economical. However, this motor option also has a number of disadvantages that should be remembered.
First of all, this is unstable operation and starting in conditions of low temperatures, which is especially important for caracats, since they are often used in winter. The speed performance of diesel units is significantly inferior to their gasoline counterparts
Brakes
Since, subject to the correct selection of components and their installation, a karakat can develop impressive speeds on a more or less flat road, it is necessary to equip the design with brakes that can quickly stop the vehicle.
Engine on caracat
This is extremely important, since in off-road conditions it is often necessary to overcome large obstacles, the descent from which can significantly increase the speed of movement. For use in construction, in most cases it is recommended to choose drum-type brake mechanisms, due to their high efficiency
How to make a children's ATV with your own hands?
Decide on the appearance and design of your brainchild. In principle, you can assemble a children's electric ATV of any size and any complexity - everything will depend on your abilities and technical skills. You can stretch out the process over months, but if you want to please your child quickly, choose a simpler design; it can be modified as the child grows up.
You can take a donor model as the basis for a future ATV - for example, an old ATV or a children's car, or you can make the frame yourself. If you choose the second option, an accurate drawing is required. When making it, take into account the possibility of upgrading the ATV in the future - the frame should have a strong suspension. You can draw a drawing of the frame of a children's ATV yourself or take an idea from the Internet. When making your own ATV frame, pay special attention to the quality of the welding seams. The material for the frame is a square profile of 25x25 mm (or another size), as well as a ¾-inch pipe.
Stages of karakat development
Conventionally, we can distinguish the following stages on how to assemble a floating caracat:
- Creating a Frame
- Making a pendant
- Creation and installation of wheels
- Engine and systems installation
Caracat frame
First of all, you need to choose a suitable frame for installing all the necessary equipment and units on it. It is desirable if it is a walk-behind tractor belonging to the medium or even heavy class of equipment.
In fact, even the most “advanced” karakat is nothing more than a homemade all-terrain vehicle, which is usually mounted on a frame with four (4x4) or even three wheels (tricycle). The choice of the number of wheels depends solely on the design features of the intended vehicle and the previously developed design.
Suspension
The suspension of a walk-behind tractor will require special attention and precision on the part of the developer. At this stage, in addition to the suspension itself, the master will need to make a rear axle, which is done exclusively with his own hands.
Rear axle drawing example
The suspension provides a special design made of two separate parts connected together by hinges. In this case, the spars must mate with each other, for which a steering bushing is used. Ultimately, it is possible to form independent front and rear suspensions.
Maneuverability and cross-country ability should be the primary factors that you should pay attention to when making a homemade caracat design from a walk-behind tractor
Do-it-yourself karakat wheels
Caracat wheels are, in fact, the most expensive product, which requires a lot of time to be spent on. You can either purchase ready-made disks or try to make them yourself. It is worth noting that almost all vehicles (karakats), made as homemade products, are equipped not with wheels directly, but with tires and low-pressure chambers. Especially for these purposes, it is best to choose products installed on trucks such as the Ural, KamAZ and others.
Alternatively, you can use wheels from the trailers of these vehicles - if possible, you can purchase tires and a tube from the K-700 model
The most important thing to pay attention to is that the wheels must be large enough, which will allow you to easily move off-road in the future, easily covering significant distances without the risk of overturning.
Engine and systems
Installation of the engine and other systems is carried out at the last stages of work. These operations are carried out when a suspension with prepared wheels is installed on the vehicle frame.
In addition to the engine, clutch systems, brake elements, as well as systems responsible for removing burnt fuel products from the mechanisms are mounted.
It is worth noting that depending on the walk-behind tractor used as the initial unit, the power of the vehicle can be calculated.
For assembly you will need to use a standard set of tools and technological equipment and available materials
It is important to ensure the maximum possible safety of the vehicle driver and eliminate the possibility of accidents. A self-constructed karakat from a walk-behind tractor will allow you to move without problems in harsh weather conditions and will last for a long period of time without the need for regular repairs and expensive maintenance
Wheels
It’s better not to skimp on wheels and buy new ones right away - go-kart wheels or a set of wheels for a large garden wheelbarrow will do. For an older child, it is better to take wheels with a wide tread - they are perfect for off-road use. Don't spare money on stamped discs - at least on the simplest ones.
An excellent solution for a children's ATV is rear wheel drive from an electric motor through a ready-made or homemade gearbox. Consider also the steering system - this will allow the child to easily handle the ATV and increase its safety.
Instructions for creating an all-terrain vehicle
The front suspension of an ATV based on the Ural motorcycle is installed on double transverse A-arms made of a square profile.
The cylinder drive is connected to the motorcycle pedal. A fan from a Zhiguli stove is used as an engine cooler. The rear wheels are “shod” with tires with a pronounced tread, and road tires are installed on the front.
The steering of the homemade vehicle is hybrid. The lever is borrowed from the Urals, cams, rods, bipod - from VAZ. The pendulum rear suspension will be harsh, with a large torsional load on the unit. The trunks are welded from steel rods and equipped with sheet aluminum fenders and mud flaps for protection.
The characteristics of the all-terrain vehicle are similar to those of the Ural. The maximum speed will be lower, but the torque will increase. Due to automobile shock absorbers, it is more comfortable to move on an all-terrain vehicle than on a bike.
Motor and battery
These components are selected taking into account the capabilities and wishes of the young rider. There is no limit to imagination here - from the screwdriver motor to infinity. It is important that the installed electric motor makes it possible to develop the required speed - for children 5-8 km/h is enough, for older children it is interesting, naturally, the speed will be needed more. When choosing a battery, consider its capabilities. It should be installed in such a way that it would not be necessary to disassemble the ATV for recharging. You can use a battery from a donor scooter, uninterruptible power supply, or another suitable one.
When all the components are installed, take care of the aesthetic component - after all, for a child, the appearance of his vehicle is primarily important. You can use body kit elements from an old ATV or develop your own - it all depends on desire, financial capabilities and availability of free time.
A children's electric ATV with their own hands is a pleasure for adults and a joy for a child from owning a unique personal transport. published