- it is necessary to properly prepare the car for negative temperatures;
- don't freeze yourself.
Of course, the most optimal options for driving in snowy areas are the so-called all-wheel drive ATVs, which are characterized by differential locking. But also on rear-wheel drive ATVs in winter it is possible to get a fairly large number of pleasant sensations. Those who are using an ATV for the first time in the winter should know that they should ensure that the device is 100% ready to deal with low temperatures. First of all you should:
- read the instructions for the all-terrain vehicle;
- make sure that all the necessary fluids in the device are able to operate stably at temperatures below zero.
General rules of constructions
Self-made snowmobiles are often completely different. But they are all united by the desire to give the snowmobile the following properties:
- do not fall into the snow;
- move in the right direction and at the right speed.
In order for a snowmobile to satisfy these conditions, its design must contain several mandatory elements:
- supports (wheels, tracks, runners);
- engine;
- steering wheel that changes the direction of the snowmobile;
- frame.
When making a homemade snowmobile, you can use a wide variety of elements and parts from other devices, which greatly simplifies the process.
Simple children's snowmobiles
If you want to make a snowmobile for a child, then you should not use a powerful engine. Homemade products must be created in accordance with the age, weight and height of the child.
It’s worth starting with the support - installing the skis under the frame. To make the process easier, you can use a snow scooter. Then you should install a motor with low power (about 2 horsepower). It can be removed from a chainsaw.
If you are planning a children's snowmobile, then there is no need to further strengthen the frame, but for transporting adults this procedure is required.
Ice motor sleigh
Movement in winter, especially on ice, is very difficult. Therefore, many fishermen who do not have the budget to purchase expensive equipment are thinking about making ice snowmobiles themselves.
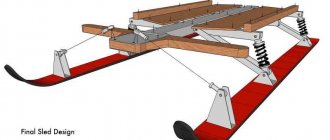
Unlike a children's snowmobile, an adult's snowmobile uses a sled instead of a snowmobile.
Next, attach a chainsaw motor with a power of 4-5 horsepower (you can use a “Friendship” chainsaw). This design is well suited for icy surfaces, but is not suitable for moving on snow (especially loose snow).
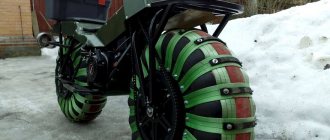
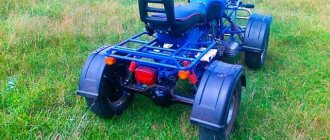
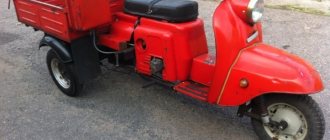
Inflatable wheels
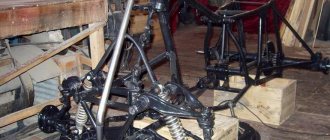
You can also make a snowmobile on inflatable wheels. To do this, take rims from a motorcycle or bicycle and wide inflatable chambers from the wheels of a truck or tractor. Chains or crossbars are attached around their circumference to increase traction. To give the cameras strength, liquid rubber should be applied to their surface or some kind of waterproof material should be glued. For such snowmobiles, you can take frames with engines from motorcycles (Ural or Dnepr).
On caterpillar tracks
Homemade snowmobiles on tracks have high speed and reliability, which is why they are popular.
Tracks can be made in several ways, for example, from truck tires or from conveyor belts.
Plastic tubes less than an inch in diameter, cut lengthwise, are screwed across the tape. Conveyor belt tracks can be reinforced with a chain.
If you cut the sidewalls from truck tires with winter tread, they can also be used as tracks. To do this, you need to sweep the edges with fishing line in centimeter increments.
Upgrading homemade snowmobiles
After using a homemade snowmobile for the first time, people notice some shortcomings that they want to correct.
To begin with, it is worth making it possible to use a snowmobile not only in the daytime, but also in the dark. You will need a lamp and a generator (you can take a bicycle one).
To prevent the wind from sweeping snow into your eyes, you can install ready-made windshields on your homemade vehicle or come up with something of your own.
Recommendations
When working on a snowmobile, it is important to follow the main manufacturing rules - evaluate engine power, stability, balance, wear resistance and replaceability of parts and the structure as a whole. It is better to use a motor with a volume of 125 cubic centimeters, with one or two cylinders, two-stroke. The desired power is from 15 horsepower. The speed of the snowmobile you assembled can reach up to 80 km/h.
Based on the parts, capabilities and desires you have, you can create the basis of a snowmobile at home. And then they usually work on modeling, improving the seats, you can even attach a cabin - for protection from precipitation or a trailer part during the transportation of goods.
When creating a snowmobile with your own hands, the most important part is the motor. It must be tested before installation on the structure prior to assembly.
When using a homemade snowmobile, you must follow safety rules - have a protective helmet, appropriate clothing and gloves (gaiters). First of all, you should conduct a test drive and make sure that there are no problems with the chassis and engine parts.
How to make a snowmobile with your own hands: detailed instructions
Features of homemade snowmobiles
Self-propelled guns made by yourself have a number of features:
- Riding a snowmobile can be quite dangerous and this must be taken into account, so although most snowmobiles cannot go faster than 15 km/h, extreme care and caution must be taken when assembling a snowmobile.
- When riding a snowmobile, the user will not get stuck in a snowdrift, since the device is equipped with a crawler walk-behind tractor.
- The snowmobile is reliable and can easily overcome many obstacles.
- When making a snowmobile with your own hands, the creator carefully selects the parts and assembles them into a single system, so the designer is responsible for the quality of his device.
- The cost of snowmobiles is quite high, but its individual elements cost little; By assembling a snowmobile yourself, the designer also saves on labor, so a homemade snowmobile costs several times less than a purchased one.
Preparation
First you need to make a drawing of the device. If you do not have such skills, then simply calculate the parameters of the machine. The design of a snowmobile is quite simple, so you can easily make a device based on a sample or video.
To make a snowmobile, you will need:
- pipe with a diameter of 40 mm. and a wall thickness of 2 mm. – needed for the frame and other frame elements;
- conveyor belt 3 mm thick. (you can use V-belts) - this is the main element of the track mechanism; lugs with a diameter of 40 mm are made from them. with a wall thickness of 5 mm;
- engine, fuel tank and carburetor from a motorcycle (for a snowmobile);
- sprockets and chain from motorcycles and snowmobiles;
- any drive shaft of suitable size;
- skis from another snowmobile;
- steering wheel with throttle and cable (from a motorcycle);
- the platform is optional because you can mount all the parts directly to the frame (most people skip this part because it's a little tricky and has little payoff); Several seats can be attached to the platform;
- seat;
- body;
- small elements (nuts, bolts, hinges, etc.).
Materials and manufacturing
When making a snowmobile on tracks with your own hands, you can follow this algorithm:
- Calculation of frame and chassis.
- Engine selection.
- Initial frame welding.
- Steering.
- Installing the engine on a temporary mount.
- Checking the design.
- If the test is successful, complete welding of the frame and installation of the engine.
- Drive system.
- Caterpillars.
- Attaching body parts.
- Final check.
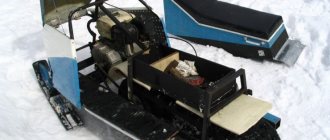
You need to start work by making a frame on which the remaining elements will be attached. The frame should not be massive, otherwise the device will turn out to be heavy and lose maneuverability. It is desirable that its length be ±2 m.
Then the following are attached to the frame:
- drive shaft and receiving star;
- power plant with a transmission star and gas tank;
- front and rear wheel axles;
- front suspension with steering wheel and skis;
- seat and body.
Then tracks 40-50 cm wide are made. They can be made from conveyor belts or V-belts.
Information on how to make lugs from plastic pipes is provided above.
The rear wheel axle is secured using a movable guide element. It allows you to fix the position of the axis in a certain position. This is done so that the user can adjust the tension of the tracks.
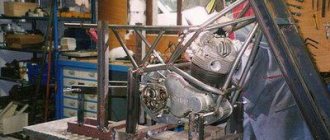
Features of creating a snowmobile from Izha
You can make a snowmobile from Izh with your own hands in several ways. The first is a wheeled ski option. At its core, the design does not change, only the wheels are removed. Instead of the front one, a ski made from a pipe is installed. It is attached to the axle shaft to the front fork.
- For the rear of the future snowmobile based on the Izha, a tracked module is being manufactured, which will be attached in place of the wheel. In addition to the frame, it will include a rear axle from a UAZ vehicle, the driven gear of which must be replaced with a rear sprocket.
- A snowmobile from Izh must have a chain intermediate shaft. The wheeled version uses cameras from PTS-2-4. Discs are made by welding rods and attaching wheels using belts. A snowmobile, which you can make yourself using the Izha base, is capable of reaching speeds of up to 60 km/h.
Useful tips
There are some tips:
- self-propelled tracks can be made of any width, but with a large caterpillar the self-propelled vehicle will lose maneuverability, and with a small one it will sink in the snow;
- you need to correctly calculate the center of gravity - if the power plant is located in the front, then the driver’s seat should be moved either back or to the center above the front axle;
- to relieve the load on the tracks, you can install a front ski between two tracks about 50-70 cm long, however, this makes the snowmobile manufacturing process more labor-intensive;
- it is necessary to minimize the distance between the shaft and the power unit to avoid loss of energy transmitted to the shaft.
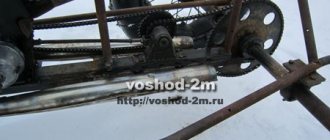
Manufacturing of caterpillar propulsion
- In the first case, a track-type mover for snowmobiles can be made on the basis of a classic roller-bushing chain and transport belt. When making a caterpillar, no special tools are required. To extend the service life of the tape, you need to stitch its edges with fishing line. The rings are connected by connecting the ends of the element.
The thickness of the tape is selected based on the power of the motor. When using domestic motorcycle engines, a tape up to 10 mm thick, which is used in agricultural conveyors, is ideal. This type of track can be easily repaired if it breaks.
- The second option is to connect V-belts to lugs that are attached with screws or rivets. The result is a caterpillar track with holes for the drive sprocket. There is a small gap left between the belts.
What to do with the engine and battery
If you store your ATV in a garage during the winter, it is advisable to start its engine regularly: at least once a month, and preferably twice, for ten to twenty minutes. During such warming up, the engine will not work at full strength, but will still be able to maintain its technical characteristics and remain in good condition. If the ATV will not start in winter (for example, if it is stored and always located in an unoccupied country house), then the following actions should be taken:
- Place the vehicle on some elevation so that its wheels do not come into contact with the cold ground. Bricks or building blocks or beams are quite suitable for such purposes.
- Create tire pressure slightly above the minimum level. Otherwise, the tires may be damaged due to low and high temperatures.
- Remove the battery from your ATV, fully charge it (charging is mandatory, since a discharged battery will quickly become unusable) and send it for winter storage in any heated room. You should also monitor the charge level and, if necessary, recharge the device (the minimum value is not lower than 12.5 V).
- Create an oil film so that all elements are protected during cold weather. For contact areas made of plastic or rubber, use high-quality specialized silicone lubricant.
- Do not drain the fuel, leave either a full fuel tank or about one or two liters of gasoline. Next, close the gasoline supply valve and idle everything that remains in the carburetor. The fuel will protect the inner layer of the tank from corrosion. If the tank is plastic, some ATV riders advise, on the contrary, to drain the fuel (such information may be contained in the instruction manual). And to minimize the risk of rust, add a fuel stabilizer to the tank along with gasoline.
- Check the closed state of the valve using the TDC mark.
- Unscrew the spark plug and pour thirty or forty cubic meters of good motor oil into the cylinder. Then replace the candle.
Winch.
In order for riding an ATV to be normal in winter, you should pay attention to the winch, as the only means that can pull you out of snow captivity. To do this, it is necessary to competently maintain the structural element even before the onset of winter, according to the instructions attached to it. To do this, it is necessary to change the lubricant to low-temperature lubricant and remove water if it has entered the gearbox. For the latter, Liqui Moly Marine Winschfett marine waterproof synthetic lubricant with Teflon is optimal. Its temperature range allows you to use the winch down to -35 °C, and one tube is just enough. Electronic-Spray contact lubricant is well suited for servicing electrical contacts and solenoids; it will also protect against freezing.
Caterpillars.
Perhaps the most labor-intensive and expensive way to deal with snow barriers.
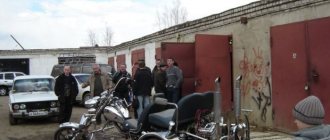
But, despite the above, the fact that this decision is relevant is evidenced by the fact that on any ATV forum there are a lot of topics in which the ATV issue is discussed.
Studying the advertising brochures for track kits, you will notice that most of them promise to “turn an ATV into a snowmobile.” And in this not entirely correct statement lies the negative part of the ratings of users who wanted to get a snowmobile from this upgrade... You can’t make a snowmobile from an ATV, or rather, you get a very specific kind of snowmobile. The first thing that will follow the installation of tracks is an increase in its dimensions.
Click on the picture to enlarge it.
The next special feature that an ATV on tracks automatically acquires is a heavy steering wheel. There are no miracles. A 100-kilogram set is an additional and significant load, almost twice as heavy as the wheels.
The consequences of the installation are that the maximum speed drops, and specific restrictions on overcoming obstacles appear. Thus, the angle of attack of the rear tracks of many manufacturers does not allow them to overcome obstacles (logs, stumps) at a right angle. The rear tracks simply “stick” into them. This explains the specificity of driving through such obstacles at an acute angle: you have to unload the caterpillar by counter-hanging.
Now about the advantages that a utilitarian snowmobile could not even dream of compared to its quad-track alternative. The most important advantage is the traction force of a “quad-snowmobile” with higher cross-country ability. Based on the combination of these qualities, it will carry or drag away hundreds and hundreds of kilograms more cargo, and will be less critical of the trajectory itself. With the exception of the forest thicket, as described above. The ATV's ability to climb hills and slopes increases. And not “on the move”, as on a snowmobile, but from a standstill, under tension. Which is an obvious advantage when hunting or when performing some household needs. True, this statement does not apply to all sets, but more so to winter ones.
In short, it’s up to you, dear quad riders, to decide.
Transmission.
She doesn't need any special events. It is advisable to replace the axle oil with a fully synthetic one if you have not done so previously. Motorbike synthetics are excellent for heavy loads - Motorbike Gear Oil VS 75W-140, if the operating instructions allow such oil. Boots on CV joints must be regularly treated with silicone so as not to lose elasticity in cold weather. In winter conditions, the chain needs treatment less often and you can use the same chain lubricants as in summer, for example: Motorbike Kettenspray Enduro.
Fuel system.
Pay attention to the fuel system. Both carburetor and injection systems need care, for which the Motorbike 4T-Bike-Additiv additive is well suited for cleaning. It cleans the system of carbon deposits, makes it easier to start the engine, improves traction and protects against corrosion.
With proper care, an ATV will give you pleasure both in summer and winter. There is nothing scary or frightening about winter trips; it is enough to prepare your equipment and acquire the appropriate equipment.
Review of factory products and homemade products for snowbike
- The Canadian company Timbersled offers several versions of its own systems for Japanese-made motorcycles. At first glance, the design is quite reliable, but the price of the product is not affordable for everyone. Manufacturers are asking $5,500 excluding delivery for the most inexpensive kit in the line. The weight of the products is slightly more than 60 kilograms.
- The Russian brand VORTEX offers kits, which they claim have no analogues in the world, for enduro and cross motorcycles with power from 250 to 750 cm3, which enable motorcyclists to engage in sports in winter. What’s important is that the kit comes with a set of bushings, with which the track and ski, according to the manufacturers, will exactly fit your motorcycle.
- The Tyumen company “Alpha Drive” is a manufacturer of Snowrider kits. The line includes three models differing mainly in the length of the tracked chassis. The weight of the set ranges from 60.5 to 64 kilograms.
“The adapter kits produced allow the track kit to be installed on almost any modern lightweight enduro or motocross motorcycle with a left-hand chain, with an engine capacity of 250 cubic centimeters or more.” -indicated on their website.
The price of product sets is from 318,000 to 342,000 rubles, delivery will be at your expense. The set of adapters is not included in the price, but is sold separately, the cost of the set is 10,000 rubles.
Let's go down the price range closer to the people.
- “Price without canister and case.
- The 101″ track kit is ideal for groomed trails as it does not require snow to lubricate the track. The set is suitable for riding in fields and forests.
- Suitable for any motocross or enduro motorcycle
- KTM. Yamaha. Husqvarna. Kawasaki. Honda. Suzuki. Kayo. BSE. Avantis. GR7. 125. 140. 150. 160. 190. 230. 250. 350. 400. 450.
- Caterpillar for a motorcycle. Snowbike. Snowbike. Snowmoto.fun. SMF. “
- Track kit SMF CROSS 101″ from 136,000 rub.
- Track kit SMF 129″ from 185,000 rub.
- Track kit SMF PRO 127″ from 250,000 rub.
- The Samara company SNOWBIKE LLC offers a set with adapters that are included in the price of the set. The issue price is 76,600 rubles. + delivery by transport company.
- For motorcycles with a volume of 110-250 m3, the company offers potential buyers a kit costing 62,500 rubles. which is suitable for motorcycles from Japanese, Chinese and European manufacturers.
- And from the same company, an offer and, in my opinion, not a budget offer.
- Electric Crawler Fat Bike Conversion Kit.
“Although the fatbike itself is quite a passable device due to the wide tires, its passability ends in loose snow. At speed, it will still be able to travel some distance in the snow, but if you drove into a snowdrift 30 degrees or deeper, then its cross-country ability will not be enough. In addition, on snowy climbs, of course, any tires, even the widest and studded ones, will slip. Therefore, we are developing a kit to increase cross-country ability. In effect, you get an ultra-light single-seat all-terrain vehicle.”
- -Assembled weight: 15 kg
- -Speed: up to 45 km/h
- -Distance on one charge: up to 70 km
- - Load capacity: 140 kg
- -Motor power: 2.2 kW
- -Battery capacity: 26 Ah.
- -Tracks width: 15-22 cm
They are asking 80,000 rubles for this device.
This is not a complete list of devices that will turn your motorcycle into a maneuverable, smaller, but more unstable and injury-prone version of a snowmobile.
For people with a technical mindset, skillful hands and a desire to create their own creation, on the vastness of the World Wide Web there are enough technical developments for the production of such kits. Good luck!
Direct winter operation
A winter ATV is used especially carefully and requires certain care, which differs from maintenance and service in the warm season, which includes the autumn, summer and spring seasons. It is necessary to take into account the weather conditions in order not only to drive normally without threats to life, but also to keep all mechanisms in good condition.
With the onset of winter, weather forecasts change, and different weather conditions may be observed: plus and minus temperatures, snow, freezing rain, frost, frozen surfaces, and so on.
To successfully and without problems ride an ATV in winter, you should follow these rules:
- Installation of studded rubber tires or wheels with deeper treads. Some people add chains to the wheels, but this option is not suitable for a long trip. It is applicable to one-time short movements at low and medium speeds to perform certain actions (towing, for example).
- Snow removal. Sometimes they have to be carried out every day if there is heavy snowfall.
- Warming up the engine before starting to drive. The engine must be warmed up well for at least five minutes so that the oil is distributed and can disperse evenly and fully through the main channels. Only when the engine warms up after starting can you start driving. It is possible to speed up the process by briefly accelerating in neutral mode at not the highest speeds.
- Heated gas trigger and handles. The option of heating the trigger part and handles will provide comfort when driving in cold weather.
- Monitor your battery charge level. Discharging at low temperatures poses a risk of serious damage.
Owners of injection ATVs rarely encounter difficulties. If you have carburetor equipment, then you need to add a starting enrichment agent to standard operation. Start-up is carried out with the enricher in the open position. When the engine is started, you need to move the lever to the middle position. And after the engine warms up, the lever is moved to the right, to the standard position.
If there is no enricher, you should manually close the damper to enrich the air-fuel mixture. Otherwise, the engine simply won’t start (sometimes it starts, but immediately stalls): you turn on the ignition switch, press the starting button, give a weak spark, but will not achieve a quick, full start.