The motorcycle ignition coil is checked using a visual inspection and on a specialized stand. If any malfunctions are detected, the coil must be replaced with a working copy.
The ignition coil is an integral part of the motorcycle starting system. Failure of the coil may make it impossible to start the engine. To ensure the operation of the motorcycle starting system, the ignition coil must be regularly checked for defects.
Testing at the stand
Testing a coil on a bench includes sequentially performing the following tests:
1. Check the functionality of the primary winding of the coil. The low-voltage terminals of the coil must be connected to a resistance meter, which must correspond to the standardized value specified in the operational documentation.
2. Check the condition of the secondary winding. An ohmmeter is connected to the high and low voltage terminals of the ignition coil. If measured in p.p. 1-2 resistance does not correspond to standardized values, the coil must be replaced with a new one.
3. Check the ground resistance. To do this, you need to connect the resistance meter with one contact to the coil body, and short the other one to each of the terminals in turn. If the resistance is less than the specified value, the ignition coil must be replaced.
4. Check the coil for inductance. If the inductance indicator does not correspond to the value specified in the documentation, it is necessary to replace the coil.
Causes of ignition coil malfunction
Causes of ignition coil malfunctions
What could be the problem with a faulty ignition coil? But first of all, what signs of a coil malfunction can haunt a vehicle? You can understand this by the following signs:
- Misfire moments occur
- High coil temperature and fast heating
- Engine refuses to start
- Vehicle dashboard displays fault messages
Coil malfunction can occur for a number of reasons:
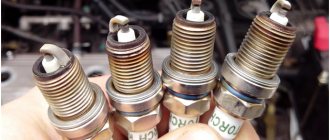
- Bad candles
- severe overheating
- Impact of the external environment
- Mechanical damage
Try to buy only high-quality spark plugs, this will get rid of problems with the ignition coil. It is also worth remembering that mechanical damage can occur due to strong vibration or oil leakage and contact with the coil, this can cause a short circuit. Strong vibrations can damage the insulation and cause breakdowns. As for temperature, the coil is initially designed to operate in high temperatures, but it is worth periodically allowing the coil, spark plugs and engine to cool down.
What types of ignition coils are there?
Based on their purpose:
- Having no contact.
- Contact.
If your car does not have a distributor, the spark plug coil is 100% contactless. For customized coils, only this type is provided. But if the distributor has special equipment - in the form of breaker contacts - you use a contact-type ignition system.
If the criterion is the number of spark plugs available, they are divided into:
- Are common.
- Individual.
There are also differences in winding insulation options . They are:
- Filled with oil. The housing contains metal; transformer oil is used to insulate the windings. If the housing loses its seal, this device will simply stop functioning. The leakage of such oil leads to interturn electrical breakdown of the windings (since they are absolutely not protected).
- Dry (filled with compound).
Setting up and adjusting the ignition on Dnepr and Ural motorcycles.
The procedure for adjustment and tuning is the same for all motorcycle models. Features are associated only with the specifically installed electronic ignition system. General order:
- We install an electronic ignition system on a motorcycle;
- We set the ignition timing by turning the shaft and aligning the stamped arrow on the flywheel with the mark on the engine crankcase;
- We connect the wires according to the manufacturer’s diagram;
- Without turning the shaft, we adjust the position of: module, flow sensors (Hall, optical), modulator;
- We secure the elements of the ignition system.
- We rotate the shaft and control the formation of a spark;
- We adjust the optimal ignition timing after a test run.
When using 92 grade gasoline on motorcycles, we make adjustments from the standard ignition timing adjustment. We put it out a little earlier.
Installing an electronic ignition system will allow trouble-free operation of the motorcycle in any weather and climatic conditions.
Three diagnostic methods
Next, consider three proven methods for checking the ignition coil.
Visual testing method
The strength of the visual testing method (known as the “spark test”) is its ease of implementation. It does not require any equipment and can be performed even on the road. The main disadvantages are reasonably considered to be low accuracy, high labor intensity, and the risk of electric shock.
This method will require a working spark plug and pliers, and you may need a socket wrench.
It is advisable to start work no earlier than a quarter of an hour after turning off the engine, so that it has time to cool down.
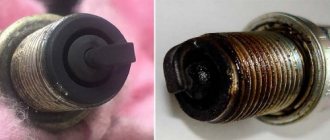
First, the wire of the first spark plug is removed and the control spark plug is connected to it. Holding the spark plug by the insulator with pliers, we touch the threaded part of the skirt to the uninsulated metal section of the engine housing. When the engine is running and the coil is working properly, an intense purple spark jumps between the electrode and the housing. To minimize risks, you can not start the engine, but turn on the starter for a couple of seconds.
The conclusion that the coil is faulty is made if the spark is weak or has a pronounced yellowish tint. The absence of a spark indicates a coil failure or a complete lack of contact.
If the engine has several coils, the control procedure is performed for each of them.
If there is no spare working spark plug, a spark plug that is unscrewed from one of the engine cylinders is used as a visual indicator.
A voltage of several kilovolts is applied to the spark plugs. Taking this feature into account, when using the visual inspection method in any form of its implementation, be careful and do not touch unprotected parts of your body to uninsulated parts of the on-board electrical wiring.
Second
This method of identifying problems is similar to the “scientific poking” method. This test of the ignition coil involves disconnecting the terminals one by one while the engine is running. Although this method may seem barbaric to many, it helps to quickly identify a faulty coil.
By disconnecting the wire from the coil, the discharge will stop flowing into the fuel combustion chamber and engine operation in this cylinder will be disrupted. A failure can be easily determined by the sound and rhythm of the motor. If there is no change in engine operation when the next coil is turned off, this is a faulty part.
The third is the scientific way
To check the ignition coil, you will need a multimeter. Remove all coils and check the resistance using a tester. The resistance value is affected by corrosion on the contacts, so before checking, clean the elements from dirt, oil residues and other formations that interfere with accurately determining the characteristics of the element.
To measure the resistance on the primary winding, the probes of the device must be installed on both contacts. In this case, the multimeter must be set to 20 ohms.
Depending on the car models and the type of coil, this value can range from 0.4 to 2 ohms.
However, all four coils (assuming your internal combustion engine has 4 cylinders) should have approximately the same resistance.
To measure the secondary winding, connect the first probe of the device to one of the contacts, and the second to the spring that goes to the coil. Since the resistance value on the secondary winding can be from 6 to 10 kOhm, the multimeter flag should be set to 20 kOhm. Thus, you can easily identify the faulty coil and replace it.
It is worth noting that the resource of this element is 60-70 thousand km. According to the experience of many car enthusiasts, original spare parts installed on a car by the manufacturer can withstand more than 100 thousand, so purchase quality parts from reliable suppliers.
Video: How to identify a faulty ignition coil
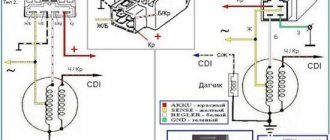
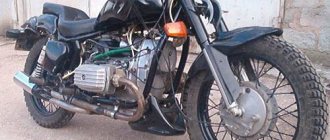
Contactless ignition system for motorcycle Ural, Dnepr
Solving the problem of the reliability of the ignition system on my Ural motorcycle, I came to the conclusion that it was necessary to install a BSZ...
Having considered the huge abundance of options for contactless ignition systems, both on the market and on the Internet, I decided to make for myself the simplest option for the electronic part. Namely, use a Zhiguli Hall sensor and switch. The reason for choosing this particular combination was that I like to travel far and for a long time, and you must admit that if a specific unit specifically for a motorcycle fails along the way, it is not always possible to find a replacement for Saurman or an opto sensor somewhere in the outback, just as it is not always possible to carry it with you contact ignition kit in reserve. And spare parts for Zhiguli can be found in any village.
Search for BSZ kit
So, the choice has been made, all that remains is to implement it. I went to the market. I bought a switch for a VAZ 2108, a Hall sensor and a piece of wiring from a VAZ 2107 distributor. I bought a two-terminal coil from Oka. I also needed an old breaker housing to make a mounting panel for the Hall sensor that I had.
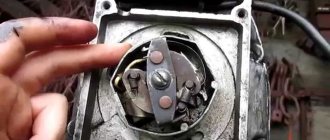
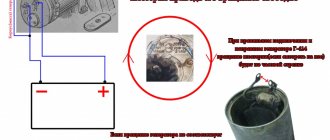
Troubleshooting problems with the ignition system on a Ural motorcycle
Checking the ignition system, first of all, occurs with an initial check of the functionality of the breaker. It is important to pay attention to the operation of the incendiary advance machine , in which various complaints are undesirable. The resistance of the primary winding, which is measured by the tester, must be at least 6 ohms. Next, the secondary winding is checked, for which the tester is connected to the high voltage connections. The voltage of such a winding should be exactly 10 kOhm.
Repair of Ural and Dnepr motorcycles , like many others, cannot be done without all these manipulations aimed at optimizing its operation. Checking the ignition does not end there. Next, the spark plug caps and high voltage wires ring. Resistance indicators, in these cases, should vary. The plug caps should have approximately 2 kOhm, and the wires should have almost zero (this is an important aspect). During these manipulations, the problem will be found and eliminated.
Ignition adjustment and repair in the Urals and Dnieper
The ignition on a motorcycle can be checked by following the following procedure:
- We take the most ordinary incandescent lamp, which is naturally working. We connect one end of the wire contact to ground, and connect the second, which comes from the breaker, to the terminal. Setting the ignition on Dnepr and Ural motorcycles is done by turning the crankshaft until the marks on the crankcase and on the flywheel, which has the letter “P,” completely coincide. Next, turn on the ignition, while retracting the automatic weights to the very end. Under this circumstance, the incandescent lamp should light up instantly. If this does not happen, i.e. the lamp does not light up, or this happened before the weights were completely retracted, then ignition adjustment is necessary.
- We loosen the screws on the breaker. Next, you need to move the weights to the very end and slowly turn the breaker structure until the incandescent lamp starts to burn. This happens exactly the same as when contacts are closed, when a spark jumps between the electrodes of the spark plug itself. After carrying out these procedures, the structure of the breaker and its position must be securely fixed using fastening screws. It is worth noting that in all MT models, the ignition timing must be at least 34 degrees before dead center.
Adjusting the ignition of a Ural motorcycle
In general, installing an ignition on Ural and Dnepr motorcycles significantly increases the main technical indicators of this motorcycle. The ignition setting allows you to easily start the motorcycle even in the coldest time of the year, when consistently negative temperatures prevail. In addition, the ignition installation of the Ural motorcycle allows you to optimize and normalize the operation of the engine, increase the spark phase, which has a positive effect on the exhaust gases that come out of the motorcycle pipe. Simply put, these gases become less harmful to human health and the environment.
Ignition adjustment
Conclusion
With proper adjustment and installation of the ignition, the amount of fuel consumed is significantly reduced. If the battery has insufficient voltage, the motorcycle engine will be started in any case, naturally, provided that the Dnepr motorcycle ignition has been installed. Older models of the Ural motorcycle generally do not have electronic ignition, which is a definite problem for its owners. You shouldn’t despair, because you can completely adjust the ignition yourself, without going to specialized salons. This should be done at least because contactless ignition can significantly improve engine performance and also make it easier to start your bike.
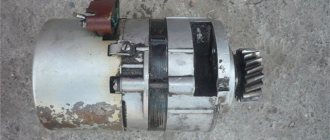
How does an ignition coil work?
It is a connection of two windings.
One consists of a small number of turns of thickened wire, the primary winding receiving low-voltage electrical impulses (12V). The secondary one is densely entwined with small-section wire, generating a high-voltage current (up to 35000V). Through high-voltage wiring, this current is supplied to the distributor, then to the spark plug electrodes. There an arc-shaped discharge is formed and a spark appears. In the first winding, the electric current is constant. In the dead position of the piston, the breaker opens the circuit in winding No. 1. A current (of high voltage) is induced in adjacent (secondary) turns and is transmitted to the spark plug electrodes.
All the time that the breaker is closed (the engine is at low speed), electricity flows through the primary coil, heating it up in vain. Therefore, a resistor is included in the coil circuit, which reduces the current (by increasing the resistance). When the breaker is in the open position (at higher speeds), the heating is very small. When the engine is first started, to increase the spark energy of the spark plugs, the resistor is blocked by a breaker (reducing the resistance, thereby increasing the current).
By the way, when you need to start the engine when the battery is dead, you just need to block the resistor with a jumper wire.