Domestic Ural motorcycles are considered very reliable and durable equipment, capable of operating even in the most severe conditions. Such a vehicle is distinguished by a fairly simple design, maintainability, low sensitivity to fuel quality, as well as wide tuning capabilities. However, they also have a weak point, represented by the ignition system - the features of its design force motorcycle owners to interfere with the operation of the electrical system quite often. Every owner of domestic heavy equipment should know how to check the ignition coil on a Ural motorcycle. This information will be especially useful for owners of older motorcycles with a 6-volt ignition system, since their coil is subject to double the stress.
First signs of trouble
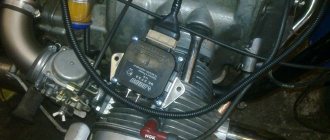
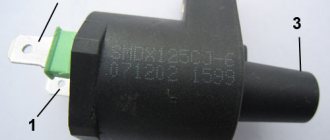
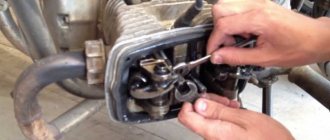
Before checking, the coil must be removed from the motorcycle using the available tools. Before removal, the part must be carefully disconnected from the connectors, and when removing it, you should be careful not to break its fragile fastening. Having taken out the coil, look carefully at its surface.
The main sign of a coil malfunction will be dark spots on the surface of the winding, as well as traces of melting, which indicate that excessive voltage is applied to the part. In addition, spots of oil or other foreign substances, which theoretically should not be in the ignition system, will be a reason to be wary. When the ignition operates without the motor running, clearly noticeable damage may appear on the surface of the winding, including breaks visible to the naked eye. However, you should not rely only on visual inspection - after inspection, the part is subjected to a thorough examination.
Selection of candles
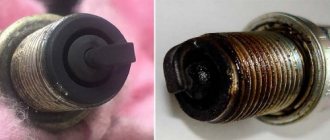
The contactless system has certain requirements for candles. If they are faulty or do not fit a specific motor, then you will not get any positive effect from using this system.
Be sure to check the condition of the spark plugs. They should not have soot. It is optimal if the electrode has a sand color. If necessary, replace the spark plugs; when selecting, pay attention to the heat rating. When the spark plugs are in order, the electronic ignition can be installed.
Electrical check
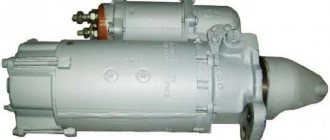
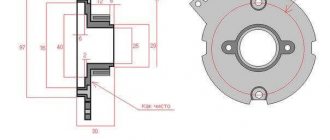
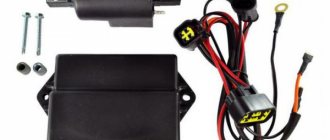
The ignition coil of the Ural motorcycle has a device quite familiar to such parts - a core made of electrical steel, as well as primary and secondary windings covered with insulation made of varnish and special tape. The functionality of this part is checked using an ohmmeter or multimeter with the appropriate function. Place the coil on the table in a position convenient for you, or place it on a thick layer of soft material that does not allow electricity to pass through (for example, foam rubber).
First, we measure the resistance level on the primary winding, which differs by winding a thicker wire. Normally, the indicator will be 6 ohms, and there should be no direct contact between the primary winding of the coil and the ground. However, it is not always possible to perform such a check - if the engine, although poorly, was working, the likelihood of finding a problem in the primary winding will be very small.
Therefore, having completed this procedure for order, proceed to measuring the resistance on the secondary winding. Checking the indicator at the high voltage terminals should show a result of 10 kOhm. In addition, you need to set one contact to ground, and alternately move the second between the two terminals - the result should be an infinity symbol on the multimeter screen or the ohmmeter needle moving to the right. Finally, take a ruler or caliper and measure the distance between the terminals and arresters - normally it should be 9 mm.
Features of the electronic system
If you prefer to service your motorcycle with your own hands, then this ignition for the Urals will be an ideal option for you. It is much easier to maintain. There is no need to adjust the gaps on the contacts, which significantly reduces the time of service work. Also, the ignition timing does not change during operation.
Also, a huge advantage of this ignition option for a Ural motorcycle is that the spark plugs last longer. Thanks to more efficient spark formation, the load on them is significantly less.
Immediately after installing the new unit, you will notice an increase in engine efficiency. Fuel consumption is reduced and it becomes more responsive on the road. Also important is the absence of problems at low temperatures and wet weather.
This type of motorcycle assembly consists of the following elements:
- Hall sensors;
- Modulator of magnetic field into electric discharge;
- Ignition coil;
- Switch for distribution of spark charges;
- High-voltage wires, terminals, fasteners.
Actually, any BSZ consists of these elements, you can also read the article Izh Planet 5, ignition adjustment, there is also information on this topic.
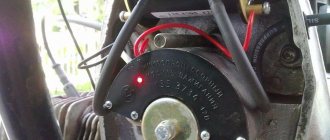
Express diagnostics
If the motorcycle begins to act up “in the field,” then removing and installing the ignition coil will become an almost impossible task. And even if you have a multimeter at hand, it will be incredibly difficult to perform the test. Therefore, it is worth using an alternative method for diagnosing the ignition system, which is often used in practice by experienced motorcyclists.
If the battery is more than half charged, you will be able to check the functionality of the ignition coil in a couple of minutes. To do this, you need to remove the contact cap of the spark plug and turn on the ignition, holding it by the insulated part. The distance between the cap and the candle should be 5–7 millimeters.
Hit the kickstarter hard and pay attention to the spark plug. If a spark forms between it and the cap, the ignition coil is in working order, and you should look for the cause of the failure in other parts of the motorcycle. In some cases, a spark is formed, but it appears rather weak and dull. This is usually due to the battery being low. However, if you are sure that the battery is charged, then most likely the problem is a breakdown of the ignition coil windings.
DO NOT JUMP! Powerful ignition for little money
As you know, few people are satisfied with the standard contact ignition of the Urals and Dnieper. This is explained, in particular, by the insufficient spark energy and the low reliability of the contacts themselves, which is associated with the large amount of current that they have to switch. This problem can be solved by installing one of the factory-produced non-contact ignition systems designed for the Urals; fortunately, there are several types of them on the market, and you can choose according to your taste - better or cheaper. But not everyone will be satisfied with the price, and it can be difficult to buy - you won’t find it in every city.
I would like to offer an option for a low-budget ignition system based on automotive components. You will need to obtain the following parts: 1. Switch TK-102 (used on ZIL and GAZ-53 trucks); 2. Two-terminal ignition coil (from Oka, Volga or Gazelle with a 406 engine or some foreign car); 3. “Volgovsky” variator (additional resistance for the coil), or resistance SE-107. All this must be connected in accordance with the following diagram:
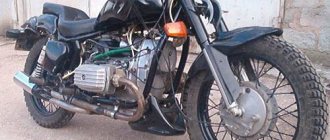
The TK-102 switch is essentially a powerful transistor switch, which allows you to use it to control a more powerful (with lower winding resistance) ignition coil than the standard “Ural” one - now the coil current flows through it. A current of optimal magnitude flows through the contacts, which does not cause them to burn or erode, but at the same time allows them to self-clean. The principle of operation remains the same - a spark on the candles occurs when the current through the coil stops at the moment the contacts open. Other switches, for example, from the G8, function completely differently and without modification will not be suitable for this scheme, because not intended for use with a contact breaker. Additional resistance (variator) is necessary to limit the current through the coil - it itself has a very low resistance, so you should not leave the ignition on for a long time with the engine not running - this can cause overheating and failure of the coil, variator or switch, or rapid discharge of the battery if the contacts the breaker will stop in the closed position. However, this also applies to standard ignition, only to a lesser extent. The commutator and variator are mounted on an aluminum plate under the saddle, the coil is mounted using a steel plate on the studs of the upper engine mount, the coil is attached to the plate with long screws with spacer bushings made of copper brake pipes - copper is more resistant to vibration. It is important to ensure good contact between the switch housing and the “ground” of the engine or frame; for this it is not a sin to even use a separate wire. The capacitor in the breaker is no longer needed; it can be turned off - one less weak point. The gap in the contacts - according to the instructions, in spark plugs can be increased to 0.8 mm (usually recommended for electronic ignition) - the spark will become more powerful. It’s no longer worth it - the high-voltage voltage may increase too much and, for example, pierce the coil. And sparking in harsh conditions (“flooded” spark plugs, etc.) will worsen. Because The coil is now in a different place; longer high-voltage wires may be needed. You need to be careful when using fashionable silicone wires with a carbon conductor - when you try to screw a motorcycle cap onto it, the conductor is damaged. Ordinary car wires with a central vein - a spider's web - are no better in this sense. Therefore, use either ready-made ones, with tips (but “angled” tips are almost never found), or ordinary old-style motorcycle tips - with a thick stranded copper conductor (you can also look for them in stores with spare parts for chainsaws, etc.), they are sometimes sold according to the principle “...rub. per meter." In case of refusal, returning to the standard circuit will not be a problem even in an open field, if you leave the unconnected standard coil and capacitor in their place during the alteration. The system was installed on the Dnepr 11 motorcycle and was tested for two seasons. Starting and engine idling have improved noticeably. Launch is always “from the first kick”. From that time on, I turned the candles out to add oil when preserving them, out of curiosity. No excessive heating of the coil or switch was noticed; the variator can be warm and even hot, but this is normal for it. Jumping on kickstarter more than once is undignified. Therefore, collect - and go!
DIY repair
Unfortunately, it is not possible to restore the ignition coil at home. If the problem is damage to the windings and the appearance of breakdowns, then the only repair method is to completely replace the windings. Imagine how long it will take to rewind the ignition coil - there are several hundred turns of wire on its primary winding, and several thousand on the secondary winding. Therefore, if the device is severely damaged, it is better to immediately purchase a new coil - fortunately, the part for domestic equipment is relatively inexpensive. The only case when you can temporarily restore full functionality of the ignition coil is if the insulation is damaged, which can be filled with varnish and wrapped with special tape.
Mechanical or electronic
Initially, these motorcycles had mechanical ignition. Unlike BSZ, this option has low reliability. The reason is in the mechanical elements of the structure; they wear out over a certain mileage, which leads to regular failures. And you have to adjust the ignition on the Ural motorcycle much more often
The electronic ignition system on a motorcycle does not have such problems. There are practically no interacting elements here. Therefore, the service life is significantly longer. Also, thanks to improved spark formation, there are fewer problems with engine operation. The owner is also relieved of the need to regularly clean the contacts. All this leads to the massive spread of BSZ on this model.
Settings
Now we adjust the ignition timing. We install the motor in accordance with the marks, connect all the wires. Next you need to adjust the position of the sensors. Next, we attach all the elements and check for sparking. If everything is fine, then you should drive 10-20 kilometers and check the set angle again.
If necessary, adjustments are made, but if everything is done correctly, this will not be necessary. Knowing how to do contactless ignition on your motorcycle, you will not wonder how much this work costs in a workshop.
Previous entry Motorcycle Ural M-72 – myth or legend?
Next entry Adjusting the ignition on a Ural motorcycle