Peculiarities
Before setting up the ignition, you should understand what elements it consists of in the Urals.
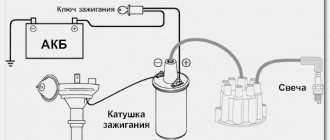
This will allow you to avoid some mistakes and also configure it more accurately. If you bought the motorcycle secondhand, then the ignition may be homemade, in which case it will have to be redone. The main source of the high-voltage pulse is the ignition coil, often called the bobbin. Can be used from Oka. It is installed separately from the main body. A chopper (cams), which is equipped with a device for advancing the ignition angle. A couple of candles. There is a set of wires for low and high voltage. This also includes power supplies, as well as their switch.
It is worth noting that, depending on the assembly, it may require 6 or 12 volts. The difference between these systems is in the coils. On twelve volt coils a B-204 coil is used, on six volt coils B-201. The connection diagram here is standard.
The breaker has a rather complex design, which consists of several elements. The housing contains a movable and fixed cam with a regulator, which operates from centrifugal force. There is also a capacitor that directly controls spark formation.
There is a piece of felt in the design; it lubricates the mechanism. Separately, it is worth mentioning the screw that secures the cam assembly; with its help, additional adjustment of the Ural ignition is made.
Selection of candles
The contactless system has certain requirements for candles. If they are faulty or do not fit a specific motor, then you will not get any positive effect from using this system.
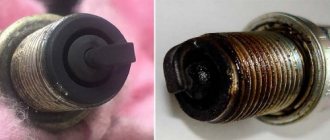
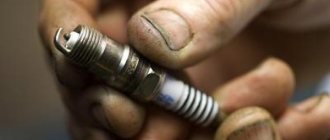
Be sure to check the condition of the spark plugs. They should not have soot. It is optimal if the electrode is sand-colored
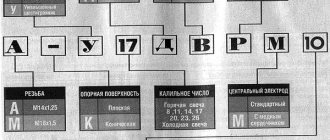
If necessary, replace the spark plugs; when selecting, pay attention to the heat rating. When the spark plugs are in order, the electronic ignition can be installed
But what if there is no such card? You should experiment with it. We get on a motorcycle, go on a tour, and it's tiring! When we reach maximum speed, we start playing with the switch, changing in advance. As soon as we deny at what advancement our motor has the most power, we return home. The memory module transmits data to the computer and reads what we just had before. Knowing this progression, we can make up bad characteristics during rotation.
But remember that such characteristics will already be better than no one! The preliminary reading values in degrees are entered into the program. In addition to the ignition map, we must enter several other values. Due to quite compelling technical reasons, in such situations it is not possible to change the ignition point, so we must set it at this moment when we receive the pulse signal. To minimize the adverse effects of switching between hard ignition and map, hysteresis should be applied. The maximum hysteresis value, i.e. The moment the card is turned on should be at a slightly lower speed than is usually used for starting, so that the card is turned just before it starts. The minimum value should be less than the minimum speed you can drive. These values are not critical, but must be chosen experimentally. The hysteresis is designed to prevent hiccups when the ignition is off, so the minimum value should be slightly higher than the maximum. This should protect the coil from overheating. After this disconnection, the coil is turned on during the next stroke. Hysteresis values of the map. . It reads from programmed characteristics.
Examination
If there is any suspicion of problems with the ignition, you should check that it is working correctly. Diagnosis is carried out in the following order;
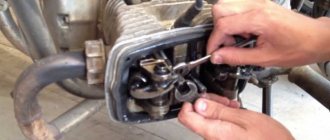
- We check the mechanical component of the unit. We look to see if the cam mechanism is stuck; if there are problems with mobility, then it is worth checking its performance. Be sure to measure the gap between the cams; most often it turns out to be too small, which prevents sparks from forming;
- The next step is to check for the presence of a spark. To do this, turn on the ignition and force the cams to move using a screwdriver, creating a gap. The spark should be blue and white. If it is red or orange, then you need to look for a malfunction.
- We take a multimeter and measure the resistance at the bobbin terminals. Attention! The ignition must be turned off. On the primary winding the resistance should be 6 Ohms, on the secondary winding 10 Ohms;
- The resistance between ground and terminals is checked, in optimal condition it should be 6-15 Ohms, if more, then the problem is in the wire;
- The tester is also used to ring high-voltage wires. If the resistance tends to infinity, then it is worth replacing the wire; it is better to do it as a set;
- The last step is to check the condition of the candles. Electrodes should have a sand color. It is recommended to maintain a distance of 0.6 mm between them.
Actually, this is all that should be checked. Microprocessor varieties are also checked in approximately the same way. SoveK ignition is of this type.
Replacing spark plugs before installing electronic ignition systems
Spark plugs are the last element of the spark generation system in any engine. They work under conditions of high pressure and temperature.
Sparking occurs on them when a high voltage pulse is applied. Therefore, it is not possible to test them, without a test bench, in domestic conditions.
The serviceability of a working spark plug can only be judged visually - by carbon deposits on its tip or presence on the “skirt”. To ensure reliable engine operation, change spark plugs according to the motorcycle operating rules, without expecting them to work forever.
Choose the correct heat rating when purchasing spark plugs. Set the gap in the spark plug electrodes to 0.7-0.8 mm.
We hope that these problems with the spark plugs are not observed and, after purchasing (manufacturing) a non-contact type ignition system and replacing the spark plugs, we begin adjustment work.
Why do you need to adjust the ignition on a Ural motorcycle?
Not every motorcyclist knows how to adjust the ignition on a Ural motorcycle. However, this process is a necessity. Over time, the owners of each vehicle face a wide range of problems. The biggest ones are associated with motor or engine failure. To prevent this from happening, you need to regularly carry out preventive maintenance and adjust the ignition system and valves.
If you don’t master how to set up the engine on a Ural motorcycle, you may encounter the fact that the engine’s potential will not be fully revealed. It will not operate at full capacity. This can lead to the motor simply becoming unusable over time.
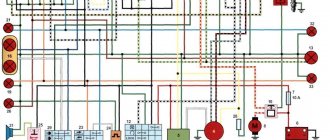
Ural motorcycle ignition circuit
Leave it to mechanics or install electronics
Perhaps not all older motorcycle models are running.
The Ural motorcycle sits and rusts in my grandfather’s barn because it won’t start. The wheels are spinning, the engine is not jammed. Maybe the spark goes into the ground, as they say. In short, you need to look at the spark generation system. But even a working motorcycle, with a contact ignition system, causes unexpected and unpleasant problems for its owner:
- won't start when you really need it;
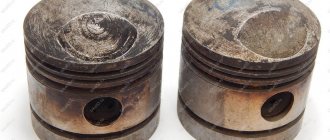
- with new oil rings in the engine, the spark plugs become covered with soot;
- there is no required engine power when driving with maximum load;
- the maximum speed is not reached;
- The battery is slightly discharged and the engine does not start.
The contact ignition system creates a lot of problems, especially when the moving parts in it have already worn out, backlash has appeared, and the geometry of the elements has changed.
The solution is simple - all cam ignition is thrown out, a modern electronic non-contact type spark generation system is installed. You will no longer have to deal with the thankless task of cleaning contacts and endlessly adjusting the gaps in the breaker. All this is possible thanks to the simple, but quite reliable design of the motorcycle. For example, it is quite easy to set the thermal gap and adjust the valves in the Urals with your own hands, using only your own tools from the garage. This way you will gain valuable experience and save money on visiting the workshop.
Adjustment
If you have identified a problem with out-of-phase phases, then you just need to find out how to set the ignition on a Ural motorcycle. This will make your life much easier in the future. Please note that the electronic ignition on the Ural motorcycle is regulated completely differently.
So, you need to adjust the ignition of the Ural motorcycle. To work, you will need wrenches, a screwdriver, and it is advisable to take a test light. Adjustments are made in the following order:
- First, set the engine to the top dead center position of the first cylinder, and this should be the compression stroke. You can check this as follows: unscrew the spark plug, plug the hole with paper and crank the engine. When the resulting plug is knocked out, you can stop, this is the desired position.
- Loosen the fastening of the breaker body, after which it is turned all the way clockwise, and a 12-volt test light is connected to the contacts;
- Turn on the ignition and turn the breaker housing until the light turns on. As soon as it lights up, you should stop and secure the lid. This completes the setting of the advance angle.
Izh Jupiter 5 ignition adjustment is done in approximately the same way. Now you know how to configure this system on your motorcycle.
Previous entry Installing electronic ignition on a Ural motorcycle
Next entry Restoring a Ural tuning motorcycle
Selection of candles
The contactless system has certain requirements for candles. If they are faulty or do not fit a specific motor, then you will not get any positive effect from using this system.
Be sure to check the condition of the spark plugs. They should not have soot. It is optimal if the electrode is sand-colored
If necessary, replace the spark plugs; when selecting, pay attention to the heat rating. When the spark plugs are in order, the electronic ignition can be installed
Now you can install a new ignition system for the Ural motorcycle. Before starting work, dismantle the old BSZ. Installation is carried out in the following order:
- We install a new coil, here you will need a connection diagram, otherwise problems will arise further;
- We install the ignition module, it should be secured so that it is directed towards the coil.
- The engine rotor is installed in the position at which the ignition is adjusted.
Now you have a contactless ignition system installed, all you have to do is configure it to achieve optimal performance
Please note that setup here is only required once. In fact, you already know how to install BSZ
Now we adjust the ignition timing. We install the motor in accordance with the marks, connect all the wires. Next you need to adjust the position of the sensors. Next, we attach all the elements and check for sparking. If everything is fine, then you should drive 10-20 kilometers and check the set angle again.
If necessary, adjustments are made, but if everything is done correctly, this will not be necessary. Knowing how to do contactless ignition on your motorcycle, you will not wonder how much this work costs in a workshop.
Signs of poor ignition performance on a Ural motorcycle
- The motorcycle does not start well;
- Kickstarter is kicking;
- The engine does not develop full power;
- Weak spark when checking spark plugs.
Before setting the ignition, the battery must be well charged; the “strength” of the spark depends on this. If the battery is weak, and this is checked by the signal (horn), since the warning lamp can light quite brightly, and the signal horn barely makes a sound, then attempts to start the motorcycle will be useless.
To set the ignition:
- unscrew the front engine ignition cover,
- unscrew the bolt pos. 9 (key for 10) which is held by the advance automatic,
- unscrew the three bolts that hold the breaker body,
- disconnect the wire going to the ignition coil.
We remove the breaker housing, clean it from dirt, and wipe it dry. We check the contacts of the breaker; if there are visible defects, we eliminate them with sandpaper. The plane of the contacts must be smooth, without distortions.
After cleaning, we put the breaker housing assembly back in place, do not tighten the fastening bolts, put the ignition timing switch in place, and tighten the bolt that holds it.
Unscrew the bolt pos. 1 which fixes the movable contact of the breaker, and with the eccentric pos. 11 we set the maximum gap between the contacts of the breaker to 0.5 mm. Fix with bolt pos. 1.
We take a 12 volt lamp (or a multimeter) and connect it parallel to the ignition contacts. Those. one end of the lamp to the wire that goes to the ignition coil, and the other to the housing. And turn on the ignition on the motorcycle. It turns out that when the breaker contacts are closed, the lamp does not light. The contacts open and the lamp lights up. At the moment when the breaker contacts open and a spark occurs at the spark plug. The moment of opening the contacts is regulated by turning the body of the breaker itself clockwise or counterclockwise.
To set the contact opening moment, you need to open the inspection window on the engine, where you can see the flywheel. Using Kickstarter, set the mark on the flywheel so that it matches the mark on the engine, next to the inspection window.
If there is no mark on the flywheel or it is not visible
You need to unscrew the valve cover of the left cylinder and use the kickstarter to set the moment when both valves are closed. Unscrew the spark plug, insert a caliper into the hole, and bring the piston to the extreme point, this will be TDC. Then take out the caliper and spread it 7.5 mm. Move the piston with TDC using the kickstarter, and determine when the valves are closed, insert the caliper into the spark plug hole again. And slowly bring the piston to the caliper so that it rests against it. Thus, the piston will not reach TDC by 7.5 mm, this is the moment when the advanced ignition is triggered. The breaker is set according to it.
If you don’t have a caliper, you can simply insert an elastic wire, take a few measurements to determine the TDC, then push it 7.5 mm deeper and bring the piston to it. This can also be done by unscrewing the head and measuring 7.5 mm from the TDC of the piston.
If there is no mark on the flywheel, then you can put it with a chisel, but carefully so that you don’t have to search for TDC for a long time.
source
Technical characteristics of the motorcycle Dnepr MT 10
The main technical characteristics of a motorcycle are the engine performance. The engine is a four-stroke engine with two valves and two cylinders, the valves are located at the top. The new product was distinguished by the presence of good traction, which is provided by a volume of 649 cm3. Power was 36 hp. Fuel injection was made possible thanks to two K-301D carburetors.
Electricity was generated using an alternating current generator with a voltage of 12 volts. Moto Dnepr MT 10 had excellent torque, reaching 46 Nm. At maximum acceleration at high power, the bike reached up to 5,800 rpm. The kit included a rechargeable battery; if desired, you can add two batteries.
Messages [14]
1↑ Topic by roman811 07/14/2016 18:25:38
- roman811
- Experienced
- Inactive
- Registered: 06/12/2016
- Posts: 132
- Reputation:
Topic: ignition adjustment on the Dnieper
The wire adjustment is as follows: first I adjust the gap on the cams to 0.45 mm (I turn the slider so that the cams open as much as possible). Then I display the letter P (early ignition) on the flywheel, turn the ignition ON and magnetize the key to the coil. I begin to turn the ignition housing all the way slowly but the key and doesn’t fall ((. I set the gap on the cams to different values 0.4, 0.5. 0.6 but the key still doesn’t fall. Help, what’s wrong?
Added: 07/14/2016 18:25:38
I installed the runners from both the old and new models and to no avail. There are sparks on the candles.
2↑ Reply from NIKITA36 07/14/2016 18:39:28
- NIKITA36
- Assistant
- Inactive
- Name: SERGEY
- From: OSTROGOZHSK
- Registered: 25-10-2014
- Posts: 177
- Reputation: 25
- Motorcycle: YES
Re: ignition adjustment on the Dnieper
Why are you so attached to these keys with light bulbs?! Well, if the key does not fall, then the contact does not open - it may have a short to ground, or maybe the cam is not positioned correctly.
And again I am sending a train around the world. I don’t break my hands, I don’t scream out loud. And they won’t impose other people’s passengers on me - I put whoever I want on my train.
3↑ Reply from 16 18:52:46
- 666
- Technical support, materials scientist
- Inactive
- Registered: 06-05-2010
- Posts: 6,591
- Reputation: 602
Re: ignition adjustment on the Dnieper
So I don’t understand this masochism. some creature at one time spread this nonsense about keys and light bulbs in the ignition control and people are still suffering.. Roman. If you turn the ignition housing, put it in approximately the middle position. Then you set the crankshaft to the TDC position, and if necessary, use a screwdriver to check through the spark plug hole whether the piston is exactly at top dead center. Next, either use a screwdriver or something else to move the flywheel back a little (not to the front, but BACK), approximately 10mm from the TDC mark. (if you don’t understand, we set the ignition for you earlier).. Then you go and adjust the gap on the cam. gap from 0.4-0.6 mm. If you don’t understand how and where the flywheel is shifted relative to its position at TDC. then you simply adjust the clearance on the cam when the piston is at TDC. It will work 100% But the ignition timing will be slightly different.
(2 ratings, average 4.5 out of 5)
Electronic ignition “Saruman”
The Saruman microprocessor ignition system is another way to quickly and without much hassle replace the outdated contact ignition of the Ural. Manufacturers promise the same set of advantages as the previous system. There are two configuration options: with a Hall sensor and with an optical sensor. The second option is somewhat more expensive, but it is usually recommended, since the optical sensor is more accurate and reliable. However, reviews from motorcycle owners are not as good as we would like, mostly complaints are made about the quality of assembly of parts. Another complaint is that the kit does not include an ignition coil.
ignition adjustment on the Dnieper
Pages 1
To post a response you must login or register
- roman811
- Experienced
- Inactive
- Registered: 06/12/2016
- Posts: 132
- Reputation: 0
Topic: ignition adjustment on the Dnieper
The wire adjustment is as follows: first I adjust the gap on the cams to 0.45 mm (I turn the slider so that the cams open as much as possible). Then I display the letter P (early ignition) on the flywheel, turn the ignition ON and magnetize the key to the coil. I begin to turn the ignition housing all the way slowly but the key and doesn’t fall ((. I set the gap on the cams to different values 0.4, 0.5. 0.6 but the key still doesn’t fall. Help, what’s wrong?
Added: 07/14/2016 18:25:38
I installed the runners from both the old and new models and to no avail. There are sparks on the candles.
Dnepr 10-36 Dnepr 11-32
- NIKITA36
- Assistant
- Inactive
- Name: SERGEY
- From: OSTROGOZHSK
- Registered: 25-10-2014
- Posts: 180
- Reputation: 25
- Motorcycle: YES
Re: ignition adjustment on the Dnieper
Why are you so attached to these keys with light bulbs?! Well, if the key does not fall, then the contact does not open - it may have a short to ground, or maybe the cam is not positioned correctly.
And again I am sending a train around the world. I don’t break my hands, I don’t scream out loud. And they won’t impose other people’s passengers on me - I put whoever I want on my train...
Vladimir Vysotsky
- 666
- Technical support, materials scientist
- Inactive
- Registered: 06-05-2010
- Posts: 6,620
- Reputation: 612
Re: ignition adjustment on the Dnieper
So I don’t understand this masochism... some creature at one time spread this nonsense about keys and light bulbs in ignition control and people are still tormented..
Roman...If you turn the ignition housing, you put it in approximately the middle position...
Then you set the crankshaft to the TDC position, if necessary, use a screwdriver to check through the spark plug hole whether the piston is exactly at top dead center...
Next, either use a screwdriver or something else to move the flywheel back a little (not to the front, but BACK), approximately 10mm from the TDC mark... (if you don’t understand, we’re setting the ignition earlier)..
Then you go and adjust the gap on the cam... the gap is from 0.4-0.6 mm...
If you don’t understand how and where the flywheel is shifted relative to the position at TDC... then you simply adjust the clearance on the cam when the piston is at TDC... it will work 100%
But the ignition timing will be slightly different...
Edited 666 (14-07-2016 19:04:43)
“Now we are among the mountains, surrounded by an enemy of superior strength... Moreover, we are without provisions, without ammunition, without artillery. We have no one to expect help from... We have great work ahead of us, unprecedented in the world: we are on the edge of an abyss, but we are Russian!
- roman811
- Experienced
- Inactive
- Registered: 06/12/2016
- Posts: 132
- Reputation: 0
Re: ignition adjustment on the Dnieper
666 writes:
So I don’t understand this masochism... some creature at one time spread this nonsense about keys and light bulbs in ignition control and people are still tormented..
Roman...If you turn the ignition housing, you put it in approximately the middle position...
Then you set the crankshaft to the TDC position, if necessary, use a screwdriver to check through the spark plug hole whether the piston is exactly at top dead center...
Next, either use a screwdriver or something else to move the flywheel back a little (not to the front, but BACK), approximately 10mm from the TDC mark... (if you don’t understand, we’re setting the ignition earlier)..
Then you go and adjust the gap on the cam... the gap is from 0.4-0.6 mm...
If you don’t understand how and where the flywheel is shifted relative to the position at TDC... then you simply adjust the clearance on the cam when the piston is at TDC... it will work 100%
But the ignition timing will be slightly different...
I have TDC and R on the flywheel. When turning the flywheel, the flywheel first goes R and after 10mm TDC. So I set it to P and adjust the clearance on the cams by placing the housing in the middle before that?
Added: 07/14/2016 19:32:02
The flywheel rotates counterclockwise and when TDC is set, should it be turned clockwise 10mm from TDC?
Dnepr 10-36 Dnepr 11-32
- mexanik62
- Mechanic from the 30s.
- Inactive
- Name: Uncle Vitya
- From: Evpatoria
- Registered: 03-08-2011
- Posts: 10,832
- Reputation: 1,151
- Motorcycle: 12-volt K-750, ZAZ Sens Hatchback
Re: ignition adjustment on the Dnieper
At the P mark it is necessary to move the weights of the advance machine.
...nothing can stop this Soviet motorcycle, not even its own brakes...
- 666
- Technical support, materials scientist
- Inactive
- Registered: 06-05-2010
- Posts: 6,620
- Reputation: 612
Re: ignition adjustment on the Dnieper
roman811 writes:
first comes R and through 10mm TDC
They are somehow close, it seems there should be more in millimeters))
roman811 writes:
and when TDC is set, do you need to turn it clockwise 10mm from TDC?
I don’t remember whether it spins clockwise or counterclockwise... Just when I kicked it to TDC, turn it back a little (that is, in the opposite direction), I either push the flywheel back straight through the inspection window... or I turn it with a wrench to 11 on the bolt that secures the slider on ignition...
10 mm of offset back is not an axiom... it will work at TDC and at 5 mm of offset and 7 mm... The task of each motorcyclist is to choose his own advance amount depending on the engine operation (the sound of operation, popping and shooting at carburetors and muffler, dynamics)
“Now we are among the mountains, surrounded by an enemy of superior strength... Moreover, we are without provisions, without ammunition, without artillery. We have no one to expect help from... We have great work ahead of us, unprecedented in the world: we are on the edge of an abyss, but we are Russian!
- kilowatt3
- Electrician
- Inactive
- Name: Alexander
- From: Belgorod region Alekseevka
- Registered: 03/24/2011
- Messages: 1,950
- Reputation: 198
- Motorcycle: Dnepr MT 11, but there were different ones and more than one!
Re: ignition adjustment on the Dnieper
Well, I’ll bring a little clarity to the relationship between magnetism and not falling, there is such a thing as residual magnetization of metal, at the moment when the contacts are closed the coil works like an electromagnet, hence the core is magnetized and everything metal sticks to it, as soon as the contacts open, a magnetic field weakens, but not completely, perhaps the core and key are magnetized, but it’s all crap as described repeatedly, put it according to the marks and everything is ok, set the gap to the maximum so that it is no more than 06 mm, and then at mark p on the flywheel catch the lead by moving the weights apart catch in different directions so that there is a gap on the p mark with the weights spread apart, and that’s all
I own a BMW 525, it eats a lot quickly))))
- roman811
- Experienced
- Inactive
- Registered: 06/12/2016
- Posts: 132
- Reputation: 0
Re: ignition adjustment on the Dnieper
666 writes:
roman811 writes:
first comes R and through 10mm TDC
They are somehow close, it seems there should be more in millimeters))
roman811 writes:
and when TDC is set, do you need to turn it clockwise 10mm from TDC?
I don’t remember whether it spins clockwise or counterclockwise... Just when I kicked it to TDC, turn it back a little (that is, in the opposite direction), I either push the flywheel back straight through the inspection window... or I turn it with a wrench to 11 on the bolt that secures the slider on ignition...
10 mm of offset back is not an axiom... it will work at TDC and at 5 mm of offset and 7 mm... The task of each motorcyclist is to choose his own advance amount depending on the engine operation (the sound of operation, popping and shooting at carburetors and muffler, dynamics)
I did everything as you wrote, but the sparks disappeared from the spark plugs (. I’m installing everything back that I wrote at the very top of the topic, sparks appear. What should I do? Some crap is going on.
Dnepr 10-36 Dnepr 11-32
- SSSR
- Elder
- Inactive
- Name: Sergey
- From: 68 region
- Registered: 07/18/2015
- Posts: 1,047
- Reputation: 137
- Motorcycle: Ural with K750 engine, Dnepr with K750 engine
Re: ignition adjustment on the Dnieper
Instead of using the key, use a light bulb, one wire to the ignition contact, the other to ground. When the contacts open, the light comes on, adjust the flywheel to P and rotate the ignition housing until the light comes on. But this is the case if the mark is filled correctly, so you need, as has already been written here, to first check the marks on the flywheel at least through the spark plug hole.
Edited by SSSR (17-07-2016 23:26:07)
It is better to drive a screw with a hammer than to tighten a nail with a screwdriver.
- roman811
- Experienced
- Inactive
- Registered: 06/12/2016
- Posts: 132
- Reputation: 0
Re: ignition adjustment on the Dnieper
SSSR writes:
Instead of using the key, use a light bulb, one wire to the ignition contact, the other to ground. When the contacts open, the light comes on, adjust the flywheel to P and rotate the ignition housing until the light comes on. But this is the case if the mark is filled correctly, so you need, as has already been written here, to first check the marks on the flywheel at least through the spark plug hole.
Please advise which slider should I buy, the old one or the new one? Many people recommend buying the old one.
Dnepr 10-36 Dnepr 11-32
- SSSR
- Elder
- Inactive
- Name: Sergey
- From: 68 region
- Registered: 07/18/2015
- Posts: 1,047
- Reputation: 137
- Motorcycle: Ural with K750 engine, Dnepr with K750 engine
Re: ignition adjustment on the Dnieper
I won’t tell you, I don’t know how they differ, but what do you mean by a slider, in my opinion it’s a rotating part in the ignition distributor (distributor), but it was installed on ancient engines such as M72, K750, but on the Dnieper it is not there, since a two-terminal one is used coil.
It is better to drive a screw with a hammer than to tighten a nail with a screwdriver.
- roman811
- Experienced
- Inactive
- Registered: 06/12/2016
- Posts: 132
- Reputation: 0
Re: ignition adjustment on the Dnieper
kilowatt3 writes:
Well, I’ll bring a little clarity to the relationship between magnetism and not falling, there is such a thing as residual magnetization of metal, at the moment when the contacts are closed the coil works like an electromagnet, hence the core is magnetized and everything metal sticks to it, as soon as the contacts open, a magnetic field weakens, but not completely, perhaps the core and key are magnetized, but it’s all crap as described repeatedly, put it according to the marks and everything is ok, set the gap to the maximum so that it is no more than 06 mm, and then at mark p on the flywheel catch the lead by moving the weights apart catch in different directions so that there is a gap on the p mark with the weights spread apart, and that’s all
I don’t understand how to catch the advance by spreading the weights, do you have to turn the ignition housing when it’s set to r?
Dnepr 10-36 Dnepr 11-32
- mexanik62
- Mechanic from the 30s.
- Inactive
- Name: Uncle Vitya
- From: Evpatoria
- Registered: 03-08-2011
- Posts: 10,832
- Reputation: 1,151
- Motorcycle: 12-volt K-750, ZAZ Sens Hatchback
Re: ignition adjustment on the Dnieper
At mark P, you need to catch the moment of opening with the weights separated
...nothing can stop this Soviet motorcycle, not even its own brakes...
- kilowatt3
- Electrician
- Inactive
- Name: Alexander
- From: Belgorod region Alekseevka
- Registered: 03/24/2011
- Messages: 1,950
- Reputation: 198
- Motorcycle: Dnepr MT 11, but there were different ones and more than one!
Contactless ignition systems
Not so long ago you could only find a homemade device. The reason is the lack of proper supply in stores. Craftsmen in garages remade the contactless unit from other motorcycle models and assembled it from individual parts. This is a rather complex activity that requires skills. Now you can purchase a ready-made kit without any problems.
In subsequent approximations, it turns out that the combustion time of the mixture depends on its temperature, composition, octane number and many other factors. However, the most important are rotation and vacuum. Depending on the vacuum approx. There are many books ahead on variable ignition; there is little information on this issue on the Internet, even in English.
The main idea is to minimize interference to existing electrical installations, without mechanical modifications and to be assembled in such a way that, in the event of a device failure, it can quickly return to its previous state. We now develop the most common installation types.
There are many advantages to using ready-made products. At a minimum, they have been tested in the Urals, which guarantees reliable operation. It is also much easier to install a ready-made unit than to make it yourself. The following sets can be found on the market:
- "SoveK". Under this brand you can find regular contactless ignition, as well as a more advanced microprocessor ignition. The assembly can be supplied with or without a bobbin. Easy to install and practically does not respond to voltage changes;
- "Saruman." Quite an interesting and reliable assembly. There are two sensor options available here; there can be a conventional Hall sensor, or a modern optical one. There is protection against voltage surges, especially high current. To simplify setting the ignition, there is a light indication.
Using ready-made kits is currently the best option.
Electronic Hall effect control with digital output
Connect the positive end of the meter to the wires coming from the pulse transmitter. Electronic Hall effect control with analog output, inductive or optoelectronic sensor.
- Connect the negative end of the meter to the motorcycle weight.
- Turn on the ignition.
- Turn the crankshaft slowly.
Unfortunately, in this case you need to develop a specialized circuit.
Where can I get an ignition card for your motorcycle? If the motorcycle has a static ignition, it usually does not have guidance in the manual or on the service website for such a card. However, you can get it. Huche received it after a long exchange of mail with the Kanuni factory in Turkey.
Messages [11]
1↑ Topic from SergeyM61 04/17/2018 23:22:15
- SergeyM61
- passerby
- Inactive
- Registered: 04/17/2018
- Posts: 4
Topic: Ignition cannot be adjusted (Ural 6V)
Good day to all!
Before the restoration, the Ural worked like a clock. The restoration has come to an end, and hello, let's not start. I looked and re-read a lot of things.
I set the flywheel to o (the mark is set not far from the factory one). Judging by the stroke of the piston, it is where it needs to be. But the advance machine is turned far from the desired position. I can’t reach it by turning the housing (the contact is closed). I remove the leash (the front plate is on the automatic), put it in the “clumsy” position, so that the contact opens at the desired point, I turn the engine - it does not start. I return the “leash” to its place (when the contact opens in the wrong place) - the engine starts, but runs terribly. It feels like it’s shooting into both pipes and carbs. I would have thought that the timing gears and crankshaft were knocked off, but, as far as I know, they were not touched when disassembling the motorcycle. They didn't even open the lid.
In such a “clumsy” position of the leash, attempts to turn the body in any direction do not give results.
Maybe someone has encountered this, or has some ideas.
2↑ Reply from Alexey. 17-04-2018 23:44:00
- Alexei .
- Rocker Pro
- Inactive
- Registered: 03-11-2010
- Posts: 1,298
- Reputation: 186
- Motorcycle: Ural M-68
Re: Ignition cannot be adjusted (Ural 6V)
I think that I should not be too lazy and remove the gear cover. Carefully check the marks and fastening of the crankshaft gear, unscrewing its bolt and checking the condition of the key. Well. and then we’ll see where to “dig.”
Added: 04/17/2018 23:44:00
And further. If you are not sure, then it is better to set the ignition not according to the marks on the flywheel, but according to the TDC of the piston. And when it starts, then it will be possible to “clarify” the ignition setting.
+1
3↑ Reply from Messer_SS 04/18/2018 09:11:43
- Messer_SS
- Moderator
- Inactive
- From: Tambov
- Registered: 05-09-2010
- Messages: 3,750
- Reputation: 298
- Motorcycle: There are many of them.
Re: Ignition cannot be adjusted (Ural 6V)
As I understand it, the ignition is contact. What could be the reasons for poor performance besides the timing gears - a broken capacitor and a broken coil?
4↑ Reply from SANYa pif 04/18/2018 14:48:29
- SANYA pif
- Elder
- Inactive
- Name: Alexander
- From: Bely, Tver region.
- Registered: 06-02-2013
- Posts: 4,913
- Reputation: 293
- Motorcycle: Ural 8.103.10
Re: Ignition cannot be adjusted (Ural 6V)
It feels like it’s shooting into both pipes and carbs. .
maybe just reconfigure the valves
5↑ Reply from SergeyM61 04/30/2018 13:27:20
- SergeyM61
- passerby
- Inactive
- Registered: 04/17/2018
- Posts: 4
Re: Ignition cannot be adjusted (Ural 6V)
Thanks for the advice.
I opened the lid, the marks are in place, the keys are also there. At the same time, I changed the timing shaft oil seal.
I replaced the aluminum gaskets under the head with paranite gaskets with a ring, rebuilt the gas valve (fuel flow was bad), and double-checked the marks on the flywheel. Everything matches.
My father-in-law, an experienced driver, put his finger in the spark plug cap and said the spark was rather weak. I rang the coil with a multimeter - it seemed to be ok.
Another question: I have carburetors on adapters, do the gaskets need to be sealed?
In general, many questions still remain. Has anyone encountered this?
Added: 04/30/2018 13:27:20
Here's another. I measured the resistance. On armored wires there are 4-5 kilo-ohms, spark plugs are close to zero.
I tried different spark plugs, the picture is the same for all of them - 5-6 such sparks, which are barely noticeable, and one normal one slips through.
I'm seriously sinning, but ringing shows that everything is in order.
6↑ Reply from rednefed 04/30/2018 13:50:54
- rednefed
- passerby
- Inactive
- Registered: 08/22/2015
- Posts: 5
- Reputation: 1
Re: Ignition cannot be adjusted (Ural 6V)
Something on the armored wire has a lot of resistance. There is a wire with a simple core. When setting the ignition to the “P” mark, the weights must be moved apart. And try replacing the capacitor.
Added: 04/30/2018 12:50:54
And also, the gap in the contacts should be 0.5 mm. (thickness of the hacksaw blade for metal) if it is larger or smaller, interruptions in engine operation may occur, the greater the gap differs from normal. You can set the flywheel to the TDC mark and set the ignition in this position (do not move the weights in this case). I have no problems with ignition on the Dnepr (stock ignition).
+1
7↑ Reply from SergeyM61 05/22/2018 23:28:34
- SergeyM61
- passerby
- Inactive
- Registered: 04/17/2018
- Posts: 4
Re: Ignition cannot be adjusted (Ural 6V)
Thank you, rednefed. I moved the weights apart and will double-check the gap again.
I found a video online that describes a similar case. The ignition was not adjusted in any way until the author checked the valve opening phases. It turned out that it was necessary to turn the shafts 4 teeth from the mark. Inspired by this video, I started checking, and was completely confused. The deviation on the cylinders is only 3 and 5 degrees.
Replaced the ignition coil, capacitor and spark plugs. I went through the carburetors (leveled the joint surface on the circle, replaced the main jets, dampers, floats) and installed the carburetors with sealant. I threw out the newfangled fuel filters.
The motorcycle STARTED, but “from the pusher”. Moreover, the position of the ignition cam is not correct. Relatively speaking, it is very, very early. The engine didn't even fire, but the cylinders worked differently. The left one produced a much more powerful exhaust than the right one.
8↑ Reply from komandor 05/23/2018 06:30:24
- commander
- Seeker of new sensations
- Inactive
- Registered: 02/12/2015
- Posts: 753
- Reputation: 116
Re: Ignition cannot be adjusted (Ural 6V)
The left one produced a much more powerful exhaust than the right one.
Will Pushkin and Lermontov synchronize the carburetors? And further. When it “won’t start”, there is a certain algorithm of actions. Try to follow it. And again. You have a model M61 in your nickname. There is no window for marks on the flywheel. How do you set the ignition there? Why are you putting the moment on some mark (it is not known by what drunken master “curly hands” stuffed), you can’t ==> a and X with it, which is early and wrong - let’s start with a pusher! Strange "restoration".
9↑ Reply from SergeyM61 06/07/2018 00:02:01
- SergeyM61
- passerby
- Inactive
- Registered: 04/17/2018
- Posts: 4
Re: Ignition cannot be adjusted (Ural 6V)
The left one produced a much more powerful exhaust than the right one.
Will Pushkin and Lermontov synchronize the carburetors? And further. When it “won’t start”, there is a certain algorithm of actions. Try to follow it. And again. You have a model M61 in your nickname. There is no window for marks on the flywheel. How do you set the ignition there? Why are you putting the moment on some mark (it is not known by what drunken master “curly hands” stuffed), you can’t ==> a and X with it, which is early and wrong - let’s start with a pusher! Strange "restoration".
Dear Commander, in order for classics to work on carburetors, you must first start the engine. Thanks for the advice on the algorithm. I’ll definitely refresh my memory and go through it.
As for the viewing window. I'm not a great expert on the differences between engines of different models. According to the documents, it is M-61, but in general, I suspect that on this vehicle only the tank and side trailer remain from the M-61.
The question was that when installing the ignition “leash” in its rightful place, the cam becomes in a position that is clearly incorrect. Although the valve opening phases indicate that the timing shaft relative to the crankshaft is installed correctly (3 and 5 degrees is not a significant deviation, is it?).
10↑ Reply from komandor 06/07/2018 06:17:30
- commander
- Seeker of new sensations
- Inactive
- Registered: 02/12/2015
- Posts: 753
- Reputation: 116
Re: Ignition cannot be adjusted (Ural 6V)
Well, you launched it with a pusher and what did it give you? Boilers operate differently - not synchronized. “Wrong cam position”? - Which position is correct? What does the manual say about this? Valve opening phases? Can you still determine whether Mars is in Aquarius?
Instead of removing the head and checking the marks on the flywheel, why do you need to engage in some kind of shamanism? The Urals were exploited by people of three classes. And they set it up, and synchronized it, and sorted it out. All procedures are described.
+1
11↑ Reply from Dmitry86 11/22/2018 10:06:16
- Dmitry86
- Assistant
- Inactive
- Name: Dmitry
- From: Moscow
- Registered: 05-11-2018
- Posts: 194
- Reputation: 59
- Motorcycle: Ural M-63 1969, 6 volts