Very often the reason that the engine does not start is the lack of a spark at the spark plug. This is diagnosed very simply:
- you need to unscrew the spark plug from the engine (or take a spare one),
- put a candle cap on it,
- turn on the ignition,
- press the spark plug to ground
- crank the engine with the starter, or better yet, with the kickstarter.
If a spark does not jump between the electrodes of the spark plug, the engine will not start.
But fortunately, the ignition system on Alpha mopeds is quite simple and you can find the fault on your own.
I always try to follow the principle “from simple to complex” when troubleshooting. That is, before disassembling half of the moped, you need to try to check everything that is easy and cheap to check.
First, remember what preceded the malfunction: some work may have been carried out or there may have been mechanical damage (for example, the moped fell). If something like this happened, start troubleshooting from there. There is a high probability that upon inspection you will find a broken wire, damaged insulation, a damaged connector, or something else.
Be sure to try cranking the engine with a kickstarter; it happens that the starter turns too slowly and there is no spark.
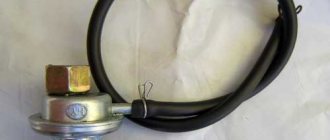
Spark plug, high-voltage wire, tip
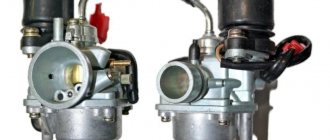
Next on the list is the spark plug. It happens that an apparently serviceable spark plug does not work, so it is better to immediately replace the spark plug with a known serviceable one. Even if the spark plug was in good working order, it’s okay, spark plugs are “consumables”.
Be sure to take a spark plug recommended by the moped manufacturer, or its complete analogue, selected from the catalog. Do not listen to “experts” who recommend non-standard spark plugs, for example, with an increased gap or three electrodes.
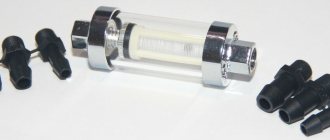
If the spark plug is working but there is no spark, check the tip of the spark plug and the high-voltage wire. There should be no mechanical damage or cracks on them.
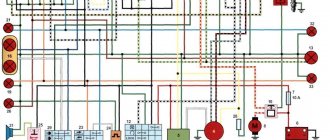
Alfa 110 moped wiring diagram
This abbreviation stands for Capacitor Discharge Ignition - ignition from a capacitor discharge. Sprinkle talcum powder on the inside of the tire.
Electrical diagram of Delta 50 mopeds without a tachometer The photo below shows a schematic electrical diagram of the Alfa, Delta moped and other mopeds that do not have a tachometer.
Change the oil in the gearbox with a warm engine after the first km, and then regularly after km in the following order: remove the filler and drain plugs; drain the used oil; Screw in the drain plug and fill in approximately cm3 of oil; screw in the filler plug; let the engine run for 3-5 minutes, shift gears alternately. When starting a cold engine, press the float stop 22 fig. Problem identification is done using a multimeter. Place part of one bead of the tire in the recess of the rim, use a spudger and a wrench to push the entire bead of the tire onto the rim and slide it towards the rim flange.
Brakes To adjust the front brake, a stop is installed on the brake pad disc. Check the operation of the gear shift mechanisms, clutch, and brakes.
Protect the paper element from contact with oil and gasoline. Obe3obPasha Leave a comment Over the past few decades, the domestic moped manufacturer has completely left our market, and Chinese analogues and new models have taken its place. Electrical wiring for the 157QMJ engine (Simplified) or how to start the engine without a moped
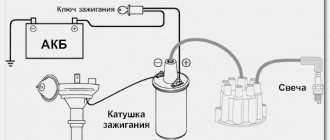
Ignition coil
If everything looks intact, check the ignition coil. To do this, disconnect it (remembering how the wires are connected) and use a multimeter to check the resistance of the windings.
The primary winding is made of thicker copper wire. Its terminals are connected to two terminal connectors at the end of the coil. It has a small number of turns and therefore its resistance is low, approximately 0.5-5 Ohms. One wire of the coil is connected to ground - you need to check it, attach one multimeter probe to the nearest metal part of the moped, and the second to the coil connector. The resistance should be close to zero.
The high-voltage coil consists of several thousand turns of very thin copper wire, so its resistance should be on the order of 2-5 kOhms. The resistance must be measured between the coil contact connected to ground and the core of the high-voltage wire.
In this way, we will check the coil for a break, but without special equipment we cannot check for other coil faults, for example, an interturn short circuit, so we will leave the coil alone for now, also because a coil without visible mechanical damage is most likely working.
Adjusting fork softness on a bicycle
Pre-setting the travel of the suspension fork - preload - allows you to set the spring stiffness.
When in optimal condition, the damping system dampens vibrations where needed and maintains firmness on level surfaces. The adjustment consists of changing the distance between the upper “unloaded” and lower point of maximum pressure.
Let's look at a few examples:
1 – load is minimal, fork is soft; 2 – high rigidity; 3 – correct setting
In the first case, the fork travel is close to the maximum possible. On the roads this will result in constant oscillations of the springs “up and down” under the pressure of the cyclist. Interestingly, such a fork will handle obstacles in the form of bumps and potholes poorly.
The second option is high fork rigidity, stroke length less than 50% of the original. This value is not enough for the smooth passage of large obstacles.
In the third situation, the shock absorber is fully tuned, allowing it to effectively absorb impacts without compromising the dynamics of the bike. On average, the correct setting is 70% to 90% of the fork travel of the unloaded distance.
The preload method depends on the shock absorber type:
- On spring models, the compression amount is changed manually using a special regulator. When replacing a spring, a stiffer shock absorber is selected to increase the load, and vice versa.
- For spring-air forks, the stiffness is adjusted through the pressure in the chamber.
- On air shock absorbers, the fork travel is controlled by changing the pressure in the positive sector.
You can measure the load in a stationary position, sitting on a bicycle or while moving. For accurate results, adjustments are recommended to be made in small increments.
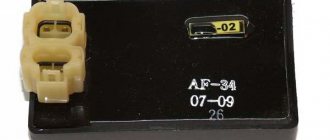
Switch
To check the switch, we need a test lamp - this is a regular 12-volt light bulb with wires routed out for easy connection. A test light and connect one end to the ground wire, the other to the ignition coil wire. We turn the engine with the starter.
If the light comes on, the switch and its wiring are working properly. If the light does not light, then the switch or switch wiring is faulty. In order to be 100% sure that the problem is not with the switch, I recommend replacing it with a known good one. A switch for Chinese mopeds is inexpensive, if it suddenly turns out that the old switch is working, let it remain in “stock” until the next check.
Adjusting the shock absorber rebound speed
The rebound of the shock absorber characterizes the speed at which the fork returns to its original position under load. The response speed of the breaker mechanism must be such that the shock absorber does not shoot out immediately and can absorb the shock from the next obstacle.
How to determine the rebound efficiency of a bicycle fork? When driving over uneven surfaces, impacts are absorbed before they hit the steering wheel - the rebound is well tuned. The shock absorber does not work on small obstacles - minor adjustments are required. And finally, an advanced case when the end call is very late.
Rebound adjustment bolt: hare - increase speed, tortoise - slow down rebound
Adjusting rebound on the fly:
- Find a road or path with uneven surfaces.
- Set the regulator to the fastest rebound.
- Accelerate, feel how hard it hits the steering wheel.
- Tighten the adjuster until the beating stops.
It's important to set up the Rebound so that the shocks don't hit the wheel, but still maintain a soft ride. If the rebound is set to the correct value but the shock behaves unpredictably, the fork travel and compression may need to be readjusted. It is recommended to adjust the front fork not immediately, but in the sequence “Preload – Compression – Rebound”
Individual selection of each parameter will improve the performance of the shock absorber and provide comfortable trips
It is recommended to adjust the front fork not immediately, but in the sequence “Preload – Compression – Rebound”. Individual selection of each parameter will improve the performance of the shock absorber and provide comfortable trips.
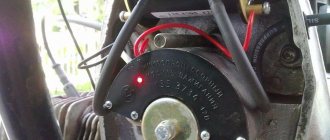
Generator and ignition sensor
You can check the generator and sensor without removing them from the engine.
We switch the tester to the AC measurement mode for the 2V range or, if your tester has such an option, for 200mV. With one probe we touch any metal part of the scooter or engine, with the other probe we touch the sensor wire (in the picture above it is labeled as a Hall sensor, but in fact it is an inductive ignition sensor). We turn the engine with the starter and look at the multimeter display. If the numbers are flashing on the display, it means the sensor is generating a signal and everything is fine with it. Otherwise, the sensor is faulty or the wire is broken.
If you know easier ways to check or something is not described in sufficient detail, write in the comments. I will be glad to improve the article based on your feedback.
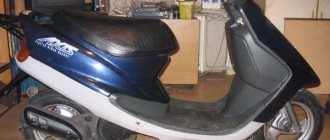
"Chezet"
The history of the legendary “Cezet” goes back to pre-war times, when the Czechoslovak arms factory Ceska Zbrojovka (CZ) decided to start producing motorcycles. In 1936, the plant produced prototypes of the Cheset, on the basis of which motorcycles with engines of 250 and 350 cc were later developed.
In 1960, CZ launched the Cheset motorcycles into mass production. In the USSR, CZ experienced unprecedented success. Along with the Java, this motorcycle was a success among rockers, and the black Cheset became the dream of an entire generation.
The famous cross-country Cezet was born in 1962. The motorcycle was equipped with a 250 cc single-cylinder two-stroke engine. Cheset's finest hour lasted until the end of the 60s. Racers from the USSR, Belgium and the GDR competed on it and won championships.
Wiring diagram of a Chinese scooter 4t 50cc
Modern scooters made in China have a similar layout. The engineers of the Celestial Empire did not bother and assembled all the critical components according to a single scheme. Even if there are differences, they are minimal.
This statement is also true for the electrical components of the moped. Any owner periodically encounters problems associated with these nodes. The electrical circuit of a Chinese 4t scooter is not a complex system; it contains only the main elements necessary for the full operation of the unit.
Knowing the main electrical wiring components and their purpose, you can quickly find the problem and fix it.
Possible breakdowns
You can often find discussions on forums that the Delta moped has low generator voltage. The spark may be weak and the battery may not charge well. These are clear signs of a generator failure. This happens for several reasons:
- The wire is burnt out or broken.
- A short circuit has occurred.
- The rotor magnetization dropped significantly.
If the voltage of the Delta moped generator drops, Nostalgia Kanuni, the cause may be a fall of the two-wheeler. Sometimes the explanation for why the rotor has become demagnetized is being near a high magnetic field. If the generator is not working properly, it becomes impossible to operate the moped.
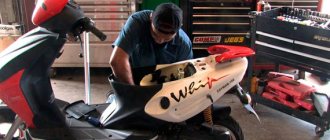
Engine disassembly
It is very easy to disassemble the Alpha engine. To do this you need:
- "Hand" with a key;
- Unscrew the bolts on the intake manifold (10);
- unscrew the cylinder covers and bolts (4 pcs.);
- remove the cylinder head.
After completing the necessary manipulations, it is necessary to correctly assemble the engine and install all the parts in place.
It may help to figure out the nuances of the scheme. The training video also contains many useful tips for repairing the most important “body” of the Alpha moped.
Depreciation
This process is carried out in the fork using a spring and damper. It’s easy to guess that when the wheel hits an obstacle, the spring compresses, leveling the impact. Well, the damper plays the opposite role. It is necessary so that after an impact there is no rebound - a sharp return of the spring to its original position. Both elements are named conventionally. That is, a spring, for example, is not always a metal spiral. Its functions can be performed by various substances, including air.
Depending on the type of spring and damper, bicycle forks are:
- Spring. In such bicycle forks, there is no damper. The main element here is a simple steel spring. Despite the simplicity of the design, riding with such a fork on uneven roads is much more comfortable than with a rigid analogue.
- Spring-elastomer. In these forks, a damper works in tandem with a steel spring. The latter is an elastomer - an element made of soft plastic. Such a damper performs its tasks well, but serves little purpose. Due to rapid wear, the elastomer only lasts for a season of more or less active driving.
- Airborne. In such forks, air acts as both a spring and a damper. The low weight of this design is its main advantage. Air shock absorbers also have disadvantages. Among them are air leakage in cold weather and lack of adjustment. Air is pumped into forks of this type using a high-pressure bicycle pump.
- Oil-air. This type of forks is considered the best. The role of the spring is played by air, and the role of damper is played by oil. Thanks to the smooth recovery of air after compression, oil flows from one section to another. Such forks are considered optimal in terms of weight and have a large number of settings.
- Oil-spring. As the name suggests, the spring element in these forks is a steel spring, and the damper is oil. Shock absorbers of this design have the greatest weight. They also have a significant advantage - excellent shock absorption and smooth running.
Features of electrical equipment
Unlike domestic motorcycles and mopeds, Alfa already in its basic version has a number of advantages:
- Electronic 12V ignition;
- Electric starter;
- Electronic tachometer on the instrument panel.
Energy sources
The moped uses a circuit with a battery power source. The manufacturer does not recommend its operation without a battery, and the wiring diagram for the Alpha moped is additionally equipped with a relay regulator (see also the wiring diagram for UAZ 31512).
The six-coil generator also copes well with its duties:
- Maintains voltage throughout the entire engine speed range;
- Ensures that the headlights and headlights work while driving.
Control and management bodies
The presence of informative devices makes the operation of the moped quite simple, which attracts many buyers. Moreover, which is typical, a fairly large number of beginners decide to buy a two-wheeled vehicle, choosing Alpha mopeds.
The equally simple operation of the moped also contributes to its popularity. All the main functions of the vehicle are displayed on the steering wheel, and their status is displayed on the instrument panel:
- Speed mode;
- Engine speed;
- Battery charge state;
- Daily and total mileage (see also Ural motorcycle wiring diagram).