Liked? Share with your friends:
Our company SAN-MOTO carries out comprehensive repairs of scooters of any complexity and scheduled maintenance of Japanese mopeds, including diagnostics, prevention, adjustment and replacement of mechanical or electrical parts and assemblies.
As you already know, no matter how high-quality and reliable a thing or mechanism is, sooner or later, it will in any case require some repairs.
Japanese scooters are no exception to this rule. Despite the amazing reliability and durability of Japanese motorcycles in general, from time to time it is necessary, if not repaired, then certainly scheduled maintenance. Any of your scooter's systems may need repairs: the engine, transmission, steering or brake system.
And, although many malfunctions, with the proper experience and certain knowledge, can be easily eliminated practically “on the knees” in a garage, work such as overhauling the engine or repainting parts will require special premises and equipment.
We can repair your moped and carry out full maintenance of all its systems and mechanisms, including the necessary spare parts. In our service, you can make the necessary repairs to your scooter without worrying about purchasing the necessary spare parts and consumables, since the bulk of the most common “consumables” are always in stock. But if you need something, our craftsmen will quickly resolve this issue: they will select and deliver the necessary part, and at the lowest prices.
In addition, we offer a service for full or partial painting of the scooter with acrylic or metallic, with high-quality restoration of all plastic parts. If you want to repaint your scooter in a different color, we will be happy to help you select and purchase paint of the desired color and shade. After painting, all plastic elements must undergo fine grinding and polishing, which gives ideal quality to our work. Reupholstering the scooter seat will completely and irrevocably change the appearance of the moped for the better. We offer a wide range of leather and leatherette materials with different textures and colors.
Price list for maintenance of scooters and mopeds
Maintenance (MOT) of a 2T scooter |
| Transmission diagnostics and variator cleaning |
| Changing the oil in the rear wheel gearbox |
| Diagnostics of the chassis and steering system |
| Cleaning or replacing the air filter |
| Cleaning and adjusting the carburetor |
| Cleaning and adjusting brakes |
| Electrical diagnostics |
| Price: 2000 rubles *excluding the cost of consumables |
Maintenance (MOT) of a 4T scooter |
| Transmission diagnostics and variator cleaning |
| Changing the oil in the rear wheel gearbox |
| Diagnostics of the chassis and steering system |
| Cleaning or replacing the air filter |
| Cleaning and adjusting the carburetor |
| Cleaning and adjusting brakes |
| Changing the engine oil |
| Electrical diagnostics |
| Price: 2500 rubles *excluding the cost of consumables |
Do-it-yourself repair of individual parts
Having determined that neither spark plugs nor gasoline are the cause of the malfunction, we move on.
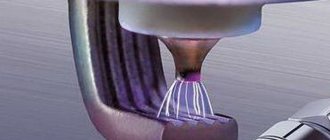
As noted earlier, engine problems can vary. Very often these problems are associated with spark plugs or the carburetor. The spark may not jump due to carbon deposits on the spark plug, which occurs due to the use of a rich mixture.
There may be a small gap, which also does not contribute to the appearance of a normal spark. In a two-stroke engine this gap is 0.6-0.7 mm. With a smaller gap, there is a high probability that the electrodes will melt. Increasing the gap causes current consumption to increase and more voltage is required to produce a spark.
There are situations when the moped stalls while moving, and then continues to move on. This occurs due to the detachment of carbon deposits from the electrode. For some time the spark is lost and the engine stops working. After self-cleaning, performance is restored.
Interruptions in engine operation may be due to moisture getting on electrical appliances and wiring. This results in a loss of voltage. After drying these parts , engine operation should be restored.
A fairly common cause in our climate is water getting into the fuel and then into the carburetor .
The reasons considered are easily eliminated by the driver themselves. However, if these steps do not bring the desired solution and the engine does not work, the scooter engine should be repaired.
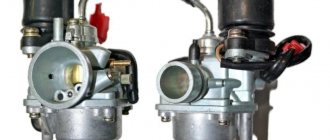
Carburetor repair
As for the carburetor, the causes of malfunctions may be caused by improper mixture quality. If the mixture is lean or rich, the performance of the moped will be at risk. The quality of the mixture can be checked by the condition of the candle. A black color will indicate that the mixture is rich, that is, there is excessive oil consumption. White color will indicate a lean mixture and a decrease in engine power for this reason.
Repairing a scooter carburetor is performed on a warm engine. Before this, if there is a possibility of clogging, it should be cleaned and washed. The carburetor adjustment itself consists of the following actions:
- Step 1 – you need to adjust the idle speed.
- Step 2 - check and adjust the quality of the mixture for the carburetor using a special screw.
- Step 3 – set the quality of the mixture by moving the needle.
- Action 4 – adjusting the fuel level in the float chamber.
This action is performed using the idle screw. In order to increase the speed, the screw is tightened, and to decrease it, it is unscrewed. After warming up the scooter, with the help of simple manipulations, you can set up stable idle operation of the engine.
The combustible mixture that enters the carburetor must clearly have the proportions set by the scooter manufacturer. If the mixture is too lean, the scooter loses power and overheats. With a rich mixture, fuel is used uneconomically. This problem can be solved by turning the screw. Turning the screw clockwise enriches the mixture, counterclockwise turns it leaner. The quality of the mixture will be indicated by the color of the candle. The candle is black and has carbon deposits, which means the mixture is rich. If, on the contrary, it is white, the mixture must be enriched.
The following manipulations are performed with the needle: when raising the needle, the mixture is enriched, and when lowered, it is leaner.
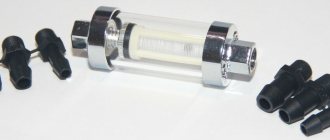
Checking the fuel level is done with a transparent tube located at the bottom of the carburetor. The procedure is as follows: unscrew the oil screw, lift the tube up and check the fuel level. The fuel level is monitored while the engine is running. The tube should be kept above the carburetor. The fuel level should be slightly below the curb of the carburetor cover.
Features of repair of Chinese mopeds
Repairing Chinese engines does not cause any particular difficulties for most scooter owners. It should be remembered that the main fastenings of the “Chinese” are more delicate than in domestic mopeds, so there is no need to pull anything with all your might.
For example, sudden movements when repairing the carburetor of a Chinese scooter can damage the pipe . Then the muffler is removed. Many Chinese scooter manufacturers use plastic soldering. This must be taken into account when disassembling the moped.
Manufacturers have foreseen that many scooter owners will want to carry out repairs themselves, so there is simply nothing complicated in the design of such scooters. The repair manual for Chinese scooters will allow you to perform all the steps yourself. Anyone can figure out the main problems and repair the engine of a Chinese scooter.
A scooter repair video will answer most questions.
Price list for repair of scooters and mopeds
General maintenance work | |
| Drum brake adjustment | 100 rub |
| Replacing the air filter element | 300 rub |
| Bleeding the disc brake system | 600 rub |
| Changing engine oil (4T) | 800 rub |
| Changing the oil in the gearbox | 400 rub |
| Replacing the spark plug | 150 rub. |
| Replacing a light bulb | 100 rub |
| Replacing disc brake pads | 600 rub |
| Replacing drum brake pads | 600 rub |
| Battery replacement | 300 rub |
| Replacing mirrors | 150 rub. |
Engine work | |
| Replacing the CPG (2T/4T) | 4500/5000 rub. |
| Crankshaft replacement | 4500 rub. |
| Replacing crankshaft bearings | 5500 rub. |
| Replacing crankshaft oil seals | 1700 rub. |
| Valve adjustment (4T) | 1300 rub. |
| Replacing the intake manifold | 550 rub. |
| Muffler replacement | 400 rub |
| Replacing the engine assembly | 3500 rub. |
| Replacing the vacuum fuel pump | 300 rub |
| Carburetor cleaning | 900 rub. |
Transmission work | |
| Replacing variator rollers | 1000 rub |
| Replacing the variator | 1000 rub |
| Replacing the variator belt | 1000 rub |
| Replacing the torque driver | 700 rub |
| Replacing the torque driver spring | 1300 rub. |
| Replacing the clutch plate | 1300 rub. |
| Reducer gear replacement | 2000 rub |
| Replacing gear bearings | 2500 rub. |
| Repairing or cleaning the kickstarter mechanism | 800 rub |
Wheel and suspension work | |
| Replacing front shock absorbers (per pair) | 1000 rub |
| Oil fork repair | 2500 rub. |
| Replacing the rear shock absorber | 600 rub |
| Replacing the shock absorber silent block | 600 rub |
| Replacing the speedometer drive | 800 rub |
| Replacing the traverse | 2300 rub. |
| Replacing the front wheel | 600 rub |
| Replacing the rear wheel | 1000 rub |
| Tire replacement | 500 rub |
| Replacing the camera | 300 rub |
Brake system work | |
| Replacing the brake caliper | 600 rub |
| Replacing the front brake cable | 900 rub. |
| Replacing the rear brake cable | 1300 rub. |
| Replacing the brake machine | 1000 rub |
Electrical work | |
| Electrical equipment diagnostics | 1000 rub |
| Replacing the electric starter | 1400 rub. |
| Replacing the headlight | 800 rub |
| Dashboard replacement | 1000 rub |
| Bendix replacement | 1000 rub |
| Electric starter repair | from 1500 rub |
| Generator replacement | 1300 rub. |
| Generator repair | from 1500 rub |
| Replacing the ignition switch | 900 rub. |
| Replacement of electrical equipment parts | from 800 rub |
Additional work | |
| Dismantling and installation of plastic parts (per piece) | from 200 rub |
| Painting of plastic parts with preparation (per piece) | from 700 rub |
| Repair/restoration of plastic parts (per piece) | from 1000 rub |
| Installing the side step | 500 rub |
| Seat reupholstery | from 700 rub |
| Alarm installation | from 2000 rub |
- < Rent and rental of scooters in Moscow
- Urgent purchase of scooters and mopeds >
Tools
- Generator puller (you can make it yourself)
- Variator puller (you can make it yourself)
- Kickstart sprocket puller (157QMJ engine only)
- Heads for 8, 10, 12, 17 mm
- Phillips and flathead screwdriver
- Small hammer
- Wish
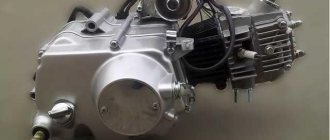
Most Chinese four-stroke scooter engines can be divided into two main types
- First type: 139QMB-series engine. This engine is very popular in the CIS countries and is installed on most Chinese four-stroke scooters
- Second type: 157QMJ-series engine. This engine has a larger volume than the first and, due to its higher price, is not so popular
Essentially, these two engines are a copy of the ancient Honda GY6 and differ from each other in displacement, kickstarter design, oil pump drive and electric starter drive. In all other respects, these engines are identical.
Typical 139QMB, in fact JL1P139QMB-2
And this is what a typical 157QMJ looks like, in fact LK162QMK
Replacing front brake pads
Let's look at the example of the Honling 7th model scooter. We loosen the tightening of the pins - the clamps; it is more convenient to do this while the caliper is screwed to the pen, see photo 1.
Then unscrew the caliper mounting bolts and remove it. Having removed the caliper, we insert a screwdriver between the pads, see photo 2, and unclench them by about 7 millimeters, otherwise the new pads, whose linings have not yet been worn out, will not fit into place.
We unscrew the locking pins and take out the old pads (photo 3).
We insert new pads, push them into place and attach the locking pins, see photo 4.
We put the caliper in place and fasten it with bolts. Tighten the locking pins.
The caliper body contains one or two pistons in cylinders located on only one side of the caliper and acting on the pad. The opposite pad is located in the protrusion of the caliper body on the other side of the disc. When braking, the piston presses the pad against the disc surface. Continuous pressure will force the caliper body together on the fingers until the other pad is pressed against the opposite side of the disc. The floating design solves the problems inherent in a fixed design, where, due to corrosion, the piston becomes stuck on one side. This results in uneven pressure being applied to the two pads and reduces braking performance. The disadvantage of a floating caliper is corrosion or wear of the axles or pins. This can also result in uneven braking force and cause vibration between the bracket and caliper. But due to the fact that the number of pistons and cylinders is half as large, the floating type caliper is cheaper and more reliable.
Source
Removing the variator
Remove the variator cover. There is nothing complicated about this: we unscrew all visible bolts and remove the cover from the engine. On the 157QMJ engine, in order not to bend the kickstarter return spring bracket, first remove the crank, remove the retaining ring from the kickstarter shaft, and only then remove the cover itself. You can, in principle, remove it this way, but then you will have to trim the bracket a little.
Removing a variator is not much easier than removing a generator. As with a generator, you need a good puller. Fortunately, you can make a puller yourself: for a 139QMB engine, instead of a puller, you can use a metal plate: remove the bendix from the niche, insert the plate into it, press the variator impeller tooth against the plate and unscrew the nut.
You can also make a more advanced puller: look for an unnecessary clutch disc from an IZH motorcycle, weld a rod and several hooks for the impeller teeth to it
For the 157QMJ engine, the puller is made according to a slightly different principle
You can go to the nearest tool store and buy a universal key for the grinder. It is very suitable for removing the variator of the 157QMJ engine and costs a penny
The principle of removing the variator is identical to the principle of removing the generator: fix the impeller with a puller, unscrew the nut, remove the variator from the axle. After removal, we completely disassemble the variator and check all its parts for wear.
On the 157QMJ engine there is a kickstarter gear behind the CVT. It is not so easy to remove, but if you are going to subsequently halve the engine, you will have to remove it.
This gear can only be removed with a suitable puller.