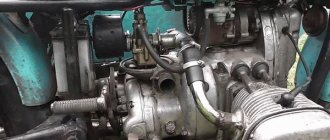
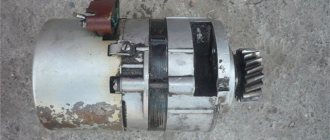
Ural motorcycle carburetor
The most popular models of the Irbit Motor Plant that have been preserved in our country are IMZ M-67 (M-67-36 with 36 hp), IMZ 8.103-30 (8.103-10 - gearbox with reverse gear).
We will focus on them, because... carburetors on other models are adjusted in a similar way. All Ural motorcycles were equipped with variable vacuum float carburetors. At first these were K-301G(B) with one float; they were installed on models M-67 and M-67-36. The letter index indicates the diameter of the diffuser (28 and 32 mm) and the throughput of the GTZ.
On later models of the Urals, more advanced K-63U(T), K-65T and K-68U(T) began to be installed. These carburetors had a new float and mixing chamber design. The throttle valve remained flat (cylindrical on the K-68), but a manual starting enrichment appeared. This made it easier to start the engine in cold weather. Also, thanks to the new carburetors, fuel consumption on the motorcycle has significantly decreased.
Motorcycle Ural IMZ M-67 with K-301 carburetors
Design and principle of operation
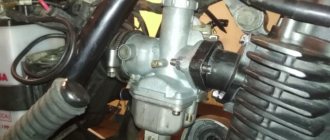
The design and operating principle of the above-mentioned carburetors are similar. The mixture from the fuel tank enters the float chamber through a hose. When the chamber is filled to the required level, the floats will float and the needle valve will close the fuel channel. From the float chamber, fuel is sucked through the GTZ into the diffuser (mixing chamber), where it is mixed with air in the required proportion and the finished mixture enters the engine cylinder.
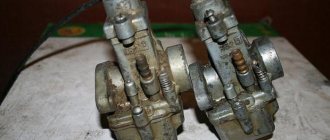
Attention, the carburetors on a motorcycle are different on the left and right. To determine, just look at the markings on the case.
The throttle valve is responsible for narrowing or increasing the diameter of the diffuser, due to which the necessary vacuum is formed in the mixing chamber. When the throttle is closed, the vacuum is at its maximum and fuel is sucked in through the idle jet. And air enters the mixing chamber through a special emulsion channel (usually located next to the carburetor inlet pipe).
As the throttle valve rises further, the amount of air in the diffuser increases and the mixture becomes leaner. And here the main fuel jet with atomizer comes into play.
To ensure that the fuel is sucked into the diffuser in the required volume, a conical needle is provided in the mixing chamber. It rises along with the throttle valve, thereby changing the flow area between the nozzle and the needle (the fuel supply does not stop, despite the decrease in vacuum parameters when the throttle is raised).
To adjust the optimal mixture parameter, the carburetor has screws for the quantity and quality of fuel. You can also change the position of the needle in the lock by raising or lowering it (change the quality of the mixture). This is usually done when the season changes, when atmospheric air parameters change sharply.
To prevent engine detonation due to a sudden enrichment of the mixture (for example, when the carburetor is flooded), a drainage hole is made in the float chamber housing. If the fuel level in the chamber becomes too high, excess fuel is removed through this channel.
Adjusting the carburetor on a Ural motorcycle
To adjust the carburetor you will need: a flat screwdriver, a ruler (caliper). To set up high-quality alternating operation of the engine cylinders, you will need a vacuum synchronizer, an electronic tachometer, and 2 5 ml syringes. But you can do without all this.
First you need to adjust each carburetor individually. The algorithm is as follows (using the K-65T as an example):
- Check the fuel level in the float chamber. Unscrew the two screws and remove the camera cover. Turning the carburetor over, measure the distance from the middle of the float to the carburetor. It should be within 13 (+1.5/-1.5) mm. If the distance does not correspond to this limit, bend the float tongue in the desired direction. At the same time, at this stage you can check the cleanliness of the carburetor jets and channels (if there is contamination, blow them out with compressed air). We put everything back together and screw the carburetor to the engine cylinder flange. ATTENTION! Before further tuning, it is recommended to check the motorcycle's ignition system, fuel tap and air filter. The latter must be clean and have the necessary throughput. The default needle groove lock is in the very middle position.
- Next comes adjusting the idle mixture. Tighten the mixture quality screw (11) all the way and unscrew it 1 turn. Start the motorcycle and warm up the engine for 5-10 minutes. Since we adjust each carburetor separately, the spark plug cap of the second cylinder must be shorted to ground. We measure and use the mixture quantity screw (27) to set the distance between the throttle valve and the bottom of the mixing chamber to approximately 2 mm. Afterwards, we start the motorcycle on one cylinder. Using the quantity screw, we set the lowest engine speed at which the motorcycle does not stall. Next, use the mixture quality screw to look for the maximum engine speed. Sometimes these operations have to be repeated several times. It is necessary to find such a position of the mixture quality screw, depending on the quantity screw, at which there will be a “maximum” engine idle speed. We carry out a similar adjustment with the second carburetor with the spark plug insulator on the other cylinder closed.
- When the desired position of the screws has been found, you should also check the composition of the mixture in the carburetor while the engine is running. It must be optimal. To do this, while the engine is idling, sharply turn the throttle lever. The speed should increase smoothly without dips or jerks. To more accurately check the mixture, after adjusting and synchronizing the carburetors, you need to ride the motorcycle for 20 kilometers. The color of the spark plug insulator will tell you a lot.
After setting each carburetor separately, it is necessary to synchronize them together. Otherwise, when the engine is running, one of the cylinders will heat up more and fail faster.
The secret to proper timing is to get the same amount of vacuum on each carburetor. But since there are no completely identical cylinders, and each carburetor has its own unique position of quantity and quality screws (for optimal mixture composition), it is necessary, first of all, to adjust the synchronous lift of each throttle valve. To do this, according to the factory instructions, the motorcycle is placed on the center stand with the rear wheel hanging out.
Start the motorcycle on each cylinder one by one and engage 4th gear. It is necessary to achieve the same speedometer readings of 40-50 km/h with a load on each cylinder (turn on the high beams or apply the rear brake). Where the speed is less than required, use the quantity screw (27) on the corresponding cylinder carburetor to raise the throttle valve. It should be remembered that the cables stretch over time, so synchronization in the Urals must be checked every thousand kilometers.
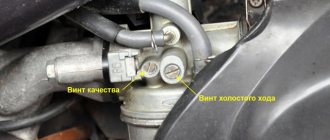
Carburetor K65
The above method has some disadvantages, in particular, inaccurate adjustment. The speedometer has an error, and not everyone can determine the correct operation of the cylinders by ear. For more accurate synchronization, you will need special devices, which we mentioned above.
We connect the electronic tachometer to the motorcycle ignition system. When starting the motorcycle one by one on different cylinders, we measure the crankshaft speed on each of them (at idle the speed should be 1200-1300 rpm). Where the values differ, we adjust the speed using the quantity screw. As soon as you achieve the same tachometer readings on each cylinder, turn off the engine and start it on two cylinders.
We ride a motorcycle for 10-20 kilometers to assess the condition of the spark plug insulator. If the quality of the mixture is optimal, its color should be brick (light brown).
Measuring the fuel consumption on each of them will also help evaluate the synchronous operation of the cylinders. To do this, connect syringes pre-filled with fuel into the carburetor fitting through hoses. We start the motorcycle and visually observe which syringe consumes fuel faster. Thus, we can easily determine which cylinder “eats” more and, accordingly, heats up faster. We again make the adjustment using the quantity screw on top of the carburetor.
You can see more about synchronizing carburetors on a Ural motorcycle by following the video link:
Carburetor repair
Among the common malfunctions of the Ural motorcycle carburetor are the following:
- Worn throttle valve, resulting in a “floating” idle. The damper begins to ring in the carburetor, because... does not sit tightly in place. It can be treated by replacing it from a repair kit or restoring its shape using solid lubricant MC-2000. It is worth noting that on K-68 carburetors the damper began to be made cylindrical and from a harder material. Its service life has increased.
- The carburetor is flooded. The fuel channel in the mixing chamber is clogged. The needle does not completely close it. The rubber tip of the locking needle may be damaged or the floats may be leaking. The channel can be blown out with compressed air, and the floats with a tip can be replaced from the repair kit.
- Worn main dispensing needle or nozzle hole. This leads to incorrect dosage of the mixture in the mixing chamber, and the idle settings are lost. The needle can be replaced from the repair kit, but the nozzle will have to be changed along with the carburetor body. But, as a rule, it rarely wears out.
- Other malfunctions. Clogged nozzle channels are washed in gasoline and blown out with air. It is not recommended to clean them with needles or wire, so as not to change the throughput. The gasket between the float chamber and the carburetor body wears out due to contact with gasoline (with frequent leaks). You should watch it especially carefully so that when driving, excess air and dust do not get into the camera.
It happens that when the engine is running, unburned mixture sneezes or pops into the carburetor. The problem here is not in the carburetor, but in the Ural ignition system, or burnt out valves.
Five random articles about motorcycles:
Store information
Our online store provides the following services: Custom motorcycle spare parts Motorcycle tuning Motorcycle accessories Moto equipment for motorcyclists Tools for motorcycle maintenance Currently, our online store offers about a million products.
We really have the largest selection of motorcycle products in the entire RuNet. In the spare parts section, we focus mainly on the range of cheaper analogues of original Japanese and European motorcycles. For Chinese-made motorcycles, we offer the entire range of original spare parts. If you have not found the standard spare part you are interested in write to us if it is on sale, we will find it for you at the lowest price. To save your and our money, we are currently working only on pre-orders! Delivery time to our warehouse in Tolyatti is 3 weeks. Then the goods can be sent to any locality where there is a branch... Read more >>
To prevent the fork from knocking
How to eliminate play in the front fork rod in the upper bridge On some YAVA motorcycles, after 30 - 50 thousand kilometers, wear leads to play in the front fork rod in the upper bridge.
It reveals itself with unpleasant knocking noises when driving on bad roads. Using foil to reduce the gap is ineffective, and tightening the nut does nothing. It was possible to eliminate the backlash using a special nut and a conical ring (Fig. 1). They are made of tool steel (you can, for example, use 40X) with hardening to a hardness of 45 - 50 HRC. We install new parts instead of the round nut, as shown in Fig. 2. When the upper nut is tightened, the split ring opens and tightly fixes the fork rod in the upper bridge. In this case, you do not need to install the lock washer. Rice. 1. Nut (left) and ring. Rice. 2. Mounting unit for the upper bridge: 1 — steering column of the frame; 2 - cone nut: 3 - bridge: 4 - split ring; 5 - nut;... Read more >>
A word to the drivers of Yav. Readers' conference for owners of Czechoslovak motorcycles in 1966
A word to Java drivers The smallest square in Moscow—Kuibyshev Square—on one June evening became the largest parking lot for “Java” and “Chezet” motorcycles registered in the capital.
It was not chance, of course, that brought so many Czechoslovak cars here in one day and hour. Information in “Evening Moscow” and announcements announced that in the club of the Ministry of Finance the editors of the magazines “Behind the Wheel” and “Motor Review” (Czechoslovakia) were holding a reading conference for owners of Czechoslovak motorcycles. Several hundred “Yavists” filled the large hall. Many are straight from work. In leather jackets, with helmets in their hands. And behind these people there is a huge audience of half a million people. We didn't make a reservation. This is exactly how many motorcycles, mopeds, and scooters made in Czechoslovakia have been sold in our country in recent years. Import of products from the Czechoslovak motorcycle industry is one of the many components of mutual trade between the two fraternal countries... Read more >>
Owners of IZH Jupiter 4K. Tighten the screws securing the crank chamber covers
For owners of IZH Jupiter 4K On the IZH-Jupiter-4K motorcycle, after two years of operation, engine performance began to deteriorate: it was difficult to start, and the left cylinder failed at times.
When something rattled in it one day, I had to get home in tow. Having disassembled the engine, I saw that the screws securing the crank chamber covers had come loose - they had been precariously sealed at the factory. I tightened the screws and secured them properly. After assembly, the engine began to start and work very well, even at the lowest speeds. Later, a similar defect arose on a friend’s car, and we eliminated it in the same way. Obviously the plant needs to pay attention to this unit.A. ZHMYKHOVKurgan region, r. p. Vargashi1986N01P33 Read more >>
Carburetor - removal and disassembly
It is possible to partially disassemble the carburetor (removing and washing the throttle, repairing the drive, etc.) without removing it from the engine.
1. Place the motorcycle on the center stand.
2. Remove the protective covers.
3. Shutting off the fuel supply, disconnect the fuel hose from the carburetor.
4. Use a screwdriver to loosen the clamp and disconnect the rubber air filter pipe from the carburetor.
5. 10 mm open-end wrench
Unscrew the mixture corrector nut.
6. Remove the corrector plunger assembly.
7. Disassemble the corrector plunger.
8. Pulling the cable sheath upward, unscrew the throttle valve cover.
9. Remove the throttle valve assembly. Cover the hole with a clean cloth.
10. To replace the cable, you need to compress the damper return spring, and, pushing the cable down, remove its end from the cut in the damper needle nut.
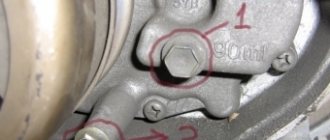
1. 12 mm wrench
unscrew the two bolts securing the carburetor adapter pipe to the cylinder. We remove the carburetor with the pipe, being careful not to tear the paronite gasket.
2. Hold the bolts with a 12mm wrench
, unscrew the nuts securing the adapter pipe with a wrench
by 13 mm
. We remove the pipe.
1. Using a screwdriver, unscrew the two screws securing the carburetor cover.
2. Remove the float chamber. There is a paper gasket underneath, be careful not to tear it.
3. Using a thin drift, carefully knock out the float axis.
4. Use thin pliers to remove the axle.
5. Remove the float along with the locking needle.
6. 8 mm socket wrench
We turn out the seat of the shut-off valve.
7. Using a screwdriver, unscrew the jets of the main dosing system and the idle system.
8. 6 mm wrench
turn out the additional jet.
9. 12 mm wrench
We turn out the fuel-emulsion nozzle of the main dosing system.
10. Turn out the “quantity” and “quality” screws.
13. We wash all carburetor parts, except gaskets and rubber parts, in acetone or solvent for nitro paints. We clean all channels and jets with copper wire or toothpicks soaked in solvent, and blow them with compressed air from the compressor.
It is unacceptable to clean carburetor jets with steel wire, needles or any other tool.
We assemble the carburetor in the reverse order, while lubricating the rubber o-rings, threads and gaskets with engine oil or BSK brake fluid containing castor oil.
We tighten the “quantity” and “quality” screws until they stop. Then we unscrew the “quality” screw one turn (preset), and unscrew the “quantity” screw five to seven turns.
We check the operation of the shut-off valve. When the carburetor is oriented with the throttle channel down, the air supplied by the mouth into the inlet fitting should not pass through the valve.
Adjusting the position of the needle of the main dosing system is carried out by rearranging the lock washer in the grooves of the needle:
- washer to the left - enrichment of the mixture; - washer to the right - lean mixture.
How it works
In the case of the K126G carburetor, there are 2 chambers at once, where the processes of mixing the working air-fuel mixture take place. These are certain proportions of fuel and oxygen.
When the key is turned in the ignition switch, fuel begins to flow into the first of the chambers. Then, as the torque increases, it is formed in the second chamber.
The structural elements of the carburetor system allow a strictly dosed amount of fuel and air to pass into the chambers. This allows you to form a mixture with optimal proportions.
If an engine that operates under high load and at high speeds needs a rich mixture, then the economizer has its say.
The solenoid valve increases the air flow through the air damper, which is constantly open. This enriches the mixture.
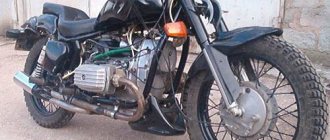
One carburetor for a Ural motorcycle
Among the frequently encountered options for tuning a Ural motorcycle, it is worth noting the installation of one carburetor in the Ural, usually a car one. This is done primarily to reduce fuel consumption. After all, it is well known that boxer engines with original carburetors have a considerable appetite (6-9 liters per 100 km).
In addition, due to the design features of single-chamber float-type carburetors, Ural motorcycles have a noticeable dip during sharp acceleration from a standstill. For some this is unacceptable. Improving the dynamic characteristics of a motorcycle is another reason why such carburetors are installed.
To install one carburetor in the Urals, you need to make so-called “pants” - inlet pipes for each cylinder with a common flange for attaching the carburetor. Since car carburetors are located (longitudinally) in the center of the engine (where the air filter was), the pipes must have strictly the same length and a smooth surface inside, without burrs or steps.
If the carburetor is installed transversely, then the right (left) pipe must be made shorter so that the first channel of the diffuser is exactly in the middle. This way we will ensure equal supply of fuel to the cylinders. The air filter is installed above the carburetor or, if there is not enough space, to the side of it.
Another important point. The intake manifold does not have to be one piece. It must have at least one elastic connection. The motor has a certain thermal expansion. Since the motor is quite wide, this expansion is enough for the connections to the heads to break the tightness of the connection and begin to suck in air. The solution is tritely simple, an incision is made in any convenient place and connected with a rubber pipe.
So, the first car carburetor for the Ural motorcycle is the DAAZ 1111 (1113) from Oka. It is designed for a similar volume - 650 cubic cm. But before installation, it will be necessary to replace the standard jets in the first chamber with 90, and in the second with 92.5. The air channels remain the same.
The K-133 carburetor from Zaporozhets is installed in a similar way. Owners note a noticeable reduction in fuel consumption (3-5 liters per 100 km) compared to two carburetors. The downsides of this carburetor are its dated single-barrel design and workmanship. Today on the market there are more advanced 5-system carburetors with suction, accelerator pump, etc.
One of these is the DAAZ-2108-1107010 carburetor. It is initially configured for a 1.5 liter V8 engine. Before installation on a motorcycle, you will need to select the appropriate jets.
The filter for the carburetors described above is made independently. They make a platform for the filter element, and cover it with a decorative cover on top. They also make an adapter for a standard filter box, if there is enough space for it.
Second phase
Now let's move on to the main second stage of carburetor adjustment in the Urals. Place the Ural motorcycle on the center stand, or in any way convenient for you, hang the rear of the motorcycle so that the rear wheel is in free rotation.
Start the motorcycle again and remove the spark plug wire from the right cylinder. Engage 4th gear, add a little gas, and the speedometer should show 55 km/h. Lock the throttle in any convenient way in this position (there is a small screw in the throttle for this). Then put the right spark plug wire back and remove the left one. Using the screws on the carburetor covers, we adjust the length of the cables so that when working on each cylinder, the speed on the speedometer does not change. This will ensure synchronized operation of the throttle valves during transient operating conditions.
How to adjust the K-65 carburetor?
One of the important systems of motorcycles is the carburetor. He is responsible for the correct operation of the vehicle, its stability and durability. The functionality of a motorcycle or scooter largely depends on the design features of the carburetor. Therefore, the owners of the presented vehicles evaluate the design features and operating principle of this device.
Often, when creating domestic brands of motorcycles, mopeds and even snowmobiles, the manufacturer installs a K-65 carburetor in the system. You can adjust it yourself if necessary. The setting will allow the engine to start simply and easily, its operation will be stable and smooth. The fuel mixture will consist of the correct proportion of components.
What indicates a malfunction
The carburetor of the K126G model in question has its own faults that are specific to this device.
Basically, they all have to do with reducing the throughput of the nozzles, depleting the pump's life, as well as the clearances in the throttle valves. Therefore, from time to time, car owners are faced with unbalanced idle speed. As a result, the engine floods, or it experiences an acute shortage of fuel. The mixture turns out to be lean.
There are several signs that indicate your carburetor needs repair or adjustment:
- the amount of fuel consumed increases sharply;
- at high speeds, interruptions appear, the car moves jerkily;
- the engine does not start the first time, it is uncertain and unstable;
- when driving, noise appears that is uncharacteristic of a normally tuned engine;
- during trips, vibrations are felt that were not there before;
- When braking, or when accelerating sharply, thick black smoke actively comes out of the exhaust pipe.
In the operation of any carburetor, including the K126G, the installed jets play a huge role. In fact, these are plugs in which there are several holes of a specific diameter. Due to these holes, air or fuel passes through. This allows you to form the air-fuel mixture in a timely manner.
But when low-quality fuel is poured, the nozzles begin to become dirty. Due to clogging, the engine does not receive the required amount of fuel.
Therefore, one of the tasks is to clean these same jets. The advantage of the system is that there is no need to disassemble the unit. Each of the jets can be separately removed from the body without complex dismantling work.
Installing a new carburetor
Before setting up a new carburetor to 65, you must carry out the following steps:
- When installing a new K65, the top cover is removed from it, the housing is placed on the engine, and the cable is connected to the throttle.
- The throttle lever raises and lowers the throttle several times. This checks its work.
- Then the throttle rises until a gap forms between its lower edge and the diffuser. This value is 3 mm.
- If the K65 carburetor has a corrector, then it is removed, the cable is attached to the piston, and then the assembly is put back.
- It is necessary to check the free movement of the cable sheaths.
- Then the screw is screwed in and released by 0.5-1.5 turns. The fuel hose is connected to the fitting and the presence of leaks is checked.
- Using the starter, you need to turn the crankshaft 3 turns. The engine turns on and warms up for some time. After this, the corrector or launch unit is removed.
Carburetor adjustment k65 k63
DESIGN FEATURES OF THE K-65 CARBURETTOR COMPARED TO K-63
The parameters of the K-65 carburetor dosing system have not changed. The throttle needle has changed in design (Fig. 3.6). In its upper part, instead of threads, there are five annular grooves. The needle is fixed to the throttle using a plastic plate 2 and a lock washer 1.
With this design, adjusting the needle position is much easier. When regulating the quality of the mixture during engine operating conditions, it is necessary to rearrange bar 2 relative to the annular grooves of the metering needle, having first removed lock 1. A very important change was made to the design of the starting device (Fig. 3.7) - instead of a long needle, a short needle 8 with a sealing washer was used
7. This completely eliminated such a defect as the needle jamming and being pulled out of the socket. In addition, a rubber sealing cap is inserted into the upper part of the device. Now, through the gap between rod 1 and guide 2, dust and dirt will not get into the starting device. The top cover of the carburetor was also changed in order to prevent dirt from getting onto the throttle.
To increase reliability on the K-65, the design of the main dosing system sprayer was improved. Minor changes have also been made to the carburetor body. The rest is the same as in the K-63 carburetor.
Rns.3.6. Throttle needle K-65: 1 — throttle needle lock; 2 — bar; 3 - needle.
Rice. 3.7. Starting device of the K-65 carburetor: 1 - rod; 2 - guide; 3 - spring; 4 - plunger plug; 5 - plunger; 6 — lock washer; 7 — sealing washer; 8 - needle
DESIGN FEATURES OF THE K-68 CARBURETOR
To replace the K-65 carburetor, a new K-68 carburetor was developed. In terms of dimensions and connecting dimensions, it is similar to K-65. At the same time, it has separate design features.
The K-68 carburetor has a cast choke with a round section. The fuel valve seat is removable. The diffuser is elliptical and equivalent to a diameter of 28 mm, the diameter of the mixing chamber is 30 mm. It is believed that the elliptical diffuser contributes to a smoother change in the amount and composition of the fuel mixture.
The throttle needle is constantly pressed in the direction of the flow, resulting in a high-quality outflow of fuel from the main metering system.
The throttle has a central drive, which ensures smooth regulation of the amount of mixture and also reduces the wear of its rubbing surfaces.
HOW TO INSTALL K-63T OR K-63F CARBURETTORS ON MOTORCYCLES K-650, MT9, MT10, MT10-36, “DNEPR-11” AND “DNEPR-16” MODELS?
Carburetors K-63T and K-63F are received assembled with spacer 4, gasket 3, bolts 2, as well as nuts and washers.
For installation on motorcycles K650, MT9. MT10, MT10-36, “Dnepr-11” and “Dnepr-16” carburetors K-63T and K-63F instead of K-301, it is necessary to install spacers 4 and bolts 2 into the sockets, then use screws 7 to attach spacer 4 to the head and bolts 2 secure the carburetor through gasket 3. Gasket 5 is used from an old carburetor. If during installation the carburetor rests on the cylinder ribs, they must be filed down.
Rice. 3.8. Installing a carburetor on an MT engine: 1 - carburetor; 2 — bolt securing the spacer to the carburetor; 3.5- gaskets; 4 — spacer; 6 - cylinder head; 7 — screw securing the spacer to the cylinder head
Rice. 3.9. Spacer 1 - carburetor; 2 — bolt securing the spacer to the carburetor; 3.5- gaskets; 4 — spacer; 6 - cylinder head; 7 — screw securing the spacer to the cylinder head
THE PISTON BURNT ON THE URAL MOTORCYCLE. WHAT IS THE REASON FOR THIS PHENOMENON AND HOW TO AVOID ITS REPEATMENT?
Burnout of the piston indicates that there is a serious disturbance in the flow of the working process in this cylinder and that these disturbances existed for a long time, but were not eliminated, although they probably revealed themselves (overheating, “popping” in the carburetor). It is most likely that the mixture in this cylinder was either lean due to incorrect adjustment of the main metering system of the carburetor, or this cylinder was working with constant overload due to the fact that the spool in its carburetor rose significantly ahead of the other. Perhaps the observed phenomenon was aggravated by setting the ignition too early or prolonged driving at maximum settings, as well as installing a spark plug that was too “hot” (with a low heat rating).
Assembly features of the K65k carburetor
The K65k carburetor was produced back in the Soviet period. This can be judged by the cast body and internal parts.
Assembly of the structure consists of the following steps:
- The spray chamber is installed. It can only be fixed in a certain position. The body has a square-shaped protrusion. The nozzle groove should fit into the protruding part of the body. Now take the atomizer itself, the diameter of which is 2.63 mm. Looks around. It is purged with air and installed in the chamber.
- Then install the main fuel jet with a flow rate of 220 ml/min, an idle tube that passes 50 ml/min, and a lock washer, which has the same dimensions for all modifications of carburetors in this series.
- A fuel system is installed to control the fuel level. It consists of a needle and a two-chamber float. If all parts are without flaws, the carburetor is turned over and placed on the plane of the table. The needle is inserted into the bronze part of the float, which is fixed on the axis.
- The cover located at the bottom is being installed. A gasket is placed, and the entire structure is securely fixed with bolts. Tightening proceeds evenly to prevent the gasket from skewing.
- The starting device is installed and the mixture quality screw is screwed in.
- The top cover is assembled. A screw is screwed in to regulate the amount of mixture. A guide for the cable is also installed.
- The throttle valve together with the top cover is fixed to the K65k carburetor and tightened with bolts.
Despite the complex structure of this type of unit, knowing its technical characteristics, it is realistic to carry out the adjustment with your own hands. The main thing is to adjust the location of the float so that there is no overflow of fuel. After this, adjust the quantity and quality of fuel supply. Then, after starting and warming up, check the stability of the engine.
Device Features
The carburetor of the model in question has a fairly simple adjustment, as well as the ability to configure it yourself.
It’s not for nothing that the K126G began to be actively installed on cars from the UAZ family. In total, they can have 3 types of carburetors:
- K151;
- DAAZ Solex;
- K126G.
Moreover, the latter option is most often found on cars of this brand. K126G is included in the basic package of the UAZ Bukhanka. It is also actively installed on the UAZ Hunter, as well as the UAZ Patriot.
This carburetor is ideal for two UAZ engines. These are UMZ 417819 and UMZ 421810.
Structurally, the carburetor under consideration consists of:
- accelerator pump;
- devices for dosing hot food in the first chamber;
- dosing devices in the second chamber;
- economizer;
- air damper;
- idle mechanism.
The device also has a number of additional and small elements. But each of them is aimed at maintaining and improving the operation of the entire system.