Creating the Intake Manifold
Having chosen which carburetor to install, we proceed to the next step - creating an intake.
First, we remove everything unnecessary - old carbs, filter, freeing up the area. Now you need to make three mounting plates. To do this you need to use metal, no thinner than 5 mm. The plate will act as a tip that is fixed to the cylinder (similar to the plates on the exhaust elbows). On the cylinder side, it must retain the mounting points and have an internal diameter corresponding to the diameter of the inlet port. You can use the old plate on the carburetor side by cutting off part of the seat from the original part (if the design allows). Parts can be ordered from a turner or made from CNC equipment. The last resort is to do everything yourself, using a drill, a file and a lot of patience. Now we need to put everything out. The plates are screwed into their seats, and the carburetor is rigidly fixed in its future location. Important! When aligning the carburetor, please note that it must be raised relative to the gearbox by at least a few centimeters. The next stage is the selection of pipes and welding machine. It is best to use stainless steel pipes, perform rough fasteners “on site” using manual electrode or semi-automatic welding, and finally weld the parts using argon or gas welding
It is best to use stainless steel pipes, perform rough fasteners “on site” using manual electrode or semi-automatic welding, and finally weld the parts using argon or gas welding
The next stage is the selection of pipes and welding machine. It is best to use stainless steel pipes, perform rough “on-site” fasteners using manual electrode or semi-automatic welding, and finally weld the parts using argon or gas welding.
Such a high-quality finishing weld is needed to ensure that the inside of the manifold is in a perfectly smooth condition, otherwise swirls or irregularities may appear that prevent normal intake. If there is only rough welding, then it is worth welding the manifold in stages, polishing the welded joint each time
Note! Due to the peculiarities of the arrangement of the cylinders in a boxer engine, the manifold created in this way cannot be of equal length, so try to make the intake pipes as equal as possible. On the other hand, if you install the carburetor not symmetrically, relative to other parts, the problem can be avoided. Solving the problem with the air filter
As you already understood, the old air filter is no longer suitable for installation. Some people get sophisticated by installing one carburetor behind the filter, making an incredibly long intake. This option has a lot of disadvantages, but the most obvious is the inability of the system to adequately respond to gas and they do not work at low temperatures. The way out of this situation is a new filter. You can make it yourself; many people approach the issue creatively, placing the filter inside a flask, leather bag, first aid kit, etc. Such a new element looks quite original and can fit well into the overall style of the motorcycle. On the other hand, the market is simply overflowing with short filters of zero resistance, which will ideally fit in a new place.
The last stage is starting the Ural engine and setting it up. Some imported carburetor models do not have an enricher, which must be taken into account when purchasing. Otherwise, the idea is simple: when the engine starts, we do a test drive, with maximum spin in low gears and try to reach speeds of more than 100 km/h. If the engine does not pull, perhaps a more efficient jet will solve the problem; you also need to work some magic with the idle speed setting.
Note! This entire system has one significant drawback - problems with operation at low temperatures. In the cold, condensation forms in a long manifold, which inevitably leads to deterioration in engine performance.
You can try to isolate the inlet with rubber pads or other insulating materials. Plus, you shouldn’t do test runs and adjustments in the cold season.
Conclusion
Now you know how to install one carburetor on a Dnepr or Ural motorcycle. Before you start work, weigh the pros and cons, correctly assess your abilities, because if you don’t have a lot of money to entrust this work to workshops, you will have to use the skills of a welder, designer, mechanic and others. On the other hand, by correctly completing all the described points, you will lighten the burden of owning Soviet equipment and will be able to ride a motorcycle without any problems, even in everyday use.
Need a collector
A separate problem is the manufacture of the intake manifold. Since casting the part at home is not possible, you will have to use thick-walled stainless steel pipes. It is important to meet the following conditions:
- The internal diameter of the pipe must correspond to the diameter of the inlet holes on the cylinders.
- The diameter, flow area and bending of both branches of the collector must be the same.
- The connecting platforms should be made of thick, at least 5 mm, and even sheet. It would be good if all operations could be performed on a milling machine. In the absence of one, you will have to arm yourself with a good plumbing tool, be patient and do everything yourself.
- Internal welds, if any, are carefully ground. Irregularities and protrusions on the inner surface of the intake tract are unacceptable.
The best carburetors.
What are the best carburetors for the Ural 750cc with sidecar drive? I drive mostly in the forest, and in the mud, and sometimes I ride on the highway too.
Rename the topic, you are misleading people, do you want to buy the best carburetors, sell them as a gift. I won’t say anything on the topic; I haven’t driven a 750 Ural and don’t plan to.
I don't buy or sell while I'm interested.
if price-quality then k68t. not China.
Where can I find them?
All you can fart?
Never mind. If you don’t drive in winter, then monocarb from the car
If you don’t drive in winter, then get a monocarb from the car.
to 63u. if you find it. there the needle is bronze and longer than 65. Unlike the Kuikhins, you can climb deep into shit. nothing gets caught, and they are easy to clean.
Yes..expensive.
What kind of carburetors (from what motorcycle?)? __________________________________________________ “Please note that Republican credit cards are not in use here!”
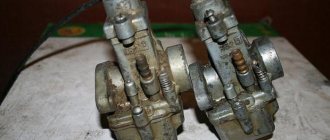
Former alcohol, converted to gasoline. 34 diffuser. Without accelerators.. They were made for a cross-country stroller, but they were not useful.
And why are they better than the cheap K68 or the same vacuum seals from disassembly?
Judging by the stamp, Italian? For sale? How expensive? __________________________________________________ “Please note that Republican credit cards are not in use here!”
PMed me
The question implies an answer in the style: “Every sandpiper praises its own swamp..”) As in most similar topics.
I myself am puzzled by this topic now. There are dellorto 30, and keihin 32 and 68And and not I, and IKOVY, etc. I came to the conclusion that none of the above fits. But I still have volume 833.
For heavy use you need carbs: -not vacuum ones! -protected! -Easy to wash! -Easily disassembled! -reliable! -cheap! -have repair kits!
..I have some ideas..if I can, I’ll voice them.
Mikuni from a dog. Other options do not meet at least two of the proposed requirements, including k68. Protected - you had vacuum bsr36-89, which should work perfectly with normal jets. Chinese copies from sfmoto are relatively cheap.
Big ones. A maximum of 32-34mm diffuser is needed. And again, the priority is the gate.
Other options are expensive. Unless we put China. There are analogues of pwk series keihins. They also have needles and jets for every taste and color. The question is how long it takes. Originals are expensive. It's a double-edged sword.
For heavy use you need carbs: -not vacuum ones! -protected! -Easy to wash! -Easily disassembled! -reliable! -cheap! -have repair kits!
..I have some ideas..if I can, I’ll voice them.
1. vacuum ones are no worse than gate valves on off-road terrain 2. if by protected we mean from dirt and water, then they are protected no less than gate valves, and even more if used from ATVs. Also, if possible, use “lying” carbs so that you can place them much higher than the cylinder + they will not interfere with your legs. However, if you drown a motorcycle up to the gas tank, then the engine needs more protection, but why drown it if you can usually go around it? 3.inside? To avoid getting clogged when driving off-road, just move the ventilation hoses higher and that’s it. 4. 4 screws on the bottom, 4 on top and the carb is in full view. 5. The Japanese don't break. 6. one thousand to one and a half rubles apiece for disassembly. 7. See previous paragraph.
I have K68u carbs from Pekarovsk, with installed GTZh from Izha Jupiter 235. I drove about 5 thousand on them in a wheelchair. Then for some reason I installed the K68T with the original 220 jets. I bought it while drunk. It got duller at the bottom. I can sell k68U with Iupaka fluids. I installed VasyaPZ) which already creates a certain aura of hihyha. Anyway, my 750 pikhlo exploded. I’ll definitely have a 650cc for about 2 years, I’m tired of spending money on this Ural
Inappropriate installation option
What carburetors are suitable and what is better to install? We will have to disappoint those who plan to use available models from Oka or Zhiguli during the conversion. All car modifications are out of play in this case. There are several reasons:
- The vacuum in the intake tract of a motorcycle differs from the parameters typical for car engines. Because of this, correct adjustment of the carburetor on a motorcycle becomes almost impossible.
- The selection is carried out not simply by working volume, but by the number of aspirations per unit of time. Aspiration can be roughly calculated by multiplying the engine displacement by the maximum speed.
- Car models pose a danger if the motorcycle falls because fuel can splash out and ignite.
Automobile carburetors are not suitable for conversion!
So the idea of using parts from Oka or other automotive equipment will have to be abandoned.
What needs to be done to install a monocarburetor
If you install one carburetor on a Ural motorcycle, this will largely solve this problem. This is a possible, although not ideal, solution. In bringing the plan to life, certain difficulties will have to be overcome. Necessary:
- Clear space above the engine crankcase. This is where it is most convenient to secure the intake tract and connecting flange.
- Make an intake manifold.
- Select a suitable carburetor according to the parameters.
All this will require a significant investment of time and money.
Installing a new carburetor
Before setting up a new carburetor to 65, you must carry out the following steps:
- When installing a new K65, the top cover is removed from it, the housing is placed on the engine, and the cable is connected to the throttle.
- The throttle lever raises and lowers the throttle several times. This checks its work.
- Then the throttle rises until a gap forms between its lower edge and the diffuser. This value is 3 mm.
- If the K65 carburetor has a corrector, then it is removed, the cable is attached to the piston, and then the assembly is put back.
- It is necessary to check the free movement of the cable sheaths.
- Then the screw is screwed in and released by 0.5-1.5 turns. The fuel hose is connected to the fitting and the presence of leaks is checked.
- Using the starter, you need to turn the crankshaft 3 turns. The engine turns on and warms up for some time. After this, the corrector or launch unit is removed.
The first stage of adjusting carburetors on a Ural motorcycle
If you have carried out the above manipulations and are confident that all systems are working properly, we proceed to direct adjustment. You need to completely warm up the engine, it is advisable to drive for 10-15 minutes before tuning. Then we start the engine on one cylinder, having first removed the cap from the spark plug of the other cylinder.
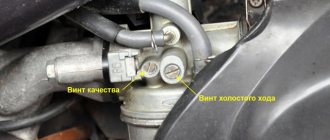
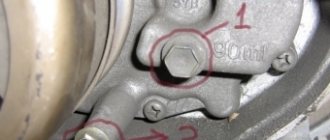
- Using the “quantity” screw (pictured No. 1), we lower the speed to the minimum stable.
- Using the “quality” screw (pictured No. 2), we increase the speed until it stops growing.
Repeat points 1,2 – 2-3 times. We do the same on the other cylinder. We achieve the same operation of the cylinders individually by ear, ideally by the tachometer.
3. Connect both spark plug wires and synchronously turn the mixture quantity screws with both hands until the minimum idle speed is obtained. The engine should run smoothly and without jerking. The first part of the adjustment affects the stability of the launch of the Ural motorcycle, the correct operation of the carburetors at the initial opening of the throttle valves.
On a note
We must not forget that before installing a new carburetor in the Urals, the power unit should be diagnosed, subjecting its components to the most thorough revision. Only after making sure that all parts are in good working order should you begin further work. After all, if there is something wrong with the engine, then it doesn’t matter how many carburetors there are on the motorcycle - 1 or 2.
The work ahead will not be easy. If you feel that you are not ready to handle it yourself, it is better to entrust the matter to specialists who already have experience in such alterations. But be careful not to give your pet into the hands of amateurs. Remember that it is very difficult to choose a suitable carburetor for a motorcycle, and especially for the Urals!
Engine and gearbox
The motorcycle used a four-stroke gasoline engine with a power of up to 36 horsepower. Torque was supplied to the four-speed gearbox through an automobile-type clutch - dry, equipped with two discs. A cardan shaft was installed between the box and the rear wheel gearbox. The technical characteristics of the Ural M-67-36 motorcycle were significantly increased in the version with a sidecar wheel drive. The drive was carried out by a shaft passing from the rear wheel gearbox to the wheel hub of the side trailer. However, such cars are quite rare. The bulk of the motorcycles were produced in the classic single-wheel drive version.
Installing a boxer carburetor
There have been and are many conversations about the feasibility of replacing the standard carburetors of the Ural and Dnepr boxer engines with one for cars. They talked about both the positive aspects of this case and the negative ones. And so I couldn’t stand it - I wanted to find out for myself how the Dnieper engine with one carburetor would work. Will there be failures? What's the launch like? And I decided to spend my efforts to get some information from a living example... 2. What is needed for this and how much does it cost.
1. Here we consider another of the many options for manufacturing the so-called manifold for replacing two standard carburetors of the Dnepr-11 motorcycle (or similar ones, but with a gearbox from the one indicated) with one car with a modern base (rectangular shape, four mounting holes). The fact is that the Dnepr-11 gearbox has a round plastic air filter housing, installed on two lugs of the gearbox housing of the appropriate shape.
2. I did it using the following:
A) two adapter pipes of the Ural-Solo exhaust system, in a basement in Sokolniki then cost 250 rubles/pair.
B) two inlet pipes for the VAZ-2108 water pump, now cost 150 rubles/piece.
C) a thick textolite spacer for a carburetor, costs 15 rubles.
D) Glue, or better yet, cold welding of the POXIPOL brand.
D) A VAZ-2108 cooling system hose (unfortunately, I don’t remember which one, but it looks like the letter S, only more developed), costs 65 rubles.
E) Bulgarian (it doesn’t matter who has which one). H) Studs with M8 nuts, 4 pcs., I don’t remember how to choose the length
H) Studs with M8 nuts, 4 pcs., I don’t remember how to select the length.
I) two clamps for fastening the exhaust pipes of Ural and Dnepr motorcycles.
K) GAZ 24 generator belt tension bar.
3.1. Cut the end of the pipe (A) as shown in the diagram:
3.2. Next, we bend and trim so that it looks like this:
3.3. We treat one side of the spacer (B) with coarse sandpaper so that it is rough, so the POXIPOL will stick better.
3.4. We apply the cut part of the tube to the spacer (B), and the end of the tube should be in the middle of the spacer. We fix the connection and apply POXIPOL. We wait 20 minutes.
3.5
We do the same with the second tube, paying attention to its mirror location
3.6. It should look like this:
3.7. We install the clamps (I) and the bar (K) on the manufactured part of the manifold.
(there are some elements in this photo that have not yet been described)
3.8. We measure locally - measure the length of the pipe (B) from the cylinder head to the place where its connection should be with the already manufactured part of the manifold. We cut the pipe. Let's measure the other side. We cut it.
3.9. Having previously measured in place, we cut off the hose (D) on one side and on the other. To strengthen the bending point (so that it does not shrink due to vacuum), we cut off the bending points from the remaining parts of the pipes (B) - 2 pieces. We insert these pieces into the cut off bending parts of the hose.
3.10. Drill out the mounting holes in the pipes (B) with an 8mm drill.
3.11. Finally, let’s see if we have all the parts:
3.12. We collect and install everything.
Below are a few more pictures for a better understanding.
4. Summary. Works. POXIPOL holds well, tightly, no air leaks. A VAZ-2107 carburetor was used due to the lack of any other one. The launch is excellent, it runs smoothly, but... Either idle, which is very high, or full throttle, in other modes it completely stalls. I attribute this solely to the carburetor itself, its performance (2107), degree of contamination, etc. In the future, I will try a carburetor from Oka.
PS The carburetor is installed like this: there are no studs yet, it slides in from the side, then the studs are inserted from below with nuts and tightened with nuts from above. Or the entire unit complete with carburetor is installed on the gearbox.
PPS The photo of the carburetor assembly was unfortunately lost, but I can assure you that there is quite enough space for, say, a “frog” (air intake from the filter to the carburetor) from the Muscovite 2141.
The author apologizes for the lack of exact drawings and dimensions - my goal was to convey the idea and show that this can be done. Good luck to all.
source
DRIVE2MOTO - motorcycles and motorcyclists
Manufacturing a manifold for one car carburetor for a Dnepr, Ural motorcycle. Collector diameter 20mm.
We cut out a slightly curved plate for the base of the entire structure.
The bend of the plate is exactly the same as the bend of the tide under the air filter of the gearbox of the Dnepr MT 11 motorcycle.
Marking the plate for the studs.
Manufacturing of studs for fastening the entire structure.
Making the collector in a simple way, we weld a corner to the site. There is a red tube screwed into the hole for the plug, in this photo, it serves for accessibility and ease of processing the insides with stone. At the end of the work, the pipe is unscrewed and a plug with an adjusting tongue is inserted. The main function of the plug is that, if necessary, you can weld a tongue to the plug and you can adjust the mixture for each cylinder.
We grab the welded manifold to the mounting plate and center it.
We calculate the difference between the pipes and shift the collector to the left.
We set the alignment. We begin to make a flange for the head of the Dnepr MT 11 motorcycle.
Since the installation of an Oka carburetor is experimental in nature, potential is built into the flange. If something happens, you can weld a 30mm pipe into it without any problems. I used 20mm diameter.
We set the alignment. In the center of the pipe, where the tacks are, then about 2 cm is cut out; to make it easier to dismantle the structure, we use a thick-walled hose as a seal and fix it with clamps. It will be possible to remove both the flanges and the manifold separately.
There is enough height for a turtle, so we begin to build a pipe for the air filter. First we make the base, an ellipse.
Carburetor - removal and disassembly
It is possible to partially disassemble the carburetor (removing and washing the throttle, repairing the drive, etc.) without removing it from the engine.
1. Place the motorcycle on the center stand.
2. Remove the protective covers.
3. Shutting off the fuel supply, disconnect the fuel hose from the carburetor.
4. Use a screwdriver to loosen the clamp and disconnect the rubber air filter pipe from the carburetor.
5. 10 mm
Unscrew the mixture corrector nut.
6. Remove the corrector plunger assembly.
7. Disassemble the corrector plunger.
8. Pulling the cable sheath upward, unscrew the throttle valve cover.
9. Remove the throttle valve assembly. Cover the hole with a clean cloth.
10. To replace the cable, you need to compress the damper return spring, and, pushing the cable down, remove its end from the cut in the damper needle nut.
1. 12 mm
unscrew the two bolts securing the carburetor adapter pipe to the cylinder. We remove the carburetor with the pipe, being careful not to tear the paronite gasket.
2. Hold the bolts with a 12mm
, unscrew the nuts securing the adapter pipe with a 13 mm
. We remove the pipe.
1. Using a screwdriver, unscrew the two screws securing the carburetor cover.
2. Remove the float chamber. There is a paper gasket underneath, be careful not to tear it.
3. Using a thin drift, carefully knock out the float axis.
4. Use thin pliers to remove the axle.
5. Remove the float along with the locking needle.
8 mm socket wrench
We turn out the seat of the shut-off valve.
7. Using a screwdriver, unscrew the jets of the main dosing system and the idle system.
8. 6 mm
turn out the additional jet.
9. 12 mm
We turn out the fuel-emulsion nozzle of the main dosing system.
10. Turn out the “quantity” and “quality” screws.
13. We wash all carburetor parts, except gaskets and rubber parts, in acetone or solvent for nitro paints. We clean all channels and jets with copper wire or toothpicks soaked in solvent, and blow them with compressed air from the compressor.
It is unacceptable to clean carburetor jets with steel wire, needles or any other tool.
We assemble the carburetor in the reverse order, while lubricating the rubber o-rings, threads and gaskets with engine oil or BSK brake fluid containing castor oil.
We tighten the “quantity” and “quality” screws until they stop. Then we unscrew the “quality” screw one turn (preset), and unscrew the “quantity” screw five to seven turns.
We check the operation of the shut-off valve. When the carburetor is oriented with the throttle channel down, the air supplied by the mouth into the inlet fitting should not pass through the valve.
Adjusting the position of the needle of the main dosing system is carried out by rearranging the lock washer in the grooves of the needle:
- washer to the left - enrichment of the mixture; - washer to the right - lean mixture.
Carburetor design
The carburetor for the Ural motorcycle is a horizontal device designed to prepare the air-fuel mixture. The float chamber is located in the center of the assembly. The mechanism is equipped with a flat throttle valve with vertical stroke, two dosage systems - the main one, the idle one. They shape the volume and quality of the mixture.
The starting device is located separately, consisting of three main blocks, Fig. 2:
- building 8;
- chamber with float 38;
- cover 4.
Rice. 2. Schematic representation of the carburetor for 63. 1 - Fitting with lock nut; 2 - Throttle spring; 3 - Throttle lift limiter; 4 - Housing cover; 5 - Lock nut; 6 - Dosing needle bar; 7 - Throttle; 8 - Housing; 9-Air channel of the sprayer; 10 - Float lever axis; 11 - Spray body; 12 - Sprayer; 13 - Float chamber cover; 14 - Main fuel jet; 15 — Idle fuel jet; 16 - Lock washer; 17 — Channel for supplying the fuel mixture from the starting device; 18 - Float; 19 — Stop for adjusting the fuel level; 20 - Fuel valve; 21 - Drainage hole; 22 - Emulsion hole: 23 - Transition hole; 24 — The air channel of the jet is idle, running; 25 Dosing needle; 26 - Air channel of the float chamber; 27 — Fuel receiving fitting; 28 — Idle speed adjustment screw; 29 — Mixture quality adjustment screw; 30 - Air channel; 31 - Starting lever; 32 - Rod; 33 - Spring; 34 - Starter plunger; 35 — Float drowner; 36 - Plunger needle; 37 — Fuel jet of the starting device; 38 - Float chamber.
The float chamber communicates with the atmosphere through the vertical outer channel of the housing 26. The top cover of the chamber has a drainage hole 21. The carburetor of the Ural motorcycle is equipped with a lever float mechanism consisting of two floats 18. Both products have the shape of rectangles, connected together by a common lever made of the innovative material caprolactam as one piece.
This is interesting: Registration of engine replacement at the traffic police in 2018
Axle 10, pressed into the lever, presses the structure with floats against the two columns of the housing. The brass fuel valve 20 visually resembles a needle. There is an elastic washer on top of the cone. It is practically eternal, almost not subject to wear. Thanks to it, the Ural carburetor always has a stable level of gasoline in the float chamber. The valve has a groove at the bottom that connects it to the float. Therefore, it never gets stuck in the guide channel.
Tricycle from the Urals and VAZ-2101
When creating a cargo tricycle with your own hands from the Urals and parts of a VAZ-2101 car, the easiest thing will be to install a regular bridge and make a car suspension with shock absorbers from the Urals.
The bridge from the VAZ-2101 is turned over, after welding the differential. This is reflected in the handling - the steering wheel is quite difficult to turn, however, the trike's cross-country ability increases.
The driveshaft is shortened and welded to the fork on the final drive and connected to the axle through a rubber coupling. It is better to take the original Uralov clutch, in this case the transmission will be softer.
To avoid bending the cardan drive, you can move the engine to the left by 7-9 cm, or move the axle to the right or increase the wheelbase.
It is better to leave the engine as a whole unchanged, but instead of two carburetors, make one Chinese one. And for forced cooling, use an air filter from Izh.
Additionally, to cool the engine when operating in difficult conditions, you can install two fans and run them separately if necessary.
Pros and cons of the design
+ Simple and cheap transport;
+ The engine does not overheat.
- Can only go forward;
— Too much load on the axle with the front wheel;
— Goes too fast in first gear.
One Carburetor K68 on K750
Making an adapter for 1 carburetor
In this article I will not argue why alone, I personally rode a monocarb before, and it was such a trip that forced me to remake my own motorcycle, I don’t know how this will affect your opinion, but I’m happy with the result.
And so the K-68 carburetor was installed on the K750 motorcycle, due to availability, and for the same reason that it had proven itself well for this.
Manufacturing process
First, I started making flanges, I have a small lathe, I turned them from a 3mm thick plate, as experience has shown, they turned out to be unsuitable (too thin, they are deformed), after which new ones were turned from a 10mm thick plate.
In order not to do everything on my knee, I took a hard rubber hose and inserted it into the inlet holes
I transferred the internal contour of the future collector to it
I went through it with a cutter and a knife, which repeats the outer diameter of the pipe
I also made an external template of a straight block to match the pipe
Before bending, the wooden templates were well watered,
I screwed the flanges to the cylinders and grabbed them with points, removed them, boiled them in cleats, checked the tightness using old 3 mm flanges and a bicycle inner tube, eliminated the defects, screwed them onto the motorcycle, saw how the carburetor would turn out, since I wanted to achieve a horizontal manifold, I had to use an elbow from such same pipes.
Cleaned it and washed it with gasoline.
After which the test drive, the dynamics of the motorcycle changed for the better, when riding it was the impression that the motorcycle had a different engine, the engine spins up faster, which was pleasing, there were no shortnesses, hiccups, or skips, it felt like the cylinders were actually working more harmoniously.
The myth that a motorcycle is difficult to start in the cold, I came across this, the problem is not big as it can be solved simply, with the ignition off and the gas turned off, pump the kick several times, then open the gas, pump up the carburetor, and pump with the kick, turn on the ignition and start the engine, As soon as the engine makes a few strokes, turn the trigger a little for 10 seconds, maintain stable speeds, I repeat stable (without fanaticism) slightly above idle, then let the engine warm up at idle.
Messages [21 to 40 of 165]
21↑ Reply from Watto 10/30/2012 21:59:48
- Watto
- Elder
- Inactive
- Name: Vladimir
- From: Nizhny Novgorod region
- Registered: 09/22/2012
- Posts: 1,664
- Reputation: 229
- Motorcycle: ZiD-50, DKW SB200, Dnepr MT 10-36
Re: which carburetor should I install?
I agree - Wise!
Edited by Watto (30-10-2012 22:00:22)
22↑ Reply from PATRIOT 31-10-2012 14:04:55
- PATRIOT
- Patriot IMZ
- Inactive
- Name: Ilya
- From: Krasnodar region, Krasnodar
- Registered: 02/18/2011
- Posts: 3,148
- Reputation: 176
- Motorcycle: No. Next will be the K750!
Re: which carburetor should I install?
Well, if you drive a normal Ural and get a kick out of it, then two carbs should be standing. And if grandpa goes to the market to buy potatoes once every three weeks, then you can supply one carb...
From: no longer important
Registered: 09/25/2012
Posts: 728
Reputation: 33
Motorcycle: Remained in dreams. the future mot will be a Ural
Installation
After purchasing carburetors, it is necessary to make intake pipes. In their manufacture, it is necessary to use pipes with an internal diameter corresponding to the diameter of the inlet channels on the cylinders. The shape and length of the pipes on the left and right cylinders must be the same. At the ends of the pipes it is necessary to make flanges through which they will be securely and hermetically attached to the cylinders. The resulting seams inside the pipes must be sanded, as they will swirl the flow of the fuel mixture and impair engine performance.
After making the pipes, they must be mounted on the engine and connected to the carburetor. Rubber hoses from the cooling system are often used for this. One end of the hose is put on the pipe, the other - on a special tee installed on the carburetor. Hoses are sealed with tape or spring clamps. After this, you need to install an air filter of the appropriate size on the carburetor. After adapting the handle to one control cable, you can begin to try the motorcycle on the go, gradually eliminating possible defects.
Change or leave, what do you prefer?
If you don’t do everything as expected, then selecting and installing a carburetor for a Ural motorcycle will only be a waste of time, effort and money. But even when all the conditions are met, it should be remembered that such a modification, although it will make it possible to easily adjust the supply of the fuel mixture, will create other problems:
- In the intake manifold, which is necessary to switch to a single carburetor, condensation will accumulate in cold weather. This will make starting the engine more difficult.
- A converted Ural with one carburetor will lose some power and will consume more fuel. After all, the filling of the cylinders will worsen.
- You will need to decide where to install a new air filter that matches the parameters, of which there will also only be one now.
After studying the issue, many leave the option with two carburetors
Based on the above, many prefer to leave two carburetors on the Ural motorcycle, as before, replacing them with more advanced ones. Models with constant, rather than variable, discharge in diffusers are better suited for this. They allow you to get rid of failure during acceleration - a disease of many two-cylinder four-stroke engines.
Conversion of the Dnepr motorcycle to one K65D carburetor
Hello Dear Like-minded People! So, I thought about installing one carburetor, instead of the old K301. Because it was very difficult to set up synchronization, the consumption was high, and in general they were outdated. I thought for a long time about which one to choose, there were many options - Solex, DAZ, K133, from a tractor launcher, etc. I read a post on this resource that you can install one K65D carburetor from Jupiter. Here was my topic about one K65D, logically it would have been better to install the K65I from the Planet, but it turned out the way it turned out. K65D (Pekar, Russia). Diameter of the mixing chamber, mm – 32; Diffuser diameter, mm – 30; Throughput, mlmin - GTZh - 260 - idle metering tubes - 50 - fuel corrector nozzle - 255 Ambient temperature range at which the engine starts and stable operation is ensured in all operating modes - from -20C to +50C.
A stainless steel pipe with a diameter of 28mm was found, and 4 pipe angles with a diameter of 25-28mm were purchased, the diameter of the angles varied. The flanges were made of metal 5mm thick, there were two more metal options - 3-3.5mm, 10mm. 3mm - in my opinion, too thin, most likely they would begin to bend when tightened, and 10mm - this is too much, and it is more difficult to work with such material.
Here is the finished flange.
The most difficult thing was to make a structure with a flange that was attached to the carburetor, or rather to make a hole in the pipe, it took a long time. Since the drills did not have such a diameter, it turned out that it was decided to use a trick, namely, take a piston pin with a diameter of 30 mm, cut longitudinal lines on it with a grinder, it turned out something like a milling cutter. We didn’t drill the hole, but squeezed it out, the finger was red-hot.
It was difficult to secure the manifold to the flanges in place. Fortunately, four pipeline bends were purchased; without them, it’s unlikely that anything would have worked; we would probably have had to bend the pipe. And so we put one knee, on the other it turned out, something like the English letter “S”. Thus, we made a less abrupt transition.
Of course, there was a lot of welding stuck on, the welder offered me to remove everything with a grinder, I refused. All the same, the collector needs to be covered with something and insulated. There is an idea to cover it with outdoor insulation for the wires. The whole rework took quite a long time; they started at 13:00 and were finished at 21:30. Because it was dark, the collector was poorly welded, leaving many small holes. I noticed this already at home, so I went to the welder again. The second time they boiled it well, checked it, put it in water and blew into the collector, everything was clear.
The first launch went surprisingly well. There is nothing, without changing the position of the needle in the carburetor in the middle. I installed it, replaced the air filter with a sock, pumped it up, grabbed the first kick, but stalled, and started on the second. I adjusted the idle and that's it. The precise operation of both boilers was a pleasant surprise. After unscrewing the throttle, a shot followed, it was the first and the last. This didn't happen anymore. The traction at the bottom is crazy, at first you can even climb the wall. The top was most likely cut off, acceleration was normal up to 70 km/h, then I don’t know. The collector cools down strongly, even in the heat of 30C, it is covered with dew. The consumption, it seems to me, is still high, the candles indicate this, they are too black. I lowered the needle to the very last mark, it didn’t seem to be as black as before. Maybe this is because I drive mostly at idle... This is the experience of converting it to one carburetor, I’m happy, I definitely won’t go back to two. I apologize for the photos because I took them on my phone!
Thank you for your attention!
Solex carburetor 21083. — logbook Lada Oka 4-wheeled motorcycle Ural 2005 on DRIVE2
I installed a Solex 21083 carb. It refused to start on standard jets. Only with the choke fully extended, but then the revolutions were about 4 thousand, which is clearly not good for an engine at -30 (yes, I did everything in the cold again). I installed jets from the Oka and everything was fine =) I just adjusted the idle (it was about 1400 when warmed up) with a very convenient plastic screw on the back side and a very inconvenient recessed screw on the one hundred side of the Akum. I took a ride. It's not clear yet. Acceleration is a little faster. A little. So it may be self-deception. Let's measure the flow, maybe I'll play with the jets. By the way, there are three gaskets under the carb - a standard sandwich for a eight. Two simple and paranito thick. The lows are quite good, more like a standard Kaarb. I managed to leave the pan as standard, bending the hole in it with pliers. I have not yet figured out how to make this thing airtight. Probably the simplest thing is to buy an elastic band for a 08 pan and straighten the shackle even further. By the way, I have just unscrewed the standard 08 pins for the pan. Then I’ll make a template out of cardboard, drill holes in the okovsky pan and cut off the attachments to the valve cover on it. I will do the return closer to summer.
Choosing a carburetor for the Urals, Dnepr
Let’s answer the most common question in advance - no, none of the old carburetors are suitable for this job. You can explain for a very long time why, in general, this model is designed for one cylinder, but you will have to “feed” two, so let’s move on. The second question is “Which Solex or Moskvich carburetor should I choose?” The answer is none. We immediately dismiss all car carburetors for their unreliability and difficulty of maintenance. There are many articles that describe the conversion of the Urals to carbs from various domestic cars or foreign cars, but they all end with the owner constantly suffering from its incorrect operation, etc.
From the above, we conclude that we need a motorcycle carburetor capable of feeding the volume of our engine. For example, the Soviet K28G or from Japanese two-cylinder engines of similar volume.
The agony of choice
There is more than enough advice on the Internet about which carburetor to install for a Ural motorcycle. But not all of them should be trusted unreservedly. Indeed, in the process of realizing your plans, you will encounter considerable difficulties. Here are some examples:
- An affordable option can be considered the domestic K28G carburetor, which was equipped with the Tula-200 scooter produced during Soviet times. But there are no new ones on sale, and finding a used one in decent condition is very difficult. Unidentified defects will negate all expected benefits.
- Mikuni or Keihin models, borrowed from Japanese motorcycle models with a similar number of aspirations, cost a lot of money and will still require additional modifications. You will have to grind out new jets and change the factory settings.
Simply installing one carburetor instead of two without modification will not work!
Whatever option you prefer, simply installing one carburetor instead of two will not work. It will require major remodeling.
Adjusting the main carburetor systems in the Urals
Adjustment of carburetors on a Ural motorcycle is carried out after checking and adjusting the gaps between the spark plug electrodes, breaker contacts, valve stems, and the ends of the rocker arms. Each of the two carburetors is separately adjustable. It is necessary to begin adjusting the carburetor in the Urals after measuring the gap between the tip of the cable sheath and the fitting, which should be 2-3 mm.
Rice. 3a. The main elements of the carburetor: 1 - main air path: 2 - throttle valve; 3 - subsidizing haze; 4 — air nozzle; 5 - sprayer; 6 — air channel; 7 - well; 8 — main fuel jet; 9 — float chamber (central location).
Rice. 3b. Fuel corrector: 1 — air inlet channel: 2 — spool; 3 — spool needle; 4 — fuel jet: 5 — sprayer; 6 — output emulsion channel; 7 — spool return spring; 8 — corrector control cable.
If the gap does not correspond to the specified size, the union locknut is loosened. Turn to the right or left to set the required gap. After this, the fitting is re-locked with a lock nut and the carburetor of the Ural motorcycle is adjusted. By turning off the warm engine at a minimum engine speed without load, the basic settings are made. The idle system is adjusted for each of the two mechanisms separately. The Ural carburetor is adjusted with the second cylinder turned off.
Idle adjustment
By rotating screw 28, the crankshaft speed is set to the minimum stable engine speed. Screw 29 is slowly unscrewed gradually until the motor begins to malfunction. It also gradually, slowly twists until a calm, stable speed is achieved. Once again, use screw 28 to reduce the opening angle of the throttle valve until the minimum speed is reached.
At the same time, screw 29 adjusts the saturation of the mixture. Such operations are repeated until the minimum stable engine crankshaft speed is obtained. The carburetor of the Ural motorcycle is adjusted in the same way for the second cylinder. The test is carried out by sharply opening and closing the throttle. In this case, you must sharply turn the throttle towards yourself and release it to its original position.
Operating modes
Modes of medium loads are characterized by the position of the needle relative to the throttle. Adjustment is carried out by choosing its most optimal position. The settings must be repeated when seasonal conditions change (winter-summer), during the running-in of new vehicles, in order to increase engine power. In this case, the dosing needle 25 moves along the thread relative to the bar 6. The locknut 5 is loosened.
When screwed into the bar, the needle rises in relation to the nozzle hole. The mixture becomes richer. When unscrewing, the mixture becomes leaner. One revolution of the needle moves 0.5 mm. The quality of the adjustment is checked by sharply turning the throttle knob. The loud pops that the carburetor makes on a Ural motorcycle indicate that the mixture needs to be enriched. To do this, the needle rises.
When operating motorcycles, owners often wonder which carburetors are best to install on a Ural motorcycle. Now Chinese carburetors are widespread in the Urals. There are some good examples among them. Foreign-made Solex and Weber models performed well in operation. However, their prices are higher than domestic ones.
What carburetors should I put on the Ural IMZ motorcycle? In my opinion, a Russian-made K63 carburetor would be good for the Urals. This is a trouble-free mechanism, the professional adjustment of which allows it to last for several decades. Every 5 thousand km it is recommended to clean it, blow it out, and rinse it.
The jets must be washed with acetone. The parts are wiped with rags or soft vinyl. The throttle should be installed after servicing with the cutout facing the air filter. Regular maintenance will ensure long-term trouble-free operation of the K63 model.
A little about carburetors for boxer engines and their alternatives
Since the time of Tsar Goroksa, domestic boxer cars have been equipped with carburetors made in the city on the Neva. All that could change was the location of the float chamber, the diameters of the jets and the shape of the throttle valve. Just as everything changes in the process of evolution, consumers received the latest device for preparing the fuel mixture - K-68. Although it is already morally outdated in our time. But this does not change the topic of conversation.
It is clear that it is better than its predecessors, but by how much? That is the question! I also have K-63 on my K-750 and they perform well! In general, K-65 carburetors are praised, even those of Chinese origin. I personally bought it for the boys in Kharkov, and they performed great! I don’t know what kind of new Urals they are putting in now in Irbit. We don’t put anything on the Dnieper at all, because they don’t produce them anymore))))))))
But this is all reasoning during which the question arises: which carburetor is best suited for a four-stroke engine? So let's try to figure it out a little.
First, let's find out what types of carburetors are installed on motorcycle engines and why. They are distinguished by the way the throttle valve moves. Hence, all modern carburetors (of mass use, of course) are divided into two types: direct drive and vacuum.
- Variable resolution carburetor: 1 - throttle valve; 2 — throttle cable.
- Constant vacuum carburetor: 1 - throttle valve: 2 - air damper; 3 - piston; 4 - return spring; 5 - vacuum channel.
Let's go back to failure. You quickly open the gas, and the diffuser cross-section also quickly increases. But the engine speed cannot increase instantly and at the first moment remains unchanged. The flow area of the diffuser has increased, but the air flow has not yet changed, therefore, in accordance with the aforementioned Bernoulli law, the vacuum has decreased and fuel has stopped being sucked out of the carburetor - which is why a classic failure occurs. To avoid it, you must either open the gas slowly, and then the engine has time to “spin up” following the movement of the throttle, or abandon the carburetor with variable vacuum. Nowadays, the Ural is perhaps the only motorcycle in the world with a large-volume four-stroke engine, equipped with variable-pressure carburetors. But again, this applies to motorcycles that are a little older. Previously, motorcycles kept him company, but today even the Americans have moved away from the archaic design. All other companies install carburetors with constant vacuum on their four-stroke motorcycle engines. (see photo below - one of the options)
Keihin CVK30 CV carburetors for Kawasaki Ninja 250R. Constant vacuum carburetor
As one of the options for robots of this type of carburetors
What is their fundamental difference? Here two elephants stand one after the other: air and throttle. The throttle valve is located in the same place as in the carburetor with variable vacuum. The air, driven by a throttle cable, is placed in front of the throttle - closer to the intake valve. The throttle valve with the metering needle is moved in the well by a special piston. The piston is designed as follows: a very soft spring placed in the space above the piston tends to move the piston along with the throttle valve towards the closing direction. The vacuum in the diffuser created between the throttle and air valves is supplied through a special channel to the space above the piston and tends to raise the piston and throttle valve when the engine is running.
How does it all work? Suppose you are driving in third gear at a constant speed of 20 km/h and then suddenly give full throttle. With carburetors of the K-62 type, for the reasons described above, a deep failure occurs in the operation of the engine. To avoid this, suppose you installed Mikuni carburetors (see photo). Pretty good carbs!
When you open the gas, you open the choke and... one might say that they informed the carburetor of their intention to accelerate - nothing more. Since the speed was low before the gas opened, the air flow through the diffuser is also small, which creates a small vacuum in the diffuser. The force created by this vacuum and forcing the piston to open the throttle valve cannot overcome the action of the spring, and the throttle remains closed. As the engine speeds up, the vacuum increases and the throttle valve opens further and further. By opening the gas to full speed at low speed, you perform an incorrect action in relation to the carburetor, and it itself, with the help of the pneumatic throttle valve, corrects this error. The throttle valve is always automatically opened as much as required for best acceleration. It is this property that allows you to enjoy the process of movement without constantly thinking about how much gas you can “open”. It’s a pity, but the guys in the opposition can only dream about it.
Therefore, to tune the “Japs” you need to install the motor on a test bench, (if you’re lucky enough to find one) bring the fuel metering elements into compliance with the requirements of the “Ural”. If you are afraid or cannot, then it’s better to find someone who is rummaging. Folk “Kulibins” can be found everywhere. After this, adjust the adjustment also in road conditions.
Why is this necessary: Such an engine modernization completely eliminates failures in its operation and significantly improves the acceleration dynamics of the motorcycle. But, pay attention, your boxer will eat less (as I was told, 5-6 liters, and this is already the result) and one more thing: the carburetor does not increase engine power, it only allows you to use it more efficiently.