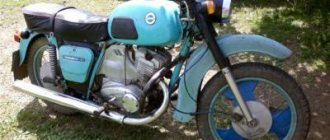
because Planet 5 offers poor charging with light rechargeable battery including seats
What is in the headlight behind the bulb so that it does not remain charged by the battery?
are they new or old brushes?
Old or new is not everything. Clean the anchor. Brushes should move freely... Post 2, p. 195-196 Reading program - post 6
I have the same charge in Java, there is a lot of ash, the battery boils and after a while I turn on the light and sit down
If the battery is discharged (and continues to work for a long time), the battery has lost capacity due to constant charging, it is better to throw it away and look for the cause of the problem, then buy a new one.
Damn, the charge on Jupiter has disappeared again. First, I changed the armature and a charge appeared (even if it was minimal). I didn't even ride a bike. A week later I started it up, but there was no charge. And I noticed when it starts to glow and appears with a charge, but soon disappears again. What is the reason? It’s already charging all my brains, you * blah!!
Most likely, your relay-regulator is not working, I had such a battery on the road, it’s good that it happened not far from the business market, I went to Renat and bought a new relay-regulator at my own peril and risk and asked if he could run the reels . When I started the engine, I inserted the battery and left, never thinking about the problem again
PS But, of course, before buying it is better to try to change the regulator to a known and working one, because it is not cheap at all.
Guys, help, I have an Izh-Planet 5 motorbike, there is no recharging! Everything went fine, there were no problems, then one day I went out for a ride and the battery was completely drained, the horn didn’t work, the headlight just burned out, I tried to start it to no avail! I went home, checked the wiring, brushes, everything sucks! AND SO SEVERAL TIMES, THEN IT WORKS, JUST DANCE! what else needs to be checked and changed? thank you in advance!
If there is no charge on Izh Jupiter.
This article was written to help those motorists who decided to independently find and fix a malfunction in the battery charging system on IZH 12v motorcycles.
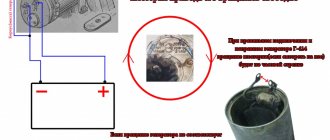
Among special devices, the most common tester with the function of dialing (buzzer) and measuring resistance is useful, because there is no recharging on the motorcycle planet. If you don't have this device, you can use a light bulb with a battery to determine the contact or open circuit.
In this case, you need to put a perfectly charged battery on the bike, or power the on-board network from another external power source with a constant voltage of 12 V.
First, we check the voltage when turning on the ignition switch to the positive pole of the regulator relay, it should be 12 V.
If there is no voltage, we look for an open circuit from the positive terminal of the battery through the ignition switch to the terminal on the relay regulator.
Generator - serviceability check
Checking the serviceability of the generator can be done on a motorcycle without disassembling the generator.
To carry out the work you will need a multimeter.
1. Place the motorcycle on the center stand or side stand.
2. Disconnect the battery by removing its fuse.
3. Remove the right cover of the power unit.
4. 6mm
unscrew the nuts securing the five “upper” wires of the generator. In order not to confuse the wires during subsequent assembly, we mark them or tie them with thin wire so that we get a cable.
5. Check the short circuit of the stator windings to ground. To do this, touch the probes of the multimeter to the generator housing and alternately the three terminals of the windings. The ohmmeter should show infinity.
6. Check the stator windings for breaks. To do this, touch the probes of the multimeter in turn to all three terminals of the stator windings. The resistance should be about 8 ohms.
7. Check for a short to ground in the excitation (rotor) winding. To do this, touch the probes to the generator housing and one of the terminals of the brush assembly. The ohmmeter should show infinity.
8. Check the field winding (rotor) for open circuit. To do this, install probes on both brushes. The ohmmeter should not show infinity.
Source
If there is no charging on the Izh Jupiter motorcycle.
This article was written to help those motorists who decided to find and fix a malfunction in the battery charging system on IZH 12V motorcycles themselves.
Of the special instruments, you will need the simplest tester with a continuity function (tweeter) and resistance measurement. If you do not have this device, then you can use a light bulb with a battery to determine the contact or break in the circuit.
In this case, you need to install a well-charged battery on the motorcycle, or power the on-board network from another external power source with a constant voltage of 12 V. First of all, we check the presence of voltage with the ignition switch on at the positive terminal of the regulator relay. There should be +12v.
If there is no voltage, then we look for a break from the positive terminal of the battery through the ignition switch and to the + terminal on the relay regulator.
Next, we measure the voltage on the brushes. There should be +12V on one of the brushes. If not, we call the wiring from the relay to the generator brushes.
Next step. We take the brushes out of the holder and ring each of them from the terminal to the graphite. It happens that at the point of contact of the wire with the graphite body of the brush itself, the contact is lost.
Troubleshooting the generator
Three phase wires are disconnected from the stator and the winding (connected to each other according to a star circuit) is connected. That is, the windings should ring with each other and have approximately the same resistance. If some winding does not ring, this means that there is a break and the stator is not working properly.
Next, all three phases are called relative to the body (mass). If it rings, it means the windings are broken into the housing and the stator is not working properly.
Anchor
We ring the armature winding (on copper rings). If the rings ring among themselves - good, if not - there is a break, the armature is not working.
The next step is to wire the armature winding relative to the armature body.
If it doesn’t ring, it’s good; if it rings, the winding is broken into the housing and the armature is not working properly!
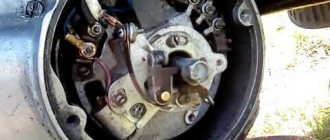
Relay regulator
If all the wiring is in order, the brushes, stator and rotor are ringing and everything is working, all that remains is the relay regulator! In my experience, even if you don’t have much knowledge of radio electronics, you can at least remove the back cover of the relay regulator and wipe off all the dirt. Carefully look at all the contacts, fastening parts, wires, jumpers; sometimes the contact or soldering simply falls off due to vibration. The diode bridge is practically “eternal”. But the control thyristors sometimes fly out! They are also called simply - to check for breakdown on the housing and between the cathode and the control electrode!
How to do exercises on Planet 5
This topic will discuss all issues related to charging.
Well, let's move forward, point by point:
2. We check whether the headlights or other powerful light bulbs are accidentally turned on, and start the motorcycle. Let it thresh at idle.
3.2. If the voltage has increased, but does not reach 14 volts, accelerate to medium speed, while looking at the voltmeter. 3.2.1. If the voltage normally rises to 14-14.5 V (no more!), then everything is fine with the electrics and you are just glitching :).
3.2.2. If the voltage goes off scale beyond 15 V, and when the speed increases, it increases, and when the speed drops, it drops again, then the relay-regulator has burned out, the generator is in order. The check is completed.
Attention! When carrying out the check under paragraph 3.1, be careful! Monitor the voltage and do not increase the speed beyond measure, because if the voltage rises to 18-20 V, the light bulbs and half of the other electrics on the motorcycle may burn out, to hell!
Content:
There is no need to have special stands and equipment for repairs. A minimum knowledge of electrical engineering and a simple avometer (tester) is enough; even often you can get by with just a test lamp.
We will tell you in more detail about the main electrical wiring components and possible malfunctions. Finding a broken wire or damaged insulation is easy (for example, a bad contact always gets hot).
But pay special attention to the fact that the electrical circuit is designed not only for 12 volts, there is also a high-voltage cable (connecting the coil and the spark plug), which cannot be checked with a regular ohmmeter.
In this case, we look to see if there is a spark at the coil output and at the output at the spark plug contact. Now in detail about the main wiring components of the Izh Planet.
Generator
The heart is the generator (sometimes called a magneto, but they were never used on Izh Planet). Three windings produce alternating current. For excitation, an additional coil is used instead of a permanent magnet. Therefore, it is impossible to jump start a motorcycle with a completely dead or missing battery.
A diode bridge for current rectification and a voltage regulator assembled in one unit are mounted on the Izh Planet 5 generator (they are not even highlighted in the Izh Planet wiring diagram manuals).
Possible breakdowns in this unit:
- It is checked by measuring their resistance of current-carrying conductors and insulation. If the generator is damaged, it will become noticeably hot.
- — the output voltage will differ significantly from the nominal level or be absent.
- Although the electrical circuit includes short circuit protection, it happens that the automation does not work and most often the output transistor burns out.
Izh Planet 5 BATTERY IS NOT CHARGING
Moderator: User buggy
Izh Planet 5 BATTERY IS NOT CHARGING
Post by Alexander 72 » Sat Mar 12, 2011 5:44 pm
Re: Izh Planet 5 BATTERY IS NOT CHARGING
Post by smirnov » Sat Mar 12, 2011 8:33 pm
Re: Izh Planet 5 BATTERY IS NOT CHARGING
Post by ValeraBaggi » Sun Mar 13, 2011 6:17 pm
Re: Izh Planet 5 BATTERY IS NOT CHARGING
Post by Alexander 72 » Mon Mar 14, 2011 6:27 pm
Re: Izh Planet 5 BATTERY IS NOT CHARGING
Post by Alexander 72 » Tue Mar 15, 2011 4:45 pm
Re: Izh Planet 5 BATTERY IS NOT CHARGING
Post by BRDM-2 » Tue Mar 15, 2011 7:21 pm
Re: Izh Planet 5 BATTERY IS NOT CHARGING
Post by BRDM-2 » Tue Mar 15, 2011 7:23 pm
Re: Izh Planet 5 BATTERY IS NOT CHARGING
Post by Alexander 72 » Wed Mar 16, 2011 6:02 pm
Re: Izh Planet 5 BATTERY IS NOT CHARGING
Post by BRDM-2 » Wed Mar 16, 2011 8:28 pm
Battery
The battery in the motorcycle is low-power. The motorcycle does not have a starter, so its task is only to supply voltage to the ignition system and the generator excitation winding during starting. Thanks to the battery, designed for 12 volts, a stable start of the fifth Planet is ensured; up to the third model, the wiring was 6 volt, and the ignition was not always clear.
Possible battery malfunctions:
- - housings, plates, leakage of electrolyte.
- - determined by measurements using a hydrometer.
- - detected by measuring resistance.
- minus not on the body (frame) of the motorcycle - all the electronics will not work.
Ignition system
The ignition chopper is used to ignite a spark at a certain point in the piston stroke. In early modifications of the electrical wiring of Izh Planet 5, contact was mounted, later electronic.
The main malfunctions of this unit:
- Burning of breaker contacts is determined visually.
- Failure of a sensor or switch elements - the easiest way to detect it is to use the method of installing a known-good unit. The lubrication system sensor valve is also checked using the same method.
- An incorrectly set ignition timing is visible from the fuzzy operation of the engine. It can be eliminated by adjustment using special probes.
The ignition coil increases the voltage to several kilovolts so that the discharge can ignite a spark at the spark plug electrodes. The secondary winding is made of a fairly thin wire; most often it burns out. Although a breakdown between the turns or onto the housing is also possible. The same troubles can (but less often) happen to the primary circuit. Everything is revealed using resistance measurements.
Motorcycle Features
According to industry norm, the motorcycle had an alphanumeric index:
- IZH 7.107-010 – basic model;
- IZH 7.107-020 was already equipped with a new lubrication system and improved front axle suspension. In addition, the wiring diagram of the IZH Planet 5 motorcycle had a contactless ignition system, independent of the battery;
- IZH 7.107-030 was equipped with a spring-hydraulic shock absorber and a redesigned rear wheel brake drive;
- IZH 7.107-040 was produced with modified kinematics and a modified front wheel brake. The wiring diagram on IZH Planet 5 remained contactless until 2008.
Modernized wiring diagram for the IZH Planet 5 motorcycle with contactless ignition
In addition, a side trailer (sidecar) or a universal cargo platform (without a seat) could be attached to the motorcycle.
Photo of a motorcycle with a side trailer
Switching elements.
These include switches (high-low, turns, engine stop, etc.) as well as brake and neutral sensors and the ignition switch. You can easily “ring” them with a tester, finding out which contact group is not working.
Switching also includes the Izh electronic turn signal relay. Its malfunction is visible by the absence of interruption or no voltage supply to the turn signals.
As can be seen from all of the above, the wiring on Izh Planet is without any special secrets or complex elements, all its parts are easily diagnosed and repairs should not cause difficulties.
Now we advise you to watch the video, which shows in detail and clearly the assembly of the Izh Planet 5 circuit.
Checking the serviceability of the generator can be done on a motorcycle without disassembling the generator.
To carry out the work you will need a multimeter.
1. Place the motorcycle on the center stand or side stand.
2. Disconnect the battery by removing its fuse.
3. Remove the right cover of the power unit.
4. 6mm
unscrew the nuts securing the five “upper” wires of the generator. In order not to confuse the wires during subsequent assembly, we mark them or tie them with thin wire so that we get a cable.
5. Check the short circuit of the stator windings to ground. To do this, touch the probes of the multimeter to the generator housing and alternately the three terminals of the windings. The ohmmeter should show infinity.
6. Check the stator windings for breaks. To do this, touch the probes of the multimeter in turn to all three terminals of the stator windings. The resistance should be about 8 ohms.
7. Check for a short to ground in the excitation (rotor) winding. To do this, touch the probes to the generator housing and one of the terminals of the brush assembly. The ohmmeter should show infinity.
8. Check the field winding (rotor) for open circuit. To do this, install probes on both brushes. The ohmmeter should not show infinity.
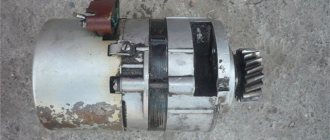
On IZH motorcycles starting from the fourth Planet, an alternating current generator 281.3701 is installed, which is a modern three-phase electric source of electricity. This source is used to power electrical lighting, alarm, and ignition devices. Together with the rectifier, the BPV-14-10 regulator recharges the battery. The generator consists of two parts, a stator and a rotor.
Izh Planet 5 BATTERY IS NOT CHARGING
Moderator: User buggy
Izh Planet 5 BATTERY IS NOT CHARGING
Post by Alexander 72 » Sat Mar 12, 2011 5:44 pm
Re: Izh Planet 5 BATTERY IS NOT CHARGING
Post by smirnov » Sat Mar 12, 2011 8:33 pm
Re: Izh Planet 5 BATTERY IS NOT CHARGING
Post by ValeraBaggi » Sun Mar 13, 2011 6:17 pm
Re: Izh Planet 5 BATTERY IS NOT CHARGING
Post by Alexander 72 » Mon Mar 14, 2011 6:27 pm
Re: Izh Planet 5 BATTERY IS NOT CHARGING
Post by Alexander 72 » Tue Mar 15, 2011 4:45 pm
Re: Izh Planet 5 BATTERY IS NOT CHARGING
Post by BRDM-2 » Tue Mar 15, 2011 7:21 pm
Re: Izh Planet 5 BATTERY IS NOT CHARGING
Post by BRDM-2 » Tue Mar 15, 2011 7:23 pm
Re: Izh Planet 5 BATTERY IS NOT CHARGING
Post by Alexander 72 » Wed Mar 16, 2011 6:02 pm
Re: Izh Planet 5 BATTERY IS NOT CHARGING
Post by BRDM-2 » Wed Mar 16, 2011 8:28 pm
Re: Izh Planet 5 BATTERY IS NOT CHARGING
Post by Alexander 72 » Thu Mar 17, 2011 1:13 pm
Re: Izh Planet 5 BATTERY IS NOT CHARGING
Post by BRDM-2 » Thu Mar 17, 2011 4:17 pm
Re: Izh Planet 5 BATTERY IS NOT CHARGING
Post by Alexander 72 » Thu Mar 17, 2011 5:11 pm
Re: Izh Planet 5 BATTERY IS NOT CHARGING
Post by BRDM-2 » Thu Mar 17, 2011 5:58 pm
Re: Izh Planet 5 BATTERY IS NOT CHARGING
Post by cAndy » Thu Mar 17, 2011 8:16 pm
Re: Izh Planet 5 BATTERY IS NOT CHARGING
Post by Alexander 72 » Fri Mar 18, 2011 12:11 pm
Source
Generator stator 281.3701 for IZH motorcycles
The stator is installed on the right half of the engine crankcase and secured with three bolts. The frame is made of special sheet steel. It has 18 tooth-shaped places for winding phase windings. The phase winding is made of one solid wire with a diameter of 0.9 mm and is wound on six teeth. Each tooth has 20 turns of copper wire wound around it. There are six teeth in total on the winding, so 120 turns are wound. There are three such windings. The connection of the windings is made with a star. The terminals of the phase windings are connected to the terminals of the comb.
The generator stator is covered with an aluminum alloy cover. There are special places on the cover and threaded holes where the carbon brush holder is installed. A breaker with a capacitor to produce a spark. Special comb for connecting wires.
Generator rotor 281.3701
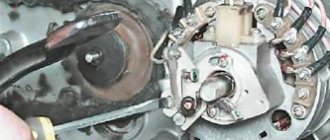
The generator rotor 1 is located inside the stator. It is installed on the crankshaft using bolt 3 and key 5. An excitation winding 6 is wound on the rotor core with a copper wire with a diameter of 0.56 mm, 600 turns are made. The winding resistance is approximately 6.4 ohms. For contact with the winding, two copper rings 2 and carbon brushes are used. They perform the work of a current collector.
How to remove the generator rotor 281.3701
The breaker cam 4 is installed in one position on the rotor shaft in a special socket and secured with a mounting bolt 3. Under this cam there is a thread that is intended for removing the rotor from the crankshaft. To remove the rotor, you need to screw the screw from the chain disassembly device into the thread. The device is located in the motorcycle tool. If there is no screw, you can use a regular bolt with an M10 thread. The only condition for the thread must be at least 70 mm. Turn until the screw rests on the crankshaft. Then we apply more force to tighten it, and the rotor is removed from the shaft.
Electrical equipment IZH Planet 5
The motorcycle uses 12-volt electrical equipment. The electrical wiring of the IZH Planet 5 motorcycle is single-wire, the role of the negative wire is performed by a metal frame.
Among the main components are:
- Power supplies;
- Ignition system;
- Headlight;
- Side lighting and turns.
The wiring for IZH Planet 5 is borrowed from other models of the manufacturer
For reference: as is customary in auto and motorcycle construction, modification of components and assemblies allows you to reduce the cost of products. For consumers, the advantage is that the price is low and a number of parts are interchangeable.
Generator
The motorcycle is equipped with a three-phase alternating current generator with an electromagnetic excitation circuit.
The principle of its operation is as follows:
- Electric current from the windings located on the stator is supplied to the rectifier;
- It converts it to direct current;
- And supplies it to consumers through the ignition switch.
Factory instructions: design of the IZH Planet 5 generator
The instructions provided include the following items:
- Voltage regulator with rectifier BPV-14-10;
- Generator rotor;
- Generator stator with windings;
- Current collector brushes;
- Ignition system cam (battery);
- Ignition system contact unit
For reference: on three-phase generators of the IZH Planet 5 motorcycle, the windings are connected according to a “star” or “delta” circuit. The rectifier is installed as a separate unit, and the IZH Planet 5 electrical wiring is connected to it.
Headlight
Unlike European countries, where there is a requirement that motorcycles with permanent magnet generators must be equipped with a battery - since a motorcycle with a non-working engine must have side lights - there are no such restrictions in Russia (see also about the Ural motorcycle wiring diagram).
For reference: with such a generator, IZH Planet 5 did not need an external current source when starting the engine. Therefore, the battery was not included in the electrical equipment.
Headlight bulb replacement process
The head light circuit includes:
- headlight lamp (35W);
- blue indicator lamp (2W);
- headlight parking light (4W);
- rear brake light lamp (15W).
Control devices
The following control devices are installed on the motorcycle:
- speedometer with daily and total mileage counters;
- tachometer with indicator lamps for direction indicators and headlights;
- engine temperature indicator;
- voltmeter.
Standard set of control devices
Generator care
Comes down to visual inspection and cleaning.
First of all, you need to pay attention to parts subject to wear. The carbon brushes of the current collector wear out faster than other parts. They require regular inspection and are replaced if worn. The slip rings of the slip ring must be kept clean. You cannot clean it with sandpaper or needle files. You can use the finest glass sandpaper.
The breaker contacts are periodically checked for the gap value specified in the instructions. For Planet 4 the gap is 0.4 - 0.6 mm. In case of burning, the contacts are leveled and then polished to a mirror finish.