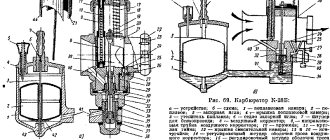
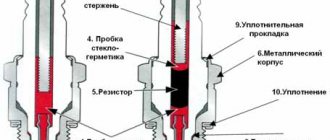
Carburetor design
Our element is designed in such a way that gasoline enters the float chamber up to a certain level, which is limited by the float. As it rises, it closes the fuel passage with a shut-off needle.
Then the fuel enters through the nozzle into the mixing chamber, where it is mixed with air and enters the cylinder under the action of thrust, when the piston moves down. Engine performance depends on the quality of the mixture.
The K-62 carburetor diagram should be known to everyone who is going to work with this device.
Jets play an important function; they play a major role in the volume of fuel supplied to the engine. It is possible to install different jets on the K-62 carburetor. Its technical characteristics allow it to work perfectly on smaller jets with low fuel consumption.
Depending on the quality of the mixture, we either get a powerful but uneconomical engine, or an engine without good torque. If there is a strong deviation in one direction or another, the engine cannot operate normally.
Adjustment with dosing needle
The dosing needle for adjustment has five positions and is fixed with a special lock. Raise the needle one notch and increase the fuel supply. We lower it and reduce the fuel supply.
Under normal conditions, the needle is installed in the central groove.
When operating a motorcycle at high temperatures of plus 35 degrees and above, as well as in rarefied air at an altitude of 2000 and above above sea level. The needle should be released one division.
And vice versa at low temperatures of minus 15 degrees and below. The needle should be raised one notch
Return to content
Troubleshooting
If difficulties arise, for example, the engine does not start when there is a spark and we are sure that the compression in the engine is sufficient, you can moisten the spark plug with gasoline or fill the cylinder with fuel through the spark plug hole and try to start it, this will help clear the passages in the carburetor and the clogged nozzle.
If the engine does not start, you can try to start it by pushing the motorcycle in neutral with the ignition off. When the speed has become stable and the motorcycle has gained sufficient inertia, turn on the ignition, depress the clutch, set the shift pedal to the 1st speed position and smoothly release the left lever on the handlebar.
If the engine starts, but stalls when the throttle is raised or lowered sharply, or idles unstably, then the carburetor should be carefully inspected
Five random motorcycles:
RUB 178,000*
Kawasaki EX 500R Ninja 1999
Kawasaki ZX-R 750 H2 1990
Honda GL 1200 Gold Wing Aspencade SE 10th Anniversary 1985
Ducati draXter Concept 2016
RUB 179,000*
Honda XR 600R 1995
Carburetor Inspection
Before removing a mechanism such as the K-62 carburetor from the engine, you should press the float release button and make sure that fuel enters the carburetor (gasoline should exit through the hole under the button), and the cause of poor performance is precisely in the carburetor.
If gasoline flows slowly into the float chamber, then the cause of poor carburetor performance may be a clogged filter in the gas tap. It is enough to unscrew the sump cup (a cylindrical container with a screw at the bottom), it is clearly visible on all gas taps on motorcycles, and clean the filter.
The K-62 carburetor may not work well due to untimely addition of fluid to the oil air filter or its clogging. You should try to start the engine without a filter; if the performance improves, then it should be cleaned and rinsed in kerosene.
Five random articles about motorcycles:
Solving the problem of clogged float chamber in the carburetor
For owners of the Java 634 motorcycle To prevent the drain hole in the carburetor float chamber on the Java 350 634 motorcycle from becoming clogged, I inserted a curved (see picture) plastic tube into it (a used ballpoint pen refill is suitable).
He heated a straight tube in boiling water and cooled it on a pre-bent wire of a suitable diameter - this way it will retain its shape and there will be no kinks on it. It is easy to install if you first loosen the float chamber cover and then tighten the screws, holding the end of the tube in the drain hole.M. IVANOV172500, Kalinin region, Nelidovo, st. Kuibysheva, 66, apt. 4 Plastic tube that protects the carburetor drain hole from contamination: 1 - float chamber body; 2 - tube; 3 - float. 1980N06P33 Read more >>
Java 250 Trial - Jawa 250 Trial
A trial for everyone Jawa 250 Trial The design of the motorcycle Jawa 250 Trial The Trial is a motorcycle competition for cross-country driving skills that is gaining more and more popularity in the world.
At the FIM congress, the issue of making trials the number one discipline in the international motorsports calendar and recommending it to the Olympic Games program was even discussed. In mass trials competitions, excluding official meetings held under the auspices of the FIM, ordinary road motorcycles are used. The modifications boil down to protecting the engine from below, reducing the fork travel and adjusting the motor to achieve maximum power in the first two or three gears (speed does not matter here). At the same time, leading foreign motorcycle companies began producing special machines for trials. The Czechoslovak JAVA plant in Prague is also starting to produce such motorcycles. The design of the Jawa 250 Trial motorcycle takes into account the specifics determined by the competition route. The chassis provides maximum... Read more >>
Troubleshooting Tips for Java Motorcycles
For those who ride Java motorcycles The editors receive many letters from Java motorcycle owners.
They ask for advice on troubleshooting problems that appear during operation. The editors turned to experts and are publishing their answers to these questions. The mechanic of the Moscow workshop for warranty repair of Java and Chezet motorcycles, V. T. BOIKO, tells the story. About malfunctions of the clutch mechanism, gearbox and kick-sterter Clutch mechanism. If a correctly adjusted clutch does not engage smoothly, but jerkily, then to determine the defect it is necessary to disassemble the clutch. First of all, remove the left cover. The shift pedal does not need to be removed before this: it should be installed in the gear shift position, and not in the engine start position. The pedal is removed along with the cover and shift shaft (be careful not to lose the release shaft cover). Before removing the cover, drain the oil from the gearbox housing or place the motorcycle on its right side, first... Read more >>
Color diagram of electrical equipment CZ 350 472
Electrical equipment CZ 472 (Click on the picture to enlarge) 1— main headlight lamp (6 V, 35 + 35 W);
2— parking light lamp (6 V, 4 W); 3— direction indicator lamp (6 V, 15 W); 4 — turn signal indicator lamp (b V, 2 W); 5 - high beam warning lamp (6 V" 2 W); 6 — control lamp for turning on neutral gear (6 V, 2 W); 7 — lamp for monitoring generator operation (6 V, 2 W); 8 — speedometer lighting lamp (in V, 2 W); 9 - central switch; 10 — turn signal interrupter relay; 11 — turn signal switch; 12 — switch for low-high beam with a button for turning on the sound signal; 13 — sound signal; 14 and 16 — spark plugs; 15 — ignition coils; 17 — brake light switch; 18 — switch for the neutral transmission warning lamp; 19 — right cylinder breaker contact; 20 - capacitors... Read more >>
Disassembling the carburetor
The disassembled K-62 carburetor photos in our article allow you to examine it in detail.
We will need the following tools: a minus screwdriver, 12, 14 keys, a 6 hex head or pliers. You should first unscrew the screws securing the carburetor to the engine with a 14mm wrench, then the top cover with a screwdriver. From the throttle valve, from the groove, remove the accelerator handle cable and the idle speed adjustment screw, which has a flat end.
Then we unscrew all the bolts, including the mixture quality screw, and remove the float chamber cover, it is secured with two screws - one on the left side of the cylinder, there is also a float release button, a mixture quality screw and a fuel supply hose; the other - from the opposite.
Turn the carburetor upside down, inspect the float, its end should be several degrees higher than the beginning. There should be a tongue at the base; if the float is positioned incorrectly, you should bend it to achieve the desired effect.
Trigger
Almost all models were equipped with a starting device, which was driven by a lever on the steering wheel. To start it when the temperature drops from -15 C, a float sink is designed. It serves to enhance the enrichment of the mixture when starting cold two-stroke engines.
When setting up the trigger mechanism, to check the correct alignment of the needle, it is first placed on the lower border. Then you need to check how easily the lever rotates and the degree of elasticity of the cable. These parts must be free of corrosion and lubricated.
Disassembling jets
First, we take out the float axis, look at the wear, it should be the same along the entire length. We remove the needle with the lock from the float; there should be a small silicone gasket on it. Then we unscrew the main central jet with a 12mm wrench, after which we unscrew the idle jet with a 6mm wrench or use pliers and secure it with a lock washer.
It is important to tighten the smaller jet when assembling it with the lock washer, otherwise it will break. The K-62 carburetor is produced without an enricher; they come in brands starting from K-33 and up to K-38, where it is located in the corner and is unscrewed with a screwdriver.
After unscrewing the jets, the central element is removed from the reverse side - the guide valve, which was held in place by the main jet. For better performance, you can sand the throttle body and center piece. If the inspection is not carried out for urgent installation on the engine, then all components need to be lubricated with oil. Assembly is carried out in reverse order.
Buying a new carburetor
When purchasing a repair kit for the K-62 carburetor, you should pay attention that the holes are free of defects, and it is advisable to immediately select or replace the jets. There is often a discrepancy between the instructions and the actual dimensions of the holes, especially if the jet is made in China.
The K-62 carburetor can easily work with a jet from the K-55 brand; they are installed on Voskhod motorcycles; as practice shows, it does not particularly affect the engine, but with careful driving, more economical fuel consumption and less engine overheating are possible.
When installing a carburetor on new motorcycles, you may need an adapter; even a machine one will do; you need to plug the extra hole, it can be clearly seen in the photo below.
But you should take into account the dimensions of the seats in the store; it is advisable to take the carburetor with you as an example, because the standards may differ, and we will have to go back.
What is the weight of IZH Planet 3?
5-6 liters at a speed of 90 km/h. The weight of this motorcycle without side trailer is 165 kg. The instrument panel of this motorcycle is made very simply.
Interesting materials:
When will the new Among AS update be released? When will the last hero 3 be released? When will the law on driving from 16 years old come out? When to dig up heirloom onions? When does The Bachelor air on TNT 2022? When do they post coupons for visiting a doctor in St. Petersburg? When should vacation pay be paid in 2022? When was the first TV released? When did Well Wait? When did episode 1 of Barboskin come out?
Carburetor flushing
The K-62 carburetor jets can be seen in the light; if clogged, you can clean them with a match, but with a non-metallic wire. You need to wash all the holes and the float chamber cover with a special solution.
There is a special can with a thin nozzle; it is best to clean the carburetor with it. Partial disassembly is done, the jets are left, and the mixture ensures instant cleaning and purging of all channels.
You need to rinse and wipe the top and bottom covers well. Heavily contaminated carburetors can be washed in kerosene, then purged with a compressor and a spray can to finally clean the element.
Carburetor assembly
Set the lock on top of the needle to the middle position; if economical work is required, set it to the lower position. The engine will start poorly, but will become more economical. We insert the throttle valve with the cutout to the air filter. It should move easily and freely along the guide flap.
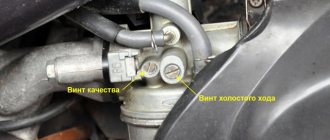
After preliminary adjustment of the position of all elements, selection of the nozzle, cleaning of all channels, you should screw the carburetor to the engine with a 14 key, attach the hose, cable (from the throttle grip) to the throttle, tighten the mixture quality screw, which is near the gas hose, until it stops, and unscrew it by 2 -3 turns.
Tighten the mixture quantity screw to the maximum; the damper rests on it when raised; it must be inserted into the groove next to the throttle cable. There is also an adjustment with the enricher; it can either be attached to the carburetor, or a cable from it can go to the steering wheel. The enricher is a needle that opens an additional channel with fuel.
Aerosols
It is convenient to work with them, since the aerosol comes out under pressure and additionally clears blockages with a flow of air with the mixture. Sprayers contain propane, acetone and a number of other dangerous components. Therefore, avoid getting them in your eyes and hands. They catch fire easily and can only be extinguished with carbon dioxide fire extinguishers.
Aerosol Abro for carburetor cleaning
Aerosols do an excellent job, but they cannot clean the float chamber.
The cleaning process is the same for all cars:
- Remove the air filter;
- Spray cleaner through the tubes outside and inside;
- After 3 minutes, start the engine at high speed and spray the product intermittently for 2 minutes.
This process will take you a maximum of 15 minutes.
Starting the engine after installing the carburetor
You should open the enricher about 1 cm, press the float release button, gasoline should seep through the hole a little, then turn on the ignition, the light should burn brightly, add a little gas, press the kick starter several times.
If the engine starts lazily and immediately stalls, the reason is either the quality of gasoline or a weak battery charge. If the engine does not start at all, you should inspect the main wires and the spark plug; it could be filled with excess fuel; you should unscrew it and wipe it.
To check the spark plug, you need to attach it to the cylinder, turn on the ignition and press the kick starter, the spark should be strong and jump with equal force at the exact time.
Engine tuning
How to adjust the K-62 carburetor for normal operation? First, after starting the engine, tighten the enricher. Next, the K-62 carburetor is adjusted using two screws - the quality and quantity of the mixture. Carefully gradually tighten the quality screw a quarter of a turn each time until the engine runs minimally stable.
After which you should repeat the same procedure with the quantity screw, carefully unscrew it until the engine begins to gain speed, and then tighten the screws one by one to the lowest stable speed. Correct adjustment of the K-62 carburetor occurs not according to the instructions, but according to the operation of the engine.
Factory settings and recommendations indicate that the quality screw should be unscrewed exactly one and a half turns, this is not always the case in practice, because the engines have different wear and compression, which cannot but affect the carburetor, so you need to adjust it at the minimum stable speed engine.
Adjustment of the K-62 carburetor occurs on a well-warmed engine. It is important to ride the motorcycle for a certain distance so that the engine, along with the carburetor and the entire system, warms up well. Then we reduce the gas to idle and begin to configure again according to the same scheme. This will ensure excellent engine tuning, minimal fuel consumption and good traction.
Adjusting the fuel level
For this purpose, there is a brass adjusting element on the float, as shown by the white arrow in the photo.
The entire adjustment process comes down to setting the float in a certain position. Remove the bottom carburetor cover and turn it upside down with the float.
We look from the side so that the mark on the float from the mold (black arrow shows) is parallel to the carburetor plane (red arrow shows).
In this position of the float, the fuel level will be within 12 ... 14 mm. This level is necessary for normal engine operation.
Return to content
How to set up a K-62 carburetor?
It is especially important to warm up the engine well while driving when installing new parts on the carburetor or for precise and final tuning. If you do not adjust the carburetor when the engine is well warmed up, it will not work correctly.
The engine will not produce enough power when you lift the throttle suddenly, or the gas mileage will be too high and the engine will overheat. This is possible even if the setting is done correctly, but on a poorly warmed-up engine.
Then you should try to touch the crankcase under the cylinder; it should be warm, but not hot. Some people try the cylinder, this is a mistake; the normal heating of all internal parts can only be determined by touching the crankcase.
After sufficient warm-up, the propeller adjustment should be repeated, the speed should be minimally stable, otherwise the engine will overheat, and it should not stop randomly after a while.
The K-62 carburetor, despite some negative reviews, has proven itself quite well in practice. Its unpretentiousness, reliability and ease of operation have won the hearts of many motorcycle owners. It is quite competitive compared to many foreign analogues and more modern models.