The principle of operation of the Yamaha Jog scooter carburetor and its repair
The carburetor is the main element of the fuel system on almost all 2-stroke scooters.
Sooner or later, scooter owners are faced with a problem related to carburetor repair. Often we are talking about adjusting the carburetor. In many cases, scooter owners are afraid to fix this problem themselves. This is based on insufficient knowledge of the carburetor structure. Further in the article we will try to disassemble the carburetor adjustment on the Yamaha Jog scooter step by step. The fuel cell on Yamaha scooters has a simple design. Therefore, even a beginner should not have any problems during its adjustment.
Lifehacks for the last time
- — Before adjusting, you need to check that the air filter is clean and soaked in engine oil. How to clean the air filter, read the article: Scooter maintenance.
- — If the rubber cuff on the quality screw is torn, then it can be replaced with a cuff from the quality screw of the classic Lada carburetor.
- — On Suzuki Sepia models, lets 2,
In the latest models of Honda Dio 34 everything is simpler.
The carburetor has only one large screw, which is used to regulate the XO. The small one on dio 34 is located under the plug. The first time the setup will take 15 - 20 minutes, and then everything will be automatic. Feel free to get down to business and share your experience in the comments.
Subscribe and see you for new articles!
Reasons for adjustment
They say there is no smoke without fire. This folk wisdom also applies to our case. There is no need to get into the carburetor unless there is a reason to do so. What reasons could there be? Here are the main ones:
- the spark plug always floods;
- The engine runs intermittently and stalls.
Also, carburetor adjustment is necessary when using low quality gasoline for a long time or the air element is dirty. Let's move directly to adjusting the Yamaha Jog carburetor.
First, thoroughly rinse the carburetor. We pay special attention to all channels where gasoline is supplied. If you have already gotten around to repairing the carburetor, then at the same time you can change the spark plug. In addition, we reproduce the replacement of the air element. After the above steps, we proceed to adjustment. Pay attention to the old spark plug, it can “say” a lot. White candle - a mixture of white, black and rich. This leads to excessive fuel consumption and channel contamination.
A simple and effective way to adjust the carburetor (Views: 2)
Alexander Kr.
The mixture is rich. Composition 12:1. The spark plugs will be black when idling for a long time (when trolling, for example). I won’t say anything about CO.
—- Message added at 12:54 —- Previous message posted at 12:44 —-
Can you give an example? It seems like this has never happened.
And further. A feature of adjusting the carburetor at XX (in carburetors only XX is adjusted with screws) is the dependence of the mixture composition on both the position of the quality screw and the position of the quantity screw. Therefore, the adjustment technique is not the same.
Attachments
Alexander Kr.
Thank you for enlightening me about ejection.
The instructions in the attachment are as incomprehensible as most service manuals for some reason. First, the need for adjustment is assessed and the adjustment itself is made in response to a sudden release of gas. But this is true if the mixture was lean. What if you're rich? The engine will respond normally to gas. So, is everything okay? Secondly, it is not clear which way to turn and what should happen. If you don't understand how to adjust, you can wind it in the wrong place.
I suggest turning it so as to create a deliberately lean mixture, so that it is clear that it is lean (the revolutions have dropped, the engine stalls). Then create a rich one, and so that the person understands that it is now rich (the revs have dropped again, now from excess fuel). Then it will be clear at what position of the screw the mixture is optimal.
—- Message added at 17:45 —- Previous message posted at 17:36 —-
I wrote incorrectly about the Suzuki service manual. The second position of the screw is when the speed decreases again.
Alexander Kr.
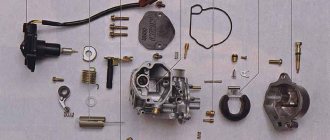
Disassembling the carburetor
- We block the flow of gasoline into the carburetor. This can be achieved by disconnecting the fuel hose. Next, unscrew the special hole for draining gasoline and grind it into any container.
- Then unscrew the mixture quality screw and the throttle valve.
- Let's disconnect the unscrewed parts.
- We remove the enrichment agent and the float chamber.
You can assemble the carburetor using the reverse algorithm. We remember that disassembling the carburetor is necessary only when the channels are clogged. After cleaning, we move on to adjusting the carburetor.
- We start the engine at idle speed.
- Tighten the mixture quality and idle speed screw to maximum.
- Then we loosen these two screws ¼ turn. At the same time we monitor the operation of the engine. If there are too many revolutions, lower the mixture quality screw another ¼ turn.
In conclusion, I would like to say that the first “acquaintance” with the carburetor design may be unsuccessful. Therefore, the process will be more effective with a more experienced friend. It is also recommended to watch the instructional video regarding carburetor adjustment. You can, of course, buy a new carburetor for a Yamaha Jog, but this should be resorted to only in case of mechanical damage to the old carburetor.
source
Adjusting the carburetor on a 2t scooter: setting it up together
We continue to discuss DIY motorcycle repairs.
The carburetor has been cleaned, the next step is to adjust the carburetor of the 2t scooter. Over the summer, you have to adjust and adjust the operation of the engine several times.
Anyone who is at least a little familiar with the structure of the carburetor will be able to set it up on their equipment themselves. On 2-stroke engines, carburetors are adjusted according to the same principle. Therefore, the topic will be of interest to owners of any brand of 2t 50cc scooters. Whether you have a Honda Dio 27, 34, 35, stroke, Yamaha Jog, BVS or other 2-stroke mopeds.
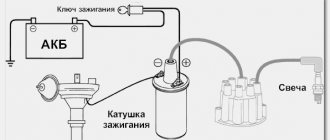
How to set the ignition on a scooter
The ignition system plays an important role: without it, not a single vehicle with a gasoline or diesel engine will move. The quality of engine operation, whether it will start in cold weather, and whether it will work correctly depends on how it is configured. Depending on how the ignition is set and what spark plugs are selected on the scooter, it depends on whether it will go or not. From this material you will learn how to set the ignition on a scooter yourself, what you will need for this, and how to set up a contactless system.
How to Adjust the Carburetor on a Yamaha Jog Scooter
Yamaha Cardiac Surgical Carbon Correction
Many scooter owners are faced with the problem of how to adjust the carburetor . It may seem like a daunting task at first, but carburetor has a design that even a beginner can understand.
Yamaha scooter carburetor adjustment is not performed when the engine is cold. The best option. Adjust the carburetor after driving until the engine has cooled down and warmed up. Cold engine operation will affect the quality of carbon control.
The principle of operation of ignition in a 4-stroke scooter engine
Modern scooters are equipped with contactless systems. They are considered the most reliable and easy to use, do not require complex connections, and provide a constant good spark on time. However, the setting is still important; even the presence of a spark does not always allow the fuel mixture to ignite, since its power also plays a role.
The main reasons for the operation of the ignition system are quite simple: its task is to create a spark to detonate the fuel mixture. If this does not happen, you need to carefully examine each node and find out why the spark disappeared.
In order to check whether there is a spark at all, you need to unscrew the spark plug and apply it to the engine ground; this can be done using metal objects that are not covered with paint. You cannot hold it with your hand: if there is a spark, it can give you an electric shock, and the discharge reaches 40,000 volts, which the coil creates.
Broken ignition is the cause of engine failure
An incorrectly configured or faulty ignition often causes engine failure. It would be wrong to immediately climb into the cylinder and examine the insides of the scooter, especially since this will not solve the problem. Before touching the ignition system, you need to check for other reasons why the scooter may not work.
- The simplest thing is the lack of gasoline in the tank. Quite often, owners forget to refuel their vehicle, and such a trivial reason can be overlooked.
- The carburetor may be clogged, which prevents the formation of a mixture suitable for driving.
- The carburetor needs to be cleaned regularly, so it doesn't hurt to check whether fuel is flowing from it into the cylinder. It is possible that the fuel pipe is clogged. The jets and other parts of the device may become clogged with debris, which causes little fuel to flow or, conversely, the engine does not have enough air, and therefore it does not start.
- The scooter may also refuse to start if the fault is caused by spark plugs. They may be wet or not produce a normal spark. It is advisable to have a spare set and check with it. In any case, the spark plug needs to be unscrewed and inspected.
JavaScript is disabled in your browser
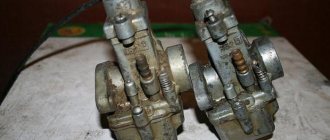
When buying a Japanese scooter, the question of cleaning and adjusting the carburetor may arise, this is not at all surprising because there are almost no new mopeds in Russia or Ukraine, all copies come to us in a worn condition and are already “shamanized” here by skilled craftsmen and brought into the appropriate form . You may wonder, why take the Japanese if you can take the new Chinese? Yes, but even used Japanese equipment can be better than new Chinese equipment.
And so, first you need to remove the scooter carburetor itself (the example is given taking into account that the plastic has already been removed), to do this you need to unhook the air filter pipe on one side, and the inlet pipe to the engine itself on the other. You should also check these pipes, if there are cracks or holes in them, replace them. Possible problems with carburetion, leanness or enrichment of the mixture may be related to this. It is necessary to disconnect the wiring (it goes to the solenoid valve), fuel pipes, and vacuum pipes. Then unscrew the screws that secure the top cover of the carburetor, to which the spool throttle with a needle is attached. Unscrew the lower part - the float chamber. Next, use a pneumatic gun, or simply use your mouth to blow out all the air and fuel jets. If there is debris or film on the surface of the float chamber, remove excess; the walls can also be cleaned or washed with kerosene, AWD-40.
How to set the ignition on a scooter
With minimal experience, but good theoretical knowledge, you can set the ignition yourself. To do this, you just need to strictly follow the instructions below.
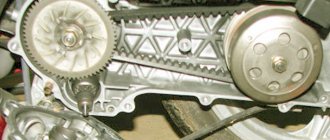
The most important part of tuning is to find the correct position for the timing sprocket to sit. In order to find it, they use special marks that are applied at the factory during engine assembly. The desired mark looks like the letter "T". In this position, the piston is at dead center. This is the extreme position after which the piston will return back. You need to rotate the rotor until the protrusion on the crankcase and the letter “T” coincide. This can be done using your hands or a kick starter. An electric starter does not need to be used.
If the piston has only moved down minimally, turn it further until the marks line up. It's not always possible to get the right position the first time. After they match, you need to study the other marks: they are located on the timing star. Usually these are three points or holes that are located on the outside of the star. They form a triangular shape if you connect them visually. Notice that one point is larger than the others. After adjusting the ignition, it should be on top, and the other two marks should remain opposite each other. They must stand horizontally.
If the ignition is contactless, it is adjusted as follows. In order for the engine to run smoothly and correctly, you need to adjust the ignition of the mixture at the right moment. To do this, after all the tags are installed in the right places, you need to understand how the contactless principle works in general.
A special feature of the BZS is the presence of special sensors, a switch, and two types of ignition coil winding. When the sensor is closed using a rotor equipped with a magnet, a pulse is generated that enters the commutator, it pumps up the current coming from the generator and directs it to the primary winding of the coil. After this, the charge enters the secondary winding, where a high voltage is generated, with the help of which a spark appears, used to detonate the gasoline mixture. Adjusting the ignition is the alignment of the marks on the crankcase and the sprocket. Usually you have to remove the valve cover.
After this you need to do the following:
- Labels are set in the manner described above.
- In order to set the ignition angle, you can release the stator mount and adjust it in accordance with the technical requirements of your vehicle.
- Make sure that the marks or holes are in the correct position.
How to check the starter enrichment of a scooter for serviceability
The importance of starting enrichment on modern scooters and mopeds has been discussed many times. Today we will not delve into the intricacies of the design and details of the purpose of the enrichment; we will look at this in another article. Today we will just determine how to properly check the starting enrichment for serviceability, what methods this can be done and whether it is necessary to check the enrichment in specific situations, because the cause of a certain malfunction may be completely different.
Why check the starter enrichment of the scooter.
So what should make you think that your starter enricher is faulty. Let's look at the main reasons:
- The scooter is difficult to start in the morning;
- The scooter is difficult to start after parking;
- The scooter consumes an excessive amount of gasoline;
- The scooter does not idle;
- After warming up it works normally, but when cold it works with significant interruptions.
These points may indicate a faulty starting enrichment.
The enrichment malfunction also has two positions: when the solenoid valve is constantly in the extended needle position (1) or in the initial position of a cold engine - that is, when the needle is constantly retracted (2).
Both cases have completely different consequences for engine performance. In the first case, the scooter does not start when cold, several kick movements do not produce results, and the scooter does not start with the wiper. In the second case, the scooter starts up normally, but consumes a lot of gasoline and constantly operates in a rich mixture mode, with consequences arising from this.
How to check the starting enrichment of a scooter.
It’s very easy to check whether the starting enrichment works on your scooter, let’s start with the basics:
- Let's check whether the solenoid valve needle closes the enrichment channel. After starting the engine, when cold, the idle speed of the engine should be slightly increased, and then gradually decrease to the desired level. If this phenomenon occurs consistently for you, then the starting enrichment is working and there is no need to disturb it anymore.
- If the scooter starts normally, but the idle speed does not decrease after warming up, remaining at a constantly high level, you should think about a possible breakdown of the starting enrichment and, of course, check it.
- If the scooter starts after a long and exhausting use of the kickstarter, but the compression is normal, the carburetor is clean, and the fuel level in the float chamber is in the correct position, you should also think about a faulty starting enrichment and check it.
So, how to check the starter enrichment of a scooter for serviceability . To do this, disconnect the power supply to the enricher from the scooter's electrical network, unscrew the attachment of the enrichment to the carburetor and remove it.
Prepare two small wires with insulation. Bare the ends of the wires by connecting them on one side to the battery terminals. Make sure that the bare ends of the wire on the other side do not touch. Next, apply 12 volts to the enricher from the scooter battery, and the polarity, as a rule, does not matter. It is important to carefully connect the wires to the connectors in the chip that you disconnected from the scooter's electrical outlet. You can first connect the wires to the chip, and then connect it to the battery, this will be even easier.
This is what the enrichment device looks like with the needle retracted before voltage is applied to it from the battery.
After this, after 1-2 minutes, the needle will begin to gradually move out of the body of the enrichment agent, this can be seen with the naked eye. If this is difficult to determine, you can measure the length before and after applying voltage.
If even after 5 minutes have passed after applying voltage, the needle remains motionless, then the enrichment device is faulty or has defects in the wiring.
If the wiring is intact, then the solenoid valve must be replaced with a new one. Fortunately, the price of a new starting enrichment for a scooter ranges around 6-8 dollars. Naturally, they are different for each model of scooter and when purchasing you need to take it with you or check with the seller whether the spare part belongs to a certain brand and model of the scooter.
A type of enrichment for scooters.
Below are photos of the starting enrichment of the main brands of scooters in our market:
What is advance ignition
The quality of the mixture supplied to the engine cylinder determines the behavior of the scooter in cold weather, as well as how high the wear of the cylinder itself will be. For example, with a rich mixture, the engine starts better, but carbon deposits form; with a lean mixture, the cylinder quickly wears out and traction is lost.
In order to facilitate the process of starting the engine, you can set the ignition to advance, this will make it easier to start the engine regardless of the weather outside, slightly increase engine power, and significantly increase traction. The peculiarities of such settings are that a charge is formed in the spark plug before the piston reaches the dead center. This makes it easier to start the engine and increases engine power. However, it is worth remembering that cylinder wear may increase.
The procedure is carried out in approximately the same way as a regular ignition adjustment, but has its own nuances. To do this, all the same actions are carried out, only the tags are not completely connected. The discrepancy should be approximately half a centimeter. This is enough to get the desired effect.
How to set the lead angle (video)
About adjusting the ignition of a 4t scooter
Knowing how to set up the ignition of a 4T scooter on your own, you can save time and money, since you will not need to contact a motorcycle repair shop. The procedure is simple, even if you have no experience it takes a little time, but you will need to be patient. Regardless of the type of ignition, an important role is played by how the marks are set.
Correct adjustment is a guarantee of stable and smooth engine operation even in cold weather conditions. Often, in used vehicles, the ignition is broken: this can happen for various reasons, ranging from elementary shaking when driving to improper handling of the equipment. In order for the scooter not to let you down and for you to be able to start it whenever you want, you will need to learn how to carry out this procedure yourself. To do this, you will need to have several keys that allow you to remove the valve cover if the engine is four-stroke.
Setting up the Vision scooter ignition system
If the ignition is knocked out, this may be the reason the scooter does not work. Restoring it is not difficult if you understand how it is done.
Advice: before starting work, carefully check and clean the carburetor: this may be the reason. Adjust the quality of the mixture. In addition, it doesn't hurt to check the spark plugs.
You need to start adjusting by setting the timing belt in the desired position. As a rule, there are marks on it for this purpose; they are set at the factory. The cylinder must be installed at dead center. The mark may be indicated by the letter T or another symbol. Now make sure that the mark installed on the rotor matches the mark found on the magneto. To do this, you need to gently press the kickstarter. The rotor can also be turned using your hands, but this is more difficult.
There are also marks on the timing star in the form of holes or dots; they must be set so that the largest hole is on top and located exactly in the center. The remaining points should be below and located horizontally opposite each other. Setting the ignition advance makes sense if you want to increase the engine's power a little and make it start easily. The adjustment will help make the spark plug produce a spark earlier than the standard time. That is, a spark will appear even before the piston reaches the dead center. In cold weather, a moped configured in this way will start better.
In order to configure the scooter in this way, you will need to repeat the procedure described above. However, there is a difference: the marks should not coincide clearly, and not reach each other by about 0.5 cm. The main difficulty lies in connecting the marks.