What is a starting enrichment
A starting enricher (electrovalve) is a device designed to supply an additional amount of air-fuel mixture into the combustion chamber during a cold start of the scooter engine. The fact is that when starting the scooter when cold, the engine requires an enriched mixture. The supply of such a mixture is ensured by the carburetor solenoid valve . If the starting enrichment is in good working order and there are no breakdowns in other engine elements, the scooter engine starts easily even at temperatures around zero degrees.
Signs that a check is needed
If difficulties arise with starting the engine and in a number of other situations, it is necessary to be able to check the functionality of the starting enrichment. Thoughts about a malfunction of the solenoid valve may arise in different cases.
Let's take a closer look at the main reasons:
- the first morning start of a cold scooter engine is problematic;
- it is difficult to start a cooled scooter engine after a long stay;
- fuel consumption significantly exceeds the consumption indicated in the passport;
- The scooter's power unit is quite unstable at idle;
- a warm engine does not maintain speed, and a cold engine functions intermittently.
Any of these problems should make the scooter owner think about a possible malfunction of the solenoid valve.
A faulty enrichment device can be in two positions:
- with the solenoid valve needle constantly extended;
- in the initial state, when the needle does not protrude.
It is necessary to be able to check the functionality of the starting enrichment if difficulties arise with starting the engine.
Each case has a different effect on the operation of the motor. The first situation makes it difficult to start the engine of a cold scooter. An attempt to start the engine by pressing the kickstarter, as well as starting with an electric starter, are unsuccessful. In the second case, the engine starts without problems, but during operation it consumes an increased amount of gasoline. Increased fuel consumption is associated with engine operation on a highly enriched mixture.
Scooter starting enrichment device
There are two types of starting concentrators - manual and automatic.
The manual (mechanical) starting enrichment requires adjustment - it must be opened at startup and closed after the engine warms up using a cable on the steering wheel. But manually opening and closing the additional channel for supplying the mixture is inconvenient. An automatic starting enricher (thermoelectric valve) is installed on most modern 2t and 4t scooters. We will learn about the device of the automatic starting enrichment further.
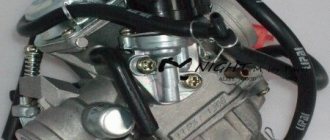
Solenoid valve body- Ceramic heater
- Drive (powder)
- Stock
- Pusher
- Damper
- Fuel chamber
- Float chamber
- Starting fuel jet
- Spring
The scooter carburetor has a small additional fuel chamber 7, which is connected to the main float chamber 8 through the start nozzle 9. The tube from chamber 7 leads to the mixing chamber into which air is supplied and from which the air-gasoline mixture goes into the engine. A valve 6 can move in the mixing chamber, similar to a carburetor throttle valve, only much smaller in size. Just like the throttle valve, the starting valve contains a spring-loaded needle that closes the fuel channel when the valve is lowered. Valve body 1 is wrapped in thermal insulation (polyethylene foam) and covered with a rubber boot. This enricher design is used on almost all modern scooters.
Older models may use a design without an electric heater, heat is transferred to the drive through a copper heat-conducting cylinder directly from the scooter's engine cylinder, and a membrane . One cavity of the flask, where it is located, is connected through a thermal valve to the intake manifold, which is mounted on the cylinder head.
Operating principle of a membrane enricher
The membrane starting enrichment works on a different principle. When the engine is not warmed up, the valve is in the open position. Starting the engine causes a vacuum in the area of the intake manifold, which is transferred to the membrane thanks to the thermal valve. Under the influence of reduced pressure, the membrane tries to rise, opening a channel responsible for supplying additional air volume.
Further heating of the cylinder to operating temperature causes the valve to close and lower the spring-loaded valve associated with the needle. As a result, the supply of additional fuel is cut off. Such a system with a membrane functions in a clear connection with the engine temperature, which ensures a more correct dosage of fuel.
The membrane starting enrichment works on a different principle.
The principle of operation of the scooter carburetor solenoid valve
When the engine is cold, the valve with the spool needle 6 is raised as high as possible (open). The needle opens the fuel supply channel, and the flap opens the air supply hole. At the first engine revolutions, a vacuum is created in the emulsion channel and gasoline located in chamber 7 is sucked into the engine through channel A, causing a strong enrichment of the mixture and facilitating the first flashes in the engine. After the engine has started, but has not yet warmed up, it still needs a rich mixture. The enricher works like a parallel carburetor - gasoline enters it through jet 9, mixes with air and enters the engine.
When the engine is running, alternating current from its generator is always supplied to the contacts of the ceramic heater 2 of the thermoelectric valve of the starting system. Heater 2 warms up drive 3. As the engine and drive warm up, the rod gradually extends by 3 ... 4 mm and drives the damper through pusher 5. Thus, the engine warms up along with the thermoelectric valve, the spool with the needle drops and closes the air and fuel channels, and the mixture gradually becomes leaner. After 3...5 minutes, the damper closes completely and the degree of enrichment of the mixture on a hot engine is regulated only by the carburetor idle system .
When the engine stops heating of the valve stops , the damper drive cools down (the powder is compressed) and under the action of spring 10, pusher 5, rod 4 and damper 6 return to their original position, opening the channels for subsequent start-up. Cooling down and returning to its original position also occurs within a few minutes.
The disadvantage of this type of enrichment is that it operates separately from the engine. For example, very often, especially in warm weather, while the engine is still hot and there is no need to enrich the mixture, the thermoelement is already cooling down. We start the engine and it gets a rich mixture.
What is the purpose of a solenoid valve in a carburetor?
The solenoid valve is designed to reduce fuel consumption by adjusting its supply. Depending on the needs, it alternately closes the air supply channel and the fuel-air mixture located in the carburetor and thereby doses it.
Interesting materials:
How to open wine with lipstick? How to open the gate to Vault 87? How to open all the islands in The Sims 3 Island Paradise? How to open Windows Movie Maker in Windows 7? How to open the back cover of Huawei p20 Lite? How to open a message request on Instagram? How to open a can of condensed milk? How to open multiple tabs? How to undo formatting of a cell without deleting it? How to undo changes in Google Form?
The design of a scooter carburetor and its operating principle
The design of a scooter carburetor is quite simple; Once you understand it, you will be able to understand how to properly configure the carburetor so that the vehicle does not let you down in bad weather, how you can tune it and improve the performance of the engine. You will be able to control the quality of the mixture and many other processes that affect the operation and operation of the device.
The principle of operation of a scooter carburetor
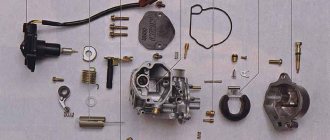
The carburetor design of a 4t scooter is not very complicated. The basic principle of its operation is as follows: a certain amount of fuel and oxygen enters the float chamber of the device, where they are mixed in the required proportions and supplied to the combustion chamber of the engine.
The design of a 4-stroke scooter carburetor may vary slightly depending on the model, but in general it is the same for all types of carburetors. The float version of products is most often used. It is distinguished by the presence of a float chamber in which fuel is mixed with air, after which the finished mixture is fed into the cylinder. In order for air to enter the fuel in the required proportion, the carburetor includes the following elements:
- Jets.
- A needle that meters the supply of oxygen.
- Spool.
- Throttle valve.
Sometimes the design of a 4t carburetor on a 50cc scooter includes an element such as an accelerator pump. It works in tandem with a starting mixture enricher. These devices help the scooter engine to work correctly and start in damp and wet weather. The correct operation of the motor depends on the coherence of the devices, so it is important to pay attention to their settings.
Scooter starter booster
Most often, scooters are equipped with an electric starting enrichment; on older models you can find a manual one. The task of this device is to create the right mixture in order to start the engine after a long period of inactivity.
The carburetor has an additional channel for connecting the enricher. If the device is automatic, the channel opens itself when you try to start the scooter and closes as the engine warms up. If the enrichment is manual, you need to close its valve yourself. The operating principle of the device is as follows:
- Inside the housing there is an element heated by electricity, which pushes out a needle that blocks the fuel channel.
- After the engine is stopped, the needle will be retracted.
Float chamber device
Mixing of fuel with air in the carburetor occurs with the participation of the float chamber; Thus, the finished fuel, saturated with the required amount of oxygen, enters the combustion chamber, where it explodes and sets the scooter in motion.
From the gas tank, fuel enters the carburetor through special pipes. But mixing cannot occur in them, so first the fuel ends up in the float chamber, and only then it is enriched with oxygen and further moved. To ensure that gasoline does not flow continuously, but in the right quantity, the carburetor is equipped with a special system with a float and valve. When the chamber is full, the float rises and the valve blocks fuel from entering the carburetor; when the float is lowered, the flow of fuel resumes.
Fuel dosing system design
The mixture is supplied to the cylinder in finished form, so it is necessary to control its quality. For this purpose, the carburetor has a special needle with grooves and a locking ring. The position of the needle depends on the position of the ring: the higher it is, the richer the mixture, and vice versa. Modern carburetor models allow you to tune them without disassembling them.
For proper operation of the device, the diameter of the main jet is important. It is selected based on motor power and diffuser size. When tuning, the nozzle hole can be enlarged.
Photo report: How to grind scooter valves
Due to its initially unfavorable location, the cylinder head valve takes on the main load arising during fuel combustion. The exhaust valve is especially hard hit, since the main flow of hot gases passes directly through it.
In order to increase the resistance of valves to temperature, vibration, wear and various deformations, they try to use more expensive, and therefore high-quality materials and technologies for the manufacture of scooter valves and cylinder heads. Chinese manufacturers constantly save on something, so the “quality” of valves and cylinder heads made in China leaves much to be desired...
The valve can be removed from the cylinder head using this device, which consists of two washers of suitable size welded together through small spacers.
We place our device on the valve plate and, using a suitable clamp, compress the spring and remove the crackers.
After removing the valve from the cylinder head, we clean it and the cylinder head from carbon deposits using all available means.
What parts should look like after cleaning.
We take pliers, use them to clamp the valve right next to the plate, and apply a little lapping paste evenly over the entire surface of the chamfer.
All manipulations with valves should be performed with round nose pliers, this way you will protect yourself from getting abrasives on the valve stem.
After applying the paste, use pliers to insert the valve into place.
We push the valve all the way in and put a rubber tube of a suitable diameter on it on the back side.
The valves should be ground in according to this principle: lightly pull the tube, then turn the valve in one direction about one turn, then raise the valve a little, again lightly pull the tube and turn the valve in the opposite direction by half a turn, and repeat this many times until it is ground in the valve to the seat completely. Yes, it is long and tedious, but the result will be worth it.
During grinding, constantly monitor the condition of the chamfers and carefully ensure that the paste does not get on the valve stem.[/stextbox]
This is the chamfer that was originally on the burnt out exhaust valve.
You should grind until the shells, irregularities and other damage are completely removed; as a result, you should get a uniform chamfer with a matte color on the seat and valve plate.
Here are examples of an ideal ground bevel.
After grinding in, we thoroughly wash all the parts and proceed back to installing the valves on the cylinder head: Install new valve stem seals (preferably), use a syringe to apply engine oil to the valve stem and insert it into place, then put on the valve springs and using our device We put the crackers in their places.
The direction of the inner and outer valve spring coils after installation should be in different directions.
After installing the crackers, to check their secure fit, lightly hit the valve stem from the spring side with a hammer.
After all that has been done, the valves should be checked for leaks, for this there is a special stand which, unfortunately, I do not have, so I will check them the “old-fashioned” way using kerosene.
We turn the head over so that the outlet or inlet channel is at the top and fill it with kerosene to the very edge, and after 30 minutes we see if the kerosene has leaked out, then we disassemble and grind everything again, and if everything is dry then the head can be put back in place, work on The installation of the cylinder head is described in detail in the article: Installing a piston 170 CC instead of the standard 150 CC on a scooter
Why adjust the carburetor?
Carburetor adjustment may be required in the following cases:
- The spark plugs are serviceable, but do not work very well; their color has changed to black or yellowish.
- The engine does not provide the required power
- Scooter won't start
- Fuel consumption has increased excessively.
All these problems in most cases are caused by an insufficiently enriched or, conversely, overly enriched mixture with oxygen, and they can be corrected by correctly adjusting the carburetor.
The settings, regardless of whether you have a 2t or 4t scooter, have three phases and are made as follows:
- Idle speed adjustment
- Setting the fuel level
- Adjusting the quality of the mixture.
On some carburetor models there is no screw that adjusts the fuel quality, so you have to disassemble the carburetor to change the position of the needle.
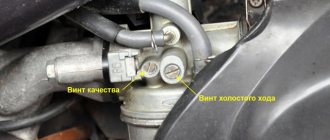
The idle speed adjustment is carried out after the engine has warmed up: this takes no more than 15 minutes. For this purpose, the design provides an idle screw. It allows you to make the engine stable by selecting the desired idle speed. When the screw is tightened, the speed will increase, and when it is rotated counterclockwise, it will decrease.
It is important to adjust the quality of the mixture. If it is too lean, the scooter will ride with difficulty, and the engine will noticeably lack power. If the mixture is too rich, the spark plugs will turn black and quickly fail. Fuel quality adjustment is usually carried out using a screw located on the carburetor body. To enrich it you need to turn it clockwise, to lean it counterclockwise. If there is no screw, the carburetor is opened, the locking ring on the needle moves up for a richer mixture, down for a leaner one.
Adjustments are made as follows:
- Start the engine and warm it up for 10 minutes, after which you need to turn it off
- The screw must be tightened clockwise until it stops, but without force.
- After this, it is unscrewed counterclockwise 1.5 turns
- The engine needs to be started and the screw turned an additional 1/3 turn in the same direction. Wait 2 minutes
- As the speed increases, you need to unscrew the screw an additional 1/4 turn and observe the reaction for about 2 minutes. If the speed does not drop, repeat the steps
- If the speed begins to decrease, the screw must be turned clockwise 1/4 turn.
Ideally, the engine will operate exactly at 1.5-2 propeller revolutions, but its position depends on the quality of the fuel. In the case of a needle, the quality of the mixture will vary depending on the position of the needle locking ring. The disadvantage of such a carburetor is the small number of needle positions and the need to disassemble it each time to make adjustments.
You can adjust the fuel level in the chamber as follows:
- Unscrew the drain screw
- The phone is lifted up
- You need to check the fuel level while the engine is running. The melting level is slightly below the skirt located on the float chamber cover
- Most often, the level rises above normal and the carburetor overflows, so you need to adjust the float so that it fires earlier. To do this, the needle holder is usually bent. A lot of force is not required, only a few mm are needed.
Ignition circuit elements.
One of the most important electrical circuits in a scooter is the ignition circuit. It includes the CDI ignition module ( 1 ), ignition coil ( 2 ), spark plug ( 3 ).
CDI ignition module.
The CDI ignition module ( 1 ) is made in the form of a small box filled with compound. This makes it difficult to disassemble the CDI unit if it malfunctions. Although the modular design of this unit simplifies the process of replacing it.
There are 5 wires connected to the CDI module. The CDI module itself is located in the bottom of the scooter body near the battery compartment and is secured to the frame with a rubber clamp. Access to the CDI block is made difficult by the fact that it is located in the bottom part and is covered with decorative plastic, which has to be completely removed.
Ignition coil.
Ignition coil ( 2 ). The ignition coil itself is located on the right side of the scooter and is mounted on the frame. It is a kind of plastic barrel with two connectors for connection and a high-voltage wire output that goes to the spark plug.
Structurally, the ignition coil is located next to the start relay. To protect against dust, dirt and accidental short circuits, the coil is covered with a rubber cover.
Spark plug.
A7TC spark plug ( 3 ).
The spark plug turned out to be cleverly hidden on the scooter, and it can take quite a long time to find it the first time. But if we “walk” along the high-voltage wire from the ignition coil, the wire will lead us straight to the spark plug cap.
The cap is removed from the candle with a little effort. It is fixed to the spark plug contact with an elastic metal latch.
It is worth noting that the high-voltage wire is connected to the cap without soldering. The insulated stranded wire is simply screwed onto the screw contact built into the cap. Therefore, you should not pull the wire too hard, otherwise you can pull the wire out of the cap. This can be easily fixed, but the wire will have to be shortened by 0.5 - 1 cm.
It's not so easy to get to the spark plug itself. To dismantle it, a socket wrench is required. With its help, the candle is simply unscrewed from its seat.
Starter.
Starter ( 8 ). The starter is used to start the engine. It is located in the middle part of the scooter next to the engine. It's not easy to get to.
The starting of the starter is controlled by the starting relay (10).
The start relay is located on the right side of the scooter frame. The starting relay receives a thick red wire from the positive terminal of the battery. This is how the start relay is energized.
What is the carburetor of a Chinese scooter and its capabilities, disadvantages, tuning
The carburetor circuit of a Chinese scooter is, in principle, standard and suitable for both 2t and 4t engines. The design of the carburetor allows certain actions to be taken to improve its performance, however, if the engine is two-stroke, the efforts will not make sense.
The simplest approach is to replace the carburetor with a more advanced one, for example, with an accelerator motor, if you have a fairly old version without it. Most often, simple tuning is limited to replacing the main fuel jet, this is especially true for engines with low power. Replacing the nozzle helps to increase the fuel channel and, due to this, add a little power to the engine.
Quite often, more serious tuning involves the use of a 150 cc scooter carburetor. Interesting models with a diffuser diameter of 17.5 mm. It is great for 70cc piston. Less often you come across a large diameter of 19-24 mm, it is just ideal for a bored 150 cc piston engine. However, the diameter must be selected correctly, otherwise the motor will begin to choke.
What are the consequences if the intake valve leaks?
What are the consequences if the intake valve leaks?
- hodge^
- March 17, 2014
- 19:33
The carb will sneeze, fuel consumption will be high, and engine power will drop.
hodge^, will the carb sneeze?
^7perimeter0, well, if it lets through, then it will all go into the carb.
hodge^, that means I need to get ready for valve grinding
^7perimeter0, it may be clamped - why immediately rub it.
headmaster197705, clearances are normal
hodge^, what is the maximum flow rate in this situation?
country, depending on the condition of the valve
hodge^, well, at 110cc what fuel consumption will be 4 liters maybe?
^7perimeter0, and compression is normal. By the way, I once checked the intake for the pass without analyzing it - the method is really stupid, but I think it’s correct.
hodge^, how much then?
headmaster197705, the compression is good, but in my opinion not everyone reaches the maximum speed
^7perimeter0, but with a pass the compression drops.
country, yes a little, don’t worry
hodge^, I ate a lot
country, take the head apart, check the valves for leaks, if they hold, remove the carb.
hodge^, mmm. Yes, I’m sure - but you’re not?
hodge^, you missed everything right now
headmaster197705, if the valve leaks, then the compression already drops.
Design and connection of a Yamaha scooter carburetor
The Yamaha Jog scooter is one of the most popular on the Russian market: this is explained by the simplicity and reliability of the model, and its affordable price. The carburetor design of this scooter is standard, so you can figure it out using the description given above. However, when installing it, inexperienced owners may encounter some difficulties, which we will help you sort out.
The device is worth considering in more detail. This will help you understand not only how to adjust the carburetor and use it correctly, but also how to connect it correctly.
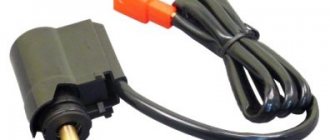
- A starter enricher is attached to the carburetor body: it is small in size and housed in a plastic case. It has two bolts with rubber seals. The enricher is powered via a 12 V battery. This device is used to start the engine when cold, as it allows you to automatically enrich the mixture with oxygen.
- The fitting is connected to the fuel supply hose coming from the gas tank tap.
- If the enrichment unit needs to be removed, you will need to not only unscrew the bolts, but also disconnect the electric valve, to which there are only two wires.
- The mixing chamber has a special cover to which a bolt is attached. If you unscrew it, you can get to the throttle valve. This allows you to check whether the throttle cable is connected, and also to get to the needle that regulates the level of fuel and air supply. If the carburetor needs cleaning, you will definitely need to remove the throttle.
- The enrichment connector has two wire outputs, the yellow one is connected to the generator, the green one goes to ground. In principle, if you reverse the polarity, nothing will happen and the device will still work.
- For the enricher to operate, voltage must come from the battery. When the element inside the device heats up, the needle will extend.
- A special fitting is connected to the air filter, and there is a rubber elbow between them.
- There are several screws on the carburetor body with which you can adjust the idle speed and mixture quality.
- The float chamber is screwed from below and has 4 mounting bolts.
- There is an additional fitting for oil supply: it is the smallest.
- The second fitting is needed for communication with the atmosphere; you do not need to put anything on it.
- The third one is connected to a gas hose. It goes to the gas tank vacuum valve.
Fix a malfunction of the solenoid valve on a Chinese scooter
How to fix a carburetor solenoid valve malfunction (139QMB engine) with your own hands using the example of the Chinese Super Sport Acar scooter
The solenoid valve on the scooter's carburetor is used for cold starting of the engine. And it so happened that the previous owner had big problems Super Sport Acar To do this, in the removed state, I connected it to a 12-volt charger. There was no movement of the needle either after 5 minutes (as it should be approximately) or after 10 minutes. The verdict is harsh - faulty, but since there were no shops with spare parts for the scooter within a radius of tens of kilometers, I had to make do on my own.
I took a sharp knife and cut off the top part where the wires fit. The plastic turned out to be relatively soft and this procedure did not take much time. I disconnected both parts and the solenoid valve was easily disassembled into the following parts.
I looked carefully and saw that the heating element (in the form of a tablet) had oxidized from the sides to the contacts. I cleaned both the element and contacts with fine sandpaper. I pressed the heating element between the contacts with my fingers and connected the device. After 10-15 seconds I felt that the element was heating up. Next, I took the part to which the heating element is adjacent and, using a lighter with a weak flame, heated up the copper part a little - the thin rod on the other side began to extend. Everything works... Next, I cut out a strip of soft aluminum, made a hole in the middle into which the cylindrical part of the solenoid valve fit, and crimped the assembled body. In the future, for reliability, I plan to put a screw with a nut in the upper part. And it is advisable to initially coat the cut site with cold welding for plastic or some other adhesive.
Carburetor design (video)
For clarity, we suggest watching a video instruction about the design of carburetors and the principle of their operation:
Knowing the structure of the carburetor and understanding what needs to be connected where, you can easily disassemble, reassemble, clean and adjust it yourself, regardless of what brand and model of scooter you have, with some skill. All these procedures will not take much time and will help you save money on car services. The ability to carry them out will help you out when the engine does not want to start.
Source