Alfa moped wiring diagram: features of domestic operation
With the development of trade relations between Russia and China, in addition to traditional knitted goods and consumer electronics, various auto and motorcycle equipment began to be imported en masse to our country.
And since the domestic motorcycle industry was experiencing a decline, the new items were to the taste of motorcyclists and began to be purchased en masse for their own needs. Of particular interest is the ALPHA moped with an air-cooled engine, which is sold in the Russian Federation as “Alpha 110cc” or “Alpha 49”. The numbers in the name indicate the engine displacement:
- 49 cc four-stroke air-cooled engine. cm, power 4.5 hp;
- 110 cc four-stroke air-cooled engine. cm, power 7 hp.
Mopeds, due to their external resemblance to motorcycles, differ from scooters, although they represent a separate class. However, the combination of technical parameters, ease of do-it-yourself maintenance and low operating cost have made this moped a sales leader on the Russian motorcycle market.
Appearance of Alpha RX
Alpha RX is an updated version of the previous classic moped. The new moped has become more interesting and elegant in appearance. The exterior has a modern look which I liked. The tank has been updated, a two-level seat has been installed - the passenger is now slightly higher than the driver. The passenger's visibility is now better. The wings are now made of plastic, but only the front wing is painted. This already saves the wings from corrosion.
The headlight became larger than that of the classic Alpha, a serious halogen lamp was installed, and the light became brighter. The rear shock absorbers have become more advanced in shape. The motorcycle is also equipped with serious lighting equipment - front and rear lights, turn signals with sound, high and low beams, a signal and a brake light.
Very easy to use. Repair is possible with a minimum set of tools, but you will have to stock up on additional open-end wrenches: 9, 11 and 15.
It comes in two versions for sale: with a 72 cc and 110 cc engine. But lately they have been supplied partially unserviceable with a 50cc piston that will need to be upgraded. These versions of the models are called Alpha 7 and Alpha 11.
These numbers are deciphered as follows:
- 7 is an Alpha, which after modification will become a 72 cc model.
- 11 is the Alpha, which will become a 110 cc model.
Initially, these models cost like “fifty dollars” and they will not be able to drive. In any case, they will have to be modified. But according to the documents, they are like mopeds with 49.9 cubic meters and there is no need to register them with the traffic police. The only thing you need is a driver's license of any category.
Starting current coefficient
There is another important nuance that must be taken into account - the inrush current coefficient. When most electrical appliances start up, their power consumption increases for the first few milliseconds. For example, a standard 800 W microwave oven has a starting current coefficient of 2, so in the first second its energy consumption will be 1600 W. In most cases, these coefficients are distributed as follows:
- All heating electrical appliances that no longer perform any functions (electric kettles, boilers, incandescent lamps, irons, heaters, etc.) have a coefficient of 1, that is, they do not consume more energy at the time of startup;
- TVs, computers, laptops and similar equipment have a minimum inrush current coefficient of 1.1.
- Most power tools (jigsaws, drills, screwdrivers, grinders, industrial hair dryers and similar devices) operate with a coefficient of 1.3-1.4.
- The highest coefficient (3-4) is for refrigerators, concrete mixers, vacuum cleaners, water pumps and air conditioners.
Thus, you can calculate that if, during a power outage, 3 incandescent lamps of 100 W each are on in your home, a computer is running at 400 W, a refrigerator at 600 W, and you decide to clean with a vacuum cleaner at 1800 W (starting current coefficient 2.5) then you need a diesel - a 5.8 kW generator or gas generator, while it is advisable to leave some reserve and install a 7 kW power plant. If you try to perform these operations with an electric generator whose power is 4 kW, unwanted overloads will occur and the protection system will work. Therefore, calculating the optimal performance of a home station is of great importance.
Fuse box in the trunk of a car
Description of the scheme
| A | Rear window defroster relay |
| B | Trunk lid release relay |
| C | Fuel filler lock actuator relay |
| D | Seat heater relay |
| E | Trunk Lamp Timer Relay |
| 1 | (40A) Rear window defroster |
| 2 | (10A) Heated door mirrors |
| 3 | (20A) Trunk lid opening drive |
| 4 | (25A) Fuel tank filler flap opening drive |
| 5 | (20A) Seat heater |
| 6 | (15A) Trailer electrical connector |
| 7 | (30A) Power seat right |
| 8 | (25A) Electric rear windows |
| 9 | (30A) Left seat electric drive |
Technical characteristics of the Alpha RX 110 moped
| Dimensions | Length/width/height – 1.84/0.52/1.02 m |
| Moped weight | 85 kg |
| Limit load capacity | The maximum load capacity of the moped is 150 kilograms. Just the other day my wife and I took a ride in an Alpha, where our total weight was 130 kg. It pulls briskly along the dirt road. The two of us flew up a steep hill in first gear. |
| Engine | 1-cylinder, 4-stroke |
| Fuel consumption | 1.9 liters per 100 km (at a speed of 40 km/h) |
| Starter | You can start the moped using either a foot starter or an electric starter. |
| Fuel tank capacity | The tank holds 10 liters of gasoline. I use gasoline grade AI 95. You can use no lower than AI - 92. |
| Oil in the crankcase | 0.9 liters |
| Power | Maximum moped power 7 horsepower |
| Tires | 2.5/2.75 on 17-inch wheels. The pressure in the front wheel is 1.8 kgf/cm. The pressure in the rear wheel is 2.0 kgf/cm. |
| Brake type | The moped has drum brakes on the rear and front wheels. |
| Transmission | Four-speed transmission with neutral gear between first and second gears. |
| Maximum speed | The moped reaches a maximum speed of 85 kilometers per hour with a 15-tooth drive sprocket according to the speedometer. |
| Ignition | CDI electronic ignition |
| Battery | 12 v, 7Ah |
Preparatory procedures
Where should you start first? Check all electrical connections on your scooter. Most of them can be found in the battery compartment. Make sure they are all tightly connected to each other. At this time, your scooter's battery pack will automatically check the main and individual battery connections. Bundles of wires should not hang freely.
Usually the battery compartment on a scooter is located at the bottom of the floor
Scooter engine initial test
Test the generator by making a direct connection to the battery. You will need to find an insulated wire to perform this procedure and cut 2 pieces approximately 20cm long.
- Raise the scooter so that the rear wheel does not touch the ground.
- Remove the battery cover and locate the 2 wires that come from the engine. Disconnect the motor wires from the controller - this is easy to do by unfastening the clamps.
- Using 2 wires, attach the first jumper wire to the red positive wire inside the motor wire clamp. Do the same with the black negative wire coming from the engine. Then take the red wire and make contact with the positive terminal of the battery and do the same with the black wire at the negative terminal.
- If the engine starts and the rear wheel rotates, the generator is fully operational. If the rear wheel does not rotate, then the problem is in the engine.
Air conditioning compressor from Chrysler
Around this time, I came across a refrigeration compressor and it turned out to be ideal as the basis for the engine I had planned. It was a Chrysler RV-2 automatic air conditioning compressor. The crank moved the pistons 90 degrees (V-twin design), with a 58.7mm bore and 33.4mm stroke.
In both cylinders, combined with the correct gas path, the displacement was 127.8 cc, which is more than double the volume compared to the Philips MP1002C engine. Being a refrigeration compressor, the design was made thoroughly and with sufficient margin of safety for such strong compression. In addition, this compressor contained a gerotor oil pump, which under pressure lubricated the edges of the large connecting rod bearings. Each aluminum piston had one compression ring and was connected through Alcoa aluminum connecting rods. This compressor turned out to be the most optimal for my idea.
Air conditioning compressor Chrysler RV-2
Years of development
Over the course of several years, I have designed and developed all the necessary components in order to adapt the compressor to work in a Stirling engine. I also designed a tubular support frame to support the engine. The frame is styled to resemble that used on a Philips generator set.
The heater head, displacer and inner cylinder are made of stainless steel 302 pipes of various sizes. I used a coil of copper wire as a regenerator. The cooler, located on the compression side of the engine, was made of aluminum tubes. Used a small 200 watt 12 volt belt driven generator that was originally purchased and intended to run on a garden tractor.
Here is this engine, called SV-2 MK I (Stirling V-2 Mark I):
Generator based on the Stirling engine SV-2 MK I (Stirling V-2 Mark 1)
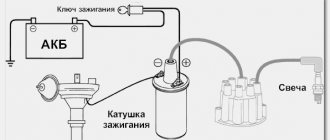
Checking the ignition coil
Disconnect the battery and remove the beak on the scooter. We disconnect the connector on the switch and measure the resistance on the coil with a meter. We put one probe in the connector on the black wire, and the second on the negative (green wire). There should be 4 ohms - this means that the wiring and the primary winding of the coil are working properly.
Next step.
We check the second winding of the coil. We take out the probe from the contact of the green wire and insert it into the candlestick instead of the candle. And we leave the other probe on the contact of the h/w wire. The resistance should be about 7.85 kOhm. This indicates that the second winding, the armored wire and the candlestick itself are in good working order.
And if the device shows a break (i.e. does not react at all), then remove and check the candlestick and armored wire separately. If they ring, it means a break has occurred in the ignition coil. It cannot be repaired, it is solid, you will have to replace it with a new one. It's inexpensive and you can always buy it without any problems.
Scooter generator inspection
Remove the generator base plate or cover and try to locate any burnt or melted wires, wire connectors, or electrical components. Also look for loose, disconnected or damaged wires or wire connectors. Pull and push on all individual wires and wire connectors to ensure they are not loose.
Sniff the engine speed control to make sure there is no burning smell. Any components that appear burnt or melted, or have a distinctive odor similar to burnt plastic, are almost always defective and should be replaced. Engines that smell burning should be replaced to prevent damage to the speed controller. Burnt or melted wires or wire connectors indicate overheating of the motor, which can cause the plastic insulation to melt the motors' electromagnetic copper wire windings.
If the insulation melts from the copper windings, a short circuit will occur, which will lead to complete breakdown of the generator. A short circuit can also burn out the speed controller by giving it too much resistance, causing it to work too hard to the point of overheating.
Electric Scooter Motor Test
Data on the health of electric motors is, in most cases, obtained using a braking test. Power consumption is calculated based on current and voltage. During the test procedure, the engine is freely accelerated and stopped to no-load speed. From the moment of inertia and acceleration, the engine torque is calculated and the power at full speed is set. Since the entire measurement time, depending on the size of the engine, is usually less than one second, the engine does not have time to warm up. During this time, it remains at room temperature.
Check the battery with the scooter running. If the scooter is running, you can perform a battery test on it by fully charging the battery and then checking how long the battery lasts. Most electric scooters will have a range of about 30-45 minutes. If the generator runs for less than 30 minutes, it is worn out and may need to be replaced. If the generator runs less than 20 minutes, it is moderately worn and should be replaced. Severely worn generators will only run for 5-10 minutes.
If you have a multimeter and the scooter is in working order, you can check the load on the battery pack by fully charging the battery. Next, lift the rear wheel, connect the multimeter to the battery, and give the scooter full throttle while engaging, but do not lock the rear brake. When you apply the rear brake, the battery will be "stressed" and you can then read its voltage to determine how much it drops. If the battery is in good condition, the voltage will only drop a few volts, however, if the battery is worn out, the voltage will drop more rapidly.
Batteries are an integral part of the operation of an electric generator. You won't get far without good batteries. Always use a charger recommended by the manufacturer. This charger should have an indicator light or sensor that will tell you when the battery is charged.
If you notice that your battery no longer holds the same amount of charge as it used to, this means your battery is getting old and you will need to replace it
Pay attention to corrosion and any chemicals that may be leaking from the battery. If you notice any leaks, replace the battery immediately
If you see corrosion on the battery terminals or connectors, clean the corrosion. Remember to charge the battery after the battery has cooled down. This will help extend the battery life.
Photo report: How to remove a scooter generator?
The generator is not such a simple thing and you will have to work a little to remove it. Well, in addition to everything, if you don’t have at least the minimum material and technical base nearby, then buy pullers for one thing. Unfortunately, there is nowhere without them. Of course, you can do without pullers, and such precedents have already been encountered in my practice, but they are not what we will be talking about today.
Our people don’t want to buy pullers and they put everything under the rotor and even try to knock it down with a hammer, and once I came across a scooter with a piece of some kind of metal welded to the rotor. They probably welded a hook and wanted to pull it off with a KAMAZ.
On the one hand, people can understand: why buy an expensive tool for a one-time job. On the other hand, I don’t understand people: why buy and personally damage a scooter with a hammer, if you can give it to a mechanic for repairs? A dilemma, whatever one may say.
The generator consists of two main parts: the rotor and the stator. The stator is attached to the engine crankcase and can be removed very easily, literally “by hand”. But the situation with the rotor is different. The rotor is mounted on a cone and clamped with a nut, and it is clamped tightly, and in order to remove it from there, you must first secure it from turning, then unscrew the nut and only then use a puller to pull it off the cone.
Travel rules
The moped is popular not only because of its budget. Another advantage is that you can ride a moped without having a license and without undergoing a technical inspection. At the same time, no one exempts the moped driver from knowing the rules of the road. A moped is considered more like a bicycle than a motorcycle. Therefore, the moped should not move in the general flow of cars, but as close as possible to the right edge of the road or along a bicycle path.
With a scooter things are a little different. A scooter is a type of motorcycle. Today, a law is being developed to revise the age limits for driving a scooter, as well as compulsory acquisition of a license.
Chinese mopeds
Single platform models
Today's realities are such that you can no longer see domestic models on public roads.
Times are changing, and the weakened banner of freedom from the hands of the domestic “Carpathians” and “Verkhovyna” was picked up by Chinese mopeds of the following series:
Let us state a fact: products from China have become widespread in the domestic motorcycle market.
- Alpha;
- Delta (DELTA);
- Dino;
- Irbis;
- Viper (VIPER);
- Zip Star;
- Leader;
- Mustang;
- Breeze;
- Dingo;
and other similar models, equipped with everything necessary for travel. These are all Delta “co-platforms” produced by the Chinese manufacturer Chongqing Wonjan motorcycle and the companies that bought a license from it.
For reference: It should be noted that Chinese technology has significantly displaced the products of domestic motorcycle manufacturers on the Russian market. This is noticeable not only in the form of finished products, but also in all kinds of components. For example, the Kovrov Motor Plant abandoned its own production of power units and installed the Lifan engine on its models.
Similarity of design
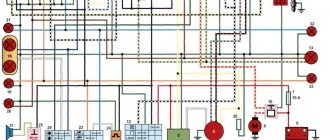
It is noteworthy that the electrical wiring of the Delta moped is similar to other models, which facilitates maintenance and increases the popularity of the vehicles.
Although seemingly complex at first glance, the electrical connection diagram is quite traditional.
Note! The photo above shows the wiring diagram for a Delta moped that does not have a tachometer on the instrument panel. It is identical for all models of this manufacturer, and differs only in the control of the semi-automatic transmission (Delta Racer model).
The video in this article will provide information regarding maintenance of similar models. For products with an instrument panel containing a tachometer, we publish part of the diagram, which also has differences in the controls. In this case, the wiring for the Delta moped is supplemented with several elements for connection.
The photo shows part of the electrical circuit of the Delta model with a tachometer
Setting up and testing the scooter
Check the power interrupt switch. This safety feature "interrupts" engine power when you apply the brakes. If your scooter does not work after adjusting the brakes, then the problem lies in this unit.
Adjustment procedures may vary depending on the scooter model. You can usually loosen the brake adjustment tension by turning the brake adjuster built into the handle toward the lever. This releases the tension on the adjustment and safety switch. Check the owner's manual or contact the motor manufacturer.
If this setup doesn't work, there is an easy way to test the generator. Disconnect it from the controller, then try to start the scooter. If the problem is with the switch, then the scooter will only work when the brake lever switch is disabled. Make sure the power switch is turned on.
Checking the scooter fuse
If the scooter uses a fuse, look at the inside of the fuse to make sure it hasn't blown. The fuse may need to be removed from the scooter and held up to a light source so you can determine whether it is blown or not.
fuse in scooter
For scooters that use an automatic fuse, press or flip the automatic switch to check its functionality.
Automatic power switch
Perform a test using a multimeter. Sometimes fuses burn out in a hard-to-reach place. Also, circuit breakers can mechanically reset but still not work. Testing the continuity of a fuse or circuit breaker using a multimeter is the best way to determine whether it is working or not.
Also try charging the battery for 8 hours. Electric scooters that have not been charged for more than 3 months will have their batteries partially discharged. Try charging the battery for 8 hours and then see if that helps.
The role of a generator on a scooter
As you already know, a scooter battery always needs current, constantly, and to provide this, a generator is included in the work, which charges the battery throughout its operation. If the battery does not need to be charged, the generator still works and, if necessary, immediately transfers charge to the device. Even though the power of the generator is several times higher than other scooter devices, if it is necessary to install an additional device, in any case it is necessary to remove some other energy consumer. Let's say you wanted to install another headlight, but to do this you will have to remove the old one, otherwise the generator will not be able to function normally.
Generator circuit for a 150cc scooter
This is the main task and operating principle of such a complex, but at the same time very necessary device. Repairing a scooter generator can be very complicated, so it's best to take this issue to a professional.
How to make a relay regulator with your own hands?
To make a relay regulator with your own hands, you need a diagram and a little knowledge. The model of a homemade regulator is based on the principle of disassembling the generator and outputting a separate end of the wire from ground.
As a diagram, you can take the relay-regulator connection diagram (Figure 3), and on its basis assemble a single-phase generator.
To collect the stabilizer you need:
- disassemble the generator and remove the stator from the engine;
- then you need to unsolder the ground from the generator, solder a separate additional wire for the winding to it and bring it out. This wire will be one end of the winding. The second end is the generator wire;
- After removing the wires, you need to reassemble the generator in reverse order.
With this device, the generator has 2 wires (there should be 3 in total). You can connect the stabilizer according to this scheme:
Do-it-yourself relay-regulator manufacturing diagram
At the end of the process, you need to connect the yellow wire from the old regulator to the “+” terminal in order to obtain a constant voltage on the sides of the network. Check the resulting voltage regulator on the scooter. At this point, the process of creating a homemade device can be considered complete.
The relay regulator is a very useful thing and necessary for the normal operation of the moped. However, it requires attention and constant monitoring of its work. Therefore, if the device fails or its performance is unsatisfactory, it is better to replace it with a new one, the cost of which today ranges from 300 to 500 rubles.
Supercharging (pressure injection in Stirling)
To obtain significant output power, it is necessary to increase the pressure in the working area of the engine. Knowing that the Philips engine operated at 12 bar (175 psi), I would like to have an engine that was structurally strong and compact to operate at these levels of internal working gas pressure. The working fluid was air, and it was chosen on the basis of practicality. I wanted my generator to be oil-lubricated, just like the Philips Stirling - this feature greatly contributes to the quiet operation and long service life that you really want in a Stirling engine.
Moped maintenance
Like any vehicle, Alpha mopeds require routine maintenance, the essence of which boils down to:
- Replacement of parts and assemblies whose service life has expired;
- Setting up and restoring the factory parameters of the main components and assemblies;
- Visual inspection of the moped to identify damage.
Chinese engines quite confidently “maintain” 20,000 km on our domestic fuels and lubricants without breakdowns or overhaul of the piston group. The main thing is to change the oil in a timely manner, especially during the break-in period.
If you do not operate the moped in harsh conditions (winter, cross-country racing, etc.), then all oil seals and rubber seals will also last a long time.
Service Features
Unfortunately, suppliers of motorcycle equipment do not always take into account the specific features of a particular type of vehicle, assuming that low price is more important. In particular, the majority of mopeds supplied to Russia under the ALPHA brand are not designed for our climatic and road conditions.
This manifests itself in the following:
- Most mopeds are used off-road (in rural areas, for trips to nature, fishing, etc.). And factory tires, alloy rims, springs and shock absorbers are not designed for such loads;
- The quality of gasoline and oil is also far from ideal, which affects the performance parameters of the moped;
- The moped is not intended for operation at sub-zero temperatures.
In the same way as wiring for an Alpha moped, other “diseases” of Alpha mopeds can be cured with the help of replacement. In particular:
- Factory tires are replaced with more wear-resistant ones;
- Alloy wheels are replaced by traditional spoked rims;
- Shock absorbers are reinstalled from domestic motorcycles.
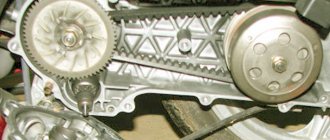
Engine Specifications
The moped is equipped with a 4-stroke air-cooled engine marked 1P39FMB. The marking means that the engine has a piston with a diameter of supposedly 39 mm and the engine has a volume of supposedly 49.9 cubic cm.
The advantage of such an engine is that there is no need to mix gasoline and oil. But unlike a 2-stroke engine, which is structurally simpler, here you need to monitor the valve clearance. Plus, the engine is equipped with an oil pump, a drive chain and a chain tensioner.
The gearbox on the Alpha RX moped is four-speed, like on the Voskhod motorcycle. But the neutral position is between first and second gears. The first gear is down and the rest are up.
900 ml of engine oil is poured into the engine crankcase. Oil can be filled with 10W-40. After riding the moped for 100 kilometers, I drained the factory oil and filled it with Zic engine oil. As soon as I complete the break-in, I will fill in more expensive Motul oil.
The moped is equipped with an electric starter, which can be used to start the engine by pressing a button on the steering wheel. The thing is convenient, but if the moto sits for a long time without recharging, the battery runs out. You have to start it using the kickstarter, which is located on the right side of the moped.
Kickstarter is not conveniently located. It gets in the way when driving. Therefore, it must be installed at an angle, and not vertically! The kickstarter stroke becomes shorter, but it is enough to start the engine and it does not interfere.
I installed the kickstarter at the angle shown in the photo below. For me this is the best option.
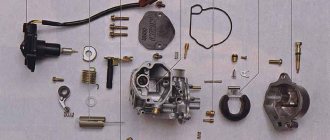
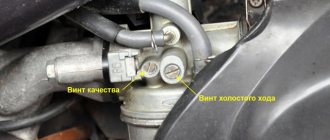
The Alpha RX moped is equipped with a PZ 19 carburetor, which has no suction. Inside there is a throttle valve with a needle on which there are 5 marks. Two idle speed adjustment screws are installed. This is a quality screw and a quantity screw. Plus there is a lever that blocks the access of air to the carburetor.
Scooter generator device
Hub engines have no disadvantages. First, they add extra weight to the wheel they power. And because they require additional wiring to deliver power, using wheels and changing tires is difficult. With this in mind, you will need to properly maintain your device.
Hub motor cones come in a variety of designs, and there are differences between designs. The smaller geared motor offers an increased rpm range but less power. Gear-type motors are usually large and heavy, but they provide more torque and power to an electric scooter. They are more efficient than gear motors. However, no matter what the design of the generators is, the principle of their operation is the same, which means the maintenance is the same.
Scooter generator device
Taking care of your electric scooter is key to maximizing the performance and usability of parts and components, especially engine components. If you know what kind of motor your device runs on, this article will help you know how to properly test your scooter electric generator.
How to check PP with a multimeter on a moped?
The relay regulator on a Chinese scooter is checked using a multimeter with a voltmeter function. For this purpose, a simple DT-830 (or equivalent) is usually used. It is better to carry out diagnostics and measurement of output voltage with the device removed.
Verification algorithm:
- You need to unscrew the fairing with the central phase and find on the frame a device with 4 wires: red, green, yellow and white.
- Then start the scooter and check the voltage at idle: measure it between the green and red wires, setting the multimeter to the maximum value of 20 V.
- If the multimeter display shows a figure of 14.6-14.8 V, this is normal. For stabilizers on Chinese mopeds, this is the operating standard voltage. If at idle the multimeter shows a value of 15-16 V, this is a high voltage indicator. This indicates a malfunction of the relay regulator.
- Then you need to check the voltage supplied to the lighting lamps. An alternating voltage is supplied to the central low beam (high beam) lamp, so the multimeter should be switched to the alternating current measurement mode with a parameter of 20 V.
- Next, we measure the voltage between the green and yellow wires (green is the general electrical network of the moped). If the multimeter shows a network voltage of up to 12 V, then the electrical appliances are operating without additional load.
- If at idle this value is 16 V or higher, and with a sharp increase in engine speed it jumps to 25 V, the device does not stabilize the voltage and, therefore, does not work. With such readings, the device must be replaced with a new one.
Using a multimeter, they check the relay regulator on a Chinese scooter.
In order to make a measurement, you need to:
- switch the device to the “KiloOhm” mode and remove the regulator;
- then place the probes on the first pair of terminals (AB). The tester should show a value of no more than 18 kOhm;
- after that, we change the position of the probes on the terminals in the opposite direction (VA) and measure the voltage again - the arrow on the device should show 0;
- then we install the probes on the next pair of terminals (SD) and measure the readings on this pair;
- swap the probes (DS) and measure the indicator again;
- the remaining measurements have no contact and are not checked. The indicator when checking them should be zero.
In this way, regulators are tested on popular Japanese models with small engine volumes from brands such as Honda (Leard, Dio, Tact), Suzuki, Yamaha.
Replacing a faulty relay regulator on a scooter is not difficult.
Ignition circuit elements.
Electronic tachometer on the dashboard.
When the turn signals are on, it makes characteristic clicks with a frequency of about 1 Hz. Also, you cannot replace lamps with more powerful ones. Due to the electronic circuit of the regulator, the voltage on this wire is converted into a pulsating one, and is supplied to powerful current consumers - low and high beam lamps, as well as dashboard backlight lamps, there may be several of them.
This is what the relay regulator looks like on a scooter. Due to its primitive circuitry, the relay-regulator often fails. Basic Concepts In order to understand wiring, you need to understand a little about the types of current. The starting relay receives a thick red wire from the positive terminal of the battery. The alternating voltage is removed from the white wire and supplied to the relay regulator for subsequent straightening and stabilization. The start relay is located on the right side of the scooter frame. This is an ordinary key switch that switches the positive voltage from the relay-turns the gray wire to the lamps. There are three wires coming from the sensor. The fuel level indicator, tachometer, sound signal, turn relay, and ignition circuit are also ready for operation. Experienced owners, after purchase, replace it with rubber-insulated wiring. Also, you cannot replace lamps with more powerful ones. The toggle switch must be powerful enough, because the entire electrical circuit of the scooter is, in fact, switched through the ignition switch. Wiring Operation The large black wire connects: 2 yellow ones, green and red, where direct current flows. Valuable tips It is no secret that wire insulation is made of cheap plastic and it is better to replace the insulation with rubber before it crumbles after a few rains.
This can be easily fixed, but the wire will have to be shortened by 0.5 - 1 cm. But if we “walk” along the high-voltage wire from the ignition coil, the wire will lead us straight to the spark plug cap. Lamp power 25W, supply voltage 12V. Ignition coil 2. Moreover, which is typical, a fairly large number of beginners decide to buy a two-wheeled vehicle, choosing Alpha mopeds.
Therefore, you should not pull the wire too hard, otherwise you can pull the wire out of the cap. Structurally, the ignition coil is located next to the start relay. Therefore, if at idle the lamp shines very brightly, and not at full intensity, then it is better to turn it off and check the relay regulator. Alpha 72 (Voltage Regulator)
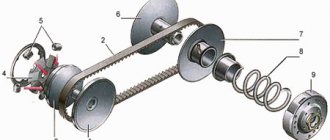
Generator operating principle
As you already understand, the generator is the most important device of the scooter, and it is capable of producing only alternating current. But there are many cases when headlights, batteries and other devices only need direct current. And before we begin to consider this problem, we will study the concepts of alternating and direct current. Any type of electric current is a stream of charged particles, in other words they are called electrons. In the case of direct current, energy generation occurs without changing direction or magnitude. When the generator operates using the alternating current method, the flow of particles always changes direction and magnitude. Accordingly, to operate alternating current, batteries are required, which are found in most household devices. They allow devices to operate with alternating current, but in turn require a direct current source to charge them directly.
Let's move from theory closer to precise examples, and take a regular scooter battery that needs to be charged from direct current. To convert direct current into alternating current, a rectifier is installed on the scooter. Then the voltage relay comes into operation, supplying only the required amount of electricity. This relay is considered a rectifier. As a result, normal operation of the scooter is ensured by the current generated by the generator in the required amount, previously passed through the voltage regulator. So depending on the speed of the crankshaft, your scooter produces a corresponding amount of electricity.
JavaScript is disabled in your browser
Today, modern mopeds are equipped with a huge number of different electronic devices, which naturally operate using electricity. Whatever one may say, even a rechargeable battery needs current, so it requires periodic charging. Optics, battery, starter, tail lights and other electronic devices depend on the generator. The scooter's generator plays a major role in the correct operation of the moped, and the simplicity of its design should be like the ABCs even for novice motorcyclists. After all, this is classical physics - a school curriculum!
The moped generator is a simple flywheel magdino. Electric current is supplied directly to consumers during the rotation of the crankshaft, or more precisely during operation of the power plant. When the flywheel and magnets rotate, electricity is generated. A special charging coil is located inside the flywheel. The magnetic field oscillates in the coil itself, which leads to voltage indication.
A scooter's generator produces only alternating current, but some moped devices require direct current. For example, the battery is charged only with direct current. Let's figure out together how direct current differs from alternating current?
Homemade voltage regulator.
Greetings to all! Somehow my voltage regulator (not a relay-regulator, don’t confuse it) on a Chinese 4-stroke “fly”; I wasn’t planning on buying a new one, since the standard LV on all 4Ts is crap, so I went online to look for a diagram. I didn’t have to search for long; I found a very simple and cheap option: a shunt RN. But for proper operation, it was necessary to disassemble the generator and disconnect the wire from ground, and lead it out with a separate wire.. Well, okay, I won’t explain further, because not everyone knows about electrics. In Chinese 4t, as a rule, these are the launch vehicles: The circuit is crap, the efficiency is crap, the resource is crap
Let’s assemble this one (For a single-phase generator, in our case): For a three-phase one: We have two options for connecting a homemade LV, I won’t drag it out and tell you what and how: The first option (with alteration of the generator): 1) We disassemble the generator, remove the stator from engine and this is what we see: Important: Where it says “The mass needs to be soldered off” we solder a separate wire onto the winding and bring it out, this will be one end of the winding. The other end will be the white wire. That's it, we're done, putting the generator back together
It should turn out like this: That is, we have two wires coming from the generator (Actually, there will be three of them, but we will need two). I won’t describe the connection of the LV further, I’ll show you a better picture: Done, all that remains is to connect the yellow wire from the old LV to the “+” of the battery. With this, the first version of the alteration is completed. Now our board. the network has a constant voltage.
pitstopsaki.com
Factory puller
The rotor can be removed using either a factory puller or a homemade one. The option with a factory and homemade puller has its pros and cons. I'll start with the disadvantages of the factory puller.
The main disadvantage of a factory puller is its price. A factory puller is very, very expensive. About 500-600 rubles. But price is essentially not a very important criterion for me. Versatility, reliability, ease of use and durability are much more important to me. Unfortunately, the factory puller does not have all these advantages, except perhaps ease of use.
The versatility of the factory puller is zero and, unfortunately, it is only suitable for a certain series of engines. And if you need to repair a scooter that is not widely used in our country, then you will also have to buy a new puller for it. And this will be very, very difficult to do, since tools for rare models of scooters are as rare on sale as spare parts.
The reliability of the factory puller is extremely low. I won’t say that the problem is in the design itself, rather the opposite: the design is more than perfect. And it’s much more perfect. Nut + bolt - that’s all its design.
But the quality... There is something to discuss here. The quality of factory pullers leaves much to be desired. They are enough for literally several times, and I’m talking about expensive pullers for 500-600 rubles.