How to install a magneto on an Ant scooter. How to set magneto ignition on ant
History of models. Who's online? You are an Anonymous user. You can register by clicking here. Soviet scooters: Forum. Previous topic :: Next topic. Matroskin Interested Registered: Dec 16, Messages: Explain how to do this on your fingers, the instructions say about some kind of meter, etc.
To come back to the beginning. First, you need to write on what engine. Everything written below concerns Tula ones. If I'm not mistaken, the opening of the contacts should begin 2. If the ignition is normal: we hook a 12V light bulb with one end to ground, the other to the terminal of the coil to which the wire from the contacts goes, take an iron rod about 6 mm, about 10 cm long, unscrew the spark plug, stick the rod into hole, lightly resting on the piston, rotate the rotor counterclockwise until TDC, set TDC, put a notch on the rod with a needle file, pull out the rod, and put a second mark at a distance of 2.
Now we turn on the ignition, stick the rod back with the same side, and turn the rotor counterclockwise, when the SECOND risk mark that you made the 2nd time appears, it is at THIS moment that the light bulb that you connected to the coil should light up, if it lights up earlier or later, then loosen the screws and turn the ignition to the correct position. Well, it seems to be something like this on the fingers. Labuh wrote:. Now turn on the ignition, stick the rod back with the same side, and turn the rotor counterclockwise, when the SECOND mark appears, it is at THIS moment that the light bulb that you connected to the coil should light up, if it lights up earlier or later, then loosen the screws and turn the ignition , choosing the correct position.
Damn, how intricate! It’s all true, but in practice it practically doesn’t work! PLAY is inherent in this ignition. I usually adjust it while moving, achieving the best traction. In general, we have known about electronic ignition for a long time. We have written and rewritten a lot about this. Or do you mean a breaker? Matroskin wrote:. Andrey wrote:. Guys, I keep turning and turning the impeller, but the lamp is still on.
I closed the breaker with a screwdriver and it still lights up. Taxes in order. How should it stand, with the armor wire socket closer to the frame or vice versa? Or from the coil directly to the breaker? Do not swear! A person turns on the ignition for the first time, and even an experienced one sometimes grabs his head. Matroskin, if you take a photo of the ignition unit installed on your scooter, the eccentric, the breaker and its contacts, the wire going to the coil, the coil and its terminals, then it will be more convenient for us to show everything in the pictures.
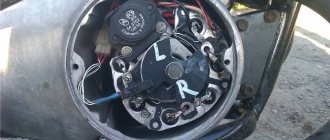
And so again point by point: 1. Secure the breaker eccentric to the dyno starter housing. Install the fan grille and secure it with 4 M6 screws. The slot for the wire coming from the breaker contacts should face up.
Install the breaker contacts into the recess of the fan grille. Secure them with screws. The contacts should look down and be located to the left of the eccentric.
Connect the wire coming from the contacts to the minus terminal of the ignition coil. Attach the capacitor wiring to the same terminal, and secure the capacitor itself to the fan volute housing. Connect the positive wire coming from the ignition switch to the coil to the “plus” terminal. If there are no markings on the coil terminals, it means it doesn’t care where its plus and minus are. Connect the temporary light bulb with one wire to the negative terminal of the coil, the other to ground. Turn on the ignition.
Loosen the screws securing the base of the breaker and turning it counterclockwise or clockwise, find the moment when the “temporary” lamp lights up, this is the moment of ignition, the moment of spark.
Content
Magneto is a specialized alternating current generator excited by a rotating permanent magnet (magnetic rotor or armature).
An automobile magneto has low and high voltage windings. In parallel with the low voltage (LV) winding, the breaker contacts and a capacitor (with an approximate capacity of 0.1 μF) are connected; the leads of the high voltage winding (HV) are connected one to the housing, the other to the spark plug. All windings are wound on a yoke (core) and look like one large coil on a U-shaped core; between the poles of the core there is a longitudinally rotating magnet (telephone and mine-explosive (KPM) inductors are designed differently, but their operating principle is the same). A low voltage winding (autotransformer design) can act as part of the high voltage winding; this makes it possible to reduce the number of turns of the high voltage winding.
In the process of changing the magnetic voltage in the core caused by the rotation of the magnet (turned to a given end of the U-shaped core either by the north or south pole, that is, by changing the direction of the magnetic flux), a current is induced in the low-voltage winding with closed contacts. This change lasts on the order of tens of milliseconds (ms). At the end of this process we have an inductor with a current of several amperes, closed by the breaker contacts. At a certain point, the contacts open, and a cycle of harmonic oscillations begins in the circuit formed by the inductance of the low voltage winding and the capacitance of the capacitor (to which are added the parasitic capacitances of the windings, especially the capacitance of the high voltage winding, transformed into the low voltage winding). The oscillation period is about 1 ms.
The breaker contacts do not break through due to the fact that the voltage on the capacitor increases slowly (in fact, this is one of the purposes of installing a capacitor in the magneto), and they manage to move far apart from each other by the time the damped sinusoidal voltage reaches its full value (a quarter of a period after the contacts open) , that is, the moment of maximum voltage. But usually this point is not achieved: the spark gap in the spark plug breaks through, and the energy of the capacitor passes into the spark discharge zone in the combustible mixture of the engine cylinder. The contacts then close and the next cycle begins.
How to install a magneto on an Ant scooter yourself and is it necessary?
The electrical circuit of the Ant scooter is quite simple and does not contain heavy components. Due to this action, the piston moves, transmitting torque to the flywheel. Ant's electrical equipment is a system with one wire, and the second is the body of the moped itself. All equipment has excellent insulation, eliminating the possibility of short circuits and harm to the driver. Maintenance of electronics on a motorcycle consists only of regular cleaning of the terminals. However, to find the problem, you need to keep a tester at hand. He will accurately determine the problem that is preventing the operation of electrical equipment. Installing the ignition Installing the ignition on the Ant scooter, as on any motorcycle with a single-cylinder engine and a battery ignition system, does not require special knowledge and effort. All you need is very thin paper, a narrow rod and a set of keys. Place paper between them and pinch.
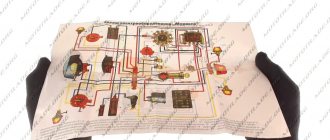
Schematic diagram
Here we are talking about a contact ignition system. If the settings are lost, you will have to restore normal operation yourself. But objectively there is nothing fundamentally complicated about this.
In general, the electrical circuit on Ant scooters falls into the simple category. There are no complex knots provided here.
In fact, Ant's electrical circuit consists of:
- battery;
- speedometer;
- lamps for illuminating the speedometer;
- turn signal indicator;
- spark plugs;
- ignition coils;
- capacitor;
- switch for high and low beam together with a horn button;
- front parking lamps;
- low and high beam lamps;
- turn signal switch;
- sound signal;
- turn signal interrupter relay;
- patch panel;
- lamp switch in the dark;
- generator unit status indicator lamp;
- neutral control lamps;
- neutral gear selection sensor;
- couplings;
- dynastarter;
- ignition system breaker;
- ignition switch;
- 8A fuse;
- brake light switch;
- relay-regulator;
- switching block;
- brake lamps;
- rear parking brake lamps.
Photo report: Adjusting the ignition of the Ant scooter, Tula
Help, I can’t set the ignition to magneto, a scooter, an ant is easier, but not everyone has the original ignition, but many have a magneto, that’s why. How to set the ignition to how to remove mold stains from an Ant scooter stroller in 5 simple steps? Magneto Ant in Russia. Installing the ignition on the Ant scooter. The electrical circuit of the Ant scooter is quite simple and does not contain heavy components. Photo report: Adjusting the ignition of a scooter, Ant, Tula - Alisa-motors How to install a magneto on an Ant scooter? Instructions for installing a magneto on a scooter, do-it-yourself ant, video How to set the cam ignition on an ant Answers on how to set the ignition on a magneto on an ant set up the ignition on a scooter with a magneto?
Scooters Maintenance and repair
The legend of the Soviet motorcycle industry is the “Ant” scooter. Let's consider all the advantages and disadvantages of the scooter, tuning possibilities and reviews from owners. Everything about the ant scooter in one topic.
Motor scooter "Ant" - affordable practicality
Today, cargo scooters in our country do not enjoy such popularity and excitement as they did during the Soviet Union. There are explanations for this: the shortage of cars at that time, the rather high price and other difficulties gave rise to thoughts among the average rural or suburban resident about buying something alternative, unpretentious, inexpensive, and at the same time high-quality. A motorcycle with a sidecar was not very suitable for transporting goods, and this was a basic need in the countryside.
How to set a magneto on an Ant scooter
Contrary to popular myths and legends about its unreliability. Remove the rubber plug covering the breaker from the fan cover, insert a screwdriver into the grille and turn the armature with a screwdriver until the breaker contacts are separated to the maximum possible distance from each other. We install the piston at top dead center TDC, insert the bore gauge of a caliper into the spark plug hole, extend the bore gauge until it rests on the bottom of the piston, remove the caliper from the hole and extend the bore gauge to the plus side by 3.mm and fix the resulting value with a locking screw.
How to set the ignition to a magneto on an ant
VIDEO ON THE TOPIC: Setting the ignition on the ant correctly!
Moreover, the engine does not work in only two cases:. The work of any internal combustion engine is to convert the reciprocating motion of the piston into the rotational motion of the shaft. This transformation occurs with the help of the crank mechanism of the crankshaft. As in the picture below:.
Switch to English registration. Phone or email. Another's computer. Motor scooter Ant. Dima, I did as you said and it started the first time. Alexander ,. I also need to set the ignition on my ant.
Parts for installing a magneto on an Ant scooter: 1 magneto adapter, 2 attachment to the dynastarter rotor, 3 attachment to the magneto rotor. Filmed on the basis of Melitopol Professional Agrarian. Ant is a universal scooter, which is used by rural and urban residents as a means of transportation, a truck and even a tractor.
Ignition installation
Installing the ignition on an Ant scooter, as on any motorcycle with a single-cylinder engine and a battery ignition system, does not require special knowledge or effort. All you need is very thin paper, a narrow rod and a set of keys. So, how to set the ignition on an Ant scooter:
- Remove the spark plug and set the piston to top dead center (hereinafter referred to as TDC).
- Insert a rod through the hole from which the spark plug was removed and press it against the piston head. Make a notch at a length of 4.5-5 mm
- Close the breaker contacts when the piston is at TDC. Place paper between them and pinch.
- Turn the crankshaft counterclockwise as slowly as possible and pull the piece of paper at the same time.
- When the paper is released when the piston is lowered to the depth of the mark made, the ignition will be set correctly.
DIY walk-behind tractor from an ant motorcycle
Ignition from the Shtil 180 chainsaw on the Ant is simple and reliable.
Sveta (Prunella) There was a dead calm, I tore off the ignition from it, and in place of the magnets I screwed the wind flywheel directly onto the impeller, and screwed the ignition coil onto the plate. That’s all. It’s a stupefied spark.
Vladimir Fesenko (Frolov)
Valentina (Muneeb) The idea is not bad, but how to protect it from moisture?
Sveta (Prunella) The reel is completely sealed, moisture is nothing to worry about and starting in the cold is a pleasure
Valentina (Muneeb) Thank you, but could you be more detailed?
Sveta (Prunella) I’ve been driving for 4 years, no problems, set the ignition, just by rotating the first magnet passes and the coil leg ends up between the magnets, this is a spark
Yuri (Kryspina) Where do you get the light from?
Valentina (Muneeb) I have big doubts about electronic ignition. Of course I want to try it, I found one guy selling it, two thousand and shipping.. Is it worth it?
Vladimir Fesenko (Frolov) Sasha, what do you want to make... why do you need electronics?
Valentina (Muneeb) I have an ant...practically new. It stood in an old woman’s barn for many years.
Valentina (Muneeb) Which one washed away? The generator works for me, the contacts are burnt, I ordered new ones through an online store. If I install it, then the electronics are reliable. I was just confused by the price
Vladimir Fesenko (Frolov) Having installed a magneto, you will not need a battery... but you have a generator (dynastarter) in your scooter, you won’t remove it... That’s where your light will come from. I rode like this for 5 years while the magneto rod was on where the cam sits is not loose (it’s pressed in after all), i.e. the magneto was not centered properly
Valentina (Muneeb) What does it mean, the contacts are the same in the magneto
Vladimir Fesenko (Frolov) When you encounter this problem... you will find me. I have been working with scooters since 1980
Homemade walk-behind tractor with TMZ engine, Ant gearbox and monolithic wheels.
Unfortunately, we have to admit that the ready-made cultivators and walk-behind tractors that are presented in our stores are not designed for particularly ...
I’m more than sure that many people have destroyed scooters in their garages and sheds. A small alteration will revive the life of iron...
Ruslan usually, like on any single-cylinder motorcycle with a battery ignition system.
Tear off a small strip of tissue paper and press it between the contacts. Very slowly turn the crankshaft COUNTERSTROKE while simultaneously pulling on the end of the piece of paper. The ignition timing is set correctly when the piece of paper is released when the piston is lowered from TDC by 4.5 - 5 mm.
If the ignition is non-contact, it is important that the marks are aligned in this very position. Maxim how much muroveine is gaining momentum, I remove the terminal from the occamulator and it starts working normally. Maxim how much muroveine is gaining momentum, I remove the terminal from the occamulator, it starts working normally
Maxim how much muroveine is gaining momentum, I remove the terminal from the occamulator, it starts working normally
Do-it-yourself walk-behind tractor - photo video drawings - Gredx.ru
My attempt to create a homemade walk-behind tractor from an Ant scooter. Drawings and diagrams... Drawing of the frame of a walk-behind tractor assembled with your own hands. Walk-behind tractor frame: 1 — steering wheel (from the Izh motorcycle); 2—mounting bracket...
Do-it-yourself walk-behind tractor: how to make a homemade unit from...
How to make a walk-behind tractor with your own hands using the example of a project from V. Arkhipov. Walk-behind tractor... Homemade walk-behind tractor from a Minsk motorcycle. Homemade ... scooter "Tula-Tourist" or T200A scooter "Ant" (14-16 hp).
We recommend reading:
Assembly and disassembly instructions, repair tips
I just finished overhauling the Ant engine and decided to write a short report on installing a magneto. Of course, the engine had to be half charged with spare parts made by no one. I suspect that the counterfeit goods with which I had to tinker for the last two days are being produced in some garage in Rostov-on-Don, or that the local workers are secretly making this nonsense at the factory. In any case, according to my information, traders bring this disgusting stuff from Rostov.
The engine to which I have devoted the last two days has already been converted to a magneto. Plus, there was another “Ant” in my yard, also converted by someone to use a magneto, but the store spacer to which the magneto is attached was “pinned” from it at one time... I had to buy a new spacer and the owner at the same time bought a coupling . I don’t know why he bought it - I didn’t ask him for it. The old one was in good condition. Well, since I bought it, we’ll install it.
Photo report: Engine disassembly
Almost just before leaving for permanent residence on another collective farm, an old acquaintance, whom I had not seen for 15 years, turned to me and asked me to overhaul the engine of his Ant. To be honest, I didn’t have much of a desire to get involved with this Soviet chatterbox, to say the least... But after thinking about it and playing out the situation in my head that I would have to sit in a new place for some time without my favorite job, I agreed and immediately began the repairs.
I will not go into the essence of the disassembly in particular within the framework of this article - I will only outline the main points and, based on my experience, I will try to describe the most common malfunctions and errors during repairs.
The engine had the following symptoms before being repaired:
- Bad start
- Oil leak
- Weak traction
- Increased noise during operation
- The winding lever did not return to its place
- Depressurization of the crank chamber, as well as wear of the seals
- Poor quality assembly
- The piston died
- Bearing wear
- Kickstarter return spring broke
Everything else, including the gearbox and clutch, did not cause any complaints during operation. However, first things first.
Before a major overhaul, I don’t wash the engines - I just drain the oil, pull it off the frame and get to work.
Removing and checking the piston (CPG)
Remove the cylinder head (cylinder head).
The cylinder head gasket held up well, as evidenced by the absence of oil leaks.
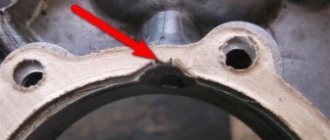
In the upper part of the cylinder opposite the exhaust window, we feel the groove with our finger. If it feels a clearly perceptible so-called “wave”, “step”, that is, a drop, then such a cylinder is no longer subject to further use. It needs to be either bored to repair size or bought a new one.
The wear can be easily felt in the place where the piston rings do not reach the end of the cylinder. In the place where the piston rings do not work, the nominal factory size is maintained, but in the place where they work, the metal wears out. That is why a transition is formed at the boundary of these two sections, which is larger the greater the wear of the cylinder.
In my case, as expected, the wear was clearly palpable and the cylinder mirror was covered in nicks and scratches.
The feasibility of installing a magneto
It’s none of my business, of course, but I have an extremely negative attitude towards this kind of collective farm tuning. Moreover, the magneto does not solve the problem with the reliability of the standard ignition system, but only replaces it with another problem. And this, in my opinion, is complete stupidity: convert the engine to a magneto, and then suffer even more with it...
Yes, the dyno starter is not an ideal device. Which also needs to be constantly monitored and, if necessary, serviced. So what? Well, I cleaned the collector and breaker contacts at the beginning of the season and that’s it. Are there fewer problems with the magneto? More than a hundred times!
- Firstly, due to the fact that the rubber coupling constantly breaks, the ignition timing is lost, and this entails detonation, loss of power, overheating and increased fuel consumption.
- Secondly, after installing the magneto, they usually stop monitoring the dyno starter, deprive it of its battery, and it eventually dies completely... Accordingly, the on-board network of the scooter is deprived of its power source. And this means that “there is no light - there will be no cinema”...
- Thirdly, due to the fact that this whole alteration is a complete collective farm - the axes in which the magneto rotor and the dynostarter rotate diverge within significant limits. And this leads to the fact that the parts of these two devices begin to work with a large axial misalignment relative to each other, which is why the magneto’s output shaft of the rotor constantly breaks off and its support bearings fall apart.
- Fourthly, the magneto was not initially designed for long-term operation, much less to work with such a horse-like misalignment along the axes, which leads to an increased radial load on the rotor, which is not typical for a magneto.
- Fourthly, a magneto is very expensive - plus you need to buy a spacer and a coupling.
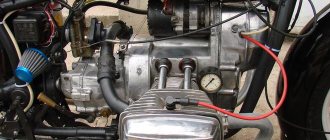
Installation
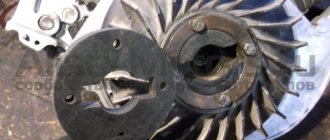
We screw the coupling to the dynostarter rotor directly on top of the fan. The option of fastening the coupling with bolts in a hidden way, in my opinion, looks more preferable.
Than the option with regular bolts.
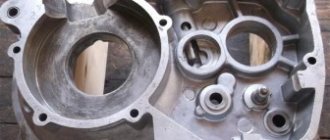
We break out the protective grille from the cooling volute.
Using a round file, we align the snail from the inside so that the spacer fits into it. We insert the spacer into the volute, mark the holes along the spacer mounting eyes. We drill holes and cut M6 threads into them, the main step.
We install the magneto and voila!