The electrical circuit of the Ant scooter is quite simple and does not contain heavy components. It is used for three main tasks:
- Ignition of the air-fuel mixture in the cylinder. Due to this action, the piston moves, transmitting torque to the flywheel.
- Starting a cold and warm engine.
- Supplying current to lighting fixtures and signal signs (turn signals, parking lights, brake lights).
Ant's electrical equipment is a system with one wire , and the second is the body of the moped itself. All equipment has excellent insulation, eliminating the possibility of short circuits and harm to the driver. Maintenance of electronics on a motorcycle consists only of regular cleaning of the terminals. However, to find the problem, you need to keep a tester at hand. He will accurately determine the problem that is preventing the operation of electrical equipment.
t0shkan › Blog › My BSZ in Tula
There is no need to convince anyone that contactless ignition is a really necessary thing.
Every owner of a motor vehicle puts it on literally everything that moves, even on hunchbacked Cossacks. But if you google about installing BSZ on Ant, then complete trash comes up. Someone came up with the idea of screwing a round curtain directly onto the shaft, which of course is logical. But there is not enough space for the sensor itself, as a result the casing is subjected to wild grinding, and all this hell sticks out outside the motor. It looks very ugly, and while in “Ant” there may be nothing, then in Tula it definitely looks like a collective farm. This solution requires the manufacture of an axis for attaching the curtain, and it is proposed to manufacture the curtain itself as follows: All videos on YouTube are dedicated to this particular implementation. I was able to find only one video where a motor with a BSZ is briefly shown, with nothing sticking out of the casing, but exactly how the author did it is left behind the scenes.
By purchasing the figure eight ignition components and playing with them, anyone can see that the dimensions and angles in the curtain drawing above are complete nonsense. They are absolutely unnecessary; a spark jumps out even if you rustle the sensor slot with the tip of a slotted screwdriver. In fact, when installing the BSZ you need to know only 2 things: 1) A spark jumps when the curtain halfway opens the sensor. 2) For the Ant motor, this moment should occur 3 mm before TDC. That's it, this information is enough to install the BSZ. After removing the impeller casing and examining possible mounting locations, it became clear that the sensor needed to be mounted from above. It won't interfere with air flow, and there's just enough room to mount the sensor to the crankcase, while the shutter can be attached to the flywheel. There are two options here: either attach the sensor without an adapter directly to the crankcase, in which case the curtain will have to be made in a Z-shape, or attach the sensor through an adapter, then the curtain will be a simple corner. I chose the first option. I drilled a couple of holes here:
And screwed the sensor into the standard holes
The curtain was made from an old mount for a three-inch drive. You can use an old case from any desktop, there is a good tin of just the right thickness, and there are ready-made neat grooves for adjusting the position of the curtain, if necessary. For mounting, I drilled a couple of holes in the flywheel and cut an M4 thread there (drill carefully so as not to drill through and damage the dynostarter winding). The depth of the hole is 7 millimeters. A long crank is convenient for cutting threads; in the photo there is a tin from which the curtain is cut.
How it all spins is clear from the video
Final view - the central hole of the casing is closed with a standard rubber band, everything is beautiful
Source
Photo report: Engine disassembly
Almost just before leaving for permanent residence on another collective farm, an old acquaintance, whom I had not seen for 15 years, turned to me and asked me to overhaul the engine of his Ant. To be honest, I didn’t have much of a desire to get involved with this Soviet chatterbox, to say the least... But after thinking about it and playing out the situation in my head that I would have to sit in a new place for some time without my favorite job, I agreed and immediately began the repairs.
I will not go into the essence of the disassembly in particular within the framework of this article - I will only outline the main points and, based on my experience, I will try to describe the most common malfunctions and errors during repairs.
The engine had the following symptoms before being repaired:
- Bad start
- Oil leak
- Weak traction
- Increased noise during operation
- The winding lever did not return to its place
- Depressurization of the crank chamber, as well as wear of the seals
- Poor quality assembly
- The piston died
- Bearing wear
- Kickstarter return spring broke
Everything else, including the gearbox and clutch, did not cause any complaints during operation. However, first things first.
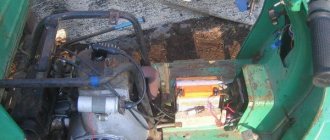
Before a major overhaul, I don’t wash the engines - I just drain the oil, pull it off the frame and get to work.
Removing and checking the piston (CPG)
Remove the cylinder head (cylinder head).
The cylinder head gasket held up well, as evidenced by the absence of oil leaks.
In the upper part of the cylinder opposite the exhaust window, we feel the groove with our finger. If it feels a clearly perceptible so-called “wave”, “step”, that is, a drop, then such a cylinder is no longer subject to further use. It needs to be either bored to repair size or bought a new one.
The wear can be easily felt in the place where the piston rings do not reach the end of the cylinder. In the place where the piston rings do not work, the nominal factory size is maintained, but in the place where they work, the metal wears out. That is why a transition is formed at the boundary of these two sections, which is larger the greater the wear of the cylinder.
In my case, as expected, the wear was clearly palpable and the cylinder mirror was covered in nicks and scratches.
A bunch of hay that blocked the flow of cooling air, in my opinion, did not add efficiency to the cooling system... How can you even drive like that?
The piston turned out to be burst and, moreover, according to the good old collective farm tradition, it was treated with sandpaper. As indicated by numerous risks on its surface.
After removing the clutch cover and removing the kickstarter shaft, the reason for the freezing of the winding lever was found - the return spring had burst in half.
The motor chain turned out to be stretched, but not critically.
Removing the clutch
Unscrew the nuts and remove the pressure plate from the basket.
Unbend the lock washer, insert a tin rod or stick under the tooth of the motor transmission sprocket and unscrew the nut on the crankshaft journal (right-hand thread).
Unbend the lock washer, fix the inner clutch drum with a puller, which is a clutch disc with a welded piece of tire, and unscrew the nut (left-hand thread).
We take out the discs and drum.
Remove the basket from the shaft along with the chain and sprocket.
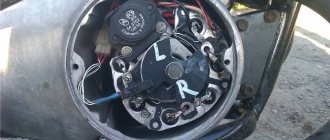
Removing the dyno starter
We remove the cooling casing and then, if the engine is not converted to a magneto, remove the ignition breaker cam. Hold the dyno starter rotor by the fan and unscrew the nut. If you cannot hold the rotor in this way, fix the crankshaft with something and unscrew the nut.
We pull off the rotor with a puller. The rotor can be pulled off either with a standard puller or with a homemade one. Depending on the situation, I use both standard and homemade ones.
Analysis of previous repair errors
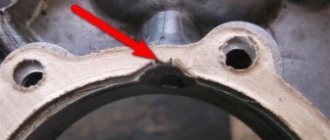
We remove the flange on which the stator is mounted and carefully inspect the connector plane for interference by “drop-dead handles”.
No matter how many times I repair Ants, I come across the fact that all sorts of “drop-dead little hands” seal the oil channel through which oil flows to the crankshaft main bearing and oil seal. I'm already tired, honestly - how much can you? Why cover it up?
It doesn’t matter to me, but how do you think the bearing and oil seal should work without lubrication? Admire what happens to the main bearing when it runs dry.
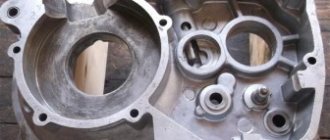
We unscrew the bolts and half the crankcase.
What's the result?
The crankshaft has been taken away - to say that it is worn out is to say nothing... The gearbox bearings, like the main bearings, have gone to the same place - to the crankshaft: in the trash. The gearbox, with the exception of one fork, did not cause any complaints. By the way, the clutch too.
Now the question is: what to do with all this junk? Buy a “plasticine” crankshaft from no one’s making and mold it into the engine. I was initially against this idea. In general, we found a used engine for a ruble and removed the crankshaft from it. Of course I had to tinker with him. Since the thread was clogged, I sharpened it and straightened it with a sharpening tool.
After correcting the threads, I checked the crankshaft for runout. There was no need to worry - the beating of the trunnions did not exceed one hundredth of a millimeter with a tolerance of three hundredths. By and large, it would have been necessary to replace the bushing of the upper head of the connecting rod, but time was running out and the bushing was not very worn. In all other respects, the crankshaft did not disappoint and this purchase can safely be called a success.
We decided to buy everything else: CPG, cylinder head, gaskets, seals, bearings, motor chain, etc. in the store. Although, by and large, the cylinder could have been bored out and that would be enough. But the owner did not want to wait, but in vain.
How to set the ignition timing on an Ant scooter so that the engine runs well and starts
In order for any internal combustion engine to start and “work well” (and it is the Internal Combustion Engine installed on your scooter), you need to supply fuel to it and then ignite it at the right moment. Moreover, the engine does not work in only two cases:
You are interested in the second case. So:
The work of any internal combustion engine is to convert the reciprocating motion of the piston into the rotational motion of the shaft. This transformation occurs with the help of a crank mechanism (CSM). How this transformation occurs is known from the elementary school “Physics” course.
For “good” operation of the internal combustion engine, all the fuel must burn in the cylinder within a very specific time - while the shaft rotates at a certain angle. Like the picture below:
Red, white, black carbon deposits on spark plugs: causes, diagnosis, problem solving
Spark plugs are installed in a car to perform two functions - ignition of the working mixture in the combustion chamber and removal of excess heat after detonation. Their competent operation seriously affects the traction properties of the engine, and if the engine begins to operate unstably at idle, with difficulty, you should pay attention to the condition of the spark plugs.
Car manufacturers include information in the technical data sheet on how often spark plugs need to be changed. But these values are most often exaggerated for marketing purposes, and the driver has to change spark plugs more often than the car’s developers plan. If you suspect a malfunction of the spark plugs, you can check their condition quite simply by paying attention to the color of the carbon deposits formed on the electrodes. This will allow you to determine which vehicle systems led to the failure of the spark plugs.
Oily black soot
A pronounced oily black deposit formed in the area of threaded connections and on the electrode often appears simultaneously with another symptom - blue smoke from the exhaust pipe when the engine starts. This type of carbon deposit on the spark plugs indicates that excess oil is entering the combustion chamber. This may happen for one of the following reasons:
- Worn oil seals on the valve;
- Worn piston rings on the piston;
- Worn valve guides.
As you can see, the problem is associated with worn parts of the cylinder-piston group. In case of such malfunctions, it is necessary to replace worn parts.
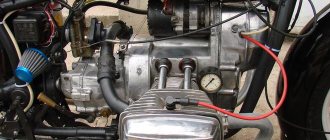
Electrical circuit of the motor scooter Ant 2M
The electrical wiring of the Ant 2 and 2M scooter (prototype – Tulitsa 2) is located at the bottom of the scooter. The cargo-passenger version is slightly different in appearance and electrical equipment. A more detailed power supply diagram of Ant 2M allows you to repair and tune the electrical equipment of the scooter.
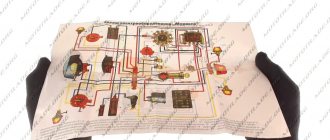
Download the electrical diagram of the Ant 2M scooter:
The dynostarter as a device is as far from complete perfection as our VAZ plant is from the premium segment. But if at least once a season you carry out competent maintenance of the collector unit, switching equipment, and battery, then with all its inherent shortcomings, the dyno starter can last a very, very long time, up to 30,000 km, or even more.
Schematic diagram
As for the Ant's ignition system, you can upgrade it yourself. You can reduce the current passing through the contacts of the breaker using a transistor switch TK-102 (Fig. 1), which was used on the most common trucks in the past, ZIL-130, GAZ-53A, etc.
Rice. 1. Connection diagram of the transistor switch TK-102.
The use of a transistor switch makes it possible to use a higher-voltage B-114 ignition coil, which has a large secondary winding (41,500 turns). Since the voltage on the spark plug will increase from 17 to 25.30 kV, you can use a spark plug with a gap of up to 1.2 mm, which will save about 30% on gasoline.
Red carbon deposits on spark plugs
If a car owner uses various fuel or oil additives, he may notice that a red carbon deposit forms on the spark plug. This is due to the combustion of chemical additives poured in excess. If a driver regularly uses certain additives and notices that his spark plugs are covered with red soot, it is recommended to reduce the amount of additives used next time.
The problem is typical if the additives used in the car contain manganese or lead. If you do not pay attention to the red carbon on the spark plug, a layer will form on the electrode, which will reduce the likelihood of a spark, which will lead to unstable engine operation.
If red carbon deposits appear on the spark plugs, it is recommended to remove it and also change the oil or gasoline, depending on where the additive was poured.
Diagnostics
The first sign that something has burned out, shorted or broken in the dyno starter or relay regulator is when, out of the blue, right in the middle of the road, your battery charge control lamp comes on.
If this happens to you, then the first thing you need to do is inspect the wires going from the dyno starter to the relay regulator, check the fuse, remove the cover from the relay regulator and at least visually determine the integrity of its elements, remove the rotor and see what’s wrong with the brushes and collector and if nothing suspicious is found there, turn to a very competent electrician for help.
Connection
This vehicle, like all other light motor vehicles, has a two-stroke engine. Firstly, the combustible mixture in the engine cylinder is ignited, due to which the piston moves and then rotational motion is transmitted to the flywheel. I think that the Tula Motorcycle Plant should equip at least some of its vehicles with a modern starter from the SZA motorized stroller and an alternating current generator. The new circuit ensures reliable engine starting and sufficient battery charge.
I think that the Tula Motorcycle Plant should equip at least some of its vehicles with a modern starter from the SZA motorized stroller and an alternating current generator. All equipment has excellent insulation, eliminating the possibility of short circuits and harm to the driver.
For the most part, the Ant motorcycle is designed to transport large loads, so it was not equipped with special lighting parts.
Starting a cold and warm engine. Make a notch at a length of 4.mm. Close the contacts of the breaker when the piston is at TDC.
The electrical equipment of the Ant scooter is securely mounted on the body of the scooter and has good insulation, so the likelihood of a short circuit is negligible.
We recommend reading:. →WIRING DIAGRAM TMZ ➧DISASSEMBLY, PRINCIPLES OF OPERATION
see also
Comments 10
If you still have a pressing question, send your email, I’ll send you a diagram for remaking the RR, very sensible, or look at the website motorscooter.ru
There is a dynastarter, and it has its own relay, with alternator-starter mode switching. It’s better, of course, to look for something native, but if you don’t have it, you can make something of your own if you have a specialist in electricity who understands. And the Lada transmissions, all these “tablets” and “chocolate bars” with old generators, work constantly. I installed the R-362 on a stationary diesel engine, as well as the R-356 on LUN generators, everything worked. Who is interested - www.reaa.ru/cgi-bin/yabb/YaBB.pl?num=1223834090.
You can’t put a relay from a Lada there, the generator design is not right.
VAZ CHOCOLATE, IF THE CURRENT IS 12 VOLTS, IF 6 VOLTS THEN THE CONTACT RELAY IS THE OLD LADY, WHICH IS ADJUSTABLE.
It’s better to look for something native, boo - they did it well before.
It won’t be a problem to find, you can hardly find analogues.
ready to sell this. write in PM
What happened to the original relay?
Is there a PP121 relay? It seems like the same thing should be on Tula... although I don’t know what’s easier to find.
Yes, in Tula it’s the same. order from the Internet or look on Avito in Russia, maybe there is something similar.
How to check the condition of the engine by sooting of spark plugs
It is believed that spark plugs are the best diagnostic tool if it is necessary to detect a malfunction that is associated with the ignition cycle of the working mixture. At the same time, you cannot draw conclusions about the condition of the engine by unscrewing the spark plugs after 10-20 or more thousand kilometers. Diagnostics are carried out exclusively on “fresh” spark plugs, but they must be run-in for 150-200 kilometers.
To check the condition of the engine by sooting of spark plugs, you must:
- Install new spark plugs;
- Drive them 150-200 kilometers;
- Unscrew the spark plugs and look at the color of the carbon that has begun to form on them.
READ Adjusting the Ignition on a Chainsaw
Attention: Check the color of carbon deposits on the spark plugs only when the engine is warm.
Glossy white carbon
Glossy white carbon deposits are dangerous for your car's engine and indicate that the spark plug is not receiving proper cooling. In addition to the spark plug, the pistons may also overheat, which will lead to cracks in the valve and result in an expensive replacement for the driver. Most often, the reasons for overheating of the spark plug and the appearance of white carbon deposits lie in the insufficient amount of fluid in the cooling system. Also, white soot with a “glossy” sheen may appear for the following reasons:
- A lean fuel mixture enters the combustion chamber;
- The inlet pipe sucks in excess air;
- A spark is missed or the spark plug produces a spark too early due to an incorrectly configured ignition;
- Incorrect spark plug selected for this engine type.
If a glossy white deposit with traces of metallic inclusions appears on the spark plug, you should show the car to diagnosticians as soon as possible or figure out the problem yourself. It is not recommended to operate the machine with such deposits.
Cleaning the collector
Take a small screwdriver and clean out the dirt between the slats. The collector must be cleaned very carefully so as not to scratch the lamellas.
After cleaning, blow the collector with compressed air, wash it with clean gasoline and wipe it dry with a rag. It is best to wash the collector with a brush: wet the brush in clean gasoline and wash it until the dirt is completely removed. When the gasoline has completely evaporated, take a piece of some lint-free cloth, moisten it a little in gasoline and carefully rub the collector with the maximum possible force until it is perfectly clean.
How to clean carbon deposits on spark plugs
As soon as the volume of carbon deposits reaches a critical mass, the spark plug will no longer perform its functions properly. To prevent this from happening, it is better to take care of its cleanliness in advance. This can be done using the two most effective methods - calcination and soaking.
During calcination, the surface of the candle is evenly heated using a blowtorch. After the spark plug has cooled, the remaining carbon deposits can be easily scraped off the electrode using a small brush.
Soaking takes a little longer and involves immersing the candle in a kerosene solution for several hours. It is not necessary to use this particular substance; you can find special liquid cleaners for removing carbon deposits on sale, they are also perfect for this purpose. Finally, all that remains is to wipe the candle with a dry cloth; the carbon deposits should come off completely.
Ensuring the smooth operation of the ignition system is one of the main tasks of a car owner, and regular checking, cleaning and replacing spark plugs is what will help him succeed in this matter.
In addition, timely diagnostics will help avoid serious problems with the machine. Spark plugs are a reliable indicator that will help you replace the fuel additive or air filter in time.
Sources:
https://jusof.com/zazhiganie-ot-trimmera-na-motoroller-muravej/ https://okeydrive.ru/krasnyj-belyj-chernyj-nagar-na-svechax-zazhiganiya/ https://zapavto.by/ blog-headlines/prichiny-nagara-na-svechax-zazhiganija
Contactless ignition Ant, Tula (FULL set of BSZ Muravey 2.5)
Topic of the section Homemade electronics, computer programs in the General Questions category; Hello everyone, I have an idea to install a spark ignition on my engine, I don’t have money to buy a specialized ignition, I want to make Forum Rules. Rules Advanced search. Forum General questions Homemade electronics, computer programs Electronic ignition circuit. Dear readers! Our articles talk about typical ways to resolve legal issues, but each case is unique. If you want to find out how to solve your particular problem, please use the online consultant form on the right or call the numbers provided on the website.
Source
Red carbon deposits on spark plugs
A relatively small percentage of motorists may notice red carbon deposits appearing on the spark plugs. This usually happens due to the fact that the owner adds special additives to the car’s gas tank, which include manganese or lead.
Another cause of red soot may be gasoline to which the manufacturer has added ferrocene, which increases the octane number of the fuel mixture. It is this substance that forms a reddish coating, which over time leads to deterioration of the ignition system and increased fuel consumption.
To get rid of red carbon deposits, you will have to stop using additives or change gas stations.