The Ant gearbox consists of high-quality manufactured parts that have a very long service life and are ready for immediate use. Despite this, sometimes you have to remove and disassemble this device, since nothing lasts forever. You can, of course, contact specialized technical services that have extensive experience in this field. But you can repair the gearbox at home, provided you have the tools, basic knowledge of mechanics and a reference book on this device. He will become an indispensable guide in this matter.
Reverse – “Ant” gearbox from the inside as seen by A. N. (part 1)
Reverse – “Ant” gearbox from the inside, as seen by A.N.
(part 1). For those buying a gearbox for the first time: the external difference from the SZD gearbox (wheelchair) is that the SZD has a longer lower oil filler neck and a more rounded part of the crankcase (at the location where the differential is installed). When the SZD gearbox operates in a classic configuration (motor with the cylinder forward), when moving forward, the gearbox, when moving forward, will work through an idler gear (it is not on rolling bearings) in reverse mode, which is short-lived (on a motorized stroller the motor is set “backwards and forwards”, and forward movement carried out without a “parasite”).
The number of teeth of the forward input shaft gear is 22.
The number of teeth of the reverse input shaft gear is 25.
The number of teeth of the shaft - the parasitic gear - is 22 (the crown is identical to the gear of the primary forward drive shaft).
The number of differential gear teeth (forward) is 47.
The number of differential gear teeth (reverse) is 52.
The crown of the gear - “parasites” in modulus and number of teeth corresponds to the crown of the kick-starter gear of the T-200 motor (Tula scooter), but the latter is 1.5 times narrower (12 versus 18 mm) than the original one.
Circumferential module of teeth m (according to Article CMEA 310-76) = 2.5 mm (for all gears of the gearbox).
The circumferential pitch of the teeth along the pitch circle is P = m x PI = 7.854 mm.
Center distances between crankcase axles:
- input shaft - parasitic shaft: 55 mm,
- input shaft - differential: 96.25+0.25 mm,
- parasitic shaft - differential: 86.25+0.25 mm.
Diameters of the circles of the tops of the gear teeth (Da) and the bottoms of the gear teeth (Df):
— forward input shaft: Da = 60 mm, Df = 48.75 mm,
— reverse primary shaft: Da = 67.5 mm, Df = 56.25 mm,
- shaft - parasitic gears: Da = 60 mm, Df = 48.75 mm,
— differential gears (forward): Da = 122.5 mm, Df = 111.25 mm,
— differential gears (reverse): Da = 135 mm, Df = 123.75 mm.
Gear ratio (forward) – 2.136; gear ratio (reverse) - 2.080 (roughly speaking, the gearbox reduces the speed (and, accordingly, increases traction) by half).
The input shaft is splined with 6 splines, like the sprocket of the Tula or Ant engine (chain on the wheel).
On the “original” axle shafts, the splined one is the same (the splined cardan of the Ural motorcycle fits it).
Used gear drive chain sprockets: pitch 15.875 (IZH-SZD) – 21 (there are 12, 10, 9 teeth),
pitch 12.7 (Ant, Minsk) – 11 or more teeth.
Bearings: input shaft - No. 000 (2 pcs), bore in crankcase ø 47 mm,
“parasite” shaft - No. 000 or conical 7203 (2 pcs), boring in the crankcase Ø 40 mm,
differential - No. 000 (2 pcs), boring in the crankcase Ø 72 mm.
Inner diameter of landing holes. for standard axle shafts in the differential box - 25 mm (for reference, the front beam pin of a Gazelle car (its diameter is 25 mm) can be used as a solid shaft for converting the gearbox into a gearbox with a locked differential for installation on a snowmobile for reversing. ). The differential housing is cast iron (a metal that does not respect welding)! For numerous options for switching to a solid shaft, see our forum.
There is no fixed neutral (you can make a groove for it on the fork stem). The slots on the shift shaft are like those on the Tula, Minsk, and Voskhod gearboxes.
It is possible to get rid of the “parasite” by switching to a chain drive (a shortened double-row chain and sprockets from the VAZ-classic gas distribution mechanism + a homemade damper made of caprolon). Carried out by Valentinich (interesting, are the timing chain sprockets not cast iron? And how is the chain shortened?).
It is possible to “mirror” the gearbox (transfer the drive sprocket from right to left to shift the gearbox to the right of the snowmobile axis and reduce the drive shaft console onto the track). Implemented by Radosnego.
It is possible to strengthen the gearbox housing (each half-crankcase is framed with a steel angle frame; in a standard crankcase, breakage of tides under the mounting studs is a common occurrence). Implemented by Radosnego.
Source
Assembly
I bought this main bearing. It seems to be our production. There are Chinese analogues in stores - they are more expensive, but I don’t know what their quality is... I try to buy something that may not be of such super-duper quality, but at least one that has been proven over the years.
The quality of production is such that there is essentially nothing to complain about. The price is quite reasonable - 350 rubles.
We press the inner race of the main bearing onto the right crankshaft journal. External - screw the stator flange of the dynostarter and press it into the crankcase until it rests against the flange.
We install the oil seal, retaining ring and main bearing into the left half of the crankcase. I'm installing a new main bearing. It is closed, but it doesn’t matter: we open it, wash out the factory grease and install it in the crankcase.
Lubricate all bearings and working edges of oil seals with clean engine oil. And very carefully, so as not to accidentally wrap the edge of the oil seal - insert the crankshaft into the left half of the crankcase, assemble the gearbox and knock out the crankcase guides by 5-6mm.
We degrease the crankcase connector, install a new gasket and install the second half of the crankcase.
We tighten the bolts and immediately, so that nothing gets into the crankcase, install the piston. I'm installing a new piston, cylinder head and reed valve body. The piston one, like everything else, is of no particular origin - most likely Rostov, but clearly not Chinese. I didn’t want to get involved with this counterfeit, but the owner didn’t want to wait until they bore the cylinder and put a liner in the cylinder head and insisted on buying it. You see the prices for spare parts - it’s up to you to decide whether to contact this new product or not.
We install the second main bearing into the crankcase and secure it with a retaining ring.
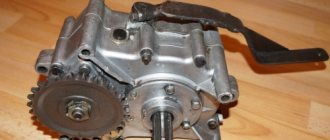
Photo report: Disassembling the rear gearbox of the “Ant” scooter
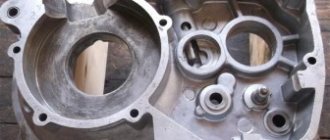
The gearbox that we are going to disassemble today had been lying in a barn for several years and was found there by pure chance. It would be a pity to throw it away, so it was decided to disassemble it and, if necessary, repair it, for further use as the basis of a homemade walk-behind tractor - no more, no less! Moreover, I have a practically new engine from SZD, which would be an excellent match for this gearbox.
Unfortunately, the technical condition of this gearbox was unknown; during the first inspection, some details became clear: The output shafts of the axle shafts did not rotate, nor did the drive sprocket... Most likely, the gearbox simply “caught a wedge.” Therefore, they removed him and threw him into a barn where he lay for many years...
We clean the housing from dirt, remove all excess, after removing the drive sprocket it turned out that the input shaft bearing had crumbled.
We unscrew the bolts holding the gearbox housing together, take a hair dryer, heat the housing evenly on all sides with a hairdryer, then take a wooden mallet and tap the housing until it separates into two halves.
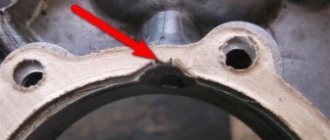
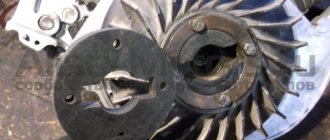
So the cause of the “wedge” was found - a crumbling input shaft bearing, but these are still “flowers”. During operation of the gearbox, the bearing balls fell between the gears, which led to serious damage to the teeth, and this is serious... Such gears will have to be replaced with new ones.
The damage to the teeth of the input shaft turned out to be the most significant.
Damage to the idler gear teeth.
Removing the dyno starter
We remove the cooling casing and then, if the engine is not converted to a magneto, remove the ignition breaker cam. Hold the dyno starter rotor by the fan and unscrew the nut. If you cannot hold the rotor in this way, fix the crankshaft with something and unscrew the nut.
We pull off the rotor with a puller. The rotor can be pulled off either with a standard puller or with a homemade one. Depending on the situation, I use both standard and homemade ones.
What is a gearbox?
The Ant gearbox is a special mechanism that transmits and converts angular velocity into one or more mechanical gears.
- cylinder (excellent reliability and high degree of performance, standardly applicable for transmissions and conversions of enormous power);
- globoid (high gear ratio, not very high efficiency, excessive heat generation);
- wave (has a reduced efficiency when compared with cylinder);
- spiral (very high load capacity, low weight, and size proportional to mass);
- combined (combines many gears, has an optimal cost, good technical components and a relatively small size).
The standard housing of this device is cast. Very often it is cast from high quality cast iron, in rare cases from steel. If it is necessary for the product to be as light as possible, then a material is used that melts quite easily. At the base of the case there are special “ears”, by which the device is attached to the base.
To prevent oil from leaking, a seal (oil seal) is installed at the shaft output, which prevents oil leakage.
To prevent an increase in internal pressure in the gearbox, it has unusual design features. It is they who do not allow the pressure inside the device to increase during heating of the device.
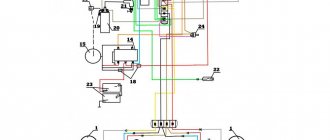
Dynastarter
However, it is not only the engine that can make a motorcyclist clearly see all the components of his motorcycle. The most common problem is a problem with the dynastarter.
. The engineers of the Tula plant installed it in Muravya, instead of a conventional alternating current generator.
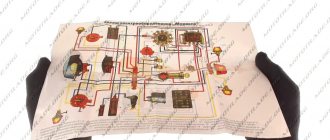
Why is it so important? If you notice a red light on the instrument panel while the moped is running, it means you are running out of charge. This happens because the generator is not producing alternating current. To begin with, in such a situation, it is necessary to check the integrity of the wires connected to the dynastarter and the relay regulator. If everything is in order, then the problem lies directly in the dynastarter. There may be three main causes of problems:
- difficulty in rotor operation (dirt getting into the collector or dust accumulation);
- freezing or wear of brushes;
- violation of the integrity of electrical equipment.
Since in most cases the operation of the dynastarter is difficult due to contamination of the collector, it is worth carrying out a simple disassembly according to the instructions described in the moped operating book. The main rules when working are neatness and cleanliness. After disassembly, be sure to thoroughly rinse all parts in gasoline and lubricate the rubbing parts, and under no circumstances throw away the parts.
Device Description
The Ant is much lighter than ordinary motorcycles, so everyone dreamed of owning one. The approximate weight was only 240 kg, which is small considering that it could transport loads several times heavier than itself. Actually, it is because of this that he received the name Ant.
Another advantage of the scooter was and is that you can buy it for a small amount of money. So, you can buy an Ant scooter for only 30,000-50,000 rubles.
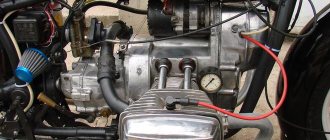
The Ant engine is single-cylinder. At the same time, it is quite voracious, so it’s hard to call a scooter an economical vehicle. After all, even a new Ant engine consumes about 8 liters of 80-grade gasoline per hundred, and what can we say about used equipment? After all, if the piston or gearbox is slightly worn out, then the costs increase to 10 liters per hundred. In this case, you can replace damaged spare parts, but it is not easy to buy them, since they are rarely found on sale.
Motor scooter engine Ant
You can buy an already assembled Ant engine, but such luxury is a little expensive.
In general, the Ant scooter is a very durable piece of equipment. The front wishbone suspension is especially well executed. It can last for decades. Many scooter users even claim that it is made better than modern versions of telescopic forks.
Nowadays, most fans of the Ant scooter install rear shock absorbers from a scooter instead of front shock absorbers, because the former are currently in short supply.
The rear suspension is independent. The gearbox drives the rear wheel. This is facilitated by a roller chain running through it. At the same time, the gearbox itself is made quite well. It is located in the very center of the rear axle, making it easy to remove if necessary.
Easy to repair
Thanks to its light weight, the owner of this equipment can easily turn over the Ant scooter, which will allow him to easily carry out repair work. To change a tube, tire or even gearbox, it is absolutely not necessary to remove the wheel.
The scooter is large in size, making the equipment excellent for work in rural areas.
The scooter can reach a maximum speed of 50-60 km/h.
ATV from "Ant": suspension
Repairing the dynastarter of an ant scooter with your own hands
You can use the suspension of a scooter as a front or rear axle. The choice is made by the master himself, but the first option is preferable. The rear suspension can be done in two ways:
- Take the rear axle from an old car, and then shorten it to fit the dimensions of the ATV. The disadvantage of this design is its significant weight.
- Cardan-gear type design. A gearbox is mounted on the rear axle, to which the drive is supplied.
An ATV requires an independent suspension that will have high ground clearance. Its levers are fixed to the frame using bolts through silent blocks. The front suspension strut must be inclined, otherwise the ATV may roll over.
How to disassemble?
The gearbox itself is removed from the Ant in a certain sequence. It needs to be disassembled if its operating functions are no longer satisfactory during operation. Sometimes it happens that when it breaks, it is sent to a landfill. But this is fundamentally wrong. This device can almost always be repaired, and it will continue to function and serve for quite a long period. Also, the “Ant” scooter is currently a rarity, and spare parts for it are extremely difficult to find. Therefore, there is no need to “throw away” them in vain.
- The first step is to remove the gearbox from the Ant without damaging it. Then clean the body from contamination and remove all excess.
- Next, you need to unscrew the bolts that tighten the body of the product, and warm up the entire device with a hair dryer. After this, you need to knock on the body with a wooden hammer. This is done until it is divided into 2 parts.
- The next step is to remove all the gears. To do this, you will need to bend the special plates and unscrew all the bolts that hold the body halves together. Then these body bowls are separated, and the corkscrew pin itself is removed. Next the wheel axle is removed. Then the retaining ring and the axle shaft are removed from the housing half.
The device itself is dismantled and mounted on a scooter quite simply, there are almost no problems.
Disassembling the gearbox will also not bring unnecessary trouble. But assembly will also require increased attention; you need to carefully assemble everything, not miss anything or confuse anything. Gears are made of high strength steel (alloy steel), so they very rarely become unusable or deformed. The main problem in most cases lies in the bearings. Therefore, regular and careful attention to these parts is required, in particular to elements such as oil seals.
Vehicle Upgrades
⚫ repair of the rear arch of a VAZ 2109. repair of the wing arch with your own hands. ♦diy cam♦
If your old bicycle, scooter or motorcycle breaks down, you should not sell the equipment for scrap. There is also no need to rush into buying a new motor. It can be replaced with a power unit from a light motor cultivator. There is only one restriction: such a car cannot be driven on public roads. But the Ant scooter with a walk-behind tractor engine can be used in the country for trips to a field or river. 5-6 hp engine quite enough to accelerate the moped to a speed of 50-60 km/h. Before installing the engine on a bicycle, it is necessary to install reinforced wheels on this vehicle that can withstand a weight of up to 100 kg.
In order to assemble a scooter with a walk-behind tractor engine, you will need the following tools and materials:
- welding machine;
- grinder with metal discs;
- electric drill;
- wrench;
- screwdriver;
- pliers;
- level;
- hammer;
- dye.
In order to install the power unit on the Ant, you will need to create a frame for it.
This is done in the following sequence:
- Drawings are drawn up, precise calculations of the frame configuration and attachment points are made. It is recommended to check the calculations on soft aluminum strips.
- The mounting bracket is welded. It is treated with anti-corrosion agents and holes are drilled for the bolts.
- The engine is carefully placed on the bracket and secured with bolts. The installation accuracy is checked and the position is adjusted.
- The motor is connected to the vehicle's chassis using a belt or chain. Gear shift cables and control levers are secured.
- Checking the functionality of the vehicle. The created homemade product needs to be run in so that all the parts get used to each other. You need to spend 6-8 hours on this with the engine running at medium speed.
If you have experience in handling household tools and knowledge in electrical engineering, you can assemble an electric excavator with your own hands. This will require channels, hinges, cables and a working electric motor. The bucket is made of sheet steel, which can be purchased inexpensively at scrap metal collection points.
Motor scooter repair Ant
Before starting repairs, you need to buy all the necessary spare parts and tools. Of course, you first need to diagnose the device in order to understand what the real problem is.
It is also necessary to take into account a few tips on how to change certain spare parts:
- If you want to change a tube or tire, you don’t need to bead the wheel at all. It is enough just to unscrew all the bolts securing it.
- The wheel begins to spin thanks to a roller chain running through the gearbox. At the same time, the rear suspension is completely independent.
- The gearbox can be easily removed without any additional tools, because it is located in the very center of the scooter.
Repair is accompanied by the following basic actions:
- drain the oil from the engine, then remove the engine and place it on some flat surface;
- remove the cooling casings and dynastrater;
- remove the final drive sprocket;
- loosen the clutch cover from the bolts and remove it;
- remove several clutch discs;
- after this it will be possible to easily remove the basket along with the chain and sprocket, the washer and the bushing;
- to disconnect the cylinder head, you need to unscrew the four washers that secure it; if there are noticeable burrs on the cylinder mirror, then it should be sharpened;
- remove the cylinder, remove the piston pin ring using pliers;
- unscrew the crankcase tightening bolts; an impact screwdriver can help, which is very useful in such cases;
- turn the engine to the disassembled side, gently hit it with a mallet until the crankcase separates into two equal halves;
- lay the engine straight, using a mallet, carefully knock out the driveshaft;
- After this, access to the bearings and seals appears.
Typically the engine will stop running if these parts become too dirty. Here you may need new spare parts - oil seal or bearing. Replacing them is quite simple. Sometimes spare parts are not needed: you just need to clean the mechanism of dirt.
But at this stage, many people who have an Ant scooter, but who are not familiar with how to properly repair it, make the same mistake. It consists of the following: they close the oil channel with a gasket or lubricate it with sealant. But this is wrong, since this closes the paths through which the lubricant passes to the oil seal and bearings. This leads to parts breaking, which is why new parts may be needed later. They are quite rare to find on sale. But you can buy spare parts in some online stores, but no one knows what their quality will be.
Vehicle Upgrades
If your old bicycle, scooter or motorcycle breaks down, you should not sell the equipment for scrap. There is also no need to rush into buying a new motor. It can be replaced with a power unit from a light motor cultivator. There is only one restriction: such a car cannot be driven on public roads. But the Ant scooter with a walk-behind tractor engine can be used in the country for trips to a field or river. 5-6 hp engine quite enough to accelerate the moped to a speed of 50-60 km/h. Before installing the engine on a bicycle, it is necessary to install reinforced wheels on this vehicle that can withstand a weight of up to 100 kg.
In order to assemble a scooter with a walk-behind tractor engine, you will need the following tools and materials:
- welding machine;
- grinder with metal discs;
- electric drill;
- wrench;
- screwdriver;
- pliers;
- level;
- hammer;
- dye.
In order to install the power unit on the Ant, you will need to create a frame for it.
This is done in the following sequence:
- Drawings are drawn up, precise calculations of the frame configuration and attachment points are made. It is recommended to check the calculations on soft aluminum strips.
- The mounting bracket is welded. It is treated with anti-corrosion agents and holes are drilled for the bolts.
- The engine is carefully placed on the bracket and secured with bolts. The installation accuracy is checked and the position is adjusted.
- The motor is connected to the vehicle's chassis using a belt or chain. Gear shift cables and control levers are secured.
- Checking the functionality of the vehicle. The created homemade product needs to be run in so that all the parts get used to each other. You need to spend 6-8 hours on this with the engine running at medium speed.
If you have experience in handling household tools and knowledge in electrical engineering, you can assemble an electric excavator with your own hands. This will require channels, hinges, cables and a working electric motor. The bucket is made of sheet steel, which can be purchased inexpensively at scrap metal collection points.
How not to make a mistake when choosing a gearbox?
When choosing this device, it is worth considering the work it will perform. Both its reliability and performance, as well as its operational period, will depend on this. If you make a mistake when choosing a device, you can “kill” the gearbox ahead of time. It is advisable to entrust the choice to qualified specialists. They will make all the calculations and advise you on the best option for the task at hand.
But there is not always a chance to get advice from an experienced specialist. In this case, you need to take the initiative into your own hands. The first step is to create the kinematics of the drive. It will tell you what type of gearbox is required for the selected system.
To determine the subordinate number, use the formula:
In this formula, ninput means the number of revolutions that the input shaft has, that is, it shows the engine speed in 1 minute. The noutput parameter means the required number of revolutions that the output shaft needs (also revolutions per minute).
Having made the calculations, the resulting transmission value will need to be compared with the values of the standard series for all types of gearbox. It is important not to forget that the resulting calculation is not exact, it is only approximate. When choosing an electric motor whose shaft rotates at a frequency not exceeding 1500 revolutions per minute, you should take into account the technical characteristics of the electric motor or mechanism itself, and then carry out an analysis and carefully select.
Tractor from a walk-behind tractor
Few people will like the process of walking around the field for many hours behind the machine. It is much easier to mow the grass, plow or hill up the soil while sitting on a comfortable chair attached to a trailed cart. There are many branded adapters, trailers and carts available at retail outlets. But they have a considerable cost, which many cannot afford. You can make a mini-tractor from a Neva walk-behind tractor almost free of charge, using the tools and materials that you have at hand.
The following devices and materials are needed:
- differential from a passenger car;
- wheels from a small car;
- sprockets and chains from a motorcycle;
- hexagonal solid steel profile;
- steel corners 50 mm;
- tin for making wings.
The first difficulty that arises when making a homemade tractor with your own hands is a high center of gravity. It is impossible to lower it for purely technical reasons. The only way to increase the stability of a tractor is to expand its wheelbase. For this, a hexagonal profile is used, which is attached to the hubs with cotter pins. When the track expands to 120 cm, the walk-behind tractor will gain normal stability. Installing a differential will allow the unit to corner easily.
The mini-tractor is assembled in the following sequence:
- Welding the frame of the trailer part. Attaching the drawbar to the flange, making holes in it for the bolts (the connection must be made collapsible in order to be able to transport the walk-behind tractor in the trunk or trailer).
- Manufacturing of chassis. Wheels are installed on the trolley. To make all-wheel drive on both axles, sprockets are welded onto the axle shaft, and a tensioning mechanism and chains are installed.
- Assembly of body and seat. If necessary, a canopy is installed over the driver. The controls are being configured and adjusted.
- Electrification of the created machine. A tractor generator or battery is used as an energy source. For ease of driving, it is advisable to install 2 headlights - front and rear (for reversing).
Spare parts price
Despite the fact that the production of the device stopped long ago, you can still find new spare parts for it that are produced by the industry. Some parts are imported, some come assembled. Supplied in sets:
- Clutch discs.
- Gaskets for power plant and gearbox.
- Nuts.
- Pipes.
- Levers.
The necessary parts can be found on the Internet using store catalogs. Prices for spare parts for the Ant scooter are fair. Here are some examples:
- Clutch disc – 400 rub.
- Kickstarter shaft – 1100 rub.
- Front shock absorber – 1600 rub.
- Gearbox seals – 100 RUR.
- Piston – 2500 rub.
- Gearbox – 14,000 rub.
- Wheel hub – 2000 rub.
Judging by the prices, the device is more than cheap to repair. This is an important operational property for people in rural areas.
In terms of tuning the Soviet Ant vehicle, the owners can’t think of anything. After all, these are often tech-savvy people who like to spend time in the garage. Several directions can be distinguished:
- Weight loss.
To do this, you will need to remove “extra” equipment. This includes body kit in the form of wings, hood and fairings, as well as all electrical equipment. To transport goods around the village in the summer, all this is unlikely to be needed. - Increased output from the power plant
. To do this, cut off the dynostarter shaft. The operation will add power and dynamism. The recoil during starting is leveled by trimming the crankshaft. - Installation of other wheels.
Front 4.5 - 9, and rear 7 - 10. Cross-country ability and speed will increase. - Improvement of the piston group .
You can buy a piston with three rings and make an additional window in the cylinder to supply the fuel mixture. - Magneto and increasing the efficiency of the cooling system
are additional tuning.
Improving the carrying capacity, or making a dump truck out of Ant
The Ant scooter is a powerful device, but most owners are not averse to increasing the model’s load-carrying capacity.
In addition, you can remake the body and make it folding (like a dump truck). However, there are some nuances and the main thing is not to overdo it. As you know, the load capacity is about 250 kg; in practice, large loads can also be accommodated. But it should be remembered that with such a load the speed will be much slower (up to 35 km/h).
You can increase the load capacity by increasing the sides. However, the scooter frame will need to be strengthened.
Welding can be considered the most optimal option, but you can do it without it (the additional frame is made from wood).
In this situation, the body is moved forward or left in its place, but it is prohibited to move it back.
It is possible to consider the option of installing separate booths on such scooters, which will require separate costs.
The following mechanisms are most often used for a dump truck:
- cable winches;
- hydraulics with automatic drive;
- methods using door hinges, etc. (so-called “manual”).
As for hydraulics, you will also need to use a pump. The total costs with this approach may exceed the cost of the scooter itself.
Let's consider options for implementing the idea:
1. Using automation.
The body is attached to an additional frame, which is connected to the main frame using hinges. Lifting can be carried out using a diamond jack, which operates with a simple electric drive. The electric drive itself can easily be made using the window lifters of a simple car. This is the essence of automation, when the body tips over with the press of one button.
The only disadvantage of such a conversion is the final cost of the work. The price depends on the spare parts used.
2. Manual method.
The body, as in the automatic method, is mounted on an additional frame. The frame is also attached to the main one.
The convenience of this method is that, if necessary, it is possible to simply remove the body (for example, when you need to transport long pipes, etc.). Such long objects can be attached directly to the frame.
Subtleties of production
In practice, it is recommended to additionally install chains that will protect the loops from being pulled out. Ordinary door handles from household appliances or car mechanisms can serve as closures.
When constructing a removable body, you will also need to attach the tank, license plate, and turn signals directly to the frame (not to be confused with the body). It is necessary to ensure that the center of gravity is near the axes of the loops (about 30 cm in relation to the rear edge). This is the only way the body can be tipped over manually without any problems.
So, the Ant scooter today is not only a means of transportation, but also a powerful mini-dump truck at home. Despite the fact that the vehicle has not been sold on the auto market for a long time, it is still worth purchasing it second-hand. Thus, from a simple moped, thanks to little effort, we acquire a powerful dump truck and a sophisticated vehicle.
Pros and cons of helical gearbox
This device has the following advantages:
- very high level of efficiency (up to 98%), and it is extremely economical;
- transmitting high power without losing it;
- very high kinematic accuracy (much higher than that of a globoid, i.e. worm);
- despite the high efficiency, the case does not heat up much, and at the same time energy transfers from the sender to the recipient with almost no losses;
- models perform well under shock loads;
- very high reliability, can continuously operate for at least 25 thousand hours;
- the shaft itself can be rotated.
But, despite the advantages, there are also disadvantages:
- in order to increase the gear ratio, the number of steps should be increased, this will lead to a significant increase in size;
- the noise threshold is very high (this device is much noisier than other modifications);
- in some cases, self-braking is required, but this type of gearbox does not provide it, so an additional device must be installed.
User manual
This manual provides the following information:
- Safety requirements when working with the device.
- The structure of a walk-behind tractor in diagrams and drawings.
- Step-by-step assembly of the Ant walk-behind tractor.
- First start-up, running-in of the unit.
- Common breakdowns, as well as their causes and solutions.
- Walk-behind tractor maintenance.
The instructions contain the necessary diagrams and photos of all components of the unit, as well as a detailed description that allows you to correctly assemble the walk-behind tractor from a set of parts (the walk-behind tractor comes from the store in a semi-assembled state, the owner will have to assemble the unit himself).
First start
The first start-up followed by running-in is a crucial moment for the owner of the unit. It is during this period that all moving parts of the engine are ground in, ensuring a long service life in the future. Initially, you should warm up the unit at idle, then, gradually increasing the speed, go through the first and second speeds. Run-in lasts about 25 hours, during which all work should be carried out in a gentle mode at no more than ¾ power.
Basic malfunctions and ways to eliminate them
The brand is represented by a line of gasoline walk-behind tractors, which are characterized by the following malfunctions.
The design of the Ant walk-behind tractor
The engine does not start:
- fuel filter clogged - replace;
- Fuel supply hoses are faulty - replace;
- problems with the carburetor - dirty - sort out and clean, worn out - replace;
- the magneto is out of order, or its blades are jammed - replace it, adjust the position;
- the spark plug is smoked - clean and rinse in gasoline;
- fuel runs out - top up;
- spark plug burnt out - replace;
- The tip of the spark plug gets wet - pump and dry, replace the spark plug.
The cutters stopped rotating:
- stones or clods of earth clog the rotors - cleaning;
- the clutch cable is loose - adjustment or replacement will help;
- the bolts are loose - tighten the fasteners.
Gearbox noise:
- oil is running low - add more;
- Fasteners are loose - tighten them.
The wheels stopped turning:
- belts stretched - replacement;
- fasteners become loose - tighten them;
- Clutch cable loose - replace.
Maintenance
There are several stages of maintenance:
- Daily care.
- Monthly examination.
- Preservation for the winter.
Before starting work:
- check the oil level in the crankcase;
- fuel in the tank;
- tighten the fasteners.
Upon completion of field work:
- we clean and wash the walk-behind tractor;
- wipe and dry;
- Lubricate the rubbing parts with oil and grease.
Every 25 hours of operation it is necessary to replace the used oil with new one.
Specifications
The Soviet moped, which has recently enjoyed great popularity, has the following technical characteristics:
- Length - 2680 millimeters.
- Width - 1250 millimeters.
- Height - 1075 millimeters.
- Dry weight - 240 kilograms.
- Load capacity - 250 kilograms.
- Speed - 25-35 kilometers per hour.
- Engine type is 2-stroke, power is 11 l/s.
- Transmission - 4-speed gearbox.
- The brakes have a diameter of 15.0 centimeters. Drum-type, each wheel has a mechanical drive.
Many fans of Soviet motorcycles are sincerely convinced that the technical characteristics of the Ant are practically in no way inferior to the characteristics of Western models.
Trailer
You can make a trike for the modern Ant yourself. In addition to this model, a homemade trike is also suitable for a sidecar motorcycle.
A standard trike is a connection:
- stroller frames (side trailer);
- a bracket curved from a steel pipe (L-shaped);
- clamps (2 pcs.);
- tubular struts.
When making a trike, it is important to ensure that the body shell does not touch the bracket. In order to give the frame more rigidity, it is necessary to weld a gusset made of steel
A homemade trike requires a welded trailer frame. The trike must also have an easily opening and freely removable tailgate. The sides and bottom of the body are covered with boards (tongue and planed).
The trike must be equipped with up-to-date lighting devices: turn signals, side lights and brake lights.