Photo report: Motor scooter engine repair “Ant”
In the article: Disassembling the engine of the Ant scooter, the process of completely disassembling the TMZ engine was shown in detail, after which all parts were carefully inspected and checked for acceptable wear and damage.
All the oil seals and bearings of the engine did not pass the test for suitability for further operation, the cylinder - it had to be bored to a repair size, the motor chain, and the first gear gear - due to wear on the bushing, and some other small things. Not so much if you take into account the age and “quality” of service of our “ant”...
We managed to buy all the worn-out parts without any problems, so all that was left was to collect all this “Soviet junk” to the heap. What exactly are we going to do today?
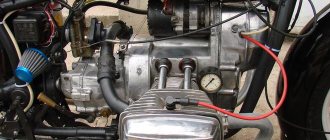
Before assembly, all planes and parts of the engine are thoroughly washed and cleaned of dirt, oil and remnants of old gaskets and sealant. We pay special attention to the condition of the crankcase and threaded connections, the main work on repairing the crankcase is described in detail in the article: Repairing the crankcase of a scooter engine, we prepare ourselves a clean workplace, and proceed to a very interesting and exciting activity...
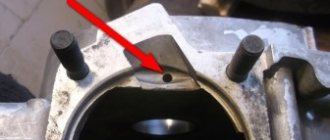
We lay the right half of the engine on the blocks, clean and blow out the oil channel (marked with an arrow), degrease the plane of the dynastarter mounting flange, lay a new gasket and be sure to cut it a little along the contour of the oil channel in the place where it is marked with an arrow.
It is not advisable to apply sealant to this connector, since there is a danger that the sealant will get into the oil channel and cut off the oil supply to the oil seal and the crankshaft main bearing. What this leads to is written in the article: Repair of the dynastarter of the Ant scooter
We install a new oil seal in the dynastarter stator mounting flange, degrease the surface, apply “blue” thread locker to the fastening bolts and finally tighten the bolts. The bolts must be tightened very well, as they are constantly unscrewed, which leads to serious engine damage.
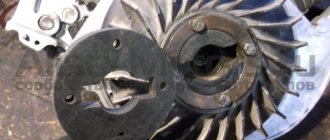
We turn the half over, heat the seat of the main bearing with a heat gun and, using a mandrel, install the new main bearing (in our case) into the crankcase.
We take the other half of the crankcase, be sure to clean and blow out the oil channel (marked with an arrow), insert a retaining ring into the seat of the main bearing and, in the same way, install the second main bearing in its place.
We are looking for a sheet of metal of suitable thickness (7-8 mm), insert our sheet between the cheeks of the crankshaft and in this position, using a mandrel, press the inner race of the main bearing onto the axle.
The crankshaft of this engine was carefully checked for faults and correct geometry; the main work on diagnosing the crankshaft is described in detail in the article: Methodology for determining faults in the crankshaft of a scooter or motorcycle
Also, on this crankshaft it was necessary to replace the bushing of the upper head of the connecting rod; this work is described in more detail in the article: Replacing the connecting rod bushing of the motorcycle “Izh-Planet”, “Jupiter”, “Ant”
We insert the crankshaft into the left half of the crankcase, we carry out the final installation of the crankshaft into the crankcase using a simple device; details of the correct installation of the crankshaft into the crankcase can be found in the article: Repairing the Voskhod-ZM motorcycle engine, not with a sledgehammer. As they often like to do on “collective farms”...
After the final installation of the crankshaft into the crankcase, we assemble the gearbox in the correct order, how to assemble the gearbox is written in the article: Repair and assembly of the gearbox (box) of the Ant scooter,
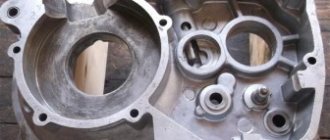
We lay the crankcase half with the assembled gearbox on planks so that the shafts hang freely in the air and do not interfere with work, degrease the crankcase planes, install the guide bushings (marked with arrows) in their places so that they extend slightly above the crankcase plane (5-6 mm) , apply sealant to both halves and place a new gasket.
Lubricate the lip of the oil seal and the main bearing of the crankshaft with engine oil and place the second half of the crankcase on top.
We fill the tendril of the gearbox shaft retainer spring inside the crankcase.
Using a wooden mallet, tap the halves until they come together completely and tighten the crankcase mounting bolts.
Lubricate the main bearing and the edge of the second crankshaft oil seal with engine oil, then use a mandrel to install the oil seal in its place.
We put the locking ring in its place.
We also install the crankshaft support bearing there and secure it with the second retaining ring.
Now all that remains is to install the piston group on the engine, check and assemble the clutch parts and install the kickstarter mechanism. After which you can install the engine on the frame.
Source
Assembly
I bought this main bearing. It seems to be our production. There are Chinese analogues in stores - they are more expensive, but I don’t know what their quality is... I try to buy something that may not be of such super-duper quality, but at least one that has been proven over the years.
The quality of production is such that there is essentially nothing to complain about. The price is quite reasonable - 350 rubles.
We press the inner race of the main bearing onto the right crankshaft journal. External - screw the stator flange of the dynostarter and press it into the crankcase until it rests against the flange.
We install the oil seal, retaining ring and main bearing into the left half of the crankcase. I'm installing a new main bearing. It is closed, but it doesn’t matter: we open it, wash out the factory grease and install it in the crankcase.
Lubricate all bearings and working edges of oil seals with clean engine oil. And very carefully, so as not to accidentally wrap the edge of the oil seal - insert the crankshaft into the left half of the crankcase, assemble the gearbox and knock out the crankcase guides by 5-6mm.
We degrease the crankcase connector, install a new gasket and install the second half of the crankcase.
We tighten the bolts and immediately, so that nothing gets into the crankcase, install the piston. I'm installing a new piston, cylinder head and reed valve body. The piston one, like everything else, is of no particular origin - most likely Rostov, but clearly not Chinese. I didn’t want to get involved with this counterfeit, but the owner didn’t want to wait until they bore the cylinder and put a liner in the cylinder head and insisted on buying it. You see the prices for spare parts - it’s up to you to decide whether to contact this new product or not.
We install the second main bearing into the crankcase and secure it with a retaining ring.
We adjust and assemble the clutch mechanism.
We install the manual start mechanism and close the whole thing with a standard lid.
Photo report: Motor scooter engine repair “Ant”
Just a couple of months ago, an old client asked to overhaul the engine of his Ant for the season. He is not greedy for money - he promised to buy everything needed for repairs. We agreed, the client pulled the engine off the frame and brought it for repairs. After disassembly, an unpleasant picture emerged: the piston, crankshaft, motor chain and almost all bearings were worn out.
The customer insisted on purchasing a new crankshaft. They are now in abundance in any store - I don’t want to take them, but their quality is still good... I resisted for a long time and in the end the client found a used engine from which I pulled the crankshaft. Of course, it was slightly worn out, but the bearing of the lower head of the connecting rod was intact and intact, and we didn’t need anything more.
Pros and cons of helical gearbox
This device has the following advantages:
- very high level of efficiency (up to 98%), and it is extremely economical;
- transmitting high power without losing it;
- very high kinematic accuracy (much higher than that of a globoid, i.e. worm);
- despite the high efficiency, the case does not heat up much, and at the same time energy transfers from the sender to the recipient with almost no losses;
- models perform well under shock loads;
- very high reliability, can continuously operate for at least 25 thousand hours;
- the shaft itself can be rotated.
But, despite the advantages, there are also disadvantages:
- in order to increase the gear ratio, the number of steps should be increased, this will lead to a significant increase in size;
- the noise threshold is very high (this device is much noisier than other modifications);
- in some cases, self-braking is required, but this type of gearbox does not provide it, so an additional device must be installed.
Preparation
Before installing the crankshaft, it is advisable to check it for runout. And it doesn’t matter whether the crankshaft is new or used, you need to check it otherwise, with today’s “quality” of spare parts, you can repair the engine and then suffer with it for a long time and tediously. We place the crankshaft on the prisms and check the runout, the norm is no more than 0.03 mm. If you don't have an indicator, take the crankshaft to a good turner
Build errors
In most cases, the right main bearing of the crankshaft fails due to an assembly error almost in the first season after repair. The engine that we are now repairing is no exception. The bearing has practically crumbled and in any case needs to be replaced with a new one.
The mistake is that when installing the flange on which the dynostarter stator is attached, the oil channel through which lubricant flows to the main bearing and oil seal is sealed.
To ensure that the main bearing lasts at least several seasons, cut the gasket under the flange a little along the contour of the oil channel and when you put the flange in place, do not smear anything with sealant there.
And one more thing: to avoid self-unscrewing of the bolts securing the dynostarter stator flange to the crankcase, and they come loose very often, apply a little thread locker to the threads. If possible, use a medium-strength fixative - “blue”.
Device Description
The Ant is much lighter than ordinary motorcycles, so everyone dreamed of owning one. The approximate weight was only 240 kg, which is small considering that it could transport loads several times heavier than itself. Actually, it is because of this that he received the name Ant.
Another advantage of the scooter was and is that you can buy it for a small amount of money. So, you can buy an Ant scooter for only 30,000-50,000 rubles.
Engine
The Ant engine is single-cylinder. At the same time, it is quite voracious, so it’s hard to call a scooter an economical vehicle. After all, even a new Ant engine consumes about 8 liters of 80-grade gasoline per hundred, and what can we say about used equipment? After all, if the piston or gearbox is slightly worn out, then the costs increase to 10 liters per hundred. In this case, you can replace damaged spare parts, but it is not easy to buy them, since they are rarely found on sale.
You can buy an already assembled Ant engine, but such luxury is a little expensive.
Suspension
In general, the Ant scooter is a very durable piece of equipment. The front wishbone suspension is especially well executed. It can last for decades. Many scooter users even claim that it is made better than modern versions of telescopic forks.
Nowadays, most fans of the Ant scooter install rear shock absorbers from a scooter instead of front shock absorbers, because the former are currently in short supply.
The rear suspension is independent. The gearbox drives the rear wheel. This is facilitated by a roller chain running through it. At the same time, the gearbox itself is made quite well. It is located in the very center of the rear axle, making it easy to remove if necessary.
Easy to repair
Thanks to its light weight, the owner of this equipment can easily turn over the Ant scooter, which will allow him to easily carry out repair work. To change a tube, tire or even gearbox, it is absolutely not necessary to remove the wheel.
The scooter is large in size, making the equipment excellent for work in rural areas.
The scooter can reach a maximum speed of 50-60 km/h.
How not to make a mistake when choosing a gearbox?
When choosing this device, it is worth considering the work it will perform. Both its reliability and performance, as well as its operational period, will depend on this. If you make a mistake when choosing a device, you can “kill” the gearbox ahead of time. It is advisable to entrust the choice to qualified specialists. They will make all the calculations and advise you on the best option for the task at hand.
But there is not always a chance to get advice from an experienced specialist. In this case, you need to take the initiative into your own hands. The first step is to create the kinematics of the drive. It will tell you what type of gearbox is required for the selected system.
To determine the subordinate number, use the formula:
In this formula, ninput means the number of revolutions that the input shaft has, that is, it shows the engine speed in 1 minute. The noutput parameter means the required number of revolutions that the output shaft needs (also revolutions per minute).
Having made the calculations, the resulting transmission value will need to be compared with the values of the standard series for all types of gearbox. It is important not to forget that the resulting calculation is not exact, it is only approximate. When choosing an electric motor whose shaft rotates at a frequency not exceeding 1500 revolutions per minute, you should take into account the technical characteristics of the electric motor or mechanism itself, and then carry out an analysis and carefully select.
Motor scooter repair Ant
Before starting repairs, you need to buy all the necessary spare parts and tools. Of course, you first need to diagnose the device in order to understand what the real problem is.
It is also necessary to take into account a few tips on how to change certain spare parts:
Repair is accompanied by the following basic actions:
Typically the engine will stop running if these parts become too dirty. Here you may need new spare parts - oil seal or bearing. Replacing them is quite simple. Sometimes spare parts are not needed: you just need to clean the mechanism of dirt.
But at this stage, many people who have an Ant scooter, but who are not familiar with how to properly repair it, make the same mistake. It consists of the following: they close the oil channel with a gasket or lubricate it with sealant. But this is wrong, since this closes the paths through which the lubricant passes to the oil seal and bearings. This leads to parts breaking, which is why new parts may be needed later. They are quite rare to find on sale. But you can buy spare parts in some online stores, but no one knows what their quality will be.
How to disassemble?
The gearbox itself is removed from the Ant in a certain sequence. It needs to be disassembled if its operating functions are no longer satisfactory during operation. Sometimes it happens that when it breaks, it is sent to a landfill. But this is fundamentally wrong. This device can almost always be repaired, and it will continue to function and serve for quite a long period. Also, the “Ant” scooter is currently a rarity, and spare parts for it are extremely difficult to find. Therefore, there is no need to “throw away” them in vain.
- The first step is to remove the gearbox from the Ant without damaging it. Then clean the body from contamination and remove all excess.
- Next, you need to unscrew the bolts that tighten the body of the product, and warm up the entire device with a hair dryer. After this, you need to knock on the body with a wooden hammer. This is done until it is divided into 2 parts.
- The next step is to remove all the gears. To do this, you will need to bend the special plates and unscrew all the bolts that hold the body halves together. Then these body bowls are separated, and the corkscrew pin itself is removed. Next the wheel axle is removed. Then the retaining ring and the axle shaft are removed from the housing half.
The device itself is dismantled and mounted on a scooter quite simply, there are almost no problems.
Disassembling the gearbox will also not bring unnecessary trouble. But assembly will also require increased attention; you need to carefully assemble everything, not miss anything or confuse anything. Gears are made of high strength steel (alloy steel), so they very rarely become unusable or deformed. The main problem in most cases lies in the bearings. Therefore, regular and careful attention to these parts is required, in particular to elements such as oil seals.
Photo report: Engine disassembly
Almost just before leaving for permanent residence on another collective farm, an old acquaintance, whom I had not seen for 15 years, turned to me and asked me to overhaul the engine of his Ant. To be honest, I didn’t have much of a desire to get involved with this Soviet chatterbox, to say the least... But after thinking about it and playing out the situation in my head that I would have to sit in a new place for some time without my favorite job, I agreed and immediately began the repairs.
I will not go into the essence of the disassembly in particular within the framework of this article - I will only outline the main points and, based on my experience, I will try to describe the most common malfunctions and errors during repairs.
The engine had the following symptoms before being repaired:
- Bad start
- Oil leak
- Weak traction
- Increased noise during operation
- The winding lever did not return to its place
- Depressurization of the crank chamber, as well as wear of the seals
- Poor quality assembly
- The piston died
- Bearing wear
- Kickstarter return spring broke
Everything else, including the gearbox and clutch, did not cause any complaints during operation. However, first things first.
Before a major overhaul, I don’t wash the engines - I just drain the oil, pull it off the frame and get to work.
Photo report: Motor scooter engine repair “Ant”
In the article: Disassembling the engine of the Ant scooter, the process of completely disassembling the TMZ engine was shown in detail, after which all parts were carefully inspected and checked for acceptable wear and damage.
All the oil seals and bearings of the engine did not pass the test for suitability for further operation, the cylinder - it had to be bored to a repair size, the motor chain, and the first gear gear - due to wear on the bushing, and some other small things. Not so much if you take into account the age and “quality” of service of our “ant”...
Engine assembly
Unlike a dynastarter, repairing an Ant scooter engine with your own hands is difficult to do according to the operating book. Therefore, it is worth seeking the advice of experienced motorcycle owners. Most often, the engine has to be disassembled when there are problems with the clutch mechanisms, the operation of the gearbox, as well as wear on the crankshaft, bearings or oil seals. The most important rule is not to be afraid to disassemble the engine yourself. Using these instructions, disassembling and assembling the engine of the Ant scooter will not be difficult.
So, the procedure for disassembling the engine:
- To begin, prepare your workspace. If you want to achieve proper and trouble-free operation, keep all parts clean and tidy. Remember and complete the disassembly order. [sc:ads3]
- First of all, remove the engine from the frame. To do this, you will need to remove the supporting hood covering the engine. Simply put, you need to unscrew the deflector, the volute and the wires: high-voltage, positive and ground. You can unscrew it in any order.
- Place the moped at any speed, unscrew the nut securing the dynastarter to the crankshaft and, holding the brake, press it out.
- With the scooter running at speed, unscrew the nut located on the drive sprocket.
- Remove the generator stator by unscrewing the 4 screws and remove the casing with the wires coming from it.
- Then we move on to removing the clutch cable and kickstarter lever.
- Now the task is to remove the muffler. To do this you will need a special key. In some cases, the muffler is secured to the cylinder with two regular bolts.
- Drain the oil from the gearbox by unscrewing the drain bolt.
- Then unscrew the three points securing the engine.
- Now you need to unscrew the cylinder secured by 4 nuts located on the head.
- Remove the head and place the cylinder vertically, with the open part up. The piston can be left in the crankshaft unless replacement is required. Otherwise, you need to pull out the locking rings and then knock out the pin.
- Now remove the bushing on the output shaft where the drive sprocket previously was.
- Unscrew the “flower” with the attached right crankshaft oil seal.
- Then remove the kickstarter cover secured with a stop bolt and 5 screws.
- Next, the clutch is removed. The central adjustment screw can be left untouched, but the 3 fingers with hooks located around it must be unscrewed.
- Pull out all the clutch discs located inside and remove the clutch lever attached to one bolt. The lever must be removed along with the spring.
- Use a chisel to break off the lock washers of the crankshaft and clutch basket and remove the rods and balls.
- After this, the entire structure is removed.
- Now the engine can be separated into halves; you just need to unscrew all the connecting screws.
- When all the parts are disconnected, you can tackle the problem area where the problem has arisen.
You can see how to assemble an Ant scooter engine in more detail in the visual video at the end of the article. The essence of assembly is in the reverse order, but it is important to tighten the parts with a certain force and synchronize the parts with the marks. Under no circumstances should you assemble an engine without detailed instructions written by the manufacturer.
With frequent breakdowns, owners think about what engine can be installed on the Ant scooter. Instead of a native motor, you can use Chinese analog motors . Since the Ant has many copies in Asian countries, replacing the engine can be a great option to save money in case of irreversible damage. True, you will have to make the fastenings yourself and, in some cases, remake the bridge for the left-hand arrangement of the chain. This is not very difficult, considering that the Tula plant provided for the possibility of rearranging the bridge.
Spare parts price
Despite the fact that the production of the device stopped long ago, you can still find new spare parts for it that are produced by the industry. Some parts are imported, some come assembled. Supplied in sets:
- Clutch discs.
- Gaskets for power plant and gearbox.
- Nuts.
- Pipes.
- Levers.
The necessary parts can be found on the Internet using store catalogs. Prices for spare parts for the Ant scooter are fair. Here are some examples:
- Clutch disc – 400 rub.
- Kickstarter shaft – 1100 rub.
- Front shock absorber – 1600 rub.
- Gearbox seals – 100 RUR.
- Piston – 2500 rub.
- Gearbox – 14,000 rub.
- Wheel hub – 2000 rub.
Judging by the prices, the device is more than cheap to repair. This is an important operational property for people in rural areas.
In terms of tuning the Soviet Ant vehicle, the owners can’t think of anything. After all, these are often tech-savvy people who like to spend time in the garage. Several directions can be distinguished:
- Weight loss.
To do this, you will need to remove “extra” equipment. This includes body kit in the form of wings, hood and fairings, as well as all electrical equipment. To transport goods around the village in the summer, all this is unlikely to be needed. - Increased output from the power plant
. To do this, cut off the dynostarter shaft. The operation will add power and dynamism. The recoil during starting is leveled by trimming the crankshaft. - Installation of other wheels.
Front 4.5 - 9, and rear 7 - 10. Cross-country ability and speed will increase. - Improvement of the piston group .
You can buy a piston with three rings and make an additional window in the cylinder to supply the fuel mixture. - Magneto and increasing the efficiency of the cooling system
are additional tuning.
How to disassemble the gearbox
The Ant gearbox is disassembled according to a certain scheme. This process is necessary if for some reason Ant’s gearbox stops functioning. Some people do it wrong: when the gearbox breaks, they simply throw it away. But with the right approach to this matter, the device can be repaired, after which the Ant scooter will function the same as before. In addition, it is difficult to buy spare parts for the Ant scooter, so you shouldn’t waste them.
The Ant scooter can become a useful type of equipment today. If you have your own farm or garden at your dacha, you won’t find anything better than such a scooter.
First of all, we note that the engine of a cargo scooter works under more intense conditions than that of any road motorcycle, and the transmission ratios here are higher: otherwise it will not be possible to carry this or that load. Therefore, to achieve the same speeds, the engine must develop high speeds, which means its service life is reduced, maintenance has to be carried out more often, and the amount of work increases. True, the techniques and order of repair operations for the most part do not differ from those that have to be done on a regular Tulitsa or any motorcycle.
What is a gearbox?
The Ant gearbox is a special mechanism that transmits and converts angular velocity into one or more mechanical gears.
- cylinder (excellent reliability and high degree of performance, standardly applicable for transmissions and conversions of enormous power);
- globoid (high gear ratio, not very high efficiency, excessive heat generation);
- wave (has a reduced efficiency when compared with cylinder);
- spiral (very high load capacity, low weight, and size proportional to mass);
- combined (combines many gears, has an optimal cost, good technical components and a relatively small size).
The standard housing of this device is cast. Very often it is cast from high quality cast iron, in rare cases from steel. If it is necessary for the product to be as light as possible, then a material is used that melts quite easily. At the base of the case there are special “ears”, by which the device is attached to the base.
To prevent oil from leaking, a seal (oil seal) is installed at the shaft output, which prevents oil leakage.
To prevent an increase in internal pressure in the gearbox, it has unusual design features. It is they who do not allow the pressure inside the device to increase during heating of the device.
Replacing Crankshaft Seals on a Chinese Chainsaw
Do-it-yourself chainsaw repair: analysis of the main breakdowns and how to fix them
It would seem, why does a summer resident who grows vegetables and fruits, or the owner of a suburban house with a small garden and several flower beds, need a chainsaw? The question disappears when there is a desire to build a bathhouse, update a greenhouse, knock down an old business, or simply make a bench for relaxation. Unfortunately, any mechanism from time to time needs maintenance and replacement of spare parts, and for this you need to have a good understanding of the structure of the product, and besides, repairing a chainsaw with your own hands will save time and money.