ความคิดเห็น • 15
Thank you friend, everything is clear, it started with half a turn.
such nonsense, I disassembled the carb to wash it, and the jet flew out, apparently uncoiled, then a short bushing flew into my hand behind it. Now I don’t know which end to put it back in. and tried this way and that, for some reason it doesn’t insert all the way, and the jet accordingly also doesn’t go all the way in and doesn’t tighten.
Tell me, does it make sense to install a Keihin with an accelerator pump on the TTR250R?
@Evgeniy Ivanov thank you.
There is no point, if you want more power, just replace the gear ratio of the stars or another more powerful engine.
I'm sick of these traffic controllers! The carburetor is adjusted with the engine running.
@Sergey Nekrasov, I don’t need your advice, if you can’t set it up by hand, use a gas analyzer. Good luck. I don’t see any point in responding further to your comments, it’s just a waste of time!
@Evgeniy Ivanov The level in the float chamber is not an adjustment, you just set it and that’s it! And when making adjustments, you must listen to the operation of the engine while rotating the mixture quality screw! Well, I won’t tell you how to do it correctly! ))) I looked at these traffic controllers, they tell such crap!)))
In your opinion, it also means that the preliminary settings are also made on the working engine! Maybe you can also miraculously keep the level in the float chamber on a working engine. ????
Why is there a black coating inside my carb?
Take the carburetor off and have a look.
@Evgeniy Ivanov only turns it up to 6000, then interruptions begin, it twitches
How does the motor work?
@Evgeniy Ivanov on my side, where the air enters the soot
This is a metal that reacts with fuel. It's not just black, it's a bit dirty.
tell me the color of the spark plug (the central electrode is half brown, half pure white) what to do, what to turn where, mot viper 200r
Raise the needle one notch
Good evening. I set the float as in the video, on the second day, when I try to start it with the kick starter, gasoline starts flowing from the carburetor, almost in a stream). And yes, I confused it with overfilling and underfilling).
mixed up a hundred pounds
Hello, it means the fuel chamber is full, you need to disassemble and adjust again, remove the carburetor along with the gasoline, unscrew the three lower bolts and look at the fuel level, it should be at the mark in the float chamber. And tighten the drain screw from the bottom, it must be closed!
1:16 just the opposite, if they are pulled up as you show, there will be underfilling, the floats are lowered into the chamber, which means they close the shut-off needle earlier, 2:25 again an error, the “quality” screw, when unscrewing, adds the ready-made idle mixture, which is prepared by jets , fuel and air, it was in the USSR carburetors that the quality screw opened the air, on this carb it is impossible to change the poverty or richness of the mixture. only volume, and yes, you can enrich it by closing the air damper
Whoops. this is hin, not keihin????
So what about the suction? Open or close?
The air damper is needed to start a cold engine; when the engine is warm, the choke is open!
Why reset the corb settings if it was working properly?
And when starting from cold, you need to close the air damper. And you won’t have to use the starter ten times.
maybe to clean it? after which it will work more stable
The choke is needed for cold weather starting if the carburetor is tuned.
How to regulate it? There are two turns here, 3 and that’s it? It won’t work that way) and didn’t say how you formed your opinion that everything is fine with the carburetor?
The white color of the spark plug electrode is a lean mixture, and a black or wet spark plug can also be black - this is an enriched mixture. So turn the screw in one direction or the other. But they look at the color after you ride the bike for 5 km at least at normal speeds, so that the color of the electrode matches exactly this fuel mixture.
@Evgeniy Ivanov, in general, everything is complicated))
It’s not just about one screw, everything in the carburetor must be balanced, I explained. The cleanliness of the carburetor, the fuel level in the float chamber, the location of the needle, all these parameters should be the same and relate exactly to 2.3 turns on the quality screw (you can see this by the spark plug, by its color and soot)
@Evgeniy Ivanov, I would like to see exactly how to choose the correct position of the quality screw, because even the same carb may not fit 2.3 turns, because this is individual. You said that you set 2.3 turns and this is ideal for your carb, but I would like to see how to determine this ideal value)
With this adjustment, there are no problems with the motor. Everything works smoothly, picks up, doesn’t sneeze, doesn’t stall. All at the highest level. I explained about the adjustments. And about the fuel level in the float chamber, how and what to do. And about the quality screw he said 2.3 turns, how many turns should be set (when unscrewing, the mixture is lean, when tightening, it is rich), the idle speed on the working engine can be adjusted. For each motorcycle, the adjustments may vary slightly, it depends on many things: the air filter, fuel, ignition system and finally even the wear of the piston group.
Source
Irbis TTR 250R Valve adjustment on 165FMM engine
306
Sasha Lomov
Alexander Polyakov
I unscrewed the intake and exhaust bolts, everything was black, covered in soot, soot, what do you think?
Alexander Polyakov
My valves are knocking, I'll adjust them
cop of coins
Was it really just one person who spoke very clearly and understandably?
Nauruz Dzhanteev
Why did I bend both valves? It was driving normally and stalled and I took apart the bent valves.
braslav braslav
The valves are adjusted when COLD. ENGINE.
Vyacheslav M
Hi. I have a question. I have a Motoland Blazer with the same engine. I’m driving along the highway, I drive 10-15 km and the engine stalls. The speed is 80-90. I stop for 5 minutes, then I drive another 1 km. The starter turns vigorously, there is a spark, it turns on There is carbe. I changed the spark plug, the filters are clean. What could be the problem?
Alexander Syomukha
Just 4 minutes. Nothing extra. Well done.
84duo
Thank you, God bless you!
ALEX BEZZUBENKO
. so damn, the TDC mark (T) can be on the compression stroke when the valves are closed and the intake stroke is also the same TDC and the mark (T) is the same.
Nicolae Nicolae
Why is my motor not working?
Heisenberg
Where do you get these numbers for clearances? in the manual for this engine there are 0.2 and 0.15. Almost like his Honda CRF 250 0.13+-3. 0.21+-3 (its copy is Chinese)
Manowaroff
I hope this is not a joke? It seems like there should be a mark after the letter T in the work and the operations should be carried out on a cold engine. Hence the name - thermal gaps - they compensate for the expansion of the metal on a hot engine.
NOMAD NOMAD
Tell me what are the dimensions of the probes for 250 cubic meters, 172 fmm lower, for inlet and outlet? Thank you in advance.
Dmitry Levkovsky
Please tell me. Motor 166 the principle is the same. I put everything according to the marks, I loosened the locknuts. Everything is fine with the exhaust valve, there is some play between the valve and the rocker arm, but the intake has not loosened, although we’ll unscrew this little thing with a square. It turns out that the rocker arm itself is pressing on the valve. I turned the crankshaft two million times according to all possible and impossible marks and nothing. No backlash appears. Either the valve is long, or maybe nobody knows. Maybe there is a solution.
Sergey Artyomov
Great video. I recently bought a set of wrenches for tightening spokes on Aliexpress. It seems that one of them should also be suitable as an alternative to the screwdriver device.
Andrey
please tell me how to work with the probe correctly? supposedly let's say 0.05 at the intake, that is, you need to adjust it so that only 0.05 goes in, otherwise it doesn't go higher?
THE TRUTH IN THE EYES
My TDC is not T, but F
Alexander
Hi Zhenya, like, tell me what oil you use and how long the engine has been in and have you changed anything in the engine?
JacksonR.DD
Guy, please tell me without offense, why the hell are you misleading people? TDC is set on the line that is located next to the letter “T” on the right, and not on the letter “T” itself. If you don’t believe me, completely disassemble the cylinder head and check it! People, THE CLEARANCES ARE ADJUSTED AS FELL AS FUCK!! FUCKING NOT ON THE LETTER “T”. I'M ALREADY TIRED OF TALKING ABOUT THIS.
Komentarze • 15
Thank you friend, everything is clear, it started with half a turn.
such nonsense, I disassembled the carb to wash it, and the jet flew out, apparently uncoiled, then a short bushing flew into my hand behind it. Now I don’t know which end to put it back in. and tried this way and that, for some reason it doesn’t insert all the way, and the jet accordingly also doesn’t go all the way in and doesn’t tighten.
Tell me, does it make sense to install a Keihin with an accelerator pump on the TTR250R?
@Evgeniy Ivanov thank you.
There is no point, if you want more power, just replace the gear ratio of the stars or another more powerful engine.
I'm sick of these traffic controllers! The carburetor is adjusted with the engine running.
@Sergey Nekrasov, I don’t need your advice, if you can’t set it up by hand, use a gas analyzer. Good luck. I don’t see any point in responding further to your comments, it’s just a waste of time!
@Evgeniy Ivanov The level in the float chamber is not an adjustment, you just set it and that’s it! And when making adjustments, you must listen to the operation of the engine while rotating the mixture quality screw! Well, I won’t tell you how to do it correctly! ))) I looked at these traffic controllers, they tell such crap!)))
In your opinion, it also means that the preliminary settings are also made on the working engine! Maybe you can also miraculously keep the level in the float chamber on a working engine. ????
Why is there a black coating inside my carb?
Take the carburetor off and have a look.
@Evgeniy Ivanov only turns it up to 6000, then interruptions begin, it twitches
How does the motor work?
@Evgeniy Ivanov on my side, where the air enters the soot
This is a metal that reacts with fuel. It's not just black, it's a bit dirty.
tell me the color of the spark plug (the central electrode is half brown, half pure white) what to do, what to turn where, mot viper 200r
Raise the needle one notch
Good evening. I set the float as in the video, on the second day, when I try to start it with the kick starter, gasoline starts flowing from the carburetor, almost in a stream). And yes, I confused it with overfilling and underfilling).
mixed up a hundred pounds
Hello, it means the fuel chamber is full, you need to disassemble and adjust again, remove the carburetor along with the gasoline, unscrew the three lower bolts and look at the fuel level, it should be at the mark in the float chamber. And tighten the drain screw from the bottom, it must be closed!
1:16 just the opposite, if they are pulled up as you show, there will be underfilling, the floats are lowered into the chamber, which means they close the shut-off needle earlier, 2:25 again an error, the “quality” screw, when unscrewing, adds the ready-made idle mixture, which is prepared by jets , fuel and air, it was in the USSR carburetors that the quality screw opened the air, on this carb it is impossible to change the poverty or richness of the mixture. only volume, and yes, you can enrich it by closing the air damper
Whoops. this is hin, not keihin????
So what about the suction? Open or close?
The air damper is needed to start a cold engine; when the engine is warm, the choke is open!
Why reset the corb settings if it was working properly?
And when starting from cold, you need to close the air damper. And you won’t have to use the starter ten times.
maybe to clean it? after which it will work more stable
The choke is needed for cold weather starting if the carburetor is tuned.
How to regulate it? There are two turns here, 3 and that’s it? It won’t work that way) and didn’t say how you formed your opinion that everything is fine with the carburetor?
The white color of the spark plug electrode is a lean mixture, and a black or wet spark plug can also be black - this is an enriched mixture. So turn the screw in one direction or the other. But they look at the color after you ride the bike for 5 km at least at normal speeds, so that the color of the electrode matches exactly this fuel mixture.
@Evgeniy Ivanov, in general, everything is complicated))
It’s not just about one screw, everything in the carburetor must be balanced, I explained. The cleanliness of the carburetor, the fuel level in the float chamber, the location of the needle, all these parameters should be the same and relate exactly to 2.3 turns on the quality screw (you can see this by the spark plug, by its color and soot)
@Evgeniy Ivanov, I would like to see exactly how to choose the correct position of the quality screw, because even the same carb may not fit 2.3 turns, because this is individual. You said that you set 2.3 turns and this is ideal for your carb, but I would like to see how to determine this ideal value)
With this adjustment, there are no problems with the motor. Everything works smoothly, picks up, doesn’t sneeze, doesn’t stall. All at the highest level. I explained about the adjustments. And about the fuel level in the float chamber, how and what to do. And about the quality screw he said 2.3 turns, how many turns should be set (when unscrewing, the mixture is lean, when tightening, it is rich), the idle speed on the working engine can be adjusted. For each motorcycle, the adjustments may vary slightly, it depends on many things: the air filter, fuel, ignition system and finally even the wear of the piston group.
Source
Tuning the carburetor of the Irbis TTR 250 motorcycle
Changing the basic carburetor settings yourself can negatively affect
stable engine operation.
Adjusting the idle speed should be done with the engine warm. Optimal
Idle speed level 1500 rpm ± 150 rpm.
If you have difficulty starting the engine in cold weather, use
carburetor choke handle. This will make starting the engine much easier and faster.
CHECKING THE SPARK PLUG
The spark plug is an important engine component whose condition is easily
check. The condition of the spark plug can indicate the condition of the engine.
For example, a very white center electrode may indicate an air leak.
or a mixture formation problem for this cylinder. Don't try
To diagnose such problems yourself, contact your dealer.
You should check the spark plug regularly and clean it if necessary, which will help
extend its service life. If electrode degradation becomes excessive, you should
The spark plug should be replaced with the correct type.
Before installing the spark plug, measure the gap between the electrodes. He must
be as shown in the photo.
Carry out work related to servicing elements with caution
power supply for your motorcycle, since gasoline is flammable
liquids, and its vapors are explosive. Do not smoke during technical
maintenance of the motorcycle, and do not carry out work near sources of open
fire - this can lead to material and physical damage.
Source
To watch online, click on the video ⤵
Irbis TTR 250R Carburetor, its cleaning and adjustment Read more
Small but daring carburetor screw Irbis TTR 250R Read more
About the carburetor with accelerator pump for the snow leopard Irbis TTR 250r (Personal opinion) Read more
Keihin PZ carburetor adjustment (Personal opinion) More details
Enduro repair, Irbis TTR250. Eliminating failures. Carburetor settings. More details
Setting up the carburetor on a PIT BIKE More details
Setting up the carburetor on the Racer Panther motorcycle Read more
Failure when opening the throttle and how to fix it. Setting the carburetor for winter mode. More details
Carburetor repair. On IRBIS TTR 125, 250 Read more
Repair: Irbis TTR 250R (part.5) Carburetors More details
Keihin pz30 carburetor - the most correct adjustment Read more
Irbis TTR 250R Valve adjustment on the 165FMM engine Read more
Mototheme. Irbis ttr250r repair. Carburetor and valve adjustment. More details
Adjusting the irbis ttr250r headlight (Personal opinion) More details
How to adjust the floats on the Irbis TTR 125. Adjusting the fuel level. More details
Setting up the carburetor on a pit bike/moped | Brief and simple | No ceremony #1 Read more
IRBIS TTR 250R.Carb. from AliExpress.(Unboxing) More details
Setting up the Irbis TTR 125 carburetor Read more
Source
What clearance should be on IRBIS TTR-250?
Hello. Thank you very much for your question.
On the Irbis TTR 250, valve adjustment is usually carried out according to the following parameters:
Inlet 0.05 mm, outlet 0.07 mm.
How to adjust the carburetor to 45 on an agro walk-behind tractor?
Hello, to adjust the K45 carburetor on a walk-behind tractor, you just need to press on its quencher so that fuel begins to pour out through the drainage hole.
How to properly adjust the differential on a Ural 220?
To adjust the differential on the Uralets 220 minitractor, do the following:
• check the axial clearance in the bearings
• check the adjusting shims between the flanges of the housing and the front axle cover
• adjust the main gear engagement
What is the difference between a motocross bike and an enduro bike?
The most important difference is the purpose of the bikes. Motocross usually goes without obstacles, while enduro is designed for uncharted terrain with natural terrain.
What spring can be installed on the rear shock absorber of an Irbis TTR 250 motorcycle to make it softer?
It is best, of course, for the shock absorber to have its original spring, since it was developed specifically for this shock absorber and in combination with it gives the best result. As for shock absorbers with good springs on the Irbis, I can recommend the very good shock absorber RMX 250 as well as the very high-quality and durable Japanese KAYO T2. These shock absorbers have some of the softest and strongest springs available.
Is it possible to add an additional hard drive to the irbis nb29?
This model uses an eMMC drive. How do you replace it? You can only add an external one, there are no other options
Irbis TTR250 2013 → “Chinese Lego” or the method of assembling a motorcycle from Irbis TTR250
So, good day everyone! To some, happy season, to others, to a speedy season!
This is a continuation post based on this: Tyk
Finally got around to it and had time to put TyTyrchik in order (yeah, it’s time for the season XD). There were no major alterations, other than some minor filing of the frame.
In principle, all the Chinese (Irbis for sure) are guilty of a very poor body kit and inattention to detail, but with the engine, carbs and gearbox, everything seems to be fine with them, according to my observations and readings of thematic forums.
If you are interested, read on...
The picture is purely for diluting the text, you can’t see any special alterations on it =)
What we have in the source:
1) Construction set “IRBIS TTR 250 2013”
2) The desire to make a motorcycle out of it for mud messers and fun off-road rides
3) Almost straight hands, creative thinking and help from people
Which units require improvement:
1) Plastic (+ tail part of the frame)
The plastic here is complete crap, very fragile and too thin in places.
For some reason, the frame at the back is too long and goes right under the wing (apparently a rudiment from another version of the TTR250, where the ability to carry a passenger is present). We delete it, but more on that later. Photos so far (already sawed off):
2) Steering column and steering spacers
There is no protection (seal) at the bottom of the steering column and all the lubricant slowly comes out of it and crawls away in an unknown direction (there is a way to solve the problem, but I haven’t gotten around to it yet). Unfortunately, there are no photos, but I think you can imagine for yourself. Also, the steering spacers are attached to the yoke in an ugly way, but you remember this from the last post:
3) All levers and paws + footrests
There’s nothing to say, silumin and that’s it. And the footrests are slippery
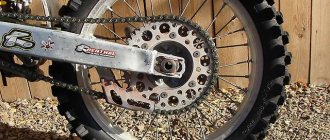
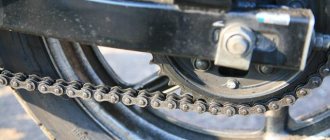
4) Chain, sprockets, chain guard and sprocket cover
The chain, like all Chinese chains, stretches like rubber. The sprockets are quite good, but I wanted a bigger rear one (but no luck, I can’t find a good Japanese analogue so that it fits on the same seats, well, what the heck with them). The sprocket cover is not particularly needed, and dirt gets clogged under it along with the grass, let's cut off a piece. The chain guard has fallen apart and is flimsy. Let's insert a piece of sheet steel into it and rivet it, it will be great.
The chain roller is bent and the bearings in it are dead, they are jammed, we will replace them.
New bearings:
5) Headlight
What happened to her, does everyone remember?)))
So this is exactly what had to be repaired and strengthened with normal materials, and not with thin and flimsy plastic. More on this later.
6) Battery location and wiring
Well, there are generally seams... you open the seat, and there the wiring is somehow lying there and the battery is stuck in there so that it is not clear how to remove it without disassembling the floor of the motorcycle. At the same time, the terminals are not closed well and the electrolyte leaks... a terrible picture... brrrr
Everything is in order.
Everything seems... phew
What was purchased:
I’ll make a reservation right away that not all the components that require improvement have yet been brought to mind and to their logical conclusion, therefore not everything has been purchased yet and only a small part is shown in the photo.
A Delta battery to replace the old one, new handles and gearbox foot, front and rear fenders from a Yamaha yzf 250, oil, bearings for the chain roller... the rest was either simply changed, or I already had.
What was actually done
So, the problems are described in detail, all that’s left is to do and assemble everything so that it works ^^
In general, it took 4 approaches to get it in order. I don’t even remember the order in which the work was done, so I’ll start from largest to smallest along the list of problem areas compiled a few paragraphs above.
The oil was changed first thing.
1) Frame and plastic
Having removed the rear wing, an extra part of the frame was discovered underneath, which was sawed off and a partition was welded there, which became the third attachment point for the new Yamaha wing. In general, the front fender fit almost without any problems, just a few washers and one additional hole in the fender.
But the rear wing... wow, it took a lot of time, since the original wing is shorter, wider and generally consists of two parts. Not only did I have to saw the frame and weld the side fastenings, but I also had to cut holes in the wing to fit the shape of the frame so that it would fit into place. This is of course collective farm, but it turned out very cool in the end.
The rest of the original plastic fit perfectly, the excess parts were sawed off from the rear sides and everything fit like original. In general, there is no point in changing the side plastics to Yamaha ones (tested by falls, does not suffer). And everything came together so successfully one fine evening that, having finished all the plastic work, there was no more work left, and I still managed to drive it under my own power from Krasnogorsk to Khimki =)
2) Steering column and steering spacers
The steering wheel spacers are just regular washers and there are no more problems. But we haven’t dismantled the steering wheel yet. But everything is not difficult there either, as experts write, the cap of a 5-liter bottle fits in there and the lubricant stops flowing out.
3) Levers, feet and footrests
The levers came from Kayo's pit bikes. Also similar to silumin, but the quality is better + they are short + they are adjustable. They have no play in the landing areas, but the brake handle had to be modified with a file, otherwise it wouldn’t stand up and touched the throttle cable (the entire throttle handle assembly will need to be replaced with a normal one).
4) Chain, stars and surroundings
I haven't done anything with the chain and sprockets yet. The chain is constantly stretching. After every ride you have to tighten up. Maybe someone can tell me where to get a good Japanese 530 chain without seals. Very necessary. Yes, and the rear sprocket is needed more, but there are no normal chain/sprocket sets for 520 or 525 chains so that they fit the seats in the Irbis... eh.
But the sprocket protection was cut in half, now dirt won’t get in there. The cracked chain guard was supplemented with a piece of steel and put back in place, painted with acrylic (by the way, it had already partially fallen off). And the chain roller was simply disassembled, cleaned, new bearings were installed, and everything was returned to its place.
5) Headlight
Here everything is even simpler: 2 steel plates with holes and a can of black acrylic. Problem solved!
6) Battery and wiring
The entire box for the battery and filter was removed, carefully cut and put in place. The battery is now attached with the terminals inward (but it was outward and they were exactly under the frame) and tightened with a belt. The wiring is neatly laid out and wrapped with electrical tape.
Repair of piston IRBIS TTR 250
Repair of piston IRBIS TTR 250
I missed the oil level in the IRBIS TTR 250 engine. And then somehow I was going at full throttle and suddenly a clattering noise appeared in the engine and the traction dropped slightly.
I removed the tank and unscrewed the two chrome-plated “cap nuts”. I pulled the valves. The gaps are normal.
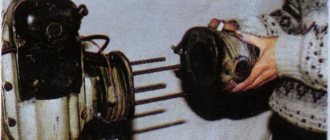
I remove the engine, disconnecting all the wires, hoses, cables, chain, etc.
I put it on level ground. And off we go...
Unscrew the cap labeled CDI.
We remove the starter (two bolts are screwed into the crankcase from above “white arrows”) and the chain tensioner, also two bolts (red arrow)
“the text initially comes with photos as a WORD document, but it’s not possible to post it”
Then unscrew the 4 small bolts and 4 large nuts on the cylinder head cover.
Let's remove the cover. Unscrew the timing gear. Let's take it out. DO NOT DROP THE TIMING CHAIN INTO THE CRANKCASE.
Let's remove the head. If it doesn’t work, gently tap it with a mallet.
Unscrew another bolt on the left.
Carefully remove the metal gasket and then the cylinder itself.
My finger seat was broken. There was noticeable play when the piston moved up and down.
We pull out the retaining rings on the sides of the piston and remove or, as in my case, knock out the piston pin.
- original set of piston + pin + two retaining rings + piston rings 1400 rub.
- cylinder-crankcase gasket 100 rub.
- outlet seal (elbow-cylinder) 60 RUR
The pistons are one size. The piston is marked IN. This is the entrance or inlet. It should be on the carburetor side.
There are 5 rings in total. 2 thin and 1 wave-shaped are oil scrapers, 1 is black cast iron and 1 is steel (white when viewed from the side)
One thin cut to the left, wavy with a cut towards you (inscription IN), the second thin cut to the right, black cast iron should be directed between the left and forward (45 degrees from the piston pin axis), and the uppermost steel one between right and forward.
Also on the cast iron and steel ring there is a marking in the form of a letter. Place the label facing up.
Then we throw in the gasket.
We put on the piston, insert the finger.
Insert the retaining rings. We install them well, otherwise the finger will pop out and kill the cylinder.
Honing the cylinder or cleaning the inner surface with 1000-grit sandpaper. I had some scuffs here and there from the old piston.
Lubricate the cylinder with a little oil and carefully place it on the piston. You won't break the rings.
Then a metal gasket. We thoroughly clean all surfaces.
Set the piston as high as possible.
Unscrew the small plug on the left.
In the hole we will see a flywheel. There will be 2 marks on it (they can be seen when the crankshaft is almost turned too far) and one mark with the letter “T” - this is TDC. We install the crankshaft so that the risk is at the very top as in the picture. The crankshaft itself will assume a stable position.
We install the timing chain guides and install the “head”.
We install the camshaft. The camshaft lobes should face down. We put on the star. STILL WITHOUT MOving THE CRANKSHAFT! And rearranging the chain should look like in the photo.
The holes of the star and shaft are vertical and coincide. The risks are strictly horizontal.
I remind you! The little fists are looking down!
Spin the star. All ignition and valves are set!
First we fasten the head with four large nuts and one long bolt. Cross to cross! EVENLY!!
Tighten well. And fasten the valve cover with the remaining 4 bolts.
Install the chain tensioner. First remove the small cover from it. We gradually tighten it by periodically turning it clockwise with a screwdriver. Otherwise, overtighten the chain.
Now, in the same TDC position, we set the valve clearances.