The chain drive of a motorcycle, unlike a car transmission, requires periodic adjustment, which consists of changing the degree of tension. Tensioning the chain on a motorcycle allows you to get rid of free play in the transmission, which is usually followed by a strong shock that destroys the most important components of the motorcycle. However, you need to understand that excessive tension will lead to rapid wear of the chain itself, since during operation of the rear suspension it will stretch greatly, gradually losing its shape. Therefore, every motorcyclist should know about the methodology for performing such a procedure.
Examination
First, you should determine whether your chain needs tension - for this you need to take a control measurement. The motorcycle must be placed on the side stand, removing panniers and other foreign objects from it. As a tool, you should take a tape measure, a ruler or a fairly large caliper. Make sure there is no load on the suspension and start taking measurements.
Very often the question arises, how should the chain be tensioned to avoid accelerated wear of motorcycle components? It is best to check the operating instructions developed by the motorcycle manufacturer, since the standard indicator may be individual for a particular vehicle. If this is not possible, you should use average values equal to:
- 15–25 mm for sport bikes;
- 30–45 mm for domestic equipment and medium-power road motorcycles;
- 35–50 mm for touring motorcycles with a large engine capacity;
- 50–60 mm for motocross motorcycles and off-road vehicles.
When checking, it may be discovered that the actual indicator is outside the acceptable range. In this case, it is necessary to urgently tension the chain to avoid motorcycle breakdown in the near future. In addition, it is worth performing another check, assessing the technical condition of the circuit. Gradually spinning the rear wheel, determine the degree of sagging at each point - if this indicator differs significantly, the part urgently needs to be replaced. If your chain is very stretched, but you need to get to a store or service center, then to adjust you need to choose a position with minimal slack.
Step-by-step instruction
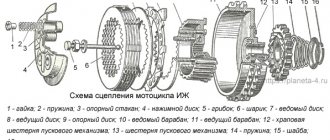
You can shorten the chain using a rivet, or by carefully cutting off the top head of the pin (rivet). Next, it’s worth starting to dismantle the decorative and protective plastic above the traveling star. Unscrew all retaining screws. To release the drive sprocket, it is necessary to unscrew the fixing bolt, which may require considerable effort. Do the same with the driven nut. It is necessary to loosen the tension bolts that separate the chain drive. Next, we take the hub nut and caliper screws. The freed chain can either be cut with a grinder or riveted. It is recommended to perform riveting, since this will make it easier to connect the old and new chains, stretch them around the working circle, and significantly save time on installation. To do this, take a wire or a special lock and connect the two chains. Set new stars
Important! When installing new parts, freedom in the movement of the stars may be observed. Inexperienced motorcyclists try with all their might to press the sprockets, however, this will lead to its rapid failure
This play is a correction for vibration and unevenness. Having put the chain on both sprockets, you can check a couple of revolutions in neutral to see how it works. If everything is good, rivet it tightly. After the chain drive is installed, it is necessary to adjust its tension level. To do this, use the two adjusting bolts on the left side of the pendulum. We remind you that this is an initial setting that will need to be repeated after 400-500 km.
Next, all that remains is to lubricate the chain and assemble all the protective elements. It is better to use chains from proven and reliable manufacturers. They will last longer and will not cause accidents on the road.
Tension
There are two main chain slack control mechanisms used by various manufacturers. The complexity of the procedure in both cases will be approximately the same, but it is worth paying attention to the basic recommendations related to tension. The durability of the transmission, as well as other important components of the motorcycle, will depend on the correct execution of such an operation.
Longitudinal movement
The most common system is one with longitudinal slots in the pendulum - they allow you to move the axle by adjusting the distance between it and the gearbox shaft. To complete the work you will need two keys - 17*19 and 13*14. Having placed the motorcycle on the center stand or suspension, use a large wrench to unscrew the wheel shaft mounts - this will significantly loosen it, which is a necessary condition for adjusting the tension. Next, you need to pick up a smaller wrench and unscrew the lock nuts on both sides of the wheel.
Now you will need to learn how to tension the chain - there are adjustment bolts on both sides that move the wheel along the slot. Strong tension on one side can cause the wheel to skew, resulting in the need to completely disassemble the rear swingarm. Therefore, experts recommend turning the bolts one by one, making 1–2 turns. Do not forget to periodically check the degree of chain tension by pulling it with your finger - you can overdo it, which will force you to spend a lot of time finding the right position. Some motorcycles use special tensioners; to set them to the optimal position, you need to move them with a screwdriver or simply move them by hand.
When you manage to find the optimal position for the rear wheel, you will need to secure it to prevent further movement. First, the locknuts are tightened, and only then the motorcycle axle is fixed. Carefully check that all connections provide the tightest possible fit and do not allow the wheel to move. After this, measure the tension again and try how the motorcycle behaves on the move.
Eccentric mechanism
Some manufacturers suggest using a more complex but reliable eccentric mechanism. Working with it is absolutely not difficult, but you will need more skill than in the option described above. Most often, an eccentric mechanism is used to regulate chain tension in one-sided cantilever pendulums, although there are exceptions.
It is very important to know how to make adjustments correctly - you do not need to unscrew bolts or locknuts to do this. The only tools you need to prepare are a large hexagon - its size is determined by each manufacturer individually and may vary depending on the specific model of motorcycle. By turning the adjusting screw, you move the axle along the eccentrically drilled hole, changing the degree of its tension.
Unfortunately, you often have to deal with cases of oxidation of the adjustment mechanism - especially if the motorcycle was used in a marine climate. In this case, you will have to use brute force. To turn the hexagon, hit it with a rubber or wooden mallet. Be careful, as too strong a blow may strip the threads of the mechanism, after which you will have to repair the pendulum.
Choosing a chain for a motorcycle
Without a chain, your motorcycle simply won't move.
The chain for a motorcycle is a very important element of its operation, although it is quite simple. Motorcycles don't run without a chain.
Chains are sold riveted at the manufacturing plant, or they can be open. These chains come with a link with a riveted lock. Riveted chains are considered more reliable. But manufacturers claim that the new locks are the most durable.
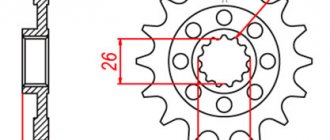
Each chain is marked. The marking numbers indicate the pitch and width of the chain links. This data is usually standard. The letters indicate the following: the strength of the rubber seal and its shape. These data may differ for each manufacturer. This is why it is so important to choose a chain that will suit the brand of your motorcycle. A suitable option can be selected in the catalogs.
As long as the factory lubrication is maintained and used on the chain, the chain will not cause any noticeable problems. Moreover, the constant improvement of seal forms makes it possible to reduce friction forces.
Problems with the chain arise when the rules for operating motorcycles are not followed. What can happen? The chain may break and the rear wheel will jam. Damage to the motorcyclist's leg is also possible. Chains can stretch over long periods of use. A chain that is not suitable for the motorcycle will fail faster.
Cases when the chain must be replaced:
- The rivets on the links are lost
- The rollers are damaged
- Connections are covered in rust
- The chain is worn to its maximum value
- Cracked rubber seals
- The chain does not stretch to the required size.
Table. Designation and application of motorcycle chains.
| Circuit designation | Where is it used? | Motorcycle model | Pitch, mm | Roller diameter, mm | Chain width, mm | Number of links, pcs. | Chain length, mm |
| 2PV-9,525-1800 | Motor transmission | “Izh-56”, “Izh-P1”, P2, P3, P4, Yu5, “Izh-Yu”, Yu2, Yu3, Yu4, Yu5 | 9,525 | 6,00 | 25,4 | 66 | — |
| PV-9,525-1200 | Same | M-105 MMVZ all models | 9,525 | 6,00 | 9,52 | 44 | 419,1 |
| PR-12.7-1820-2 | main gear | "Sunrise", "Java" | 12,7 | 8,5 | 7,75 | 112 126 | 1422,4 |
| PR-15.875-2300-2 | Same | Motorcycles, all “izhi” | 15,375 | 10,16 | 9,65 | 104 | 1651 |
Additional actions
If you know how to tighten a motorcycle chain, it wouldn't hurt to check the condition of the sprockets and other transmission parts. If signs of significant wear are detected, they should be replaced immediately, since breakdowns of this type seriously affect the reliability and durability of the motorcycle transmission. If you find that the chain is very stretched, it is better to get rid of it immediately - especially if you like to ride at high speed or perform stunts by tipping the motorcycle onto its rear wheel.
In addition, when regularly tightening the chain, it should also be cleaned and lubricated. It is better to use special products in cans that are supplied under high pressure - they effectively wash away all foreign deposits and also penetrate into all internal parts of the chain drive, contributing to its effective lubrication. The procedures are also performed with the rear of the motorcycle raised, which allows you to quickly spin the wheel if necessary. There are also special devices for cleaning the chain. The device is fixed to the transmission mechanism of the vehicle, after which all that remains is to engage first gear and ensure a continuous supply of cleaning agent to the receiving tube.
The motorcycle is serviced approximately every 500–2000 kilometers, which ensures the reliability and durability of all mechanisms. Every time you clean and lubricate, you should check the degree of chain tension to prevent serious sagging. Experts say that on average, tensioning has to be done every 2–5 thousand kilometers, depending on the operating conditions of the motorcycle. It is worth completely changing the chain every 10–15 thousand kilometers, or more often with an aggressive driving style or with frequent off-road trips. Failure to comply with these deadlines leads to accelerated wear of the transmission and the approach of expensive motorcycle repairs.
000_moto_0811_070
After work, I often stop by an old friend’s workshop. The pleasant atmosphere and the opportunity to tinker with the hardware yourself are very invigorating. One day, a new snow-white R6 stops at the entrance and a young guy asks if the service is still working. As usual, he needed to check the chain tension and lubricate it. After 10 minutes, satisfied service workers shook hands with the equally satisfied owner of the Yamaha. “What a wonderful client,” I thought then, still not understanding why he didn’t do such a simple procedure himself.
Manufacturers of modern goods are purposefully turning us into white-handed people. We don’t wash our cars, we don’t wash our clothes, we don’t hem our clothes. Many people no longer cook food at home. And they are unlikely to prepare anything edible if all the restaurants in the area close. Simply because they have never done it. Moreover, some believe that wasting time on such nonsense is beneath them. Maybe so, but I am sure that a person should still have a choice. I may not do something because I don’t want to, but not because I don’t know how. It's worth knowing! Be able to ride a horse, be able to cook deliciously, be able to take care of your own home, be able to drive a car and motorcycle well and be able to maintain them.
The chain drive is one of the most loaded components on a motorcycle. In powerful motorcycles, the forces generated in it reach several tons. And when accelerating and braking, they change direction. This often happens very abruptly, and at this moment the chain experiences serious stress. If the chain is loosely tensioned (sags a lot), then at the moment of load change, this excess supply of chain will first be selected, and then, when its free play ends, a sharp blow will occur, harmful to all elements of the transmission. By the way, it’s also unpleasant for the driver to drive such a motorcycle that jerks whenever the gas is opened or closed, especially in a sluggishly creeping traffic jam. The second disadvantage of a sagging chain is that when the tension is weak, its unloaded shoulder tends to move in a straight line by inertia, which is why it rests imperfectly on the sprocket teeth, thereby wearing them and itself out.
Is it possible to tighten the chain so that it does not sag at all? No, because as the rear suspension operates, the distance between the drive and driven sprockets changes. And the tensioned chain will be subjected to enormous loads (stretch greatly) if you do not leave it with a little slack, which will be removed during suspension operation. (And the shafts with bearings with a tightened chain, I note, will have a hard time.) The reason is that the axis of the pendulum and the axis of the drive sprocket on most motorcycles are located at a distance from each other, so the maximum tension occurs approximately in the middle of the suspension stroke - when the axles of the secondary the gearbox shaft, pendulum and rear wheel lie in the same plane.
There are many ways to adjust chain slack. Shorten or lengthen the chain itself, increase or decrease the diameter of the sprockets, move the mounting point of the pendulum... When tuning racing motorcycles, all these methods are used. But the easiest way to change the chain tension is to move the rear axle mounting point along with the driven sprocket. It is this solution, familiar from bicycles, that is used on all motorcycles.
There are two basic ways to move the axle mounting point. The first one is linear. The motorcycle pendulum has longitudinal slots along which the axle moves. Additionally, tensioners are installed. They come in different designs, but have a common principle: when you turn a screw or nut, the axis moves along the slot, respectively, loosening or tightening the chain. You just need to figure out the direction. It is also important to understand that while the nut on the wheel axle is tightened, you should not turn the tensioners - they can only be damaged by stripping the threads (however, after completing the adjustment, it is not harmful to tighten them so that they do not unwind on the road). Therefore, the axle nut must be unscrewed first. There are always marks on the pendulum and tensioners to help maintain wheel alignment. But in any case, I recommend tensioning the chain more or less synchronously, alternately gradually tightening the right and left tensioners.
Professional approach
Many motorcyclists treat chain tensioning as a routine procedure, during which significant tolerances can be made and the position of the rear wheel can be adjusted “by eye”. This approach when setting the required chain tension is unacceptable - all operations must be performed as carefully and accurately as possible, using special tools. If you want to extend the life of the chain and avoid severe wear on the transmission when using the motorcycle in extreme conditions, you should purchase a special laser gauge to set the optimal wheel position. In the most difficult cases, if you cannot understand the structure of the adjusting mechanism or cannot loosen it, you should contact the specialists of a motorcycle service station. They will carry out all the necessary work, providing you with a guarantee of the quality of the result and the reliability of the motorcycle.
Assembly (most important)
Okay, enough scientific analysis.
Time to put this thing back together. First, the front sprocket was installed on the motorcycle engine shaft, then the rear sprocket was put in place. Afterwards, the rear wheel was placed in the pendulum and secured with a cleaned and re-lubricated axle so that the wheel would not fly out anywhere. The chain was then stretched from the rear sprocket to the chainring. The direction in which the chain is installed does not matter. There are, of course, those who like to display the chain with inscriptions on the left side, but there is no point in this, except perhaps for aesthetic reasons...
We tighten the chain so that its ends meet on the rear sprocket. The teeth of the rear sprocket will support the chain links, which will make the task of further assembly easier.
The assembly of this type of chain is somewhat different from the standard chain assembly. There is no need to press the pin into it separately using a squeezer. The algorithm of actions in this case is slightly different:
Step one: To assemble the link, first install the O-rings (these are included with the new chain), as shown in the picture:
The purpose of these o-rings is to lubricate the insides of the pins throughout the life of the chain.
Step two: Lubricate the inside of the link with grease.
Step three: link assembly. It happens as shown in the photos below:
First we put on the bracket, then press it in with a squeezer.
It is important not to pinch or undertighten the outer bracket. The link should move easily, without jamming
Compare with other links in the chain. It would also be a good idea to use a caliper to measure the thickness of any link on the chain and the link that you just pressed in. They must be the same thickness unless otherwise specified in the chain instructions.
Measuring link width using a caliper
Is the width the same? Great! Now it's time to flatten the rivets with a special attachment using a rivet press. This way the link will be securely fastened and will not fly off the chain anywhere.
"Flattening" is also an important part of the job. Experienced people advise even checking the heads of the staves after the procedure with a caliper, so to speak, do they correspond to the specification? If the diameter is too small the plate may pop off, if the diameter is too large it may also fall apart as the metal is weakened
The link fell into place.
When both pins are correctly flattened, the chain installation is complete. It wasn't too difficult, was it?
Be sure to tighten the front and rear sprocket bolts and nuts to the manufacturer's required torque specifications. A wooden beam will help you.
Tightening the sprockets
Now comes the fun part of the job - setting the proper chain slack and aligning the rear wheel. I have always found this to be the most time consuming part of replacing a chain. Even if you have the right tools, you'll have to work hard to get it right.
Align the rear wheel, and then adjust the chain slack using the rear wheel tension. Since by centering the rear wheel, you can adjust the slack of the chain by simply turning the axis of the adjusting screws on each side of the pendulum with a certain pitch, tracking it on a special scale.
Rear Wheel Alignment Tool. We put the device on the rear sprocket and use the protruding rod to track the displacements. The goal is to combine the device rod and the chainline.
Once the wheel has been aligned, tighten the wheel axle nut, but not too tight as the axle still needs to be able to move back and forth to allow the chain to be adjusted.
This procedure will take some time to do everything perfectly, but the more often you do it, the faster it will be. Eventually the chain will have the correct slack and the rear wheel will be aligned. Once you've done this, torque the rear axle to specifications and apply lube to the new chain. The work is completed.
Applying chain lube
Calculations
Cost of spare parts: $175 (9 thousand rubles)
Cost of tools: $60 (3,300 rubles)
Working time: 6 hours
Disassembly
To make maintenance easier, place the motorcycle on a stable stand. We begin to remove the old chain drive. First of all, unscrew the front drive sprocket.
On some motorcycles it is secured by a huge nut with a lock washer; on the CBR, the sprocket is screwed to the shaft with a small bolt.
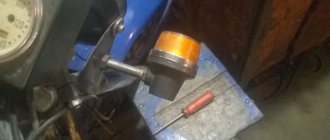
Wood: the choice of a professional.
To loosen this bolt, the front sprocket had to be secured. Simply engaging a gear is not enough to provide engine compression resistance. A specialized tool was used: a wooden wedge installed between the wheel spokes and the swingarm (rear swingarm) as shown in the picture. This locks the rear wheel in place, preventing the chain from moving, thereby keeping the front sprocket from turning. The method doesn't look very aesthetically pleasing, but it worked without damaging anything.
Using a long-arm wrench, the bolt was twisted without any problems. This step is important to do before you begin to remove the chain, since locking the rear wheel is the only cost-effective way to remove the sprocket bolt or nut. Once you've done what you set out to do, it's time to break the chain.
Once you have done what you have planned, it is time to disconnect the chain.
The chain on this motorcycle was of poor quality. This can be easily determined by the type of fastening that fastens the two ends of the chain. The method of fastening is the so-called “lock” on one of the links of the chain.
This type of connection is good for use on low-power machines with a small engine capacity. It is better not to install such a chain on sportbikes with powerful engines. There are cases when the “lock” flew off the pins of the chain and it unraveled. This kind of failure can have serious consequences: injure the motorcyclist and damage the motorcycle.
The chain that will be replaced is called “endless”. In it, the main link is riveted in exactly the same way as the other rollers in the chain. This method, when installed correctly, gives one very important advantage: the chain on the motorcycle cannot come loose. At least at the junction of its two parts.
After the clamp was removed from the master link, the pin was removed by squeezing the chain. The chain is divided. To rivet the chain, you can also use a grinder, which cuts off the axle cap...
The chain can now be removed from the motorcycle. Since the sprockets are also being replaced, the rear wheel also needs to be removed. But before removing, a good way to easily unscrew the heavily tightened rear sprocket nuts is to loosen them before removing the rear wheel. To do this, the wheel is blocked with a familiar piece of wood...
After loosening the sprocket nuts, I removed the rear axle and pulled the rear wheel off the rear arm.
It's always nice to rid your equipment of dirty, worn parts.
Old parts have been removed. But before you begin the reverse reassembly process, you will have a great opportunity to clean the motorcycle in those places where a rag and brush have not reached for a long time.
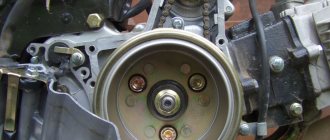
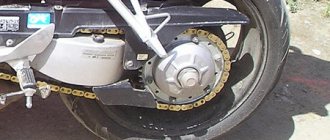
Before assembly, it is interesting to compare old and new parts. Looking at the photos below, it becomes clear why you need to replace motorcycle parts on time and not neglect replacing the elements that work together. You can clearly see how the teeth on the old chainrings became pointed, with wider grooves between each tooth. This is wear and tear.
New (left) and old (right) star
Compare the view of the new, left, and old drive star
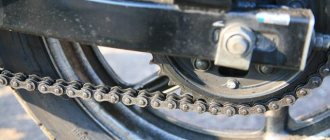
New vs old chain