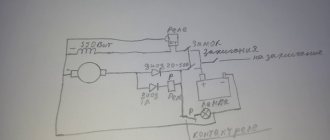
Generator G-11A of the Ural motorcycle.
Checking and adjusting the G-11A generator of the Ural motorcycle can be done in different ways. Serviceability is monitored by a warning light, and if for some reason it is missing or burnt out, then you need to remove one of the wires from the battery terminal at medium engine speeds. If the engine continues to run, then the generator is working.
The generator can also be checked by connecting one end of the wire to a portable lamp to ground, and the other to terminal I of the relay-regulator (in this case, the wires must be disconnected from terminals Ш and И). Then give the engine medium speed, and if the portable lamp lights up, then the generator is working.
Generator G-11A: 1 — drive gear; 2 — oil seal; 3 - armature winding; 4 — front cover; 5 — body; 6 - wooden wedge; 7 - armature core; 8 — pole shoe; 9 — excitation winding; 10 — brush; 11 — brush spring; 12 — contact bolts; 13 - ball bearing; 14 — bearing cover; 15 - coupling bolt; 16 — armature shaft; 17 — brush holder; 18 - collector; 19 — cover; 20 - protective tape.
Characteristics of the G-11 A electric generator → more details.
Adjusting gear mesh
If the generator has been removed, then when installing it in place it is necessary to adjust the engagement of its drive gears.
The procedure for adjusting the G-11 A generator of the Ural motorcycle is as follows: - install it in place in the engine crankcase; — start the engine and listen to the noise the drive makes; — if the drive is noisy, you need to increase the gap between the gears; — and if you hear a knock, reduce the gap; — loosen the bolt of the tightening tape and, turning the generator by the housing, set by ear the required gap between the gears; — secure the tensioning tape and check the noise of the gears again.
Return to contents — ↑
replacing a motorcycle generator with a more advanced 1000 or 750 watt
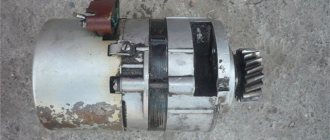
Generator from a tractor.
Heavy motorcycles in the domestic motorcycle industry are equipped with weak G 424 generators, designed for a maximum current of only about 15 amperes and a power of only 150 watts. In addition, they are too unreliable and often burn out, since the quality of workmanship, to put it mildly, has no idea what the word quality means. I’m generally silent about six-volt generator models; many call them flashlights, since the body diameter and luminous intensity are the same as those of ancient battery-powered Soviet flashlights.
And only recently, on more modern Ural Volk and Voyage motorcycles, they began to install 500-watt generators. And until they began to be replaced by Japanese generators from the Denso company, these generators either burned or their housing cracked at the attachment point. Generators from the Japanese company Denso, specially manufactured by this company for Wolves, Voyages and some Sollo models, are quite expensive and only 500 watts, which may not suit some fans of proper adult music.
Many owners of older Ural or Dnepr motorcycles install generators also from Japanese companies, but from cars. They still need to be found in working condition at a car disassembly and at a reasonable price, and if something burns out (they don’t like short circuits), then you will need to look for a Japanese part (relay, rectifier or winding), and as you know, Japanese spare parts are not cheap, even such common consumables as electric brushes.
I propose installing a three-phase generator from a tractor on the opposed engine - 462.3701, which does not have washable brushes at all; they are not provided for by the design. In addition, it has a power of 750 watts, and its new, more modern twin, which recently went on sale and has the same dimensions, has a power of 1000 watts.
Its main advantage over Japanese generators is the cheapness of spare parts (for example, a charge relay costs about $3), although in seven years of operation nothing on my motorcycle has ever burned out. Another advantage of this generator is that it can be bought literally for pennies at the nearest tractor brigade or in a special vehicle fleet, where you can also purchase a package of spare parts just in case - a rectifier unit BPV - 23 - 50 and an electronic voltage regulator Ya112B, an excitation coil and stator winding.
This generator was installed on almost all Soviet tractors, and on different tractors the difference was only in the diameter of the drive pulley. The main task when installing this generator on a boxer is: replacing the pulley with a drive gear, attaching it to the engine using a specially machined adapter, and connecting the electrical wiring.
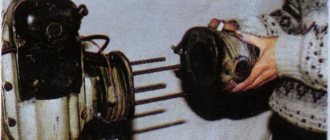
By the way, the cover bodies need to be modified with a milling cutter, adding oval holes for cooling (see photo above), since the cooling impeller is removed along with the pulley and without these ventilation holes the generator will be a little hot in the summer. This is done naturally by disassembling the generator completely. Disassembly is also necessary to modify the shaft.
First, I machined the shaft to fit the gear from K 750 on it. This gear has fewer teeth, which means the rotation speed will be higher than with the Ural or Dnepr gear, and this is important. With a gear from K 750, the generator charges already from idle speed, but with other gears with a large number of teeth, charging begins only after medium speed.
But it's not that. The gear from a six-volt cacique has a very thin wall in the area of the key. Having seated and clamped the gear, I assembled and installed the generator on the motor. During the trip, I turned on all consumers to check: music at 600 watts, three headlights (300 watts), emergency lights, dimensions and lighting. The generator easily coped with such a load and still charged the 61-amp battery, but the gear did not - it simply tore and opened in the area of the key, like a book, due to the thin walls.
Having made my conclusions, I immediately took this gear to a milling machine friend I knew and ordered a gear with the same profile and number of teeth as on the Cacique one, but in the area of the key there is much more body, for a tapered fit. According to this cone in the new gear, they made me a new generator rotor shaft, since the old shaft was machined to a smaller diameter (for the K750 gear).
You could, of course, buy a new Cacique gear and press a metal ring onto it in the area of the key, but since I had the opportunity to find steel for ST 12 XN 3 A gears and make a new one (see photo on the left), for a tapered fit, I did this did.
In addition, with the Kasikova gear, the rotor shaft turns out to be painfully thin after grooving.
This option A is more complex and, in my opinion, the most reliable, but at the very bottom of the article there is a drawing of the shaft and gear of option B, which is simpler. As a result, despite the large number of consumers on my motorcycle, I have been riding with this generator for seven years and have never had any more problems.
Making an adapter.
For the adapter, it is advisable to use a stainless steel blank (I used titanium) with a diameter of 115 mm and a thickness of approximately 40 mm, so as not to bother with chrome plating if it is sharpened from “black” steel. In addition, any stainless steel has sufficient strength for these purposes, unlike aluminum.
There was a drawing of the adapter on the Internet, and in general it was not bad (the bottom photo of the adapter with a shaft for the Dnieper gear), but I didn’t like that the oil seal rubs along the diameter of the gear. In the drawing shown below, the oil seal rubs along the smooth rotor shaft and wears out less, since the shaft has virtually no runout (unlike the diameter of the gear) and has a smaller diameter at the point of friction. And there is no need to put a sealing washer on the sealant under the gear nut.
The blank is turned on a lathe to a diameter of 112 mm and a protrusion with a diameter of 70 mm is machined on the front side. Next, the future adapter is clamped by this protrusion in the lathe chuck, but with an offset of 5 mm. Only after this can you grind all the internal diameters indicated in the drawing. This offset is necessary to adjust the gap between the generator gear and the camshaft gear.
After turning, we give the part to the milling machine, you need to use an 11 mm cutter to select oval holes for the generator mounting studs, and then use a cutter to select selections (in the shape of a crescent) for the 17 mm nuts that secure the generator (see photo of the picture at the very bottom). Diameter C by 35 mm is the outer diameter of the oil seal that I bought, but you can buy a 30 or 28 oil seal, it doesn’t matter, and according to this diameter, machine the oil seal seat in the adapter. The internal diameter of the oil seal for the rotor shaft is 17 mm.
When the adapter is ready, you will need to connect it to the generator housing. To do this, you need to drill holes in the adapter with countersunk holes for M6 bolts securing the generator housing and adapter. But here you should take into account an important nuance - on the body of the front cover of the generator, which will be connected to the plane of the adapter, there are holes for ventilation (after all, there used to be a cooling impeller there). So, before drilling, we make a test connection between the cover and the adapter and mark with a marker on the adapter the four drilling points that do not coincide with the ventilation holes.
In the picture at the very bottom these holes are approximately shown (4 holes for countersunk holes). The second nuance is that it is necessary to take into account when drilling these holes, where the pins (M5) that tighten the generator housing will be located when the adapter and generator are assembled. They should not interfere with turning the generator around its axis when adjusting the gap. Ideally, the top pin should be at the very top, and the other two should be on the sides of the generator, just below the middle.
After drilling holes in the adapter with a diameter of 6 mm, and in the front cover of the generator 5 mm, an M6 thread is cut into five millimeter holes in the cover for mounting bolts with countersunk mounting. Now, before assembling the adapter and generator, you need to remove all unnecessary things from the generator body. At the back and front covers of the generator, we cut off the mounting ears and sand the cut points.
The front cover needs to be turned on a lathe to remove the protruding edge (but I did this using a grinder). We remove and throw away the triangular cover for mounting the front bearing; instead of it, an adapter will now hold the bearing. I polished the rear aluminum cover, and polished and chromed the front steel cover (see photo above), but before that I had the ventilation holes milled.
Now you can dock and assemble the generator with the adapter, and then tighten the covers with three M5 studs. During assembly, it happens that the screws securing the excitation coil may rest against the adapter and interfere with assembly. It doesn’t matter, they can be sharpened a little. Before docking and assembling the adapter and generator, do not forget to press the oil seal into the adapter. After assembling the generator, all that remains is to install it on the engine crankcase and naturally it will not fit without modifying the engine crankcase in place.
On the Dnieper, the “hump” on the crankcase where the camshaft runs should be ground off. But don’t overdo it, grind the aluminum little by little with a grinder, constantly checking the fit with a generator. The rear aluminum cover of the generator should also be slightly sharpened from below. Ideally, the generator should lie with its body on the ground area on the crankcase, but should not interfere with turning it when adjusting.
In the Urals, the camshaft “hump” is slightly smaller, but here you will have to unscrew the interfering nut securing the oil pump axis and order a turner a new flat nut with a countersunk counter. On six-volt boxer models, you will have to work longer with an angle grinder on the crankcase, but installing this generator on these engines is quite possible.
The only thing left to do is connect the generator to the motorcycle's electrical wiring. To the + terminal of the generator, connect the wire from the positive terminal of your motorcycle battery, and keep in mind that the wire must be of the proper cross-section (see top photo), especially if you have many consumers. In addition, now instead of a measly 15 A on your motorcycle, the current will now reach 60 A, and even more with a kilowatt. Connect a wire with a smaller cross-section to terminal D on the generator, stretch it and connect it to one of the terminals of the red generator control lamp. Connect the second terminal of this lamp to the ignition switch terminal, where on-board battery voltage appears when you turn the key. When you turn the key, the lamp will light up, and when you start the engine it will go out and at the lowest speed it will light up slightly. When the speed increases, the lamp will go out again, indicating that the generator is working and charging.
shaft option for the Dnieper gear.
In conclusion, I want to say that in addition to this method of driving a generator, there are also belt drives from a roller with a pulley, fixed in a standard place, and the generator is placed to the side towards the raindrops, and another method of drive from a flywheel using a multi-ribbed belt. All these methods, as always, have their advantages and disadvantages.
But I think the mounting and drive method described above in this article has the most compact and dust- and rain-protected advantage of fastening, and as you know, compactness and practicality on choppers have always been welcomed. In addition, when examined, whether technically or simply by strangers, it never occurs to anyone that something on my engine was made handicraft and that it was a generator from a tractor, and not from a foreign car.
suvorov-custom.ru
Generator G-424 motorcycle Ural
Electric generator G-424 is a three-phase machine, with electromagnetic excitation. Generates alternating current. A VGB-2A rectifier is installed, the function of which is to convert the current into direct current, necessary for the electrical consumers of the motorcycle. For normal operation of an electric machine, a relay-regulator PP-330 is required. The work consists of connecting a generator or battery to the mains at a certain moment.
A distinctive feature of the G-424 generator is its inability to operate with a discharged battery. To start the engine and increase to 2400 rpm, the motorcycle runs on a battery. Only after this threshold is exceeded does the electric generator operate in self-excitation mode.
Generator circuit G-424: 1 - cover; 2 — oil seal; 3 - rotor; 4 - stator winding; 5 - terminal block; 6 — back cover; 7 — shield assembly; 8 - rectifier block; 9 - fan; 10 — protective casing; 11 - bearing.
Technical characteristics of G-424
1 – Voltage – 14 volts. 2 – Power – 150 watts. 3 – Full output current – 11 amperes. 4 – Total weight – 3.8 kg. 5 – The direction of rotation of the armature is right. 6 – The polarity of the motorcycle body is negative (minus). 7 – Specific power – 42 W/kg. 8 – Service life – 40,000 km.
The G-424 rotor is driven by a gear mounted on the engine camshaft. The gear ratio between the shafts is 1.33. The cantilever mounting on the crankcase is made with two studs
Adjusting the noise of G-424 gears
Loosen the nuts of the mounting studs and start the engine, turning the generator in one direction or another. We achieve the lowest gear noise. Having established the required gap, tighten the nuts. This is how the gearing of the drive gears is adjusted.
Incorrectly set drive gear engagement leads to overheating, premature gear wear and shaft failure.
Return to contents — ↑?
Heavy class motorcycles URAL, DNEPR | Topic author: Alexander
Adapter for car generator
Alexander (Amaria) Will be standing nearby. Generator from UAZ
Ilnur (Sable) What about your generator?
Alexander (Amaria) I want to install a generator from the car because... it is more powerful and there will be no problems with light
Lyolya (Chaya) set from a tractor to 1kW 150W
Lyolya (Chaya) only a lathe is needed
Generator G-414 of the Ural motorcycle.
The first production of motorcycles used six-volt electrical equipment. Accordingly, the generator generated direct current at the required voltage. It is installed in a special hole in the engine crankcase and secured with a tightening tape. Adjusting the gear engagement as on the G-11A is described above.
Generator circuit G-414:
1 – anchor; 2 – winding; 3 – bandage; 4 – collector; 5 – cover; 6 – rear bearing; 7 – cover; 8 – output; 9 – shields; 10 – coil; 11 – body; 12 – front cover; 13 – protective washer; 14 – front bearing; 15 – oil seal; 16 – key; 17 – castle nut.
Characteristics of G-414
1 – Constant voltage – 6 volts. 2 - Power - 65 watts. 3 – Full output current – 10 amperes. 4 – Total weight – 3.5 kg. 5 – The direction of rotation of the armature is right. 6 – The polarity of the motorcycle body (ground) is negative (minus). 7 – Specific power – 18.5 W/kg. 8 – Service life – 30,000 km.
Return to contents — ↑
Similar articles:
- Disassembly, assembly and repair of clutch
connecting a generator from a tractor
Darken
I got a 300-watt generator from a T-100 tractor, I think. How to connect this device, which relay regulator to install and how?
manowar
name of the generator? I'm not an expert on T-100 tractors
Darken
generator gt-1a4 output, 1,2,3,M. They short circuit with each other (or the current is large) and do not make contact with ground
hosa
For Darken: It’s very interesting how you were going to attach it to the motorcycle, otherwise I want one for myself too
quote:
what kind of relay regulator should I install and how?
So, install a native tractor, this will probably be the best option, but maybe not.
skyfox2002
This is a tractor from the time of Comrade Stalin, it seems to be called “Stalinist!”
manowar
it’s clear….in a word, with this generator a big hassle is provided with the connection. Look for another option.
MYT
This “Dynamo” is called a “collective farmer”. An alternating current unit without internal adjustments. It stood on old KhTZ and “Universals” of late production. It provided only lighting. There's a stupid magnet inside on the rotor and a working winding with taps. Just a large-sized bicycle “dynamo”… Not suitable for boxers….
a-pex
MaPro gene for 700 tractor. Brutal current already at 900 rpm. We have it in the store for 1340 rubles. Installed on DT-75. If you can, get it from a Mitsubishi Colt. It produces about 70 amperes.
Darken
I bought a generator from eight. 55 a. I put it through the pulley. If you make an adapter from the front cover of a 150 W generator with the shaft exiting to a pulley, will the bearing there not break?
Christian
I'm going to install a generator from a Zhiguli, if it works out I'll share my experience
uri
There is a question about a 700-padded tractor from a tractor. There is some kind of incomprehensible “chocolate” on which, apart from the inscription “Made in Belarus,” nothing could be found. Is it possible to plug in the Ya-112V instead? Apply + to terminal “B” from the gene output, to “B” apply + from the rectifier, which is on the OB (3 small diodes connected to terminal “D” genes). Connect the OB to terminal B of the chocolate box (also known as terminal “D” of the genes) and terminal “W” of the box. Anyone have any thoughts on this matter. Actually, the tractor ones have Ya-112B, with seasonal adjustment. Due to its absence, I want to install the Ya-112V.
MYT
So instead of Ya-112B you just put Ya-112V and that’s it. The seasonal regulator just won’t work...
uri
q] So instead of Ya-112B you just put Ya-112V and that’s it. It’s just that the seasonal regulator won’t work. It doesn’t want something to work 112V. Does not self-excite. It is excited only when you apply +12V to terminal “D” of the generator. Who knows what the reason is - the chocolate is not suitable (look for 112B) or there is a problem in the gene. Shekoladki changed one 112V to another 112V - the effect is the same.
And who actually installed a 700 padded jacket from a tractor, what are your impressions? Doesn't heat up? After all, it works without a fan.
M72_driver
So I already told you!!! This gadget is installed in the opposite direction, it works well, is very easy to maintain (since there are no brushes), it turns on at idle. BUT!!! It gets very HOT under light load (I only have 50W low beam, VAZ ignition and sometimes turn signals). It is necessary to leave at least the front holes open (in MOTO they made an adapter that plugs them). So there is no need to mock yourself and the motorcycle - do it through the pulleys, otherwise you will not be able to properly load a LARGE generator without cooling!!!
Regarding the relay regulator: look for a native one, you can find it in agricultural spare parts stores. About connection and generator number tomorrow.
M72_driver
By the way, I have 2 +12V wires from the generator and a wire to the indicator lamp.
MYT
for uri: I’ve had a generator for three years now, I mean, everything is a bunch. I haven’t noticed any glitches, the battery doesn’t go hungry, there’s more than enough for garlands. I didn’t do a very good job with two connection wires, it incorrectly determines the voltage and overestimates it. I don’t remember the details of how I connected it now, but tomorrow I’ll be in the garage, I’ll take a look and send “Ruthless” a drawing, if he deigns, he’ll post it, but there’s nothing complicated there...
MYT
And don’t believe me about the temperature. The generator is no warmer than the engine crankcase, I measured it using a tester with a thermometer. And my load, besides all the little things, is 2X100 in the headlights, and also, if I hook a lyula, it has a 100W finder headlight... and that’s all pulls fine. A general is like a woman, if he’s cold, he’s dead...
uriquote:
Gets very hot under light load
Didn't understand. According to all the laws of physics, it should warm up just under heavy load.
quote:
So there is no need to mock yourself and the motorcycle - do it through the pulleys
I don’t want to - the view is not so great, and I don’t really want to have a belt drive in front of my feet, and it’s not safe.
PILOT666
for uri: at low load it needs to release its own current somewhere, so it releases it through rectifier diodes...
manowar
for PILOT666:?????????? Didn't understand??????
quote:
at low load it needs to release its own current somewhere, so it releases it through rectifier diodes...
how to understand this? there is no surplus there. This is not a bourgeois generator, where there are 3 phases, a rectifier and a simple stabilization - “excess” in heat. Here the magnetization control ensures the absence of “excess”
MYT
for manowar: Manowarych, sometimes it’s pointless to argue here. People are sometimes so confident in their delusions that they can’t prove anything...
uri
I don’t understand what the joke is - I installed the native 112b, but for some reason there is no self-excitation. The diodes of the additional rectifier (terminal D) are all in working order 3. Maybe something is wrong with the OB? Who knows what kind of resistance it should have. Generator G-700 tractor.
motoroad.ru