Why do you need valve adjustment on an Alpha moped? The engine of the FMB 139 moped is equipped with a gas distribution mechanism with the camshaft located in the cylinder head. The valves are driven by rocker arms. During engine operation, the valves experience thermal expansion, so a small gap is provided between the rocker arm and the valve to compensate for thermal expansion. Insufficient or excessive clearance may cause serious engine damage.
The negative effect of incorrect clearances accumulates gradually and can cause valve burnout, seat destruction, decreased compression, overheating and deformation of important timing components. Adjusting the valves on the Alpha moped should be done several times a season. If the thermal clearances are set incorrectly, a characteristic knocking sound may appear when the engine is running, which is also a reason for adjusting the valves.
How to adjust the valves on an Alpha moped?
There are 2 hex caps in the engine head: on top are the intake valves, and on the bottom are the exhaust valves, which relate to the exhaust pipe.
In order to adjust the intake valves, you need to remove the cover (be careful not to lose the rubber ring).
And in order to adjust the exhaust valves, you need to remove the arches, if they are present on your moped, after which you need to lift the moped or lay it on its left side.
To adjust the valves you will need: a flat screwdriver, a special square wrench (for the adjusting screw), a 9 or 11 wrench (for the lock nut), pliers with thin jaws (to clamp the valve stem) and a set of feeler gauges, we will need a 0.05 feeler gauge (for measuring gap).
Signs of improper valve adjustment
If the thermal gaps are too large, this can cause a characteristic knocking or ringing sound that occurs when the engine is running. Loss of compression can also be an indirect consequence of improper valve adjustment. Indirect consequences of incorrect valve settings may be an increase in fuel consumption with a decrease in power due to depressurization of the valves, as well as loss of synchronization of their operation, when the operation of the valves begins to advance or lag behind the piston operation cycles.
Advantages of the Alpha moped engine
The Alpha moped has a motor - an exact copy of the engine produced by Honda for many years. The scheme, worked out over the years, works on the Honda Supe Cub, on the Monkey, Gorilla and Jazz models. They performed inhumane experiments on this engine, pouring sunflower oil instead of motor oil. There was a slight smell of roasted sunflower seeds, but the engine was running. This video is very popular among owners of any equipment that has such a motor. The Chinese motorcycle industry has spoiled almost nothing. If you monitor the condition of the moped in general and the motor in particular, the equipment will last quite a long time.
Internal structure of the Alpha moped engine
Proper Engine Maintenance
When purchasing a new Alpha moped, after a thousand kilometers of gentle mileage, you need to change the oil and adjust the valves. The engine parts have become accustomed to each other, the excess has been scraped off and now the unit can be returned to normal operating modes. Semi-synthetic oil is quite suitable, this engine does not rev high, and valve adjustment is a necessary maintenance item for any moped and even motorcycle.
What happens in the motor?
During engine operation, thermal expansion of all parts and valves occurs. If the valve clearance is greater than the nominal one, the shock loads on the entire gas distribution mechanism will increase and, ultimately, it will fail. When the gap is larger than required, such a roar is heard from the engine that it will be impossible to ignore it. If the gap is smaller, then the valves will simply tighten due to thermal expansion and stop opening. The moped will not start. It is worth watching a video once about the principles of operation of a four-stroke engine to understand how the moped works and how to adjust it. You can make a video yourself showing the process of setting up the engine of the Alpha moped.
Customization Tools
So, how to adjust the valves on an Alpha moped? What is needed for this? It is necessary to provide access to the adjustment mechanism. At the head of the engine there are two small hex caps, on top, there are the intake valves, and on the bottom, towards the exhaust pipe, there are the exhaust valves.
Adjusting the intake valves is easier, everything is visible. When removing the lids, do not lose the rubber ring that seals them. And in order to adjust the exhaust valves, if there is no lift, it will be more convenient to place the moped on its left side. You will need a special square wrench for the adjusting screw and an eleven wrench for the locknut. Feeler gauges for measuring gaps.
How is the adjustment done?
You can preview some video on this topic. The gap is measured between the top of the valve and the adjusting screw. We take the dipstick that says “0.05”. We loosen the nut, and, placing the feeler gauge under the bolt, use a special four-sided wrench to adjust the gap until the tip of the bolt easily touches the feeler gauge. If the dipstick comes out with little effort, the gap is smaller than necessary.
The first time it is quite difficult to feel the necessary effort. And each time, you will need to start the moped to understand how the adjustment went. But over time the skill will develop. Typically, the valve clearance at the intake is smaller than at the exhaust. This is due to the fact that the exhaust valves heat up more due to the temperature of the exhaust gases. But in this motor the clearances are the same and easy to remember.
Recommendations for working with the engine
When purchasing a vehicle secondhand, it is necessary to carry out the above operations, since old owners usually sell the moped “as is,” transferring all responsibility for customization to the new owner and reducing the cost. In addition to adjusting the valve, experts advise changing the oil and cleaning the engine from combustion products and dirt, reducing emissions.
If you need to change the engine completely, then all operations and a set of tools can be applied to the analogue from the Honda Super Cub, since the “Alpha” is in many ways a copy of the specified moped. The set of tools supplied with the vehicle does not contain these elements, so you need to take care of purchasing them in advance - even before purchasing the moped.
Adjusting the gap when the engine is cold is recommended not only to ensure hand safety, but also because of the design properties - the valve lengthens during operation. It is strictly not recommended to adjust the gaps without using feeler gauges, since this method is ineffective due to the fact that the owner is actually counting on a lucky break.
Additional tool
In the standard set of tools for the Alpha moped there is no special key to adjust the gas distribution system of the moped. It is customary to contact specialists with this question. If you plan to thoroughly maintain your moped, you should get one. Also on the list of useful wrenches and accessories is an alternator puller and a castle wrench for unscrewing the clutch castle nut.
When handling any equipment, production culture is important. If you do not carry out all the work with a hammer and chisel, the moped will serve faithfully for many years.
Source
Photo report: Adjusting valves on the Alpha moped
Adjusting valves is probably the simplest and at the same time very important maintenance job for your moped engine. Almost any novice driver can do it. By doing this work yourself, you save your money and time, and in addition, you have complete control over the quality of the work done from start to finish.
Timely implementation of work on adjusting valve clearances can significantly extend the life of your moped engine and increase its overall reliability as a whole.
It is advisable to make the first adjustment immediately after purchasing a new or even used moped, the second adjustment immediately after break-in, and all subsequent ones after 4000 km.
Before starting the adjustment, let the engine cool down if it has been running before; the engine temperature before adjustment should ideally be 18-25 degrees.
Using a regular flat-head screwdriver on the left side of the engine, unscrew the two plugs on the generator cover (marked with arrows) and remove the camshaft cover from the cylinder head (marked with an arrow).
We insert a socket wrench into the central hole and turn the engine crankshaft in the direction of rotation until a mark appears in the upper inspection window of the generator cover next to which the letter “T” will be stamped (do not confuse it with the letter “F”!), the risk you should stand strictly in the center of the viewing window.
After the “T” mark in the inspection window takes the desired position, we check the position of the marks on the camshaft and cylinder head housing (marks are marked with arrows). The marks on the camshaft and cylinder head should be as close to each other as possible. If the marks do not align, turn the crankshaft one more revolution and again check the alignment of the marks on the camshaft and the upper inspection window of the generator cover.
After all your marks match, unscrew the two plugs on the cylinder head: one on top and one on the bottom, under which there are adjusting elements.
Using a 9mm wrench, unscrew the locknut on the rocker arm and slightly unscrew the adjusting bolt.
We take a feeler gauge 0.05 mm thick and insert it between the adjusting bolt and the valve, tighten the adjusting bolt so that the feeler gauge moves between the valve and the bolt with little force, use pliers to secure the adjusting bolt from turning and tighten the locknut. After tightening the locknut, insert the probe again and check what we got (if necessary, repeat everything again). We do the same with the second valve.
After all that has been done, we check that the ignition is turned off and crank the engine several times with the kickstarter (the engine cannot be started at this moment!). After cranking the engine, we re-align the marks in the window of the generator cover and the camshaft and once again check the correctness of the thermal clearances, and if necessary, adjust them again.
Admin
You may also like
Scooter air filter maintenance
How to clean a scooter muffler
Adjusting the ignition of the Izh-Planet motorcycle
Preparing for work
For small parts like fasteners, you need to prepare an empty jar or box so as not to lose anything. It is desirable that each type of fastener (differentiated by diameter) has its own compartment - this way, during assembly, incorrect installation of parts, unnecessary noise due to instability of fixation and complications when driving after assembly are eliminated.
The room temperature should be 18-25 degrees, since at a lower value it will be uncomfortable to work due to deteriorated sensitivity of the fingers. In winter, it is necessary to warm up the garage to the specified values. Another reason is the nature of the gaps themselves. They are thermal, therefore, during repairs and maintenance at a different temperature, incorrect settings and deterioration of the engine condition in the future are possible. Before gaining direct access to the engine, you will need to remove the seat and put it somewhere where there are no dirty parts.
to "Photo report: Adjusting valves on the Alpha moped"
Good afternoon.
Should the intake and exhaust valves be adjusted at mark T?
Otherwise, the instructions say, first we adjust the intake valve, then we turn it 1.5 turns and adjust the exhaust valve?
Alexander, everything is correct: we adjust the valves only according to the “T” mark. There is no need to turn anything 1.5 turns. I’ll tell you a little secret: all these instructions are written at the suggestion of traders - specifically so that, following these recommendations, you break your scooters and mopeds and buy more spare parts from them.
Thank you very much for your help ????
I seem to be doing the same thing, but the valves are still clicking =) the engine is 3000 km old and is already acting up like a bastard, not idling stable at low speeds, and can barely start when cold
Chinese technology is not predictable.
Guys, good day... Please tell me, I have an Alpha 110 cc. mileage 1450 km. Until the first thousand, during the run-in, the moped worked perfectly, developing power up to 8500 rpm. when the mileage was 900 km, the moped reached a speed of up to 95 km/h. After the first thousand mileage, changing the oil and adjusting the valves, instead of improving performance, the moped began to lose power. But the speed still reached at least 80 km/h. When I first checked the valves, they were both pinched. In September I started having problems with starting and interruptions in operation.
I made mistakes on the quality of gasoline and carburetor adjustment. After that I drove about 300 km and put the moped away for the winter. And so in the spring I filled it with gas, started it and was not delighted. It now develops power at 7500 rpm. and that’s it, taboo... When you go uphill and into the wind it’s generally 6500. When I start it in the morning until I give it 2500 rpm. and if I don’t hold the gas for at least half a minute, it stalls. After warming up, the idle speed is normal, although it sometimes floats around 300-400 rpm. In general, engine power and operation at low and medium speeds is normal. The carburetor appears to be adjusted correctly. The electrode of the spark plug is light brown, it maintains speed and does not stall when the throttle valve is opened sharply. In general, it does not develop full power and has been heating up lately.
I adjusted the valves according to the diagram in the instructions, turning the shaft by 1.5 revolutions. I made the clearances 005 and 005. But according to what I read in your comments, now I’m thinking of re-adjusting the exhaust valve clearance at mark 5 without turning it. The exhaust is normal, I don’t see any signs of smoke. Do you think this is the only reason, to readjust the exhaust valve clearance, or am I missing something? After all, there may be more than one reason, for example, incorrect fuel level in the carburetor float chamber, etc. I cleaned the air filter and checked the jets in the carburetor.
And one more question. My engine is marked 139FMA, although judging by the design and all the descriptions it is FMB, because there is no FMA larger than 50cc. However, I am still confused by the valve clearances, do 005 and 005 apply to everyone? After all, for the 50k the gap is 003 and 005. This begs the question, do the 50k and 110k have identical cylinder heads? The difference in clearances is only due to the difference in power, or is there a difference in design features?
Alexander:
Sorry, but maybe I'm wrong, but:
1. You are running in incorrectly. (And proper running in is the key to engine longevity.)
2.You adjusted the valves according to the diagram in the instructions, with the shaft turned by 1.5 rpm - this is rather incorrect, the admin has already written that this is incorrect.
3. In my opinion, for a 139FMB of 50-72 cubic meters of volume, the gap should be at least 0.05 mm at the inlet and outlet. But for your engine, I don’t know.
4. Regarding the loss of power, there can be many reasons: Worn piston, Dirty carburetor, Incorrectly adjusted engine valves, etc.
I can’t say anything more. The admin will tell you what is right and what is wrong.
Admin:
Thank you very much for your invaluable advice. I would award a medal for solving this problem. I didn’t think or wait long, but simply took the dipstick, opened the valve covers, caught the T mark and rechecked the gaps. Intake is normal. 005 was, but the graduation, believe it or not, was 4 mm, not some tenths or hundredths, but real 4 mm. Here's one and a half turns for you (520 degrees)... Kill few of those who write these instructions. Adjusted both valves at the T mark and lo and behold! The engine is practically inaudible during operation, although before that there was a metallic clatter and the moped was tearing like crazy. The previous speed has returned, it accelerates to 8500 rpm. And what would I do without you. With these instructions I drove the valve to the point of burning out, and then spat on it and called it Chinese crap. Therefore, admin, thank you very much, your information has no price.
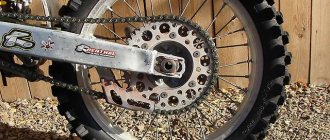
And finally, I wanted to ask. My chain drive sprocket has 14 teeth, so the maximum speed is 85 mph, well, in some cases it reached 90. So should I change it to a 16-tooth one, or leave it at 14? Will the difference be noticeable at low speed, or will the overall efficiency increase?
Andrey:
Sorry, but you didn't read my comment carefully. I wrote that the mileage is nothing less than one and a half thousand km, therefore, piston wear disappears at once. About the carburetor, he made it clear that there was nothing to scour there, besides, in terms of adjustments, the screw for the quality and quantity of the mixture, I had already eaten the dog. I also described the gaps 005 and 005 for both valves and, as it turned out, the admin was right, both valves are adjusted at the T mark. But oh... Oh gods, how many guys are currently tinkering with manuals, can’t sleep at night in bewilderment, but the only problem is in misinformation I researched a bunch of forums and read a bunch of useless books that said the same thing, gap 005 on both valves and turn 1.5 turns to adjust the exhaust valve. My deepest bow to the admin, because he was the only one who opened his eyes to the true essence of the problem. I saw a lot of guys on the forums whose valves burned out and had other problems related to the valves. Well, and I... The main thing is that I caught myself in time and did not force the equipment. I drove 400 km after the first thousand and adjusted the valves, I hope this will not affect the further operation of the valve mechanism, although I will still change the oil, despite the low mileage, because if the exhaust valve did not close completely, exhaust gases would break into the crankcase, which is unacceptable and has a detrimental effect on the unit as a whole.
Oh, I almost forgot, I wanted to tell the knowledgeable guys about oil. Is it normal for it to turn black almost immediately after replacement, or should it always be clean? The fact is that at all stages of break-in and after, my oil always turned black. After the first 300 km, 1000 km and now. That’s why I don’t know, maybe I initially had the wrong valve clearance and that’s why the oil darkened?
Source
Before you start adjusting the valves
Therefore, after purchasing a new Alpha RX, I checked the valve clearance. For this procedure I had to buy a set of probes. In our case, you will need a probe with a thickness of 0.05 mm.
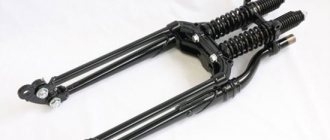
In order to calmly begin adjusting the valves, I had to unscrew the safety bars. For this we need a key of 8.
To get to the valves, you need to unscrew the valve covers located on the top and bottom of the cylinder head. To do this we need a 17 wrench. I used a spanner.
Setting TDC on Alpha
To start adjusting the valves on the Alpha moped, you need to set the top dead center. To do this, remove two covers on the rotor cover. Rotate the rotor until the T mark appears.
To accurately control this process, you need to remove the timing sprocket cover. To do this, on the opposite side you need to unscrew the clamping bolt, which can be unscrewed with a 10mm wrench. Remove the timing chain sprocket cover carefully so as not to damage the gasket.
The star has a mark in the form of a dot. It should be aligned with the mark on the head body.
To easily turn the engine mechanisms, I unscrewed the spark plug, reducing the compression to nothing.
Now you can begin adjusting the valves on the engine.
Prevention of timing belt and consequences of its breakdown
All timing elements of the FMB 139 engine require periodic and constant checking of their degree of wear. Stretching of the timing chain and wear of its tension elements can lead to its breakage, which will require quite a troublesome repair associated with the need to remove the generator rotor, or disassembling the entire crankcase to replace the oil pump gear. In addition, a broken timing chain can cause deformation of the valves, which will require their replacement and grinding of new valve plates onto the seats. Failure of individual timing elements can cause a number of other serious breakdowns.
Let's start adjusting the valves
Let's start with the intake valve, which is located at the top of the cylinder head. We'll need a key for 9. Yes! Not 8, not 10, but 9! Good thing I had a set of sockets in the car. But it is better to use a spanner wrench, which conveniently unscrews the pusher fixing nut on the rocker arm.
Then we need a feeler gauge with a thickness of 0.05 mm, which must be inserted between the pusher and the valve stem. By rotating the pusher, we reduce or increase the thermal gap until the probe moves with slight tension. After tightening the fixing nut, we again check the gap with a feeler gauge, which could have gone astray.
In a similar way, we begin adjusting the exhaust valve.
Gas distribution mechanism of the FMB 139 engine
The gas distribution mechanism of the FMB 139 engine is equipped with a camshaft located in the cylinder head. The valves are arranged vertically and V-shaped and are driven by a rocker arm, which in turn is driven by the camshaft lobes. This system is very similar to the Moskvich 412 timing belt, only there is only one cylinder and two valves.
The camshaft is driven by a chain drive. It, in turn, is driven by a gear located on the axis of the generator rotor, which is the axis of rotation of the crankshaft.