For a vehicle to function properly, it must be fueled with high-quality fuel. But even the most highly purified gasoline will not save you from rust in the gas tank if it has already appeared.
To prevent its smallest particles from leaking through the filter and damaging the engine, you need to regularly clean the fuel storage from corrosion.
Read the article on how to clean the inside of a gas tank from rust.
Preparing for cleaning
To prevent rust from accumulating in the gas tank, it must be cleaned regularly. Professionals advise doing this at least 3 times a year.
Before you begin the main procedure for removing corrosion, you need to carry out several preparatory measures:
- Empty the tank. It should not contain gasoline. It must either be developed or drained.
- Remove the tank, open the cap and turn it over to remove any remaining gasoline from the lines and from the bottom.
- Place the container in such a way that it is convenient to pour the cleaning composition into it.
Even preparatory activities should take place in a well-ventilated area. Gasoline tends to evaporate, and its vapors are toxic to humans.
The first method is “old-fashioned”
I’ve seen it on many resources, so it’s generally accepted. Further actions depend on how deep the corrosion has eaten into the tank wall. If it is significantly covered with rust from the inside, then you can use a simple and reliable method.
It is necessary to remove the gas tank, drain the remaining gasoline from it, rinse it with water and pour a couple of handfuls of nuts (not large ones) into it. After which we stock up on patience and strength, and begin to shake the tank so that the nuts knock off all the rust from the walls. If desired, you can replace the nuts with pebbles or sand; sometimes the remaining rust is cleaned with sand after the initial treatment of the gas tank with nuts. Fill with gasoline for final rinsing. After washing, drain the mud and see what’s wrong with the tank. If there are still small rust residues left, you can use already proven orthophosphoric acid or special rust converters.
Wikipedia: “Orthophosphoric acid is also used to remove rust from metal surfaces. Forms a protective film on the treated surface, preventing further corrosion.”
Which methods are not suitable?
It is not recommended to use mechanical cleaning
to remove corrosion .
The use of abrasives or hard metal objects may simply cause a hole to appear in the tank. For the same reason, high concentration acids should not be used to remove metal oxide.
Do not throw nuts, washers or bolts into the container . When shaking, the intact metal will be knocked off along with the rust, causing the tank to quickly become unusable.
Rust control methods
◾Manual
Practical Stain Removal describes the use of abrasives to remove heavy rust without a fuel tank. The raw material can be anything hard enough, as well as small enough to fit in your gas cylinder . The first thing you can do is place some small screws and nuts inside the container. Place them inside and shake. At the same time, small nuts and screws remove scale deposits.
You can additionally use s Omsk pears and crushed stone for this, as well as almost anything that can move the gas tank without getting stuck. Anything will certainly do as long as it's nasty enough to get rid of the range build-up and also tiny enough that it can be easily eliminated without the intended use of the tank.
However, this method may not be the most effective if the level of rust is high.
◾Chemical
Chemical restoration is commonly used in renovations. He uses white vinegar or extra mild acid to clean the gas tank. Vinegar helps remove rust from the fuel tank as it actually embeds itself into the tank.
However, you should only use mild acids; otherwise, it may absorb as well as damage the container itself, which is something you should stay away from. You want to be safe in the container, getting rid of all the rust.
For best results, combine this method with the previous one. Combine chemicals with nuts and bolts to create a saliva-like cleaning agent.
Water pressure
If you carry out the event frequently, you don’t need to use detergents and acids. It is enough to take a Karcher and rinse the inside of the gas tank with strong water pressure.
This method will save fuel filters from quickly depleting.
How to clean the gas tank:
- Disconnect the tank. Before doing anything, you must disconnect it from your motorcycle or other equipment. Without disconnecting the tank, you will not be able to access it or clean it safely. Unfold the tank and remove the screws or bolts that secure it. For lawn mowers and similar items, the fuel line and spark plugs must be removed.
- Close the fuel line. After disconnecting the fuel line, you need to block the access to gasoline. Dirt or other objects can get into the fuel line and cause problems. Take some kind of smooth clamp and attach it to the line near the carburetor.
- Empty the tank. Pour the remaining fuel into a gasoline-safe container. If you can't get everything out, use a suction hose or similar device to remove the fuel from the tank. Let the tank dry completely. Without draining the remaining fuel you will not be able to clean properly.
- Inspect the tank. Take the time to examine the tank, looking for any problems that could compromise its integrity. Defects, rust, or other problems may pose a potential safety hazard or may jeopardize the proper operation of the engine.
- Turn on the Karcher and spray high pressure water into the tank. It is necessary to treat all surfaces of the gas tank.
At the end of the procedure, it is necessary to dry the container and replace it.
If you are performing the procedure for the first time, take a photo of the disassembly process to make it easier to assemble later.
Carbonated drinks are great for removing limescale and rust. Coca-Cola, Pepsi, Sprite and just sparkling water are suitable for this procedure.
It's better to use Coca-Cola. It contains phosphoric acid, which will clean the container in a matter of minutes.
How to flush the gas tank:
- You will need as much drink as the flammable mixture can accommodate. You can use any carbonated drinks containing phosphoric acid.
- The drink is poured into a container, which you don’t mind spoiling if something happens, and heated to 40 degrees. Warm Coca-Cola effectively removes rust.
- While the drink is on the stove, remove the gas tank and place it in the sun, it should also be warm.
- The heated liquid is poured into the container to the very edges.
- Leave for 2–4 hours. The holding time depends on the degree of contamination. If the gas tank is cleaned once a year, then you can leave the drink in it all night.
Finally, drain the sweet drink and rinse the reservoir.
Flushing the engine and fuel system - methods
We have already written about the simplest option (using “auto chemical products”). But it is not suitable for significant contamination. Alternative and more complex processes are given below:
- mechanical cleaning (removal of nozzles is required; in addition to the product, ultrasound is used);
- washing with complete disassembly of the power unit (the ramp is dismantled, then other elements and each of them is cleaned separately with both compressed air and special liquids).
Instead of ultrasound, when working independently, you can use an electric battery charge. The second option involves cleaning the valve and gas tank along with purging the fuel actuators.
It is possible to flush the fuel system of not only gasoline, but also diesel engines. To do this, you need to prepare “Solvent” and two 80 cm rubber hoses, which are put on the injection pump (you must first remove the standard ones). On the other side, the “mains” are immersed in a container with the above-mentioned cleaner. Next, turn on the ignition, starting the “heart” of the car and leave it running for 15-20 minutes. Next, the power unit needs to be turned off and allowed to “rest” for half an hour. During this time, the chemical effect of the product is carried out. The procedure is repeated until the solution is completely exhausted, then the standard elements are mounted back.
There is another working option for flushing the fuel system of a gasoline engine. Its main difficulty is that it requires an extra pair of hands. This method involves the use of fuel additives that are mixed with fuel. To do this, remove the hose connecting the “intake” manifold and the vacuum pump. The mixture prepared in advance is poured, for example, with a syringe into the system. Next, wait 20 minutes to allow the solution to distribute in the system. At the same time, the assistant turns on the internal combustion engine and accelerates, maintaining the speed at 2,500 per minute. At the same time, it is necessary to add the product during the process (which is why the car owner himself will not be able to do such work). At the end of the procedure, let the engine cool and replace the spark plugs.
Causes and signs of gas tank contamination
Many car enthusiasts don’t even think about the fact that the insides of the gas tank may need to be flushed or cleaned. Indeed, this is a completely closed container, where does dirt or dust come from?
However, the older the car, the more clogged the fuel tank becomes. And this can be blamed on several factors:
Tank service life - during operation, rust forms inside a metal container under the influence of temperatures.
Using low-quality fuel, which contains large amounts of dirt and sediment.
Failure to use cleaners to remove impurities from all elements of the fuel system.
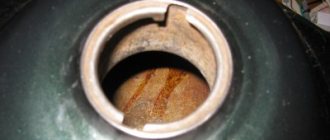
The gas tank cap allows you to safely pour fuel through the filler pipe into the tank container
The main sign of a dirty fuel tank can be considered jerks in engine operation at low speeds. Water and impurities in gasoline prevent the engine from using all its intended power, so at low speeds the car begins to twitch.
When to clean the fuel tank
Cleaning and flushing the fuel tank is a prerequisite for its reliable operation. However, it is not recommended to wash it too often. The procedure can be performed once every two or three years, it all depends on the operating conditions and the quality of the fuel being poured.
If the car is constantly refueled at questionable gas stations on the highway, it is recommended to clean the tank capacity once a year. This will save the fuel filters from quickly depleting and eliminate the possibility of the lines becoming clogged with dirt and impurities.
For the entire fuel system (including the gas tank), the use of high-quality fuel is considered an important operating factor.
Actually, cleaning the gas tank is necessary to ensure high-quality operation of all elements of the fuel supply system. After all, small particles of sediment and impurities can enter the engine through the tank, which can lead to serious damage.
Getting rid of rust
Corrosion eats away at fuel tanks not only due to moisture. Numerous additives used to increase the octane number of gasoline also contribute to its occurrence. If the stains are not removed in time, you may end up with expensive repairs or replacement of any element of the vehicle’s fuel system, including the fuel tank itself. To prevent serious consequences, you can use one of the effective methods for removing corrosion.
Cleaning with water, shot and reagents
To remove rust particles, use a high-pressure water jet. To enhance the effect, you need to throw small metal objects inside, for example, nuts. In addition, you need to purchase a special rust neutralizer. Acetone, thinner or acid will also work.
All work with chemicals should be carried out in a well-ventilated area or outdoors. It is imperative to use personal protective equipment: respirator, goggles, thick rubber gloves.
The procedure is as follows:
- You need to start by removing any remaining fuel and removing the gas tank.
- Pour 2-3 liters of hot water inside.
- Add shot or other filler.
- Shake the tank.
- Drain and repeat the procedure several times.
- Dry the container.
- Prepare the reagent. If you use a purchased regressor, you must follow the directions on the package. The acid is diluted in the amount of 100 milliliters per 1 liter of water, and acetone will need one liter.
- Shake the tank vigorously and do this several times every 2-3 hours.
- Rinse the tank with a solution of water and baking soda in a ratio of 100 g per liter.
- Treat the inner cavity of the tank with clean water.
- Remove the nuts using a magnetic screwdriver.
- Dry the tank.
- Set it in place. If corrosion stains are found on the outer walls, clean them and paint them.
- Fill with fresh fuel.
This technique is quite effective. However, it takes a lot of time to implement it, and if the tank is severely corroded by rust, you can pierce it through with pellets or burn it in weak spots with acid, so old containers should be cleaned using another method.
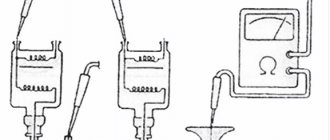
Applications of Electrolysis
When electric current passes through a chemical solution, the substance decomposes into its constituent parts. It is this property that is used when cleaning the fuel tank from corrosion using this technique. To carry out the electrical procedure you will need:
- Caustic soda.
- Battery or charger.
- Metal conductor.
- Water.
It is recommended to steam the tank before starting cleaning. To do this, you can use a steam generator or the traditional method. You need to put a hose on the exhaust pipe, the second end of which is inserted into the neck of the container. Drying should be carried out for 15-20 minutes at idle speed. You can also use this technique when welding cracks in a gas tank.
Electrochemical cleaning should be carried out using thick rubber gloves and avoid getting the solution on exposed skin, since caustic is a strong alkali and causes burns to the body. If you come into contact with this solution, the affected area should be rinsed generously with clean water.
A short guide to electrolysis:
- Mix one glass of caustic soda in 30 liters of water.
- Fill the tank 90 percent with solution.
- Insert the conductor inside to the bottom without touching the walls. You can cut a wooden or plastic plug to fit the diameter of the neck and place this electrode in the middle.
- Connect the wire to the minus of the battery, and the cleaned area of the tank body to the plus.
- In 2-3 days, the internal space will be completely cleaned of traces of corrosion.
- After completing the process, you need to disconnect the battery and remove the electrode.
- Drain the liquid, rinse and dry the tank.
Despite the duration of the procedure, this method is effective and delicate. However, to avoid such hassle, it is easier to prevent the formation of rust.
How to flush the gas tank without removing it from the car
Completely flushing a car's gas tank is a rather labor-intensive but effective procedure. If you don’t have time to do it, but you need to clean the gas tank of accumulated contaminants, you can perform express cleaning without removal, which is much less effective. You can clean the gas tank without removing it from the car as follows:
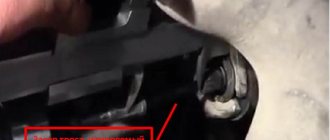
You need to unscrew the drain bolt on the bottom of the gas tank and pour the remaining fuel into a plastic container;
- Next, you need to tighten the drain bolt and take 2-3 liters of good, clean gasoline. Pour it into the car tank;
- After this, start rocking the car left and right so that the gasoline can wash away all the dirt from the walls of the gas tank;
- Drain the gasoline used for washing and fill in new 2-3 liters of gasoline to repeat the procedure;
- After draining the gasoline again, close the drain plug and clean the gas tank using compressed air.
At this point, the washing can be considered complete. As mentioned above, cleaning the gas tank without removing it from the car is ineffective. The benefit of it largely depends on the design of the gas tank itself and the degree of contamination.
Next option
We take the tank, drain the gasoline, blow out or dry the tank with the cap open. When everything is dry, take about 0.5 liters of any rust converter (chemicals), of which there are countless quantities in any auto shop. Alternatively, the same orthophosphoric acid. But be careful with it: don’t breathe or drip on the paintwork. Close the cap and twist the gas tank so that the liquid wets all the inner walls. We wait a little - from 25 minutes to an hour (depending on the temperature) and the whole mess. pour out what has formed. To clean the container from chemical residues, you can rinse it with plain water and baking soda. Soda neutralizes acid residues and softens the water, which washes absolutely everything. But do it carefully. We drain the remaining soda and rinse it with running water, and simply dry the tank.
Phosphoric acid converter
Phosphoric acid is a potent chemical; it is recommended to use it outdoors, away from fire and heating appliances.
This converter is used with rubber gloves and safety glasses.
It is not recommended to use orthophosphoric acid in its pure form. If you do not comply with the proportions, you can cause irreparable damage to the fuel tank.
Cleaning the fuel tank yourself - step-by-step instructions for using the converter:
- First you will need to dismantle the tank. Follow this algorithm: remove the terminals from the battery, drain the remaining fuel from your gas tank, disconnect the fuel level sensor and disconnect the ventilation and fuel hoses. All that remains is to unscrew the screws and carefully remove the container. Place the gas tank on a level surface.
- First, wash the inside of the container with hot water. This will help remove large chunks of rust and dirt. Hot water is poured into the gas tank, closed and shaken vigorously. The dirty liquid is poured out and proceed to the next step.
- 500 ml of converter with orthophosphoric acid is poured into the container. The tank is closed and slowly rotated so that the liquid is distributed along the walls.
- Cleaning the gas tank will take 1-2 hours. After 1 hour, you can drain the converter and perform a final flush. If there is a lot of rust, the procedure is repeated.
- The final rinse involves filling the reservoir with water. 100 grams of baking soda are poured there per 10 liters of liquid.
- All that remains is to dry the tank. There should be no liquid left in the gas tank. Drying takes 3–4 hours.
You will have to devote almost the entire day to the procedure to thoroughly clean the gas tanks from rust.
After the converter has washed away all contaminants and the tank has been dried, you can install it in the car.
This method of washing will not leave any trace of corrosion. She won't appear for a long time.
Causes and signs of gas tank contamination
Many car enthusiasts don’t even think about the fact that the insides of the gas tank may need to be flushed or cleaned. Indeed, this is a completely closed container, where does dirt or dust come from?
However, the older the car, the more clogged the fuel tank becomes. And this can be blamed on several factors:
Tank service life - during operation, rust forms inside a metal container under the influence of temperatures.
Using low-quality fuel, which contains large amounts of dirt and sediment.
Failure to use cleaners to remove impurities from all elements of the fuel system.
The main sign of a dirty fuel tank can be considered jerks in engine operation at low speeds. Water and impurities in gasoline prevent the engine from using all its intended power, so at low speeds the car begins to twitch.
When to clean the fuel tank
Cleaning and flushing the fuel tank is a prerequisite for its reliable operation. However, it is not recommended to wash it too often. The procedure can be performed once every two or three years, it all depends on the operating conditions and the quality of the fuel being poured.
If the car is constantly refueled at questionable gas stations on the highway, it is recommended to clean the tank capacity once a year. This will save the fuel filters from quickly depleting and eliminate the possibility of the lines becoming clogged with dirt and impurities.
Actually, cleaning the gas tank is necessary to ensure high-quality operation of all elements of the fuel supply system. After all, small particles of sediment and impurities can enter the engine through the tank, which can lead to serious damage.
How to flush the gas tank without removing it from the car
Completely flushing a car's gas tank is a rather labor-intensive but effective procedure. If you don’t have time to do it, but you need to clean the gas tank of accumulated contaminants, you can perform express cleaning without removal, which is much less effective. You can clean the gas tank without removing it from the car as follows:
- You need to unscrew the drain bolt on the bottom of the gas tank and pour the remaining fuel into a plastic container;
- Next, you need to tighten the drain bolt and take 2-3 liters of good, clean gasoline. Pour it into the car tank;
- After this, start rocking the car left and right so that the gasoline can wash away all the dirt from the walls of the gas tank;
- Drain the gasoline used for washing and fill in new 2-3 liters of gasoline to repeat the procedure;
- After draining the gasoline again, close the drain plug and clean the gas tank using compressed air.
At this point, the washing can be considered complete. As mentioned above, cleaning the gas tank without removing it from the car is ineffective. The benefit of it largely depends on the design of the gas tank itself and the degree of contamination.