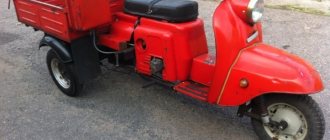
Ural Hercules - factory Ural tricycle
The Irbit Motorcycle Plant has released a three-wheeled modification in its model range for transporting cargo up to 500 kg. The model is called “Hercules” and moves well both on city roads and off-road. The sides of the tricycle are also removable and this allows it not to be limited in the size of the cargo it transports. Hercules is a truck that does not require a category “C” license.
Technical characteristics of the Hercules tricycle:
- Dimensions: 335x150x115 cm
- Ground clearance: 185 mm
- Weight: 500 kg
- Fuel tank capacity: 19 l
- Maximum speed: 70 km/h
- Engine capacity: 750 cc
- Power: 45 hp
- Engine type: opposed 4-stroke with two cylinders
- Generator: 500 W
- Electrical: 12 V
- Transmission: 4-speed, with reverse gear
- Tires: 6.45 and 13 inches
Recommendations
It is important to consider some features of using tricycles. These devices are usually intended only for dry areas. And even there they cannot accelerate faster than 30 km/h. And when driving together at a speed of more than 20 km/h, the shock absorbers may not cope. More powerful motors help compensate for some of these problems.
A few more subtleties:
pay attention to torque;
attach the gearbox to the motor as firmly as possible;
Homemade moped: manufacturing features and video instructions
Nowadays, many people have begun to engage in constructive creativity. Fortunately, there is time for this, materials and video instructions that can be easily found. If a homemade bicycle is interesting to some part of our society, then there is nothing to say about a homemade scooter or tricycle, which are easy to make. In city conditions, this is a very useful type of transport, which can be maneuvered quite successfully. You can buy a scooter or a tricycle, but making them yourself means turning all your ideas into reality, a unique opportunity to save money, and much more. You can always make it using a high-quality video guide.
Making the rear axle
The rear axle is welded from rectangular pipes or profiles. If there is a need to transport luggage, we advise you not to lengthen the wheelbase, but simply choose the length of the profile/pipe based on the calculation: rear axle mounting plus 40-50 centimeters. In the front part of the rear axle frame, it is necessary to weld mounting loops with bearings.
In the place where the rear wheels will be located, it is necessary to mount 2 bearings in which the axle will rotate. The rear sprocket of the scooter is bored in the center and soldered to the axle pipe.
Important! When choosing the location of the rear sprocket on the axle, try to position it so that it is in the same vertical plane with the front sprocket.
On the opposite side of the axle, you need to weld a brake disc (you can buy a brake disc and pads from the front wheel of another scooter). The brake disc also needs to be bored to fit the axle. The pads are fixed to the frame (it is necessary to make the connection detachable to replace worn pads in the future).
We weld fasteners for the rear axle shock absorbers onto the bearing mounting brackets.
Other modification options
In addition, you can also make other equipment from a walk-behind tractor. For example, you can get a dumper, a pneumatic duct or a vibrating plate. Also, some craftsmen make a loader or snowmobile from a walk-behind tractor. Many people use walk-behind tractors to harvest corn.
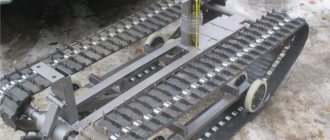
Snowmobile
This design allows you to move comfortably in the snow. To do this you will need fairly wide wheels. The caterpillar can be obtained from an old snowmobile. It will be able to fit under the wheels of a walk-behind tractor. The snowmobile itself is made from a frame, tracks, and some suspension elements. The mount can be used from a walk-behind tractor. After the modification, you get an excellent snowmobile, which is also suitable for hunting in swamps. Therefore, the result is both a swamp vehicle and a snowmobile.
Motorized towing vehicle
Sometimes when buying a factory motorized towing vehicle you have to face many disadvantages. Therefore, most often they are made with their own hands. They turn out to be quite durable if you use a walk-behind tractor for this. This design will do its job perfectly and also save fuel. In addition, it will be possible to attach compartments to this design to store the necessary tools.
Excavator
As a result, this technique will turn out to be quite compact and convenient. However, to cope with this work, you first need to make drawings. All work with drawings must be done in great detail - this will greatly facilitate further work. After this, you can move on to the design itself. First you need to make a frame, you can use a channel. After this, you need to attach the beam (up to 11 meters in size) to the frame. Springs and springs are not needed. For a simpler option, you can use a homemade axle on which wheels are mounted. The result is a chassis. Next, using a special machine, you need to grind out all the mechanisms that will be needed for movement, as well as brackets and fastenings for hydraulic cylinders.
The ladle can be purchased at the store. For hydraulics, you will need to buy a pump, and you can also use cylinders from an old KamAZ. You also need to purchase a hydraulic distributor, which will be needed to control the excavator.
When all spare parts have been purchased, you can begin assembly. Then you need to connect the power take-off shaft of the walk-behind tractor, as well as the oil pump through the cardan. After this, you need to connect all the hydraulics with high pressure hoses. Next, the finished structure must be painted, and all parts must be lubricated, after which it must be tested in operation.
Motor drill
Many fishermen no longer want to go fishing with a conventional drill, so some of them decide to convert a walk-behind tractor, which is not needed in winter, into an ice ax. You don't need to use any special effort for this. You just need to rearrange the wheels of the Zhiguli, and also make an attachment to set the drill in motion. After which you can safely go fishing. In the summer, the walk-behind tractor will be able to be used for its intended purpose again.
Motor winch
This homemade walk-behind tractor can be made at home. This will help save money. For manufacturing you will need a motor, a frame, and both shafts: upper and lower. The motor for this can be taken from a chainsaw. In addition, it is necessary to make drawings, and then begin assembly.
In addition, factory walk-behind tractors can be converted at your discretion into other designs, for example, a trike or a circular scooter.
Thus, if you show a little ingenuity, as well as get some parts and make high-quality drawings, you can use the walk-behind tractor as the starting material for the manufacture of a large number of devices that will become indispensable assistants in the household at different times of the year. However, it is important to strictly follow the assembly instructions and follow all recommendations.
How to make a three-wheeled scooter with your own hands. Blueprints
The practicality of a trike is higher compared to the classic scooter layout. It’s true that its price is steep, so we suggest taking a used Honda scooter or any other used scooter as a basis and remodeling it yourself.
How to make a tricycle from a scooter with your own hands
Added: 06 Oct 2022, 17:21
Figure 14 shows two rotors, the top one that burned out, the bottom one new. Why do I not recommend rewinding the rotors? If you look closely at the lower rotor, you will see a gray plaque; on the upper one it is simply not visible. The rotor was balanced at the factory; when rewinding, it is not always possible to balance it and the electric drive can quickly fail.
• Shuttlecocks are circles with different inner radii. The width of all shuttlecocks is the same - 10 cm. The circle must be cut in one place along the shared thread. The flounce is sewn onto the inner line of the circle.
Step two
By the way, there is an easy way to check the functionality of the power supply. To do this, it must be disconnected from the motherboard. Simply disconnect the connectors of the wires leading from the block to the plateau. Connectors can be 20 or 24 pins (4 or 6). To check whether the unit is working, you need to short-circuit contacts 14 or 15 with each other (if the connector is twenty-pin) or 16 and 17 (if it is twenty-four pin). That is, green (sometimes gray) and black wires are connected to each other. Then the unit itself is connected to the network through an outlet. If the cooler fan starts working, then everything is in order, it is not the cause. You need to look for other damage. You can also sew a blanket envelope for a newborn. Compared to the previous version, it has a simple and easy to sew pattern. This envelope is very easily transformed into a baby blanket, then, if necessary, reassembled into an envelope. Sewing it will take a small amount of time, but the convenience of this item is undeniable.
Proper installation of door hinges ensures correct functioning of the door. Make a ponytail that was fashionable in the 60s with a backcomb at the crown from an ordinary ponytail.
Each of us remembers the New Year celebration, especially the beautiful Christmas tree with toys, garlands, confetti and candles. In order not to buy a real Christmas tree or make some addition to it, it is possible to create Hand Made decorations for the holiday from what you have on hand. This craft will surely delight your family and friends.
To obtain a polyline, perform the following steps: Hello! I have two LED table lamps. Both burn well and very brightly. But yesterday I needed to transport them from one city to another, and after transporting one of the lamps began to burn very dimly, and then stopped altogether. I tried unplugging it from the socket and plugging it back in and turning it on. The LEDs lit up, but very very faintly, but two LEDs now don’t light up at all. Tell me, please, is it possible to somehow fix the lamp? And what caused this breakdown? Could it be that I hit the case and now it doesn't work? Thank you in advance for your response!
If we continue the topic of choosing gifts for the older generation, then this task is quite difficult. Not every dad, who has long since become a grandfather, can be gifted a parachute jump or quad biking. A photo book would be a good gift for parents for the New Year. As a rule, on the eve of the New Year holidays there is usually a lot of work in photo workshops, so you should start thinking about ordering such a gift as early as possible. To order a photo book, you will need to select the most interesting photos together, come up with text for each page of the book, you can add photos of parents with their grandchildren, brothers and sisters, and friends. Of course, you will have to spend a lot of time, but such a gift will make an indelible impression, becoming one of the most original and unforgettable. As an alternative, you can give a photo frame with pre-uploaded photos as a New Year's gift.
transparent glass container with a lid. There were a variety of doll designs, but they all had one common feature - the absence of a face. This is easy to explain: through facial features, a doll can be exposed to dark forces and bring negative energy into the house.
Having mentioned warm beds, a few words should be said about their structure. A warm bed consists of several layers. The bottom layer is thick branches, cardboard and other organic debris with a low decomposition rate. The middle layer is foliage, tops, hay, straw, etc. garden waste with an average rate of decomposition. The top layer is compost and soil. The thickness of each layer is approximately 20 cm. The lower two layers gradually rot and release heat. Therefore, the bed thaws much faster after winter and seedlings can be planted in it earlier. This is how an early harvest is achieved.
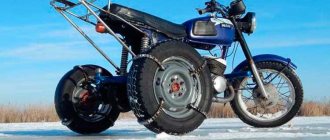
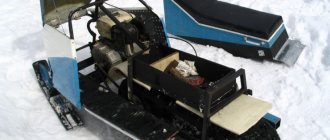
DIY trike (ant)
Such a scooter can be made independently by any owner of a two-wheeled scooter or Alpha moped with a motor power of up to 150 cubic centimeters, including the possibility of upgrading a vehicle with one shock absorber. The only condition that the manufacturer of the TMS kit sets for the user to be able to convert it into a scooter-trike with his own hands is that the scooter engine must have a top mount.
Main parts of a moped
First, let's look at the main parts of this technique. In other words, let's take our future scooter apart, so to speak, and find out its main elements so that making a moped is easy.
Main moped components
Engine
It is clear that without a good engine you cannot go far on a scooter. In this case, it is usually installed on the D-6 power unit. Recently, chainsaws have also become very popular, from which a homemade moped is made. In the video instructions you can see in detail how to do this. Chainsaws will be discussed in more detail below.
Exhaust system: forward flow
It is necessary to carefully consider a high-quality exhaust system so that the muffler does not have a negative impact on the power unit with which homemade mopeds are equipped, but, on the contrary, helps to quickly get rid of the remaining air-fuel mixture. A direct flow made by yourself will be what you need.
Suspension: pendulum fork
A pendulum fork that looks much better than other versions of this part of the scooter. The fact is that a large number of varieties of forks can be made, but any expert will confidently tell you that nothing is better than a pendulum one, nothing has been invented yet. As you know, this part of the scooter bears the hardest work. It is the fork that takes the brunt of the impact when going over various bumps, and generally uneven sections of the road. This is a kind of suspension on which the driving characteristics depend. Thanks to the pendulum fork, you can achieve stability of the scooter on any road.
DIY Izh tricycle
Few people know, but you can make a tricycle with your own hands from Izh in an ordinary garage with a fairly small budget. A small trike will have a comfortable fit, dynamics, good handling, and the lightness of the frame will allow you to accelerate at a fairly high speed.
The model itself can be implemented in the style of a rigid bike , with leather trim, chrome-plated steel inserts, or have a more sporty look, with streamlined shapes and lines of the body. Drawings of a tricycle from Izh can have emphasis on long trips, or on active driving on difficult rough terrain, copying models of famous brands, adjusted for size. Much depends on your budget and the time you are willing to invest in your hobby.
Some motorcyclists make a tricycle from Izh with their own hands in order to have a reliable and convenient household assistant. The reinforced frame and powerful rear axle will allow you to transport decent loads, and the reliable IZh engine is easy to maintain.
It will be easier to make an Izh tricycle with your own hands if you have experience in welding and understand the design of motorcycles or cars. The frame will have to be completely manufactured from scratch, have a pre-designed shape and structure. Usually the calculation is made in such a way as to exclude breakdowns and places with vulnerable structures, so that the trike can travel hundreds of kilometers without maintenance.
Strengthening is achieved by welding corners and additional pipes so that the fork does not vibrate. The basis of the transmission can be taken from a walk-behind tractor or combine harvesters. If you want to get a traction type Izh Planet tricycle, it is better to use sprockets in a ratio of 2:1, i.e. 50 and 25 teeth respectively.
Work algorithm
Step 1
First you need to make bearings and mounts for the rear axle. Fastenings are best made in the form of a pair of brackets. To prepare them, steel plates are used, in which it is necessary to cut grooves corresponding to the cross-section of the axis. It is necessary to provide 2 holes into which the bearings are inserted.
From the bicycle frame we need only one pipe, the end of which is a carriage with pedals. Places of future welds are cleaned of paint and dirt/rust with a grinder.
Step 2
In addition, the brake disc and sprocket must be fixed on the rear axle. To do this, you will need a lathe and a good turner to bore the holes in the star and disk according to the diameter of the axle. A sprocket from a motorcycle and moped is best suited. Select the number of teeth so that a large gear ratio can be provided (if an increase in traction force is necessary). The more powerful the engine, the smaller the sprocket can be installed without losing power at high speeds.
Step 3
We install the brake pad. It is most advantageous to install a hydraulic brake system on the rear axle.
The front brake can be left from the scooter.
Next, the engine is mounted on the frame, the front and rear parts of the frame are assembled, the exhaust system is mounted, the seats are mounted, the exhaust pipe is attached and the electrical components are installed.
Scooter and tricycle made from a chainsaw
Chainsaws, as mentioned above, are very popular among home craftsmen. They are distinguished by their light weight and dimensions, and in terms of power they are what you need. Today on the Internet you can watch many video tutorials on how to make a tricycle, scooter or moped from a chainsaw . More often mopeds and scooters are made from the Druzhba chainsaw. An old bicycle is also taken, onto which all the parts are installed, including a forward flow muffler.
An example of a homemade tricycle scooter
Muffler
It is the forward flow muffler that becomes almost the main feature of making a homemade scooter, because you need to know some of the secrets of its installation. The forward flow muffler was originally invented for sports cars. A forward flow muffler in itself already increases the power of a scooter engine.
Air filter
An air filter for a homemade moped or tricycle is also made by hand. First of all, the filter must be reliable. It is recommended to use an oil filter from Moskvich, a washbasin siphon, a metal pin, silicone and a self-adhesive micro-pork to make such an element.
- The filter is clamped between the neck of the siphon and the rest of it;
- The whole thing is held together with a metal pin, the length of which is selected on the spot;
- Place the plug on the metal pin;
- We collect everything and treat the cracks with silicone;
- We glue a micropork onto the flange of the siphon neck.
Manufacturing stages
Making a tricycle from a scooter with your own hands begins with cutting the bicycle frame. It is most convenient to cut metal using an angle grinder with a cutting wheel. The mounting points for the bearings are drilled with a crown. Then comes the time to form the frame, and after that you will need to make a plate that will attach the engine to the frame. An alternative solution is to use moped and bicycle parts.
The very first step in this option is the manufacture of bearings and mounts for the rear axle. Such fastenings are usually a pair of brackets. To prepare them, steel plates are used, cutting grooves that exactly match the diameter of the axis. They provide a pair of holes where the bearings are secured. When making a homemade tricycle, only one pipe is taken from the bicycle, which previously ended in an axle with pedals.