With the onset of winter, two-wheelers lose their relevance. Using a car to cover short distances with heavy snow cover is not particularly practical and, in most cases, impossible. A snowmobile copes much better with this task.
In most cases, a winter mechanical vehicle is equipped with tracked rear wheel drive and front steering skis. High cross-country ability, versatility and ease of use make the snowmobile today the most popular means of transportation in the winter season.
How to make a snowmobile from a scooter with your own hands
Dear visitors to the “ Samade Friend ” website, today we will look at one of the options for assembling a snowmobile from a scooter with your own hands. Mainly that no fundamental changes have been made to the design and the scooter can be easily converted from a snowmobile into an all-terrain vehicle) A moped or scooter is an excellent and moderately economical means of transportation, both in the city and in rural areas. This type of transport is especially popular among teenagers, because it is an intermediate link between a bicycle and a real motorcycle) With the onset of cold weather, motorcycles are placed in the garage and remain there until spring, but not in our case, because a scooter is made into an excellent snowmobile for fishing trips)
Tags
from a scooter with yoursfrom a scooter with yoursmoto scooter sleep scooter becomesfor a scooter.one scooter is the design of a scooter notransmission of a scooter geared to your scooter.so that the scooter does not take the caterpillar from one caterpillar will come outthan the tracks taken wide caterpillar and installed tracks so that the caterpillar is not on the caterpillar.you caterpillars and over the caterpillar. Snowmobiles Snowmobiles with your own hands with your own hands with your own hands with your own hands. with your own hands with your own hands with your own hands with your own hands.
drawingswideread
Homemade snowmobile on tracks with your own hands from a walk-behind tractor: video, drawings, photos
As soon as winter begins in our country, given the climate, two-wheeled vehicles are put away in the garage until spring. It may be impossible to use a car for transportation due to heavy snow. And here, a snowmobile on tracks, which you can make from a walk-behind tractor with your own hands, comes to the aid of all motorists who want to move along a snowy road.
Not everyone has the opportunity to buy an additional vehicle, but everyone can independently construct a homemade tracked snowmobile from a walk-behind tractor.
Description of the vehicle
A modern ATV is equipped with four or six small wheels, but with increased maneuverability. The main technical characteristics include: light weight, all-wheel drive and low gear. Due to the unique configuration, the vehicle can easily travel on country roads. It can be used in summer and winter.
To make a homemade ATV, it is recommended to decide on its type:
- Utilitarian. The model has a lot of weight and good maneuverability. The vehicle easily carries several people and accelerates to 90 km/h.
- Stunt. Equipped with a narrow platform and radiator. The car weighs little and can accelerate to 137 km/h.
Practical information
Making your own snowmobile from any scooter? It's a simple matter, if you have the desire. Approximate speed of the latter? 40-60 km/h. If we take into account the weight of the finished converted unit and the weight of the passenger? The speed of the snowmobile will be within 20–45 km/h. Moreover, this takes into account the use of the original engine. Its advantages include that it is quiet, has a CVT gearbox, forced cooling, light weight, electric ignition, consumes little fuel, and does not vibrate. In general, a real find for DIYers.
The only thing that can significantly reduce the power of the unit and increase the weight of the entire structure? These are snow-filled pockets that are included in the design of the scooter. To prevent this from happening, you can make a casing with your own hands that will cover the upper part of the caterpillar:
- take polycarbonate, organic glass, any other plastic;
- from the taken sheet we cut out the sides of the future casing;
- we fasten them using hot glue and plastic corners;
- take flexible and thin plastic, if possible, and cut out a strip whose width is equal to the width of the casing;
- we assemble everything into corners and coat the joints of the parts with plasticine;
- Now we cut out pieces corresponding to the casing from fiberglass, coat them with resin, and then lay them tightly on the structure;
- After a day, everything will dry, and it will be possible to trim the resulting protective casing as needed.
With my own hands, as you can see, I managed to turn an ordinary scooter into a snowmobile. Minimum investment of time, effort, money? This is what distinguishes this design from others. And, by the way, this power unit is quite capable of pulling both a sled with children and a loaded cart.
What you might need
In order to make a homemade moped, you first need to decide on the parts that will be used during assembly. In most cases, the basis of the design is an unnecessary bicycle. You immediately need to think about where all the details will be placed. The most bulky of them is the engine. It is usually located in the rear trunk or at the bottom of the frame. If the frame has such a structure that placing the engine will create inconvenience when moving the moped, then it can be made separately. This will require welding work. The frame should be made from bicycle parts that are specially designed for the appropriate load. If necessary, you can change the geometry of the desired part. For this, a stop is used and the use of water pipes is strictly prohibited, since they do not have sufficient strength. Such a homemade moped will not go far. Engine mounts can be cut from sheets of iron with a thickness of at least 5 mm and welded to the frame.
Body kit
Exterior body kits can be made from fiberglass material or old motorcycles or cars. To make the body, it is recommended to glue a “blank” of plastic or wood. When using this technology, it is possible to fit the parts of the body kit to each other as efficiently as possible. Fiberglass is applied to the model, forming the parts of the body kit.
After this, the body needs to be sanded and primed. When the layer dries, special paint is applied. Then the operation of all systems and mechanisms is checked, and appropriate modifications are made if necessary.
How to make a homemade snowmobile, options from a scooter
In good weather, a motorcycle scooter with a small engine capacity has always been in demand not only among young people, but also among adults. Because it was distinguished by its ease of operation, lightness and good speed. But unfortunately, when cold weather sets in, due to the small diameter of the wheels, riding a scooter becomes very uncomfortable, and in snowy weather, even wearing winter tires is completely unrealistic.
Having studied various motorcycle magazines, it was noticed that there are caterpillar movers on sale; they can be installed instead of the rear wheel, which will lead to the transformation of the motorcycle into a snowmobile.
If you have like-minded people in this matter, then it is best to take a track from the Buran snowmobile (photo 1); it will work perfectly, since one track will produce 4 suitable for a scooter. The cost will be 2.5 times cheaper than tracks taken from a motorcycle. But for one scooter it will cost too much.
What kind of motorcycles can I use?
Back in Soviet times, motorcycles were created that are prototypes of modern technology. You can very easily make a snowmobile out of them. Let's remember some of them.
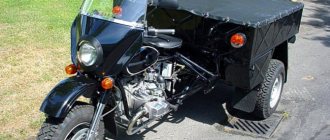
"Ant"
It was used as a cargo vehicle, had a body and three wheels. This model had wheels located as follows: one in front (drive), and two more at the edges of the body. The snowmobile from this motorcycle was the most popular among the residents of Russia. This is where it all started. One of the villagers dismantled his old motorcycle, installed a motor on a ski and tracks that were made from an ordinary fence. The product had its drawbacks, but people quickly figured out how to fix them.
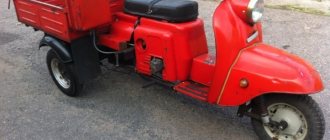
"Dnieper"
It had various modifications: MT-9, 10, 11, 16. These models were equipped with engines from 27 to 32 horsepower. It was distinguished by a cradle for the third passenger. Almost all motorcycle parts are used for a snowmobile, however, in case of repair, it will be difficult and expensive to buy spare parts.
"Ural"
This motorcycle was usually equipped with military equipment during the Great Patriotic War. The power is very pleasing, it reaches 40 horsepower. In this regard, the motorcycle is one of the best for creating a snowmobile based on its engine. The model is three-wheeled and has additional space for a passenger.
"Sunrise"
It became the next model after the Kovrovets (K-175), which was produced from 1957 to 1965. The engine is two-stroke with one cylinder, volume 175 cc. cm, power - 20 horsepower. Good characteristics, thanks to which it will be very easy and cheap to remake the motorcycle.
"IZH Planet"
Years of production: 1962-1967, 20 horsepower. Many people still have this model; it can also be used to create new equipment.
"Minsk"
A two-wheeled motorcycle, which began to be produced in 1951. And even then, many people had a desire to convert this motorcycle into a snowmobile, but things didn’t go further than ideas.
Tools and materials
The required components will be:
supporting elements (wheels, runners or tracks of your choice);
gear and transmission links;
fuel tank;
steering controls;
the frame on which all other components rest.
Most often, snowmobiles are not mounted on tracks or skis, as is usually thought, but on wide pneumatic wheels.
Many craftsmen use bicycle or motorcycle rims.
But the most passionate people make them with their own hands. The following can be used to make tracks:
Additionally you will need:
a star transmitting and receiving impulse;
one or more seats;
fasteners (nuts, bolts, screws);
We're starting to remodel
So what is the main goal? To use the scooter for its intended purpose in the summer and as a snowmobile in the winter, minimal changes will need to be made to the design. Namely ? remove the wheels and install a ski in place of the front one, in place of the rear one? mover.
We fasten the ski with our own hands using a stand, in which the left and right sides work separately, independently of each other (or, in other words, a frame made of corners on top, and a rod below). This type of design is extremely safe because, firstly, it helps the ski stay on the snow surface. Secondly, the scooter-snowmobile will not spontaneously go sideways, will not become uncontrollable on ice, and the wear of the ski when moving on asphalt is minimal. Besides, a rod? According to its function, it must be a skate, not straight, but semicircular, so that the steering wheel can freely turn in different directions both on snow and ice.
We continue to make a vehicle with our own hands, and now it’s the turn of the caterpillar, which stands in place of the rear wheel.
So, you will need a driven sprocket from a Buran snowmobile, two wheels, small, with roller bearings, a wheel with the diameter of a moped. So, we cut out the splines with the brake drum from the moped wheel and, having drilled a hole in it, insert a smaller disc there. To prevent the mover from sliding off the resulting wheel, we make similar hooks with our own hands from the plastic water pipes that were used for the caterpillar.
We take roofing metal and make a bandage out of it with our own hands, for which we attach hooks to furniture screws at a distance, taking into account the location of the holes on the caterpillar. That is, by attaching the bandage to the moped wheel with hooks, we get a drive sprocket for the propeller.
Now you will need to connect the Buranov star with two roller wheels with M8 bolts, and a pin (M10 thread) will be used as an axis. A square pipe and metal corners are suitable as a frame for the caterpillar. It is difficult to name any specific dimensions, since in this matter it is necessary to proceed from the brand of the scooter itself and from the size of the track.
Parts selection
ATV frame
Depending on the “donor” and the design of the quad, you either have to make the frame yourself, or you can reconstruct a finished, used one.
The most important thing is that the engine is securely bolted to the bottom along the frame, which can be located either front or rear. The transmission and drive should also be firmly attached to the frame to avoid play.
Homemade frame
The material used is ordinary water and gas pipes with a wall thickness of no more than 3 mm:
- for spars - 25 mm;
- for crossbars and struts - 20 mm.
The pipes are connected using spot welding, followed by solid welding. Ears for attaching shock absorbers and levers are welded to the frame immediately. Brackets - during installation of units and components.
Reconstruction of an existing frame
To reconstruct a finished frame, you should remove everything, leaving the frame, dismantle the back part and build up the front. Then weld elements for fastening a complete set of components and assemblies of the ATV. When reconstructing a motorcycle frame, the seatposts should be moved back by 40 - 45 cm.
The front and rear luggage racks are cut out of a metal sheet and welded to the frame. Finally, the finished frame is painted; there is no need to varnish it.
Additionally, we recommend reading our expert’s article on how to choose a roof rack for your car.
We also recommend reading our specialist’s article, from which you will learn how to select and install a box on the roof of a car.
Preparation for work
Before you start assembling a motorized dog with your own hands, you must decide on its characteristics. It is important to decide what load capacity the equipment will have, what engine it will power, and what type of transmission will be used in the design. The mechanic needs to decide whether the engine will be started with an electric starter or manually.
When motorized dogs are made with your own hands, they are usually supplemented with devices that will respond to the owner’s needs. This may include:
- winch;
- circuit protection;
- additional light.
You may need a motorized towing vehicle in the form of a pusher. All these characteristics will allow you to determine the required set of tools and materials.
Accessories
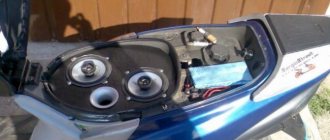
It is recommended to use the engine, power and ignition from one scooter so that the entire system functions smoothly. It is advisable to modify some components; for example, it is advisable to equip the ignition system with a battery with characteristics suitable for an ATV. It is better to take the fuel tank from a scooter, as it is large enough for such a system.
The front and rear axles are taken from a cargo scooter, since they are subject to heavy loads. If these system elements are not strong enough, they will quickly deform and fail.
Springs for the shock absorber can be taken from any motorcycle that is large enough. They are fixed on the frame movably, with a configuration resembling the letter “A”. You can purchase shock absorbers separately, as they should provide a smooth ride. New parts perform better than used parts.
Control can be either steering or motorcycle. The choice depends on the taste preferences of the master. The brake lever is connected to the transmission brake, connecting the system to the rear axle sprocket.
Motor
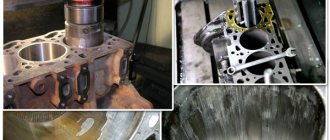
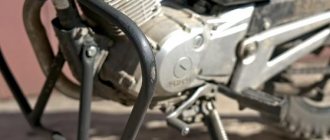
An ATV with a scooter engine will not differ in significant power. But when driving off-road, the driver will be able to get his share of drive. Once the frame is assembled, the motor can be mounted on it. This is a painstaking process that requires accuracy from the master. The motor must fit firmly into its seat. Otherwise, it will be subject to strong vibrations.
The motor shaft must be connected to the gearbox on the rear axle. To do this, you need to attach a chain drive to the gear. The transmission is installed immediately after this, bringing all controls, including those from the engine, to the frame. The pedals and control levers are secured to the appropriate seats.
Power unit
The motor is removed from a sports or regular motorcycle, scooter, or car. Auto mechanics advise using a four-stroke engine with a power of more than 15 hp. With. The power units of scooters differ from other analogues in their low fuel consumption. An ATV based on a scooter weighs little, so it can be pulled out quickly if it gets stuck in sand or mud.
To transport cargo or drive off-road, a stronger motor is installed:
- from Izh-1, Izh-2 or Izh Jupiter with a power of 24 hp. With.;
- from the Urals 32 or 36 l. With.;
- from Oka two-cylinder engine 35 liters. With.
To transport heavy loads, a three-cylinder engine is installed. To drive in hot weather, a motor with a cooling system is used. It is not available on older motorcycles. In such units, the cooling system will need to be modified.
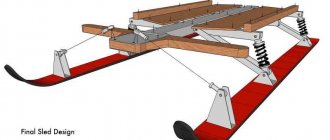
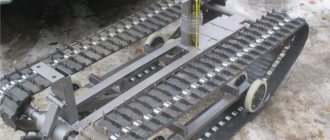
DIY tracked snowmobile from a walk-behind tractor
To make a tracked snowmobile from a walk-behind tractor with your own hands, simple materials are used. The frame is made of stamped channels and square pipes. Round water and gas pipes were used to make the shafts. The engine was used from the Neva walk-behind tractor.
The snowmobile looked a little rough. But after conducting winter tests, good driving characteristics were revealed: speed, cross-country ability. It is also light and compact, and quite economical in fuel consumption. The original design assumed an asymmetrical engine arrangement. This provided a number of advantages: during maintenance - good access to the engine; convenient starting and gear shifting; redirecting the chain drive directly to the track drive shaft.
But during testing, when moving on loose snow, when making a turn, the snowmobile often fell over. Because of this circumstance, it was decided to place the engine in the center of the front of the snowmobile. The design has been improved, especially the front of the frame. An intermediate shaft was also installed, which transmitted torque from the engine to the track. In addition, modernization was carried out, which improved the driving performance, comfort and reliability of the snowmobile.
Manufacturing
Making a snowmobile from a scooter with your own hands is not that difficult. No special adjustments to the original design are required. In this case, it will be possible to easily replace tracks with wheels and back when the weather changes. It is recommended to take tracks and driven sprockets from Buran snowmobiles. Additionally, a pair of wheels from a children's scooter and a pair of medium-sized wheels from any cart (with the addition of roller bearings) are used.
The drive wheel must be replaced with a propeller of a much smaller diameter. This is due to the need to adjust the gear ratio.
The fact is that when driving in snowy areas, the load on the engine increases. Excessive speed is also a source of risk.
How to make a snowmobile
You can make a snowmobile from different vehicles that are in the garage.
From a motorcycle
You can make a snowmobile from a motorcycle using different models. The most popular are IZH and Ural. The advantages of such a rework are that no special changes need to be made. If the product is in good condition, you can even keep the original frame.
The conversion technology is as follows:
- Make a rectangular frame from metal pipes or appropriate corners. Its optimal dimensions are 150*43.5 cm.
- In addition to the IZh motorcycle, it is necessary to make a steering beam. It is made from metal corners. The optimal dimensions are 50*50*5 mm. Additionally, the beam is sheathed with metal plates.
- After this, it can be installed horizontally on the drilling machine. Treat the connection area. Do the same with the frame. In these places you need to make special grooves for reliable fixation. Additionally, attach a corner to the front frame.
- Now you can attach the seat for motorcyclists.
- You need to make holes in the side members.
- A channel must be placed between the front and middle parts of the frame to strengthen the structure.
- Regardless of whether the snowmobile is made from a Ural or another model of motorcycle, it is necessary to select a track sprocket and rubber band in advance. The optimal dimensions are 220*30 cm with a thickness of no more than 1 cm.
- Before installation, it is recommended to cover the track with nylon, which will allow the material not to delaminate during operation.
- Now you can move on to the transmission. It consists of two parts. The first, the front axle, is the drive axle. It is made of a tubular shaft, a track sprocket and a roller. The second is the rear axle. It is made from a caterpillar drum and a tubular shaft.
- You need to complete the snowmobile manufacturing process by welding sheet metal skis.
When converting a motorcycle into a snowmobile, it is important not to change the steering system. In the final product, this part must perform its original functions.
The principles of modification are the same, they do not depend on the vehicle model. But the snowmobile from the Ural motorcycle will be heavier.
From Zhiguli
The design of the car is characterized by simplicity, ease of operation and high maneuverability. To make it you need to follow the instructions:
- Frame assembly. It's better to make it from pipes. The frame consists of front and central beams (steel pipes with a diameter of 5 cm), two lower diagonal elements (bent pipes with a diameter of 3 cm) and a rear strut. Welding is used to fix the elements.
- Installation of steering columns. To do this, you need to place two bushings on the front beam.
- Fixing the axle shaft. It is located on the rear frame; first you need to weld the body under it. It is made from a metal pipe with a diameter of 6 cm. Secure the axle shafts using bushings and electric rivets.
- Installing a car engine. First you need to make the front and rear fastening units on the central beam of the frame. First they need to be placed on the engine itself, and only then welded to the frame.
- In a homemade snowmobile, you can install large diameter wheels or skis made of sheet metal. In the first case, the rear and front wheels need to be connected in pairs with a metal pipe. At the same time, make grooves in the hub for the bearings, which are subsequently secured with spring rings. Additionally, install a spacer between the bearings.
- Install a sprocket on each wheel depending on the expected maximum speed. This snowmobile can be used at any time of the year. For a snowy winter, a design in which the front wheels are replaced with skis is suitable.
- Installation of the steering system. It is taken whole from a car, for example, from a Zaporozhets, or a motorcycle. The choice depends on personal preference. In the first case, gas, clutch and brake pedals are additionally installed. The gearbox is controlled using a lever and a rigid rod.
- Installation of a snowmobile cabin, the role of which is played by the car body.
In a similar way, you can assemble a structure from Oka with your own hands.
From a moped
The easiest way is to make a snowmobile from a scooter with your own hands. This is due to the fact that no special changes will be made to the design. This will allow you to use it as a snowmobile in winter, and as a moped in the warmer months.
Converting a scooter into a snowmobile is carried out using the following technology:
- Prepare all the details in advance. You will need a caterpillar, skis (plastic ones are possible), a driven sprocket of the intermediate shaft from a Buran snow scooter, 2 wheels from a children's scooter and 2 wheels with bearings.
- Now you can start remaking the moped. For a scooter rider it will be easy. The drive wheel must be removed and replaced with another one of smaller diameter in order to replace the gear ratio. This will reduce the maximum possible speed for scooters of this design, since when driving on snow, the load on the engine increases, which means that high speed can be detrimental to it.
- Cut a hole for the shaft from the drive wheel disk, and then make hooks for the caterpillar. Make a bandage from a sheet of metal and attach the hooks to it. The result should be a wheel with hooks.
- Connect the drive sprocket to the wheels with bearings.
- Make a frame from metal corners.
- Attach the ski to the front fork through a special rack. This will allow you to leave the ski on a flat surface when tilting the snowmobile.
- Make a small cover over the caterpillar to prevent snow from getting into the body kit.
- Make a platform for your feet from a metal sheet.
From the cultivator
A snowmobile made from a cultivator can be wheeled, tracked or combined. The advantage of this design is that there will be a minimum of rework work. It is easiest to make a wheeled one, but homemade tracked snowmobiles are also easy to make from this product. To do this you will need:
- Make a frame for a snowmobile from metal pipes. You can use corners instead. The frame should be in the shape of a rectangle.
- Attach the seat to the base. It can be a box or any similar device.
- Make skis from sheets of metal and then weld them to the frame.
- The resulting structure can be attached to a motor cultivator. Now you can pour gasoline into the tank and use the product for its intended purpose.
From Friendship
The Friendship chainsaw has a powerful engine that can propel a small vehicle. Therefore, you can make a mini snowmobile based on it if you follow the instructions:
- Frame assembly. To do this, you need to prepare steel corners measuring 50*36 cm or sheets with a thickness of more than 2 mm in advance. Angles are used to assemble the middle part of the frame, and sheets are used for the front and back. The metal is bent at an angle of 90° to ensure the required rigidity of the structure.
- Make two through holes that are necessary for attaching the track shaft and track guide wheels. The last parts are installed on both sides of the side members and are designed to adjust the track tension.
- Brackets for installing track rollers are attached to the bottom of the side members. It is better to fix these parts by welding.
- Place the rollers in rubber covers and fix them on five axes, placing them at the bottom of the grooves. The axles themselves can be attached with nuts or bolts.
- Now, between all the elements, install bushings, which are recommended to be made of duralumin.
- Make three racks from metal corners. The chainsaw gearbox will be located on them. To strengthen the structure, you can use scarves.
- Now you can install the seat on the frame. It should be located between the middle and rear parts of the structure.
- The steering wheel will be located in front of the frame. You first need to make a hole for it. A pipe with control handles can act as a steering wheel. To create a control system, it is still better to take equipment from a motorcycle or moped.
- Now you need to make the drive shaft. To do this, you can take a metal pipe into which you insert a round flange to fix the gears.
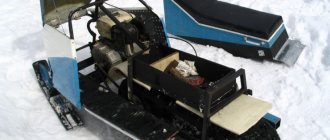
Basic elements of a motorized dog
The most important piece of equipment is the engine. Typically, a single-cylinder carburetor gasoline engine is used to create motorized dogs. An equally important part is the rubber-metal track - the propulsion unit with suspension. With the help of a caterpillar, you can drive on snow, ice, and soft ground in warm weather. It is worth taking a closer look at all the components of a motorized dog.
Car engine
Most often, motorized dogs use engines from Honda, Yamaha (expensive) or Chinese brands (MTR, Lifan and other budget ones). These power units vary greatly in price, although their power is usually equivalent. Lifan engines with a centrifugal (dry) clutch have proven themselves to be excellent. Some people use a motor from a walk-behind tractor to create motorized dogs; they remove the engine from a Ural chainsaw or a Druzhba saw.
The motor from the Sh-58 moped, designed for manual gearbox shifting, is considered popular. Scooter engines can also be used. The main thing is that the product has good traction characteristics, a power of at least 6 hp. With. This is enough to transport one person and a load of 30-50 kg on a motorized dog. For a trip of two people and a load of 150-200 kg, it is better to choose an engine with a power of more than 9 liters. With. A chain tensioner is often used as an engine tuning element.
Motorized dog support frame
The frame must be of excellent quality, because on the road it experiences high loads, especially when driving off-road. This design is made entirely with your own hands, welded from rectangular metal pipes. Usually a pipe thickness of 3 millimeters is enough; thinner metal is not suitable, it quickly deforms.
You can see how to make a frame with your own hands in the photo and video. Take two pipes with a cross-section of 20*20 mm, add two more sizes of 20*40 mm, and form a frame. Two 40 mm corners are welded into it, and a protective frame for the engine is welded on top, which will prevent it from being damaged when the equipment rolls over. It is also advisable to attach a galvanized sheet to the frame with rivets to cover the track.
Motorcycle dog suspension
The suspension serves as an important indicator of the performance of the chassis. By design, it can be skating or sliding. The skating rink performs worse in the snow, but is ideal for movement in the warm season. The suspension on skids prevents the tracks from clogging, but is used only in winter: it needs snow to cool the system (ski module).
To make a motorized dog at home and travel in any season of the year, you should choose a modern roller suspension, but not with a rigid one, but with a spring support for the rollers. Such a motorized dog will move more smoothly on a frozen road. When driving, you will have to avoid too loose snow.
Motorized dog transmission
The transmission is responsible for transmitting shaft rotation to the main track sprocket. The gearbox can be CVT, mechanical, automatic gearbox, some have reverse (reverse capability). The advantage of an automatic transmission is a large traction force, the disadvantage is the rapid wear of a number of parts and the need for regular maintenance.
As a mechanical one, you can use a box from a VAZ or other old car. Its advantage is ease of maintenance and no need for frequent repairs, but using such a transmission is less comfortable. The variator ensures smooth transmission of force from the engine to the track, which helps reduce the wear rate of parts and save on gasoline. The downside is a weak drive belt that has to be changed regularly.
Motorized dog caterpillar
Such devices can be snowmobile or specialized, created specifically for motorized dogs. They differ in width, height, length. There are replacement snowmobile tracks on sale that can be used in the manufacture of motorized towing vehicles. The tracks from Buran are popular, but they are not distinguished by high cross-country ability; motorized dogs will only have to be used on a frozen body of water, on a well-trodden road.
You should purchase tracks that are not too narrow. A 50 cm product is considered optimal, since it makes the motorized dog stable, passable, and maneuverable. There are also “aggressive” off-road tracks on sale, their width is from 55 cm, and they have a special tread pattern. The products have an increased lug height - it is 32 mm (the standard is 21 mm). You can also make your own caterpillars from conveyor belts. Tracks are made of birch planks and other materials.
Electrical equipment and machine control systems
To control motorized dogs, they use a steering wheel that is connected to the gearbox, clutch handle, and gas, which should be taken from any suitable old equipment. Typically, the basic configurations of towing vehicles are equipped with a manual start, but if desired, it can be changed to an electric starter or a lighting coil can be added. All this can be easily constructed independently, but the cost of manufacturing a motorized dog will increase.
It is quite possible to do without an electric starter; besides, a manual start is considered more reliable in terms of breakdown. But without lighting at night it will definitely be bad for a motorized dog; this system must be provided. The car must be equipped with a 7 ampere coil so that problems with recharging the headlights do not arise.
How to make an ATV from a scooter?
To assemble an ATV from a light scooter, you need to prepare a number of tools. Welding equipment and a grinder must be used in the work. You will also need a variety of hand tools, from screwdrivers to wrenches.
The workshop is equipped in a heated, well-ventilated room or outdoors under a canopy in the summer.
To make an ATV from a scooter with your own hands, the design drawings will need to be examined in detail before starting work. It is best to develop the scheme yourself, working out every detail of the future system.
You need to start assembly with the frame, which is taken from the donor scooter. It will need to be modified, additionally boiled and a trunk located in the front or rear made.
Additional material will definitely be needed to assemble the frame. It should be a thin-walled pipe with a round or square cross-section. It should not be heavy, otherwise the weight of the ATV will be large. Because of this, it will lose maneuverability and controllability, and too much load will be placed on the engine. Because of this, it can fail quite quickly.
It is not recommended to use water pipes, as they are very fragile and are not suitable for such purposes. To install all the necessary components and mechanisms, brackets are welded to the frame.
Why is it worth making a motorized dog?
The equipment is compact, unpretentious and does not require a separate storage room. If you make such a motorized towing vehicle yourself, it will be able to make your life easier, this especially applies to fishermen and hunters, as well as lovers of active winter recreation. This device can be assembled from available materials; this approach will be more cost-effective compared to purchasing a factory-assembled model.