The car battery serves as a power source only while the engine is starting. Then the on-board generator comes into operation, which powers all consumers, and also keeps the battery in working condition - it recharges it so that the battery is fully ready for the next start-up.
Some car owners may encounter an unpleasant problem - the generator does not recharge the battery. In most cases, this means that the battery also powers the vehicle loads (in whole or in part) while driving. After this, there is no need to talk about a reliable restart after jamming.
Method for checking the voltage regulator of a scooter
Chinese scooters are designed in such a way that their relay-regulator, which is also called a voltage regulator, often burns out.
The voltage regulator is an electronic circuit with 4 terminals for connecting to the scooter's electrical network. A malfunction of the voltage regulator leads to very disastrous consequences:
First, backlight lamps and the central low/high beam lamp burn out. This happens due to the fact that the voltage from the generator is not limited to 12 volts, which leads to the lamps receiving an increased voltage of 16 to 27 volts and higher. The voltage supplied to the lamps fluctuates and depends on engine speed. Even at idle, the lamps shine so much that they blind, although they should shine at half their maximum brightness.
If you do not fix the malfunction of the voltage regulator and leave everything as is (many do this - they just drive without lights), then over time the battery will fail because its charging voltage exceeds the permissible limit. If the voltage regulator is faulty, the battery receives a voltage of more than 15 volts, while the standard charging voltage should be in the range of 13.5 - 14.8 volts. All this leads to the fact that the battery begins to leak - acid begins to seep through the valves. This is noticeable to the naked eye. And although when the normal charging mode is restored, the battery restores its operation, its service life is sharply reduced.
Also, if the voltage regulator is faulty, the battery stops charging correctly and loses its capacity. Therefore, it is not possible to start the scooter using the button. You have to start it from kickstarter.
I think it’s now clear how important it is to promptly replace a faulty voltage regulator on a Chinese scooter.
How to check the voltage regulator on a scooter? It is best (and most reliable) to do this without dismantling the voltage regulator itself. We will need any multimeter with a voltmeter function. Any regular DT-830 or similar will do. What needs to be done? You need to measure the voltage at the output of the voltage regulator.
All measurements were carried out on a Chinese scooter ABM Storm L ZW50QT-16 .
To get to the relay-regulator, unscrew the front fairing in which the central headlight is installed. We find there on the frame a box with 4 terminals: red , green , yellow and white.
We put the scooter on the stand and start it. After some time, the engine operation stabilizes at idle. Next, measure the voltage between the green and red wires. We set the multimeter in DC voltage measurement mode to the limit of 20V. Here's a look at how you can do it.
The display should display a voltage of about 14.6 - 14.8 volts, as in the photo. This is normal, standard voltage.
Then we need to measure the voltage that goes to the lighting lamps. The voltage to the central high/low beam lamp is not constant, but alternating (pulsating), so we switch the multimeter to the 20V alternating voltage measurement mode. On the multimeter that I used ( Victor VC9805A+ ), to do this, you need to press the DC /AC ( Alternating Current ). After this, we measure the voltage between the green and yellow wires. We simply move the probe from the red to the yellow wire, since the green wire is the common wire in the scooter’s electrical network.
The multimeter display should show a voltage of around 12 volts. It showed 11.4 - 11.6 volts. This is normal as the scooter is idling. If you have an assistant, you can ask him to accelerate a little to increase the engine speed and, consequently, the voltage from the generator. In any case, the voltage should not change much and should be around 12 volts.
This was a voltage measurement at the output of a working voltage regulator (relay regulator) .
Now let’s see what a voltmeter shows when measuring the voltage at the output of a faulty scooter voltage regulator.
Here is a voltage measurement between the red and green wires. There should be no more than 14.8 volts. But in reality everything is 15.9 - 16 volts. And this is at idle! The regulator is not working.
And this is the voltage between the green and yellow wires. The voltmeter shows 16.3 volts alternating voltage! Is it too much for light bulbs that are designed for 12 volts? Of course, a lot.
If you accelerate a little, you can see how the voltage jumps sharply to 27 volts! From such a nightmare, the lamps burn out like matches. Let us remind you that the low/high beam lamp and backlight lamps are powered by alternating voltage, which is limited by the voltage regulator. The voltage is removed from the generator and supplied through a yellow insulated wire to the light switch and the low/high beam switch.
If you have such readings, then change the voltage regulator to a new one. Its cost at the time of writing was in the range of 300 - 500 rubles.
When diagnosing and repairing electrical equipment, you may need a scooter electrical diagram.
The most likely problems in the car and how to fix them
There are a great many reasons for malfunctions in the electrical equipment of a car, in which the generator does not charge the battery. Many years of collective driving experience have identified the most likely of them. After identifying the cause of the undercharging, it becomes clear how to deal with the detected malfunction.
Problem when there are no problems
It is not uncommon for a car to be in full working order when the alternator does not fully charge the battery. This happens because the charging current is small, and the battery can be quite deeply discharged.
You also need to take into account the battery capacity and its condition. A new high-capacity battery does not charge immediately; it requires a long time to replenish its energy reserves (but it will also take a long time to release it). Therefore, if after a short trip (20, 30 minutes or even an hour) the battery is not fully charged, then do not panic - the situation is normal. You must either find an opportunity to recharge the battery from a charger, or plan a longer trip.
When a fault can be detected visually
Some problems are visible to the naked eye. You just need to know where to look.
No. 1 Plaque on terminals
Battery terminals are prone to oxidation. Humidity, high temperature, vapors (or drips) of electrolyte leaking from the inside - all this can lead to the formation of a coating on the battery terminals and connecting terminals that does not conduct electricity well. As a result, the charging current drops to a minimum or to zero.
Plaque on the battery terminals.
You can suspect a problem even when starting the engine. If the current is insufficient, the starter will spin sluggishly, and the motor may not start at all. The problem is identified by visual inspection. If plaque appears, it must be removed. This is done mechanically (with fine sandpaper or another tool). It is necessary to clean both the battery terminals and the terminals of automotive electrical equipment. After cleaning, it is recommended to protect the contact area with a suitable lubricant.
Video solution to the problem.
No. 2 Checking the condition of the alternator belt
Rotation from the engine to the generator is transmitted using a belt drive. It is important that the belt is tensioned correctly. If the tension is weak, the belt will slip (often with a characteristic whistle). The generator will turn poorly (slowly or choppy) or, depending on the weakening and load, will not turn at all. This will cause the load (partially or completely) to fall on the battery, and it will be discharged while moving.
If the belt is tensioned correctly and a squealing noise is heard, in most cases this means the alternator bearings are seized. This situation also means that the car's power source is not working. To check the serviceability of the bearings, you need to remove the belt and rotate the generator shaft by hand. It should rotate smoothly without jamming.
To check whether the belt is tensioned correctly, you need to refer to the vehicle's operating instructions or the technical documentation for the generator. A general rule to approximate the correct setting is this: if you press on the longest section of the belt with a force of about 10 kg, it should move by about 1 cm.
Checking belt tension by measuring deflection.
Another way is to use your index finger and thumb to try to rotate the belt in a transverse direction . With the right tension, this can be done 90 degrees. If it turns out that the belt is loose, it needs to be adjusted.
Excessive tension is also harmful. It shortens the life of both the belt itself and the generator bearings.
The belt may simply be broken. This can be detected by visual inspection. In this situation, it must be replaced.
No. 3 Brushes worn out
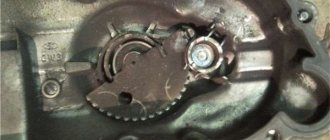
To achieve electrical contact with the rotor winding, which rotates during operation, the generator design uses a commutator assembly consisting of slip rings and spring-loaded brushes. The brushes are made of soft graphite and are consumables, as they wear out during use. When they are completely erased, the excitation circuit is interrupted and the voltage at the generator output disappears. In this case, the brushes must be replaced (often they are built into the voltage regulator). It is even better to periodically monitor their condition, preventing complete wear and tear.
Serviceable (left) and worn (right) brushes.
Video: Replacing brushes without removing the generator.
When you need diagnostics using devices
Some faults cannot be found without instruments. You will need, at a minimum, a multimeter.
No. 4 Fuse burned out
The generator-battery power circuit does not contain fuses. But there is a fuse link in the generator excitation circuit. Visually, the problem is detected when the no-recharge lamp does not go out after the engine starts.
The rotor connection diagrams are different for cars of different brands, so you will have to figure out which fuse is responsible for a given circuit individually. Sometimes a burnt insert can be seen with the naked eye, but it is better to verify its integrity using a multimeter.
Blown fuse.
No. 5 Malfunction of diodes
A car generator is essentially a three-phase alternator. To obtain constant voltage in the on-board network, a rectifier is required. It is assembled on six diodes
There are two possible malfunctions of the bridge rectifier:
- short circuit of one or more valves (in such cases they say that the diode is “sintered”);
- breakage of one or more elements.
Internal circuit of the generator and its connection to the vehicle's electrical system.
In the first case, the alternating voltage component will enter the on-board network. This problem can be detected by the flickering of high or low beam lamps. In the second situation, the tension is reduced or will be completely absent.
You can check for a fault using a multimeter in diode testing mode.
Board with rectifier diodes.
To do this, the generator will have to be removed from the car and the board with diodes must be removed. Each element is checked in the usual manner - it should conduct current in one direction, and not in the other. Faulty diodes must be replaced. You can change the entire rectifier unit at once.
The causes of malfunction of diode bridge elements can be different, including spontaneous failure. But if a problem with the rectifier occurs over and over again, then you need to find the cause. Most often this is an overload of the generator. Diodes are designed for a certain current, and if this is exceeded, the life of the elements will be short. It is necessary to remember whether any additional equipment has recently been connected to the on-board network. If this is the case, then there is a high probability of overloading the generator stator, and the consequences will not be long in coming again.
No. 6 Short circuit of the windings to the housing
A short circuit to the housing of the rotor and stator windings can occur as a result of insulation failure (due to mechanical damage, aging during long-term operation, burning due to overload, etc.). You can identify the problem with a multimeter in dial mode. One probe must be connected to the body, the other to the terminal of the corresponding winding . For a working generator, the tester should show infinite resistance; if a different value or zero is indicated, there is a short circuit to the housing.
Checking the short circuit of the stator windings to the housing.
Another characteristic problem is the interturn short circuit of the windings, but it is almost impossible to detect it with an ohmmeter - with a small number of shorted turns, the winding resistance does not noticeably decrease. You can suspect an interturn fault by local overheating of the generator.
No. 7 Destruction of windings
Not only diodes can be destroyed by overcurrent. The conductors of the rotor and stator windings can also overheat and burn out. The reason is not only the congestion caused by consumers. If the positive terminal is shorted to ground, this will also cause overcurrent. Overheating as a result of an interturn short circuit can also cause thermal destruction of both the stator winding and the field winding. Moisture getting inside the case (even during washing) can lead to a sad result.
You can detect burnout of the windings with a multimeter, checking their integrity. The resistance should be close to zero. If it is higher or infinity, the generator needs to be changed.
Burnt windings can be rewound, but this must be done in a specialized workshop with special equipment. Restoring operation "on the knee" will not lead to reliable operation of the generator, and it will soon fail again.
Generator stator winding with burn marks.
Troubleshooting your scooter's battery charging system
This article will focus on troubleshooting the charging system of a scooter battery. If your scooter's battery is constantly draining, this may be due to a problem with the battery power system. To test this system you will need a multimeter.
When the scooter's on-board voltage is 12 volts, the battery is simply necessary for the normal operation of the moped, since it provides electricity to its starter and carburetor starting enrichment.
The scooter's generator begins to produce electricity (alternating current) when the engine is running starting from 2000-3000 rpm. With the help of a converter-stabilizer, alternating current is converted into direct current, which is needed to charge the battery. The stabilizer ensures that the battery does not overcharge. If the battery needs charging, the stabilizer passes current to it. When the battery is fully charged, the stabilizer seems to turn off and no current is supplied to the battery.
If the power supply system is damaged and no current is supplied to the battery, it will not charge. Until the battery is completely discharged, the scooter's motor will continue to operate. When the battery is completely discharged, the engine will stall and will no longer start (either with an electric or kickstarter).
On the other hand, if the stabilizer does not turn off the current, this will lead to the battery being overcharged, it will heat up and “boil”, and the acid in the battery will leak out. As a result, the battery will fail and may burst.
Rice. 1 Schematic diagram of the scooter battery charging system
Troubleshooting algorithm
Problem: Scooter battery is not charging.
1. Check the fuse and its contacts (clean if necessary). If the fuse is blown, it must be replaced. If the fuse is blown, the engine will not start.
2. Check the battery contacts. If necessary, clean with sandpaper and tighten the fasteners.
3. Check all wires and plugs of the battery charging system. First of all, check the ground - the blue or black (usually) wire that connects the negative terminal of the battery to the scooter frame. Sometimes cleaning the battery terminals is all it takes to get your scooter working again.
How to charge a scooter battery: basic tips
The battery is a basic element, without which the operation of a moped or scooter will be impossible.
Being a reversible source of current, it transfers the electricity that accumulates in it to the remaining components and assemblies of the motor vehicle. Without a battery, it is impossible to start the engine; the entire electrical chain will not work, including brake lights, sounds and direction indicators. All side lights and the sensor responsible for the fuel and oil levels in the system also depend on it. The scooters also have alarms, radios, and other lighting devices. And their work will also be impossible without a battery. To learn how to charge a scooter battery yourself, you don’t need to have a lot of skills. It is enough just to study the basic recommendations and strictly follow them. This process itself is very simple, so even beginners can handle it without much difficulty. You will need 1 liter of distilled water or special acid for batteries, a device for determining the conditional density of a liquid solution (hydrometer), several different screwdrivers and the battery charger itself. It is best to purchase a charger at a motorcycle parts store, then it will come with detailed instructions, following which you can easily learn how to charge the scooter battery yourself.
To achieve high charging quality and subsequent performance, the scooter battery must be stored correctly. You also need to properly care for it, following the following rules.
Rules for the care and maintenance of the battery
- Do not allow the scooter battery to be completely discharged. As soon as the charge remains a little less than half, it already needs to be recharged. Also, do not store the battery in a completely discharged state. As soon as it feels like the battery is barely turning the engine, it needs to be charged immediately.
- Do not allow dust or dirt to get inside the scooter battery. This significantly reduces its working potential. Dirty and dusty terminals lead to its rapid discharge, because current leakage occurs.
- Sometimes the battery terminals create a short circuit and completely damage the battery. To prevent this from happening, you should buy special fuse-links, which must be factory-made. Such motorcycle parts made independently will cause more harm than good. Homemade fuses will often fail, creating an emergency situation on the road.
- Under no circumstances should the battery be stored at temperatures below -5 degrees Celsius. The same rule applies to storing batteries at elevated temperatures (from +50 degrees Celsius and above).
The battery should only be charged with currents whose value is 10 times lower than what is indicated in the characteristics of the battery itself. This is important, so you should pay close attention to this parameter.
How to check the voltage regulator of a scooter?
To check, you need to stock up on a multimeter that has a voltmeter function. It is needed to measure the voltage at the output of the voltage regulator.
To measure the voltage, you first need to get to your destination. To do this you need to remove the front fairing. As a rule, it is fastened with several nuts and rivets (for example, Honda dio has 3 nuts and 4 rivets). We remove the fairing carefully, it is easy to damage. There we need to find a small box in which there are 4 outputs (some scooters have 5 outputs). The outputs have the following colors: green, red, yellow and white.
In order to measure the voltage, the scooter must first stabilize in operation, that is, the idle speed must be stable. You can put it on the step, start it and wait for it to stabilize. If the scooter does not start or does not hold idle, then read the article: the scooter does not hold idle. If everything is fine, then you need to measure the voltage between the red and green wires. We set our measuring device to 20V, constant voltage measurement mode. If the voltage is within 14.6 - 14.8 then this is the normal voltage of the relay regulator . If the regulator is faulty, then this value can fluctuate even by 5V or more in any direction. If the value is less than 14.5V, or exceeds 15V, then the regulator is faulty.
Do-it-yourself voltage regulator for a scooter
You can make a relay regulator yourself; this requires a little knowledge and a scooter voltage regulator circuit. We will make a voltage regulator for a Chinese scooter with our own hands. The cheapest option is to use a shunt voltage regulator. The caveat is that for proper operation you need to disassemble the generator and remove the wire from ground with a separate wire.
It was decided to make a voltage regulator with your own hands for the reason that the Chinese analogues are so lousy that there are simply no words. Look at the photo of the Chinese voltage regulator circuit:
We will assemble a single-phase generator according to this circuit:
In order to make a relay regulator, you must first disassemble the generator and remove the stator from the engine. Now we see this picture:
The photo shows a mass that needs to be unsoldered, and to it we need to solder a separate wire to the winding. After which it needs to be taken outside. This wire will be one end of the winding. The other end is the white wire.
After this, carefully reassemble the generator in reverse order. Why was all this going on?! We now have 2 wires coming out of the generator, which we will use (there are 3 wires in total). All the changes that have occurred can be seen in the photo below:
The voltage regulator connection is shown in this scooter voltage regulator diagram:
OK it's all over Now. Our DIY scooter voltage regulator is almost finished. Now you need to connect the yellow wire from our old relay regulator to the “+” terminal of the scooter battery.
After all the work done, we got constant voltage on our board. networks.
Another homemade voltage regulator for a scooter in the video:
How to charge correctly
First of all, we need to touch on the characteristics of the electrolyte. In conventional batteries, where it is liquid, when the voltage rises above 14.4 V, the liquid begins to “boil”. The gel-like one is not capable of boiling due to its state of aggregation, but it “falls off” from the plates, and forever. As a result, the area between lead and electrolyte is smaller. This leads to a decrease in energy intensity and a decrease in starting current. And this is provided that the battery will generally survive the increased voltage.
The main rule when charging a gel battery is to control the voltage. The norm is 14.4 V. In this regard, before you start charging, you need to make sure you have:
Charging voltage standard/
- A charger with electronics that would limit the voltage;
- multimeter - for control voltage measurements.
Every driver should have such a device as a multimeter. It can be used to accurately measure voltage since it is connected directly to the terminals.
Procedure for charging a 12 V gel battery:
- It is not necessary to disconnect the battery from the on-board network, since the work is carried out with a safe voltage, but it is advisable to do so.
- Connect a multimeter to the battery terminals.
- The charge current is set to 10% of the actual capacity (the figure indicated on the case is relevant only for a new product, and then with an error).
- If the charger has voltage regulation, the limit is set to 14.4 V.
- A charger is connected to the battery terminals.
- They look at the parameters. When the voltage is 14.4 V and the charge current is 0.1 - 0.3 A, the battery is considered charged.
Automatic charging will turn itself off and stop supplying charge.
To ensure that charging is successful, you will need to measure the resting voltage that occurs after 8 to 12 hours of battery inactivity. At 100% there will be a voltage of 12.70 V at the terminals.
Subsequent charging must be performed when the state of charge drops to 60 - 75%. It is not recommended to allow deep discharge, although such batteries are resistant to it.
Photo report: How to check the charging of a scooter?
The process of checking the charging of a scooter can be expressed in just a couple of sentences. There is nothing complicated in this matter: open the battery hatch, switch the tester to the mode for measuring direct current in the 20V range, start the engine and, without removing the terminals from the battery, give it a good gas and measure the current:
- If the current is less than 13.4V, check the wiring, generator, relay regulator
- If the current is more than 14.6V - check the relay regulator
In our case, the charge current is within the normal range, which means that everything is in order with the generator and relay regulator
In fact, there is nothing more to talk about and it could have ended there, if not for one “but”... And the “but” is what to do if the charge current is lower than normal, for example 12V or much higher, for example 16V or something else more?
In both cases, the situation cannot be left as is, especially in the second case, when the charge current is higher than normal. Since sooner or later the high current will damage the battery and burn out all the light bulbs, and even the wiring
All the reasons for high or low charging current cannot be described in this article and they are all essentially individual. Some had a short circuit, some had a burnt-out control wiring in the generator, some had a faulty relay-regulator, and some messed up the wiring themselves... If you have skills in this matter, move towards the relay. regulator, you can't go wrong.
How to charge a gel battery for a moped without special charging
A couple of years after purchasing a moped, it becomes necessary to recharge the battery.
And then it turns out that the battery belongs to the category of gel batteries, for which not all chargers are suitable. How to restore battery capacity if a special charger is not at hand? Is there an alternative to special memory devices?
The gel battery does not tolerate overdischarge, as a result of which the gel melts and turns into liquid. For this reason, devices capable of charging a lead or AKB battery for a moped are not suitable for recharging. These options have too high current and voltage ratings. You need special chargers with automatic adjustment of the charging current, which are quite difficult to find on sale. The voltage of a suitable charger does not exceed 14 V, and the upper current threshold corresponds to 1/10 of the battery capacity (for 50 Ah - 5 A, for 7 Ah - 0.7 A). In this case, the device determines the charging time and turns off automatically when the battery is fully charged. As an alternative to special chargers, you can use conventional chargers with a low charge current (for example, 0.5 A) and an output voltage of 12 V, which are suitable for recharging batteries with a capacity of 5 Ah or more. In this case, it is important to turn off charging in time to prevent the battery from heating up. To determine the duration of the procedure, it is worth dividing the battery capacity by the current strength (for a 5 Ah battery and a 0.5 A charger, the charging time will be 10 hours). It is also important to periodically check the voltage on the gel battery using a tester: it should not exceed 14 V.
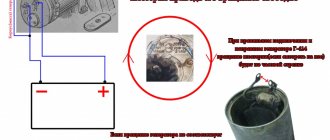
"People's" method of recharging a gel battery
If the gel battery needs urgent recharging, and you have not yet managed to find and order a special charger, use a simple trick. To implement this method, you will need a lead or AKB battery (for example, such as on the page https://www.bezpeka-hop.com/catalog/akkumulyatory_dlya_mopedov/) and charging from it. In this case, the second battery will be used as an “intermediary”. The charging circuit through the second power source is as follows:
- connect the charger to the lead battery;
- connect the terminals of the lead battery to the contacts of the gel battery;
- check the temperature of the battery case; if it gets hot, stop the process;
- check the voltage (no more than 14 V).
The duration of the procedure depends on the battery capacity.
Completely discharged moped batteries can be left to recharge for a day. In this case, it is necessary to monitor the process every 3–4 hours (check temperature and voltage). It is worth using “folk” methods of restoring battery capacity only in extreme cases, since there is a risk of damaging the battery. It is not recommended to carry out these manipulations without control devices.
1
Photo 1/2
02/13/2018,
www.moto.com.ua
How to check the charging relay on a scooter yourself?
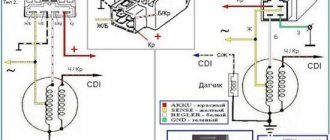
A relay regulator, or voltage stabilizer, plays an important role in the operation of modern scooters, the main task of which is to stabilize the voltage. At a moped speed of 60 km per hour, the generator is capable of generating voltage up to 35 Volts, and without its stabilization, this can lead to failure of all the electronics of the moped, including the battery. The article will tell you what a voltage regulator is and how to check it on a scooter.
Four-pin voltage regulator relay for scooter
What is a voltage regulator used for?
The relay regulator stabilizes the voltage of the scooter generator at the required level, not allowing it to increase or decrease the value above or below the norm. This prevents on-board voltage surges from going beyond the established limits (depending on the boards this is 12-14 V) and ruining the work of consumers whose service life is designed to be no more than 13 V.
That is, this part takes on the impulses that arise during the operation of the scooter (turning on the headlights, the starter button) and transfers the resulting thermal shock to itself. In this case, all the heat that could settle on the contacts is generated in it and removed through the device.
In addition to stabilizing the voltage, the relay also converts alternating current into direct current, which is necessary for charging the battery.
Moped manufacturers install charging relays with different parameters on scooters and select them individually for each. Depending on the regulator circuit, the connectors also differ. Chinese models usually have 5 terminals (male), while Japanese models have 4.
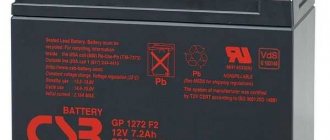
Features of gel batteries
Gel power sources for a car or a motorcycle are not a new product, but a consequence of evolution. Since the advent of rechargeable batteries, their design has changed more than once. In the process, the composition of the plates, which tend to collapse, was improved, and the chemical composition of the electrolyte changed.
As a result, batteries appeared with electrolyte in the form of a gel filler, and it is not liquid. However, a gel battery works on the same principle as a regular lead-acid battery.
Gel batteries are produced using two technologies:
- GEL. The electrolyte is silica gel, which is absorbed into the microporous separator;
- A.G.M. The electrolyte is absorbed by the glass fiber. It is also a separator.
Differences in characteristics of GEL and AGM batteries.
In addition to the automotive industry, this type of power supply has found application in shipbuilding, space and other industries. 12 Volt car gel batteries are now less common than usual, but they have been used as motorcycle batteries for a long time. When you have a model for a car, you need to know how to properly charge a gel battery with your own hands.
The main advantage of this type of battery is the high starting current provided by the gel filler. The latter effectively “fits” the plates, and in frosty conditions this helps. Also among the positive qualities are:
- Since the electrolyte is not liquid, there is no requirement that the battery must stand strictly horizontally. The gel power source can be placed even “upside down”;
- stable operation over a wide temperature range;
- high degree of safety, absence of toxic secretions;
- insensitivity to deep discharge;
- the electrolyte does not lose its properties, like liquid in lead-acid batteries;
- long service life. The battery is designed for approximately 1000 charge-discharge cycles, without loss of energy capacity. This is provided that charging is carried out correctly and the correct charger is used.
As for the cons:
- high price. A gel battery costs the same as 3 - 4 regular batteries;
- requires strict adherence to operating rules;
- It is important to monitor the voltage during charging. Even the smallest deviations can significantly reduce battery life.
A gel battery can actually last a long time, longer than the 5 years typical for a lead-acid alternative. But provided that it is charged correctly throughout its entire service life.
Scheme and principle of operation
The operation of the stabilizer for all models is almost the same and consists in distributing the current supplied from the generator to stabilize it and further distribute it to consumers.
The main peripheral consumers of the scooter include:
- battery;
- indicators;
- light bulbs;
- sensors;
- enrichment agent;
- other nodes;
- starting enrichment.
How does the stabilizer work? The main principle of its operation is to act as a transformer, which lowers the voltage to an optimal level acceptable for the operation of electrical appliances, and also stabilizes the network and prevents unexpected power surges.
If the relay malfunctions, the scooter’s devices fail, quickly wear out or burn out.
To avoid these problems and their undesirable consequences, you should know the basics of the correct operation of the electrical circuit and voltage components of the scooter (Figure 1).
Signs that a check is needed
If the battery on your scooter often runs out, and it is still quite new, this means that there is a problem with the operation of the relay regulator. As practice shows, it burns out quite often. If the device is faulty, the battery stops charging completely and loses its capacity. This means you won’t be able to start the scooter with a button; you’ll have to start it with a kickstarter.
Another characteristic sign of incorrect operation of the device may be the frequent burnout of incandescent light bulbs. They themselves are durable and have a good durability, but are quite sensitive to voltage changes. This happens because the optimal voltage in the scooter network is considered to be 12-13 V. Increasing this value even by 2 V reduces the service life of electronics and components by 2 times.
The greater the deviation from the norm, the greater the likelihood that something will burn out in the scooter. Therefore, when starting the scooter from the starter due to a power surge and a faulty relay, the bulbs usually burn out.
Signs of a malfunctioning regulator are identical for all models of Chinese scooters. They are especially typical for charging relays for scooters of Chinese models with an engine capacity of 50 cc. Therefore, before making a decision to replace something in electronics, testing systems and devices should begin with the relay regulator.
How to check PP with a multimeter on a moped?
The relay regulator on a Chinese scooter is checked using a multimeter with a voltmeter function. For this purpose, a simple DT-830 (or equivalent) is usually used. It is better to carry out diagnostics and measurement of output voltage with the device removed.
Verification algorithm:
- You need to unscrew the fairing with the central phase and find on the frame a device with 4 wires: red, green, yellow and white.
- Then start the scooter and check the voltage at idle: measure it between the green and red wires, setting the multimeter to the maximum value of 20 V.
- If the multimeter display shows a figure of 14.6-14.8 V, this is normal. For stabilizers on Chinese mopeds, this is the operating standard voltage. If at idle the multimeter shows a value of 15-16 V, this is a high voltage indicator. This indicates a malfunction of the relay regulator.
- Then you need to check the voltage supplied to the lighting lamps. An alternating voltage is supplied to the central low beam (high beam) lamp, so the multimeter should be switched to the alternating current measurement mode with a parameter of 20 V.
- Next, we measure the voltage between the green and yellow wires (green is the general electrical network of the moped). If the multimeter shows a network voltage of up to 12 V, then the electrical appliances are operating without additional load.
- If at idle this value is 16 V or higher, and with a sharp increase in engine speed it jumps to 25 V, the device does not stabilize the voltage and, therefore, does not work. With such readings, the device must be replaced with a new one.
Using a multimeter, the relay regulator is checked on a Chinese scooter.
On 4T scooters, the relay regulator is checked using a tester. Typically a mechanical tester is used for these purposes, although there are also electronic models.
In order to take a measurement, you need:
- switch the device to the “KiloOhm” mode and remove the regulator;
- then place the probes on the first pair of terminals (AB). The tester should show a value of no more than 18 kOhm;
- after that, we change the position of the probes on the terminals in the opposite direction (VA) and measure the voltage again - the arrow on the device should show 0;
- then we install the probes on the next pair of terminals (SD) and measure the readings on this pair;
- swap the probes (DS) and measure the indicator again;
- the remaining measurements have no contact and are not checked. The indicator when checking them should be zero.
In this way, regulators are tested on popular Japanese models with small engine volumes from brands such as Honda (Leard, Dio, Tact), Suzuki, Yamaha.
Replacing a faulty relay regulator on a scooter is not difficult.
How to replace a faulty relay regulator on a scooter?
If the charging current is not supplied to the battery contacts when the generator is working properly, the stabilizer needs to be changed. Replacing it yourself is not difficult.
To do this you need to do the following:
- Place the scooter on the central support.
- Find the location of the device in a specific moped model. If you can’t find it right away, you can use the instruction manual.
- Dismantle the cladding. Depending on the moped model, the stabilizer may be located on the front (under the front plastic), in the rear, or under the seat. In this case, the underseat space is removed along with the seat.
- Unscrew the device from its seat while maintaining the fasteners. As a rule, the relay is attached to the scooter frame with a bolt, or less often with a self-tapping screw.
- Disconnect the connector and secure the new regulator with the fastener. The installed device must have a pinout and connector similar to the one replaced, and be suitable in terms of parameters for this particular scooter model.
- Connect the relay-regulator on the scooter to a standard connector and assemble the remaining spare parts in the reverse order of disassembly.
How to choose a charger
The memory must be automatic, with the following capabilities:
Charger for gel battery/
- adjusting the charge current and voltage so that the gel filler maintains its condition;
- temperature compensation function - the battery heats up during charging, and it is important that the charger adjusts to the ambient temperature;
- operating range – from -5 to +40°;
- Gel batteries are charged in several stages, adjusting the parameters and monitoring the temperature. The charger must be able to adapt itself to this process.
“Smart” chargers with multiple modes have excellent protection, even against reverse polarity.
Is it possible to charge with a regular charger?
Many people are interested in this issue, and it should immediately be noted that an individual approach is needed to liquid and gel electrolytes. You can charge, but even with small deviations in the parameters, the helium will simply melt and cannot be restored. Accordingly, the battery will also suffer.
What problems can you encounter when using a conventional charger for charging:
- the charge will stop supplying once the 90% mark is reached (it is recommended to fully charge the battery to ensure it lasts longer);
- the battery simply will not be able to accept the currents that conventional charging produces;
- you will have to control the entire process, from start to finish, as you may need to abruptly turn off charging;
- The battery may overheat, and this is critical.
When connecting a gel battery to a conventional charger, you must be prepared for the fact that it may heat up. Experts do not recommend doing this, and this variety is far from cheap.
How to make a relay regulator with your own hands?
To make a relay regulator with your own hands, you need a diagram and a little knowledge. The model of a homemade regulator is based on the principle of disassembling the generator and outputting a separate end of the wire from ground.
As a diagram, you can take the relay-regulator connection diagram (Figure 3), and on its basis assemble a single-phase generator.
To collect the stabilizer you need:
- disassemble the generator and remove the stator from the engine;
- then you need to unsolder the ground from the generator, solder a separate additional wire for the winding to it and bring it out. This wire will be one end of the winding. The second end is the generator wire;
- After removing the wires, you need to reassemble the generator in reverse order.
With this device, the generator has 2 wires (there should be 3 in total). You can connect the stabilizer according to this scheme:
Do-it-yourself relay-regulator manufacturing diagram
At the end of the process, you need to connect the yellow wire from the old regulator to the “+” terminal in order to obtain a constant voltage on the sides of the network. Check the resulting voltage regulator on the scooter. At this point, the process of creating a homemade device can be considered complete.
The relay regulator is a very useful thing and necessary for the normal operation of the moped. However, it requires attention and constant monitoring of its work. Therefore, if the device fails or its performance is unsatisfactory, it is better to replace it with a new one, the cost of which today ranges from 300 to 500 rubles.